Second Opinion: Implants
Is your implant reconstruction failing or giving you problems? It may be a single implant crown that has started to look wrong, or a full upper or lower arch that breaks, moves or never felt right. This chapter sets out what goes wrong, what is normal while you adjust, and how Dr. Reshad works out why it happened.
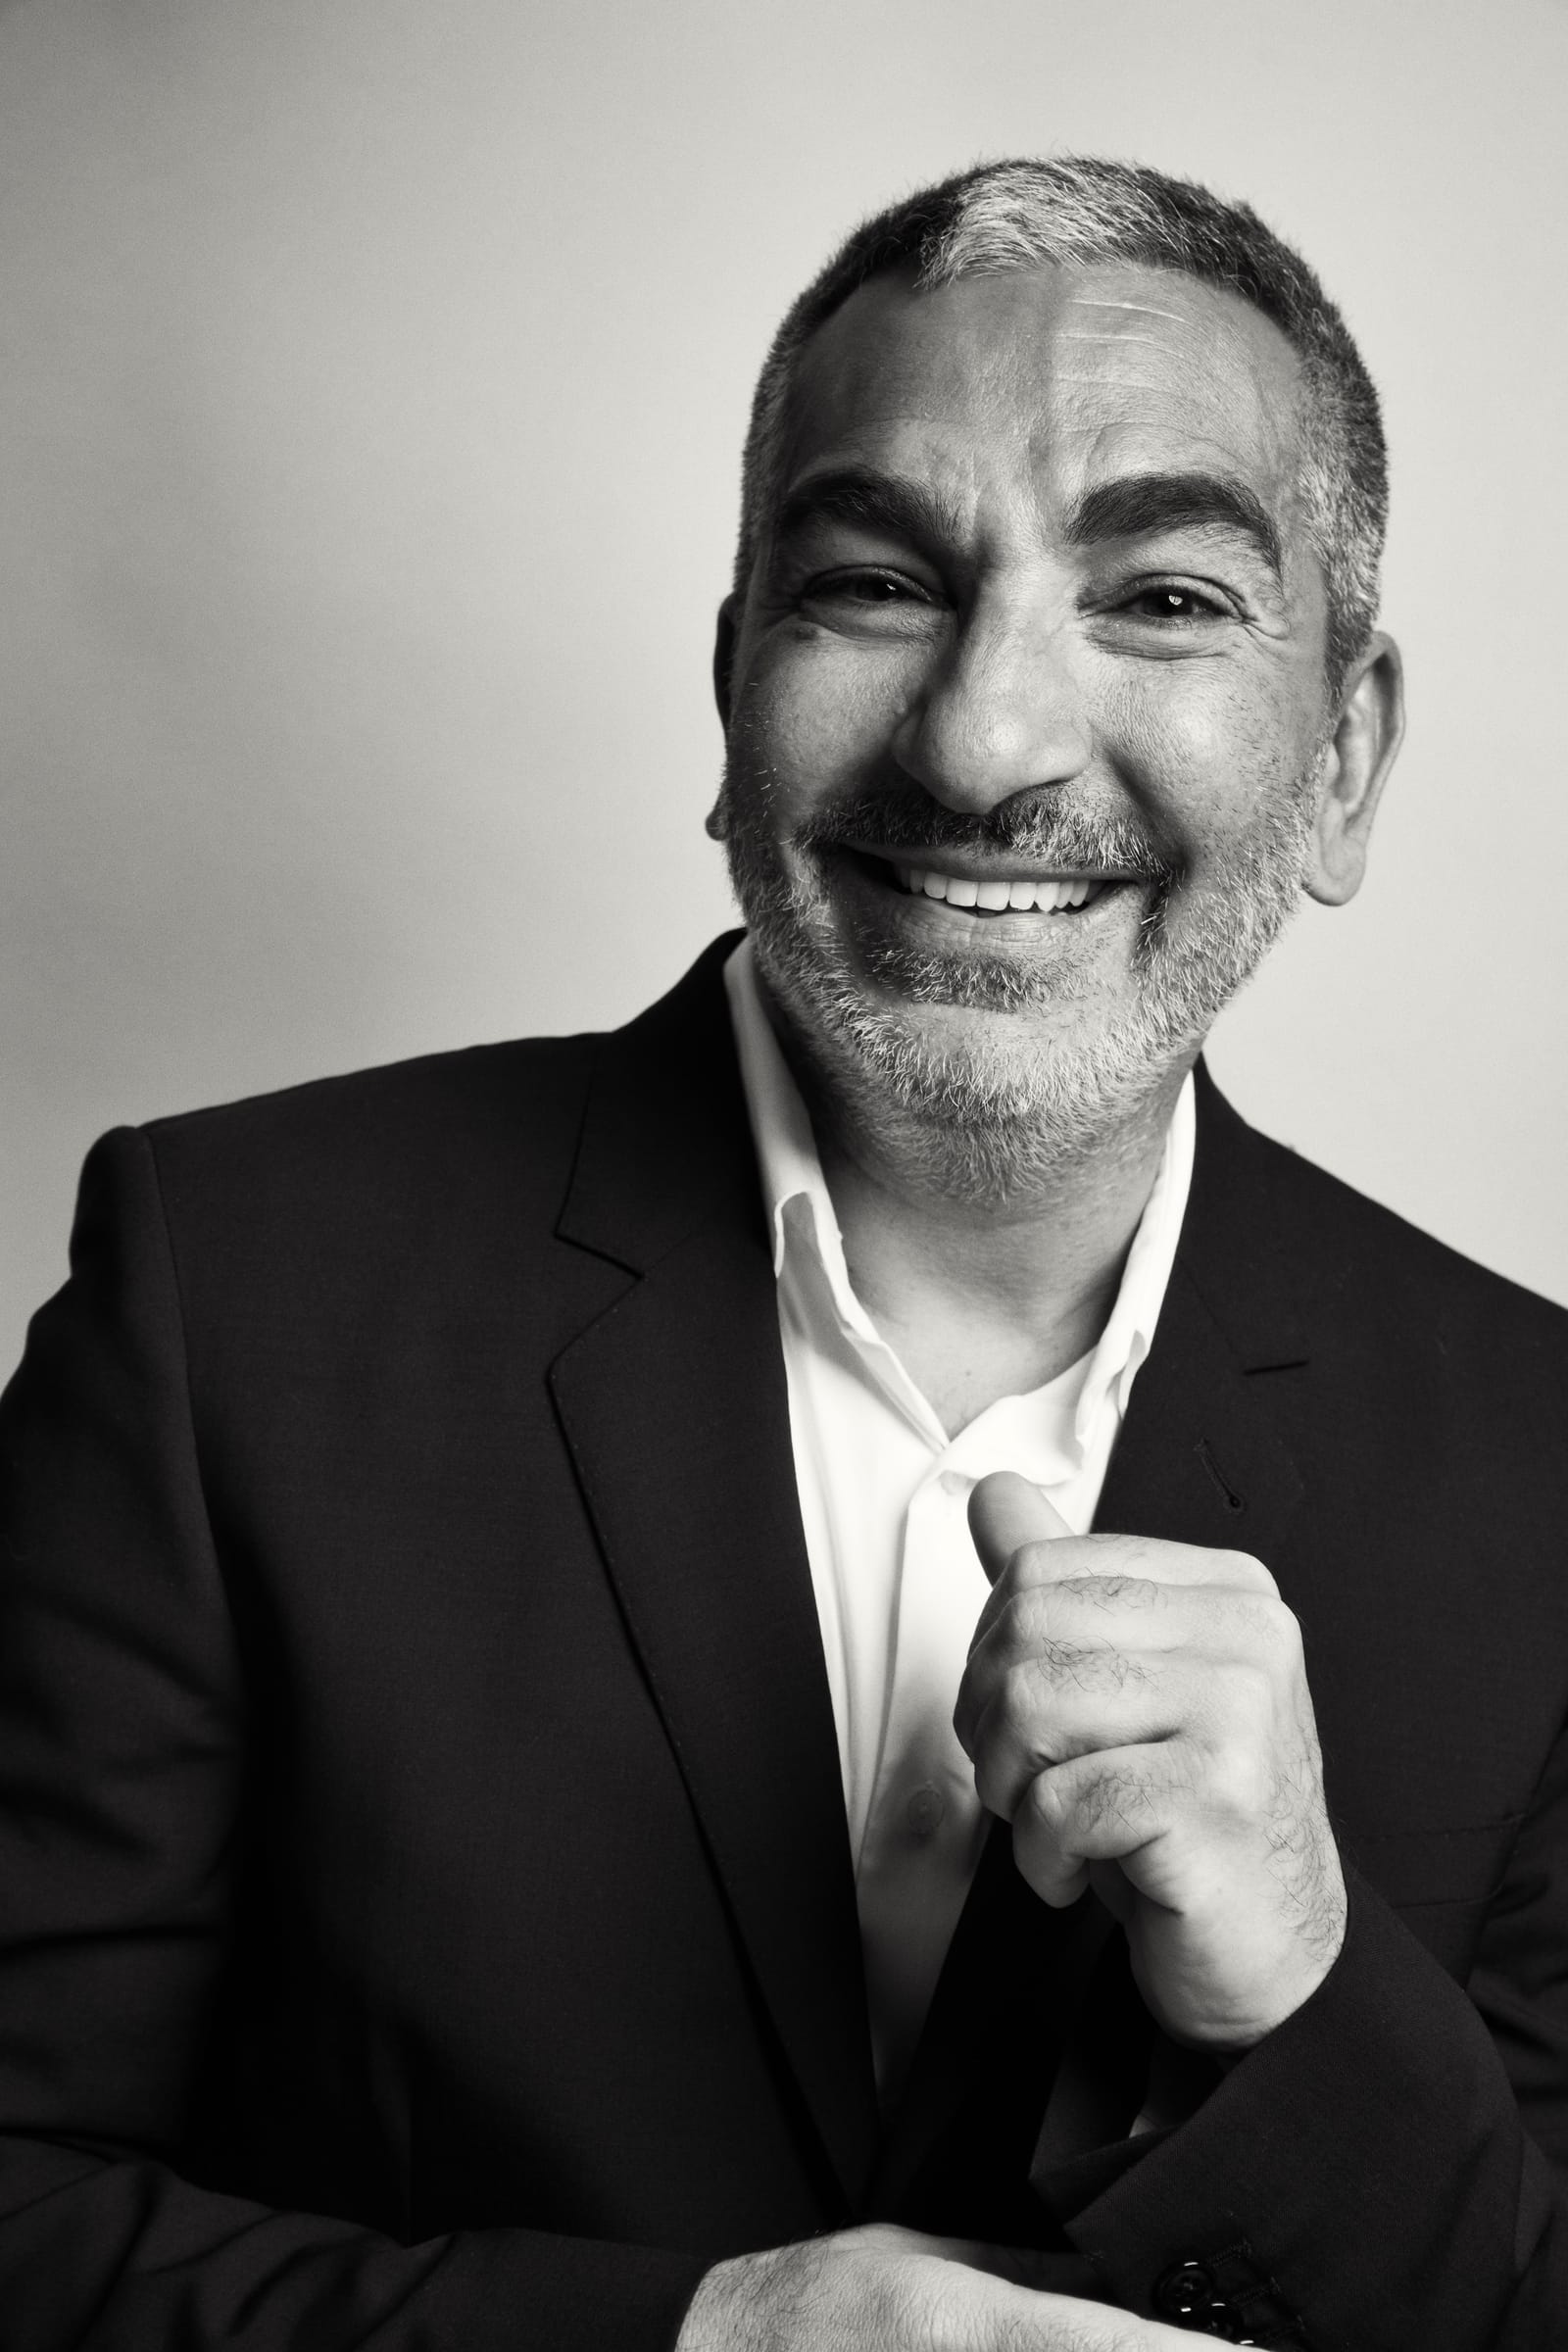
Which one of these is it?
It may be one tooth, one implant, or a whole mouth of work. All of it belongs here.
Choose what you are noticing. Each one says what it can mean, whether it is part of settling in or worth having looked at, and where on this site it is explained in full.
It's my lip
The lip looks unsupported or pushed out, or a line where the pink ceramic meets your own gum shows when you smile. Both come from where the teeth and the gum were placed relative to the lip.
Worth a look. A visible seam or a collapsed lip is a design problem, not something that settles.
Placed young, failing twenty years on.
A single implant placed in the late teens can look very different twenty years later. The jaw and face keep changing; the implant does not move with them. Gum recedes, the crown sits higher than its neighbours, threads begin to show, or the bone around it starts to go.
Fixing it properly is rarely a matter of a new crown. It usually means rebuilding the gum, the bone and the tooth, and making all three match the teeth beside them. Before any of that, the questions that matter are why it failed, what caused it, and how to do it right this time so it does not fail again.
The maxilla fails in five places.
When an upper-jaw reconstruction fails, it fails in one of these five places.
- 01SpeechMove the teeth and S and F change. Patients notice it first.
- 02The lipSupport and mobility decide where the teeth go.
- 03Transition lineWhere prosthesis meets tissue. If it shows, it fails.
- 04FormEmergence and tissue contact. Wrong: plaque, odour, implant loss.
- 05MechanicsPosterior space, AP spread, cantilever and occlusion.
Diagnose first. Then choose: augment, resect or preserve.
What goes wrong, and how Dr. Reshad fixes it.
Three of those five places, shown on real patients: what the failure looks like, what was done about it, and the result.
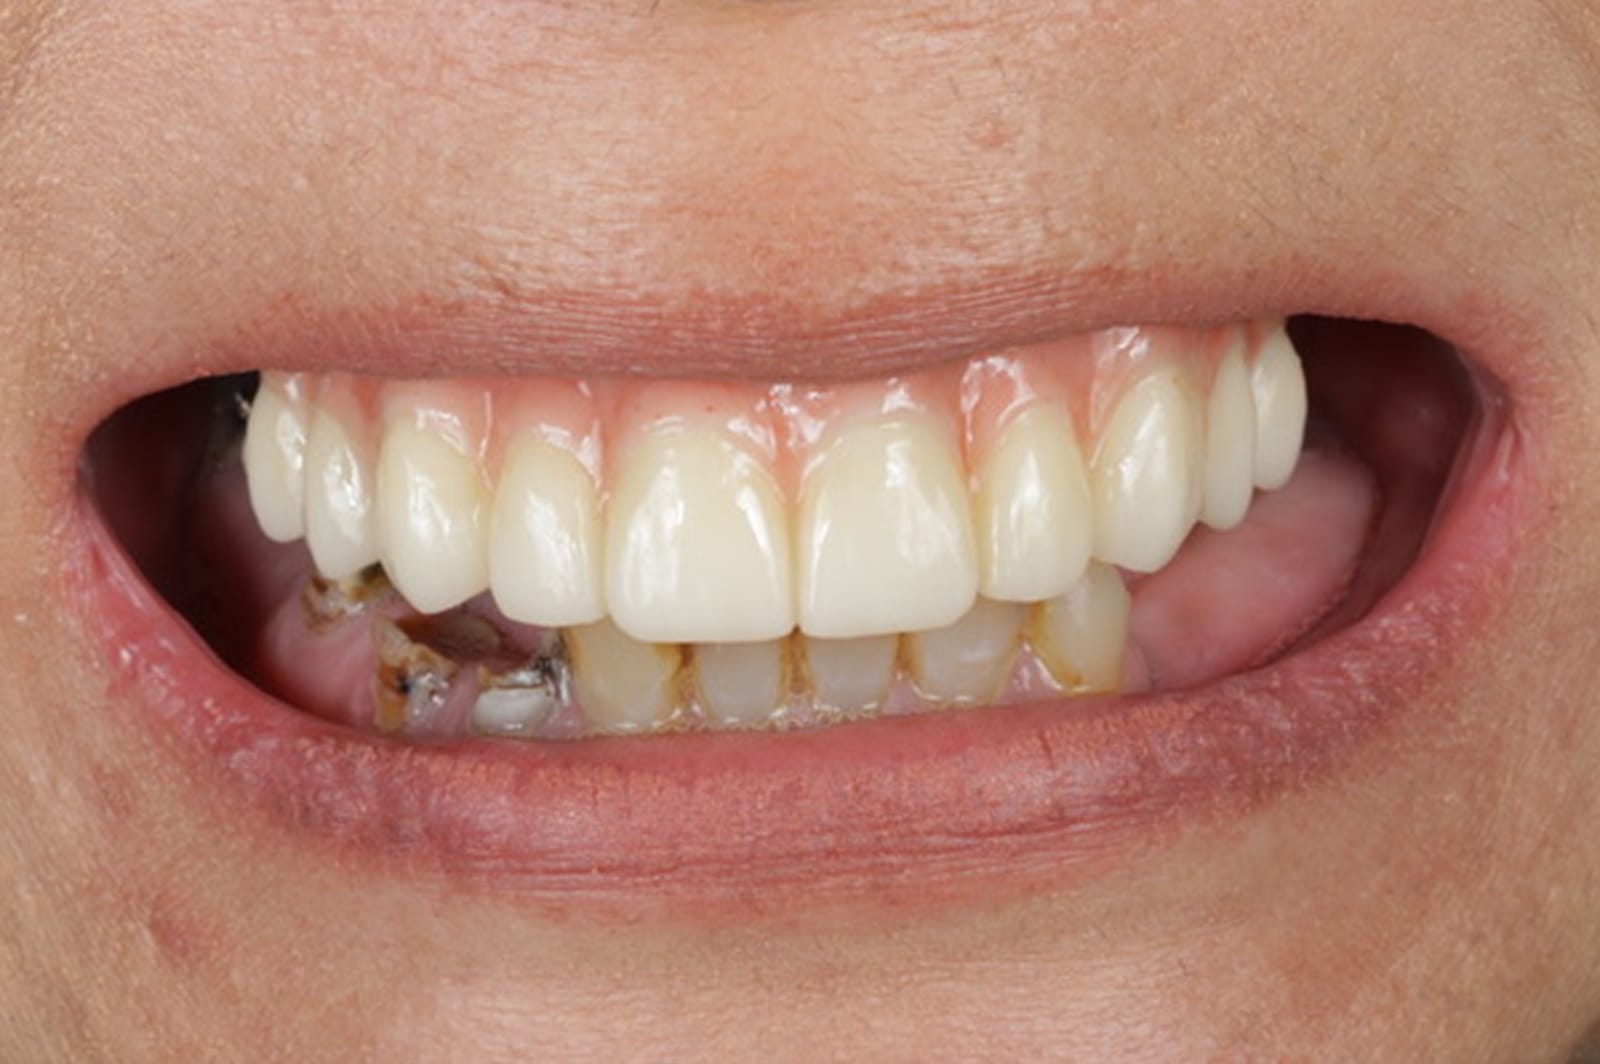
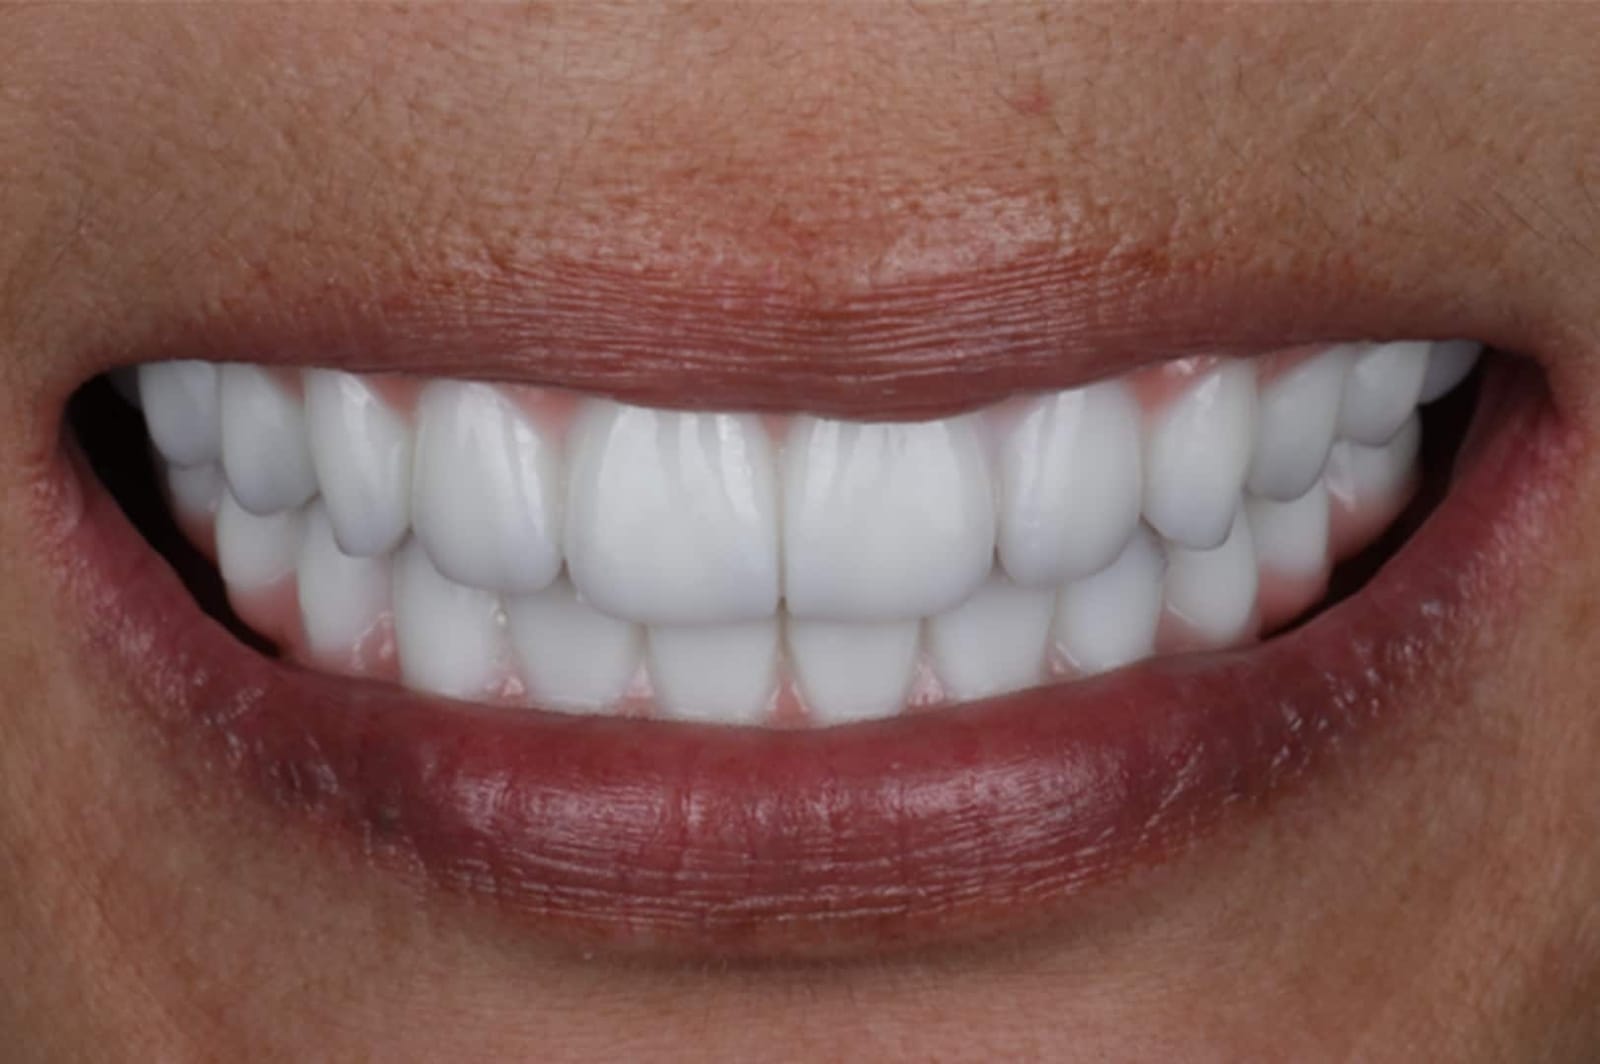
A line across the smile, where pink ceramic meets the patient's own gum, on show every time they laugh. The seam cannot be masked. It can only be hidden under the lip.
Dr. Reshad reads the lip before anything else is planned: how far it lifts at a full smile decides where the seam may sit. In a revision, the new teeth are designed so the join sits under the lip.
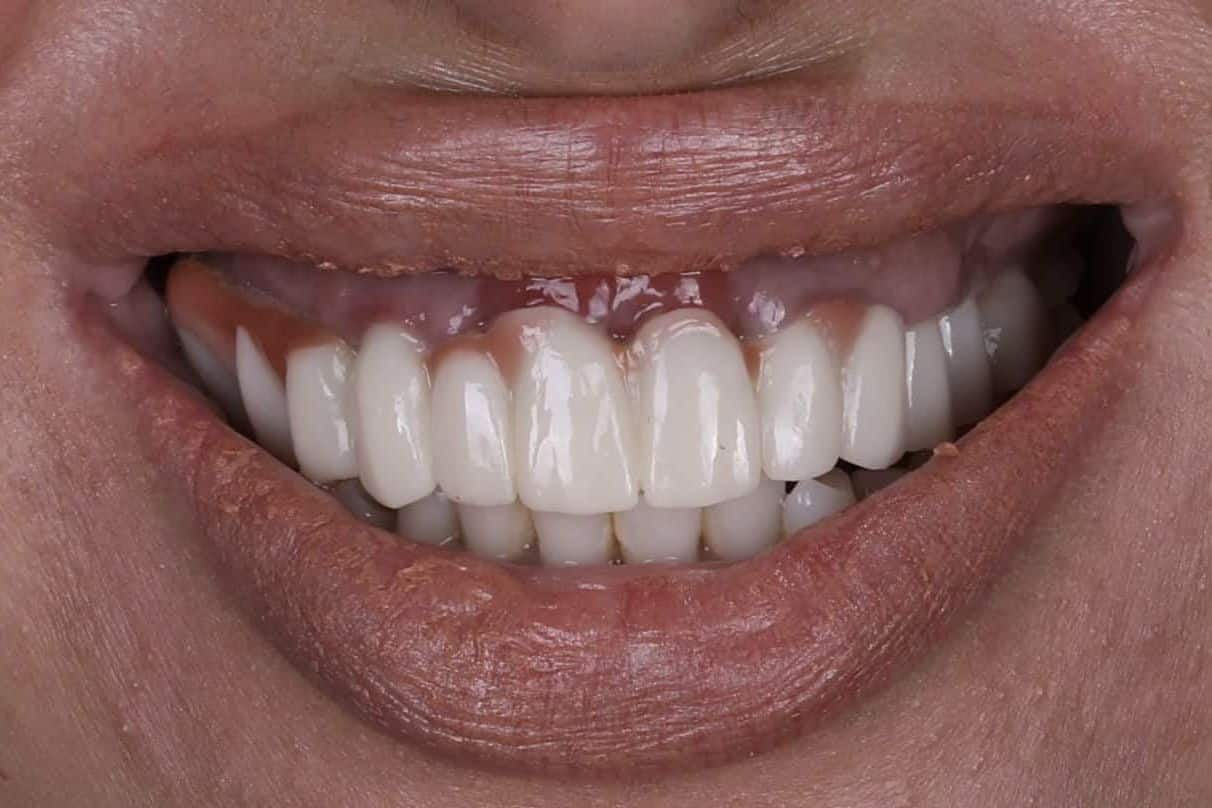
The join in plain view at full smile.
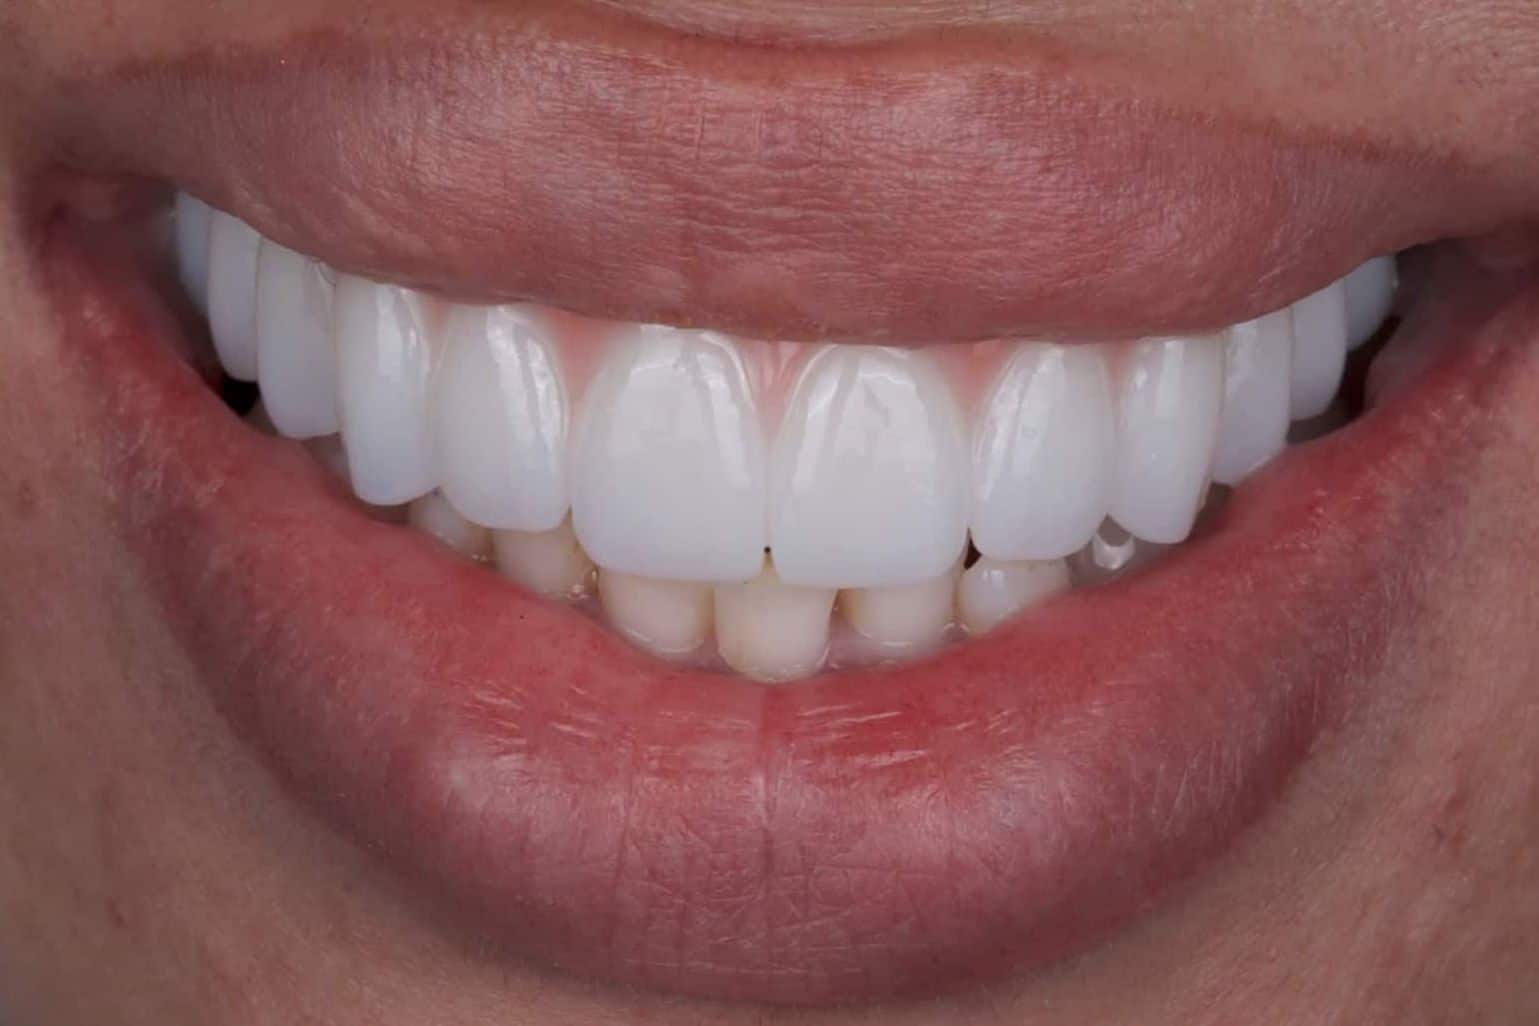
Rebuilt: the join under the lip.
A soft S on the phone. An F that will not land. Move the teeth and S and F change, and patients notice it first.
The sound points to the part of the prosthesis that needs changing. The upper edges are set against the lower lip, tested in the chair with “fifty-five”, proved in the temporaries, then copied.
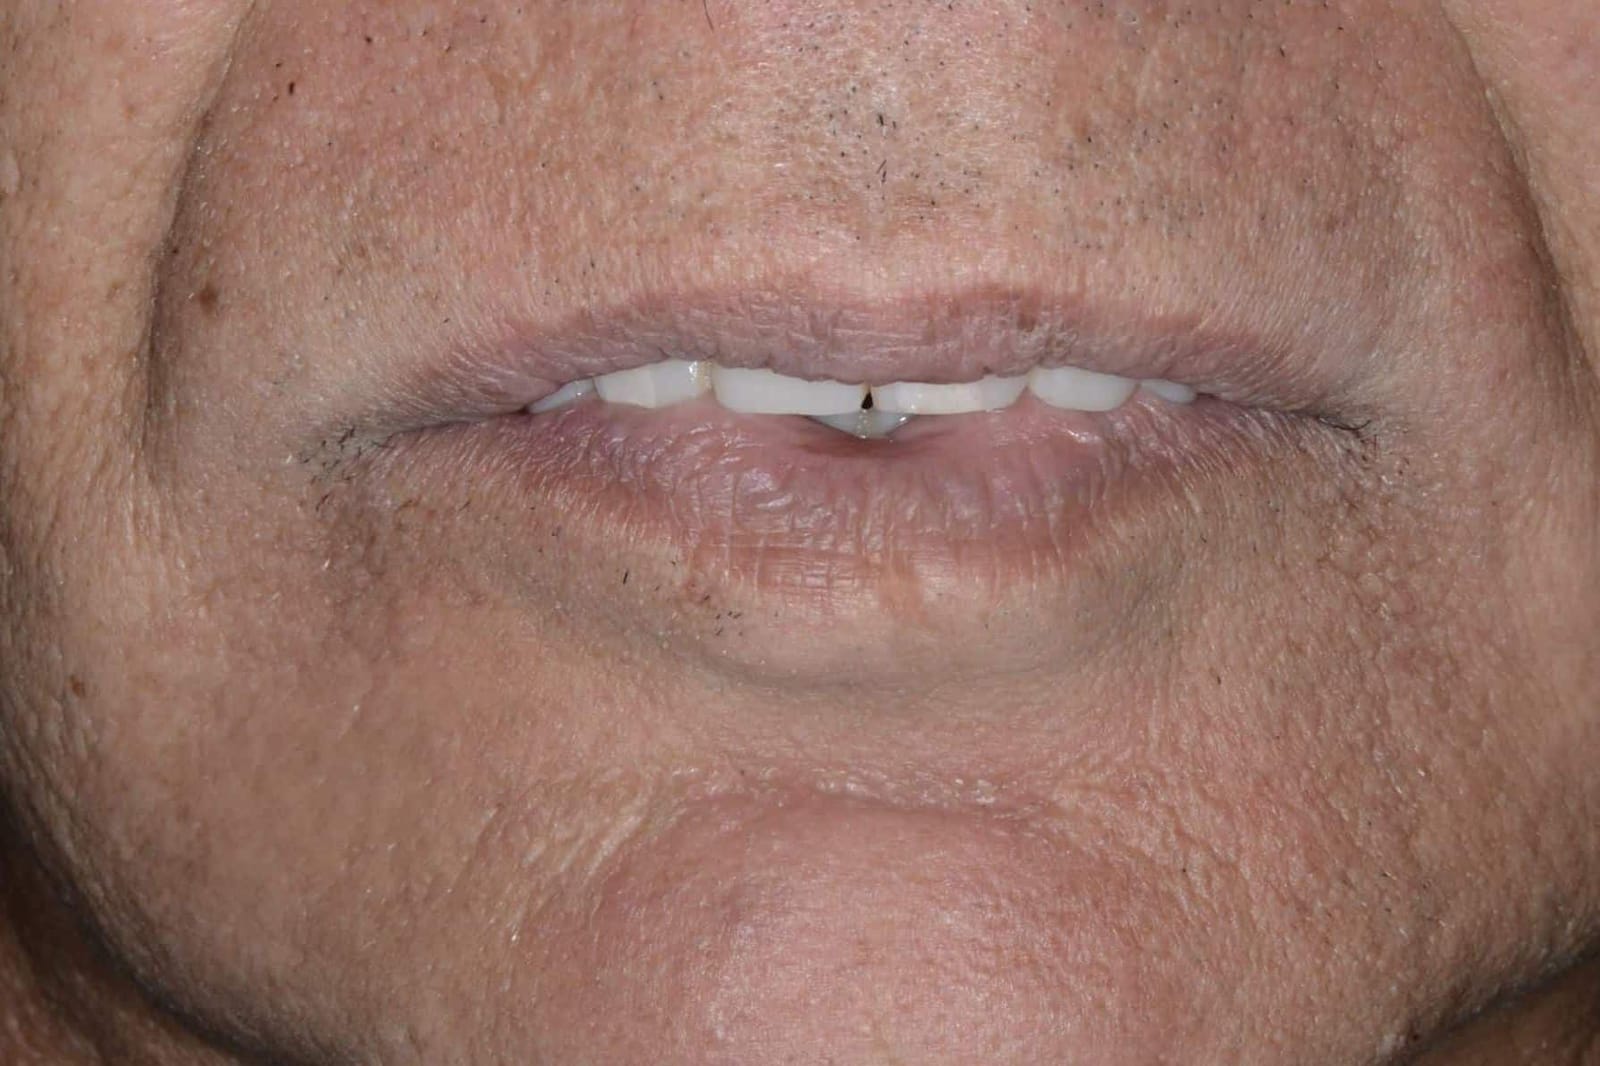
The upper edges sit outside the lower lip.
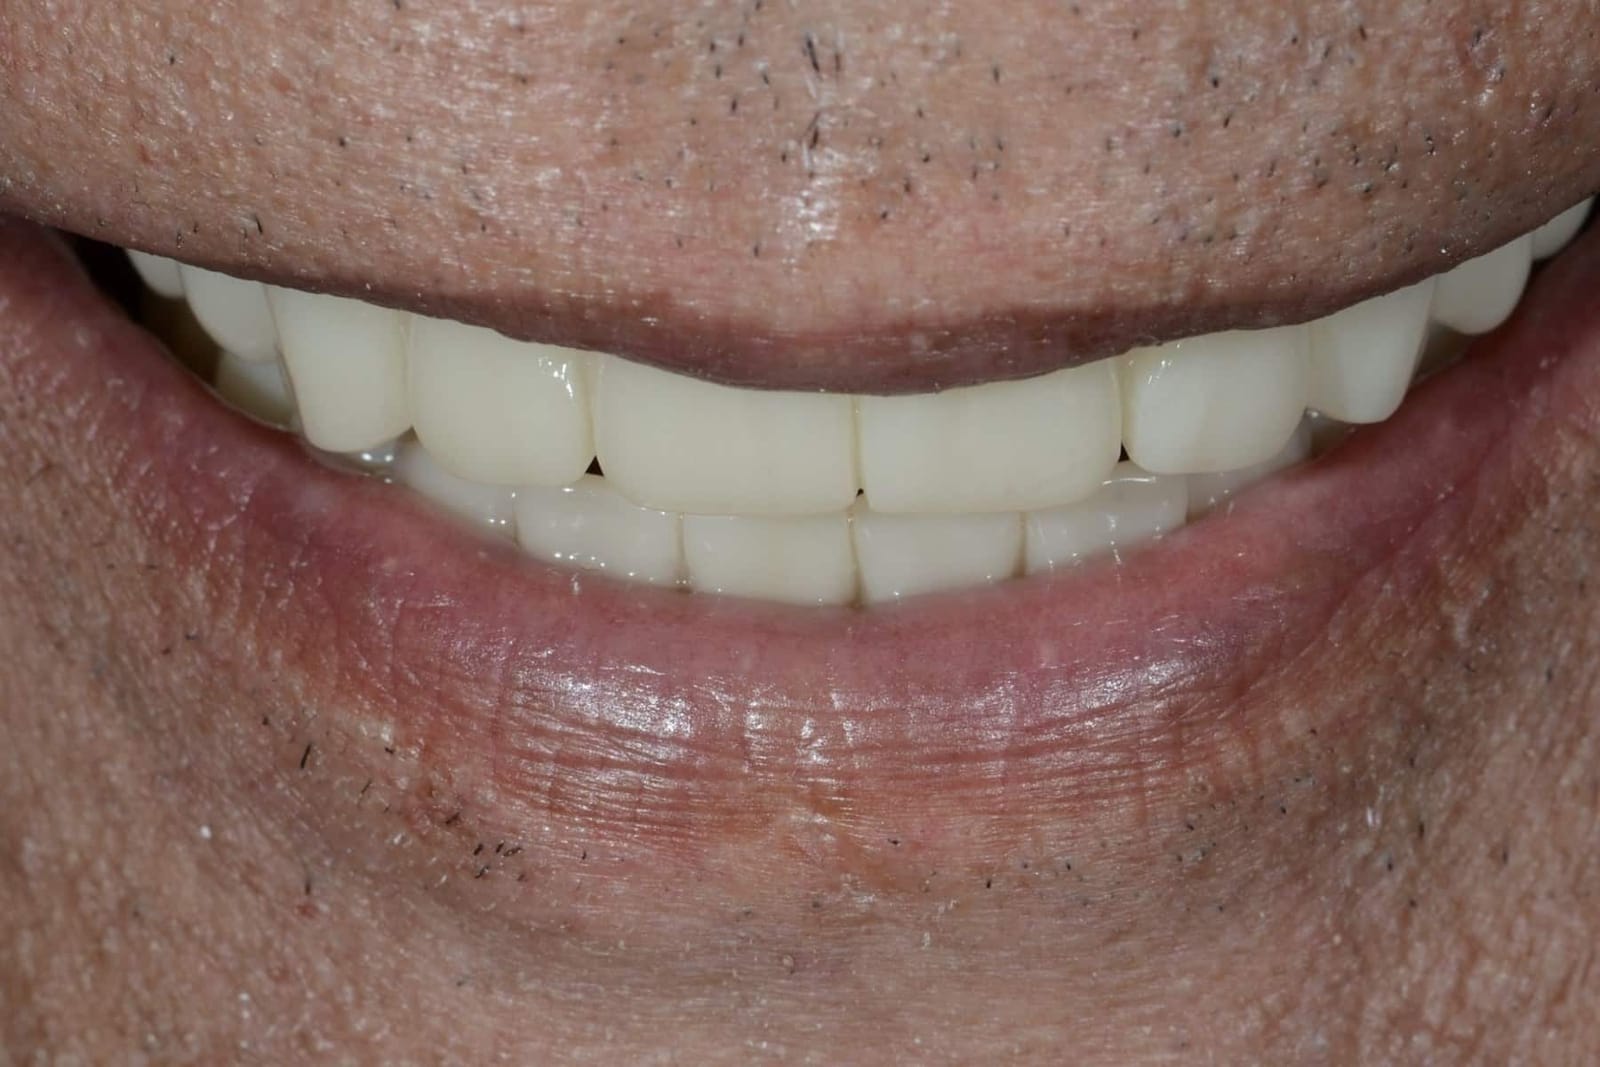
The lip closes in front. F and S came back.
Screws loosen, porcelain chips, frameworks crack. These are rarely one bad bite. They trace back to cumulative force: a bite that has collapsed, with nothing at the back to stop it, drives the lower teeth up the backs of the uppers with every movement.
The bite height is restored, the overlap is gentle, and every tooth sits over support. The back teeth separate the moment the jaw moves, so muscle activity drops, and so does the load on everything.
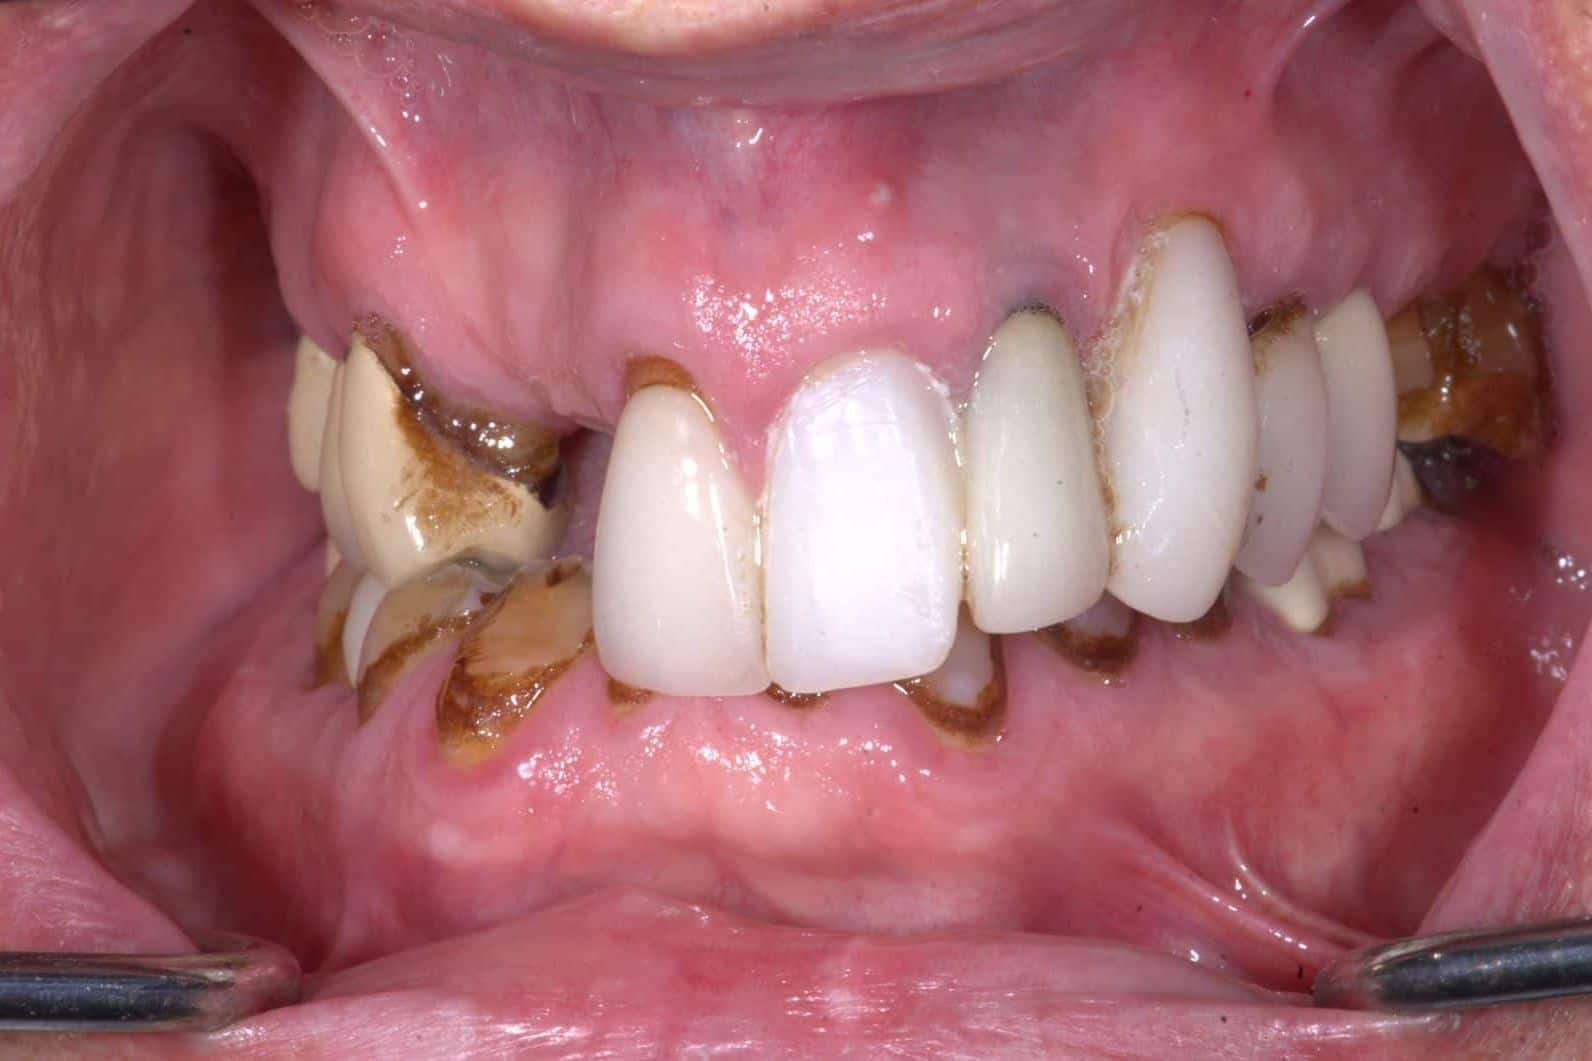
A steep, collapsed bite.
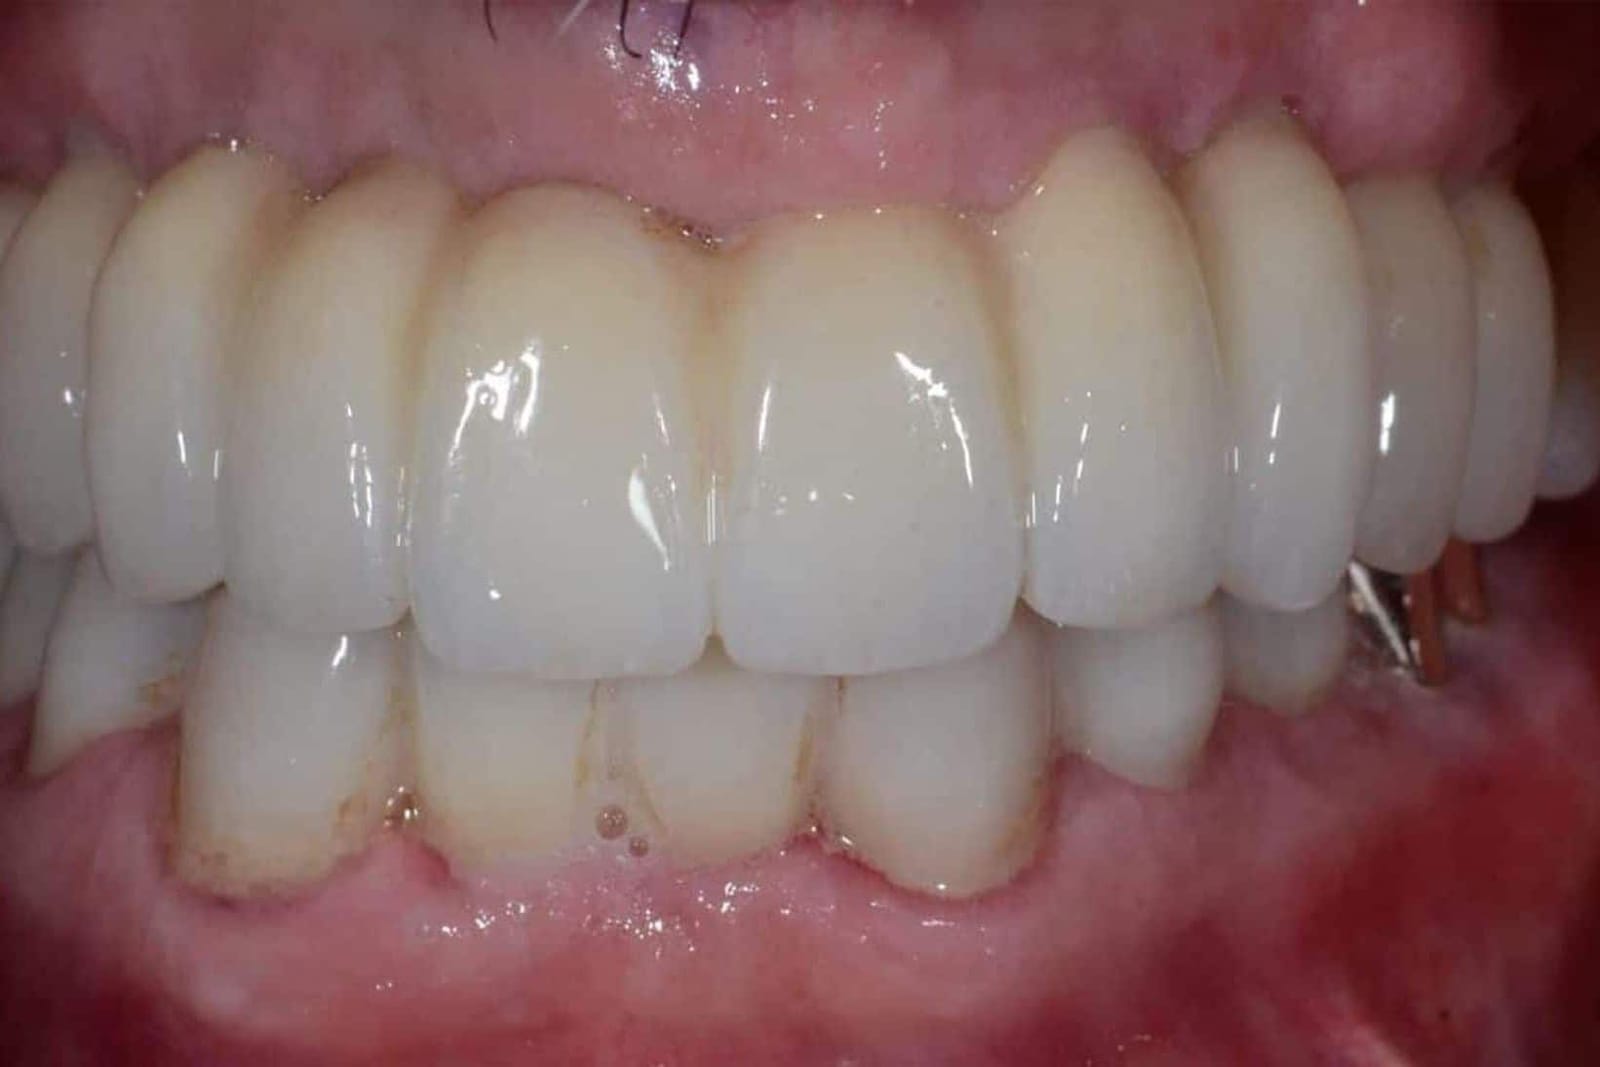
Corrected and shallower.
The shape of implant teeth is not cosmetic. It decides whether you can live with them.
Food that packs under the bridge. A lisp that never went away. Gums that bleed where the teeth meet them. A palate that feels like a mouthful of plastic. None of these are about the implants. They are about form: the shape of the prosthesis where it meets your lip, your gums, your tongue and your toothbrush. This is Dr. Mamaly Reshad's chapter on form, from the lecture he gives to dentists, written for the people who have to wear the result.
- 5 jobs
- every full-arch shape has to do at once
- 3 mm
- the ideal depth a tooth emerges from the gum
- Convex
- the only undersurface that stays clean
- Thin
- the palate that lets you speak
Form is where good work quietly fails. Not from carelessness, from compromise.
A full-arch prosthesis has to be strong, it has to hide the join between tooth and gum, it has to sit on implants that went where the bone allowed. Every one of those pulls on its shape. Thickness fights cleanability, a hidden seam fights a thin palate, an implant placed where the bone was fights an ideal emergence. The clinicians who built a prosthesis with form problems were usually solving a harder problem somewhere else. This is not a judgement on them. It is an account of what the shape has to achieve, so that if yours is failing you, the cause has a name.
Five jobs, one shape.
Dr. Reshad plans form against five requirements. A prosthesis that meets four and misses one is a prosthesis the patient complains about.
- 01EstheticsTooth position, length, proportion and the way the lip sits on the teeth.Does it look like you
- 02EmergenceHow each tooth rises out of the gum: depth, angle and the line it makes.Does it look grown, not placed
- 03Tissue contactWhere the underside meets the gum: convex, polished, lightly pressing.Does the gum fill to it
- 04Health and hygieneContours a brush, floss or water flosser can actually reach, every day, for decades.Can you keep it clean
- 05Palatal formThe inside surface: thin, smooth, shaped for the tongue. Speech and comfort live here.Can you talk and forget it
What we see when a prosthesis comes out for the first time in years.
These are not rare. They are the ordinary consequences of an undersurface that could not be cleaned, a bulk that was never thinned, or an implant exit that landed outside the tooth. The patient usually knows something is wrong. They often do not know it is the shape.
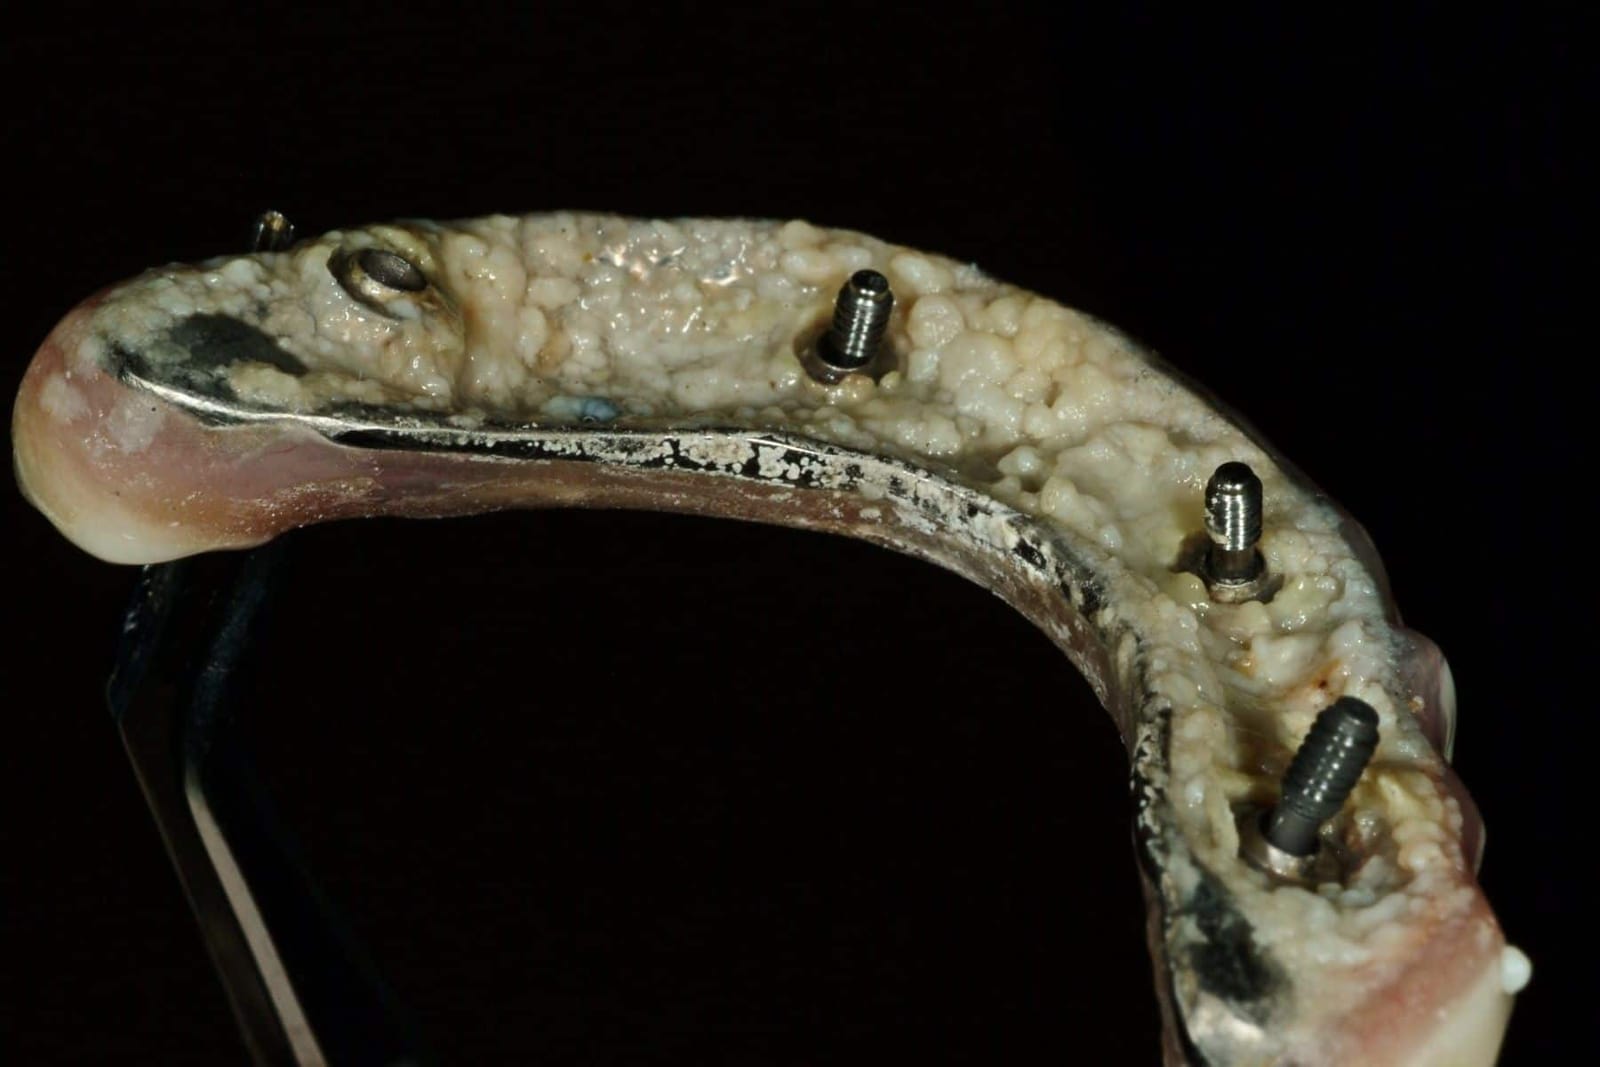
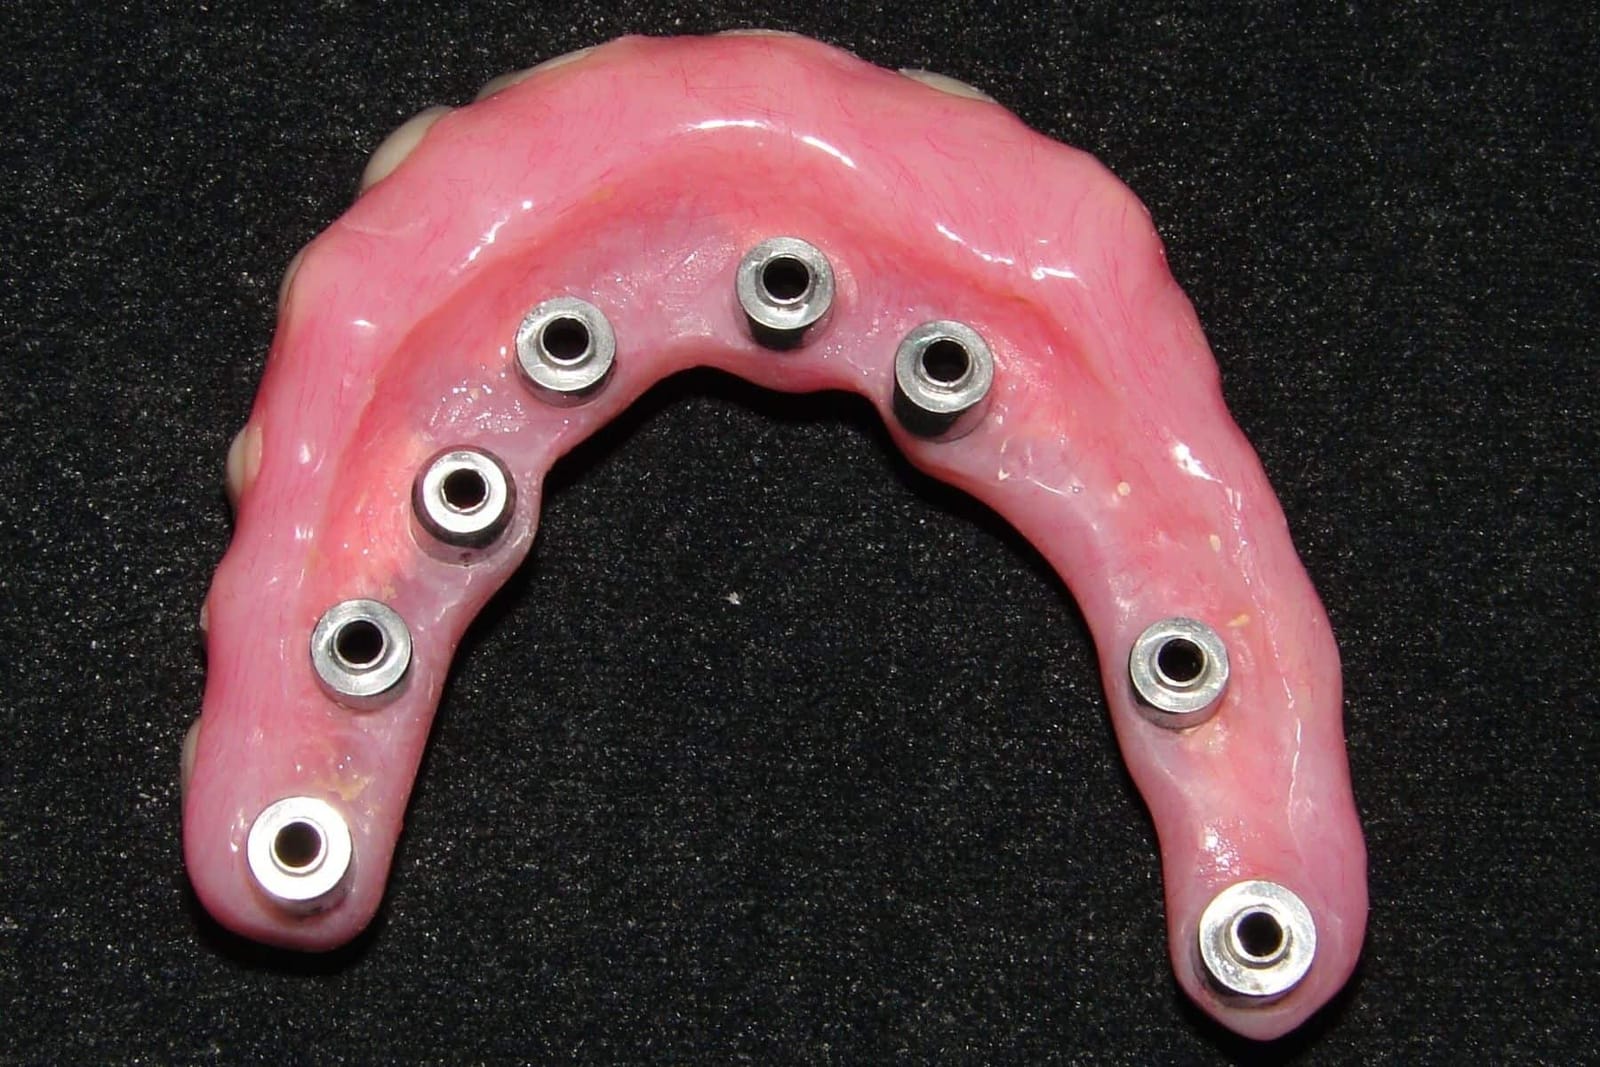
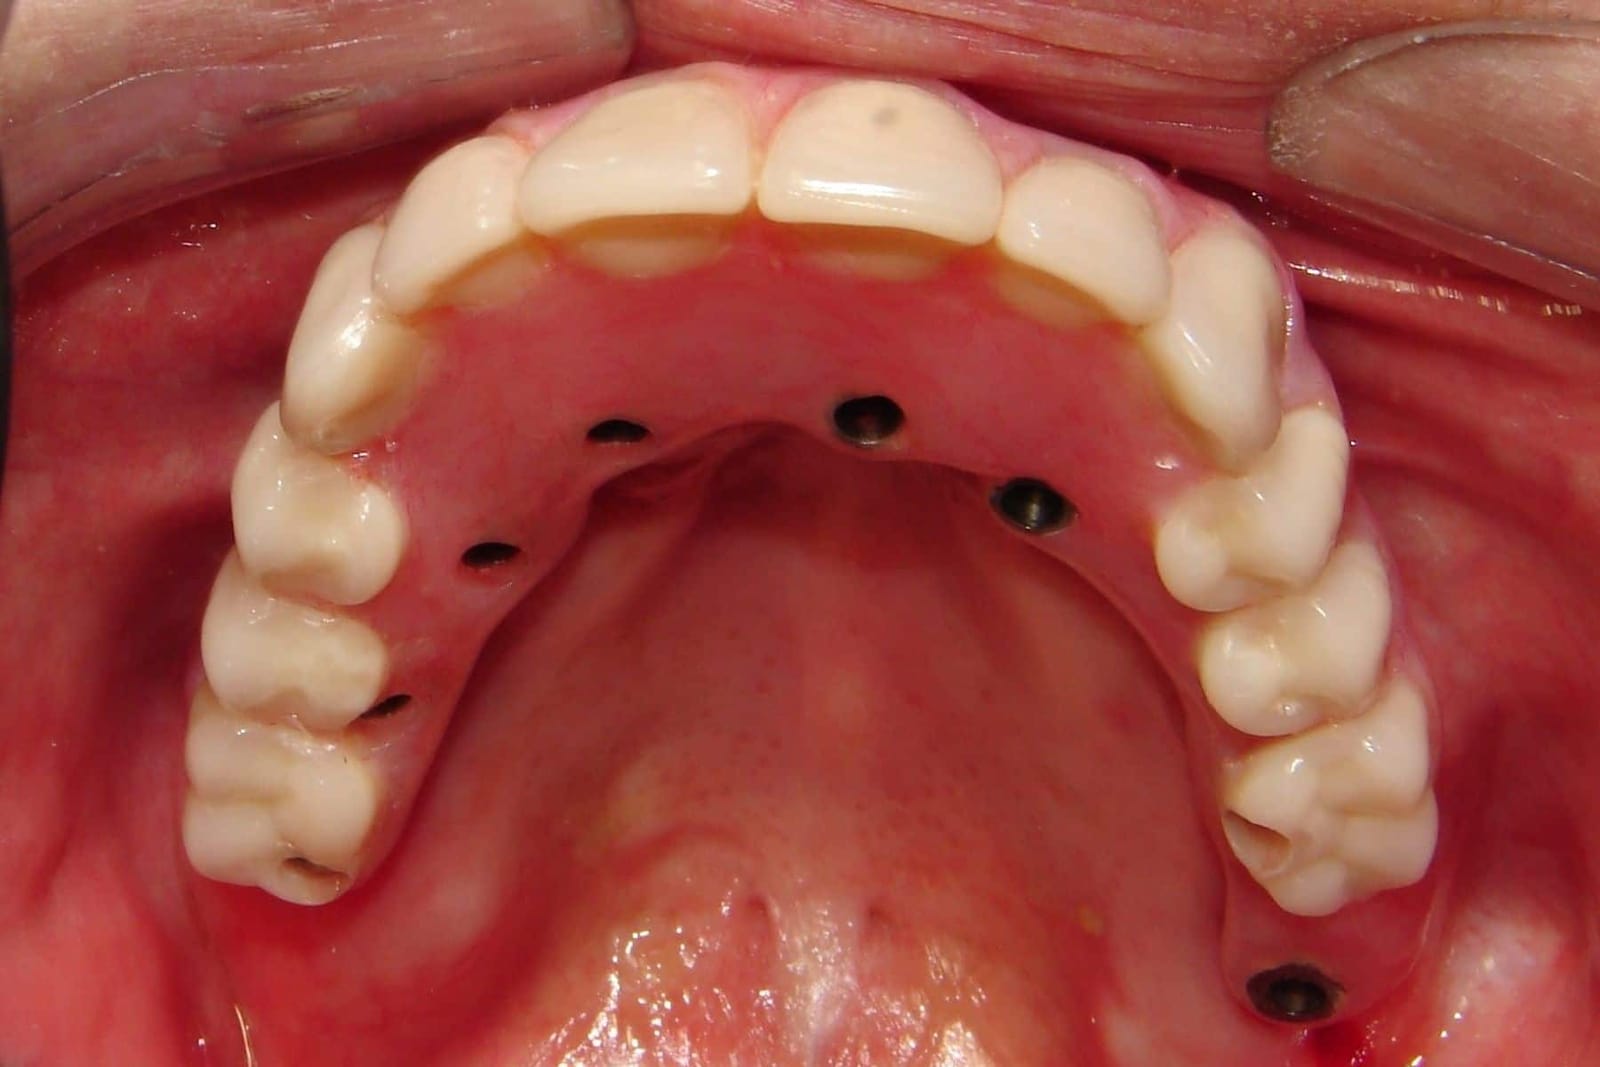
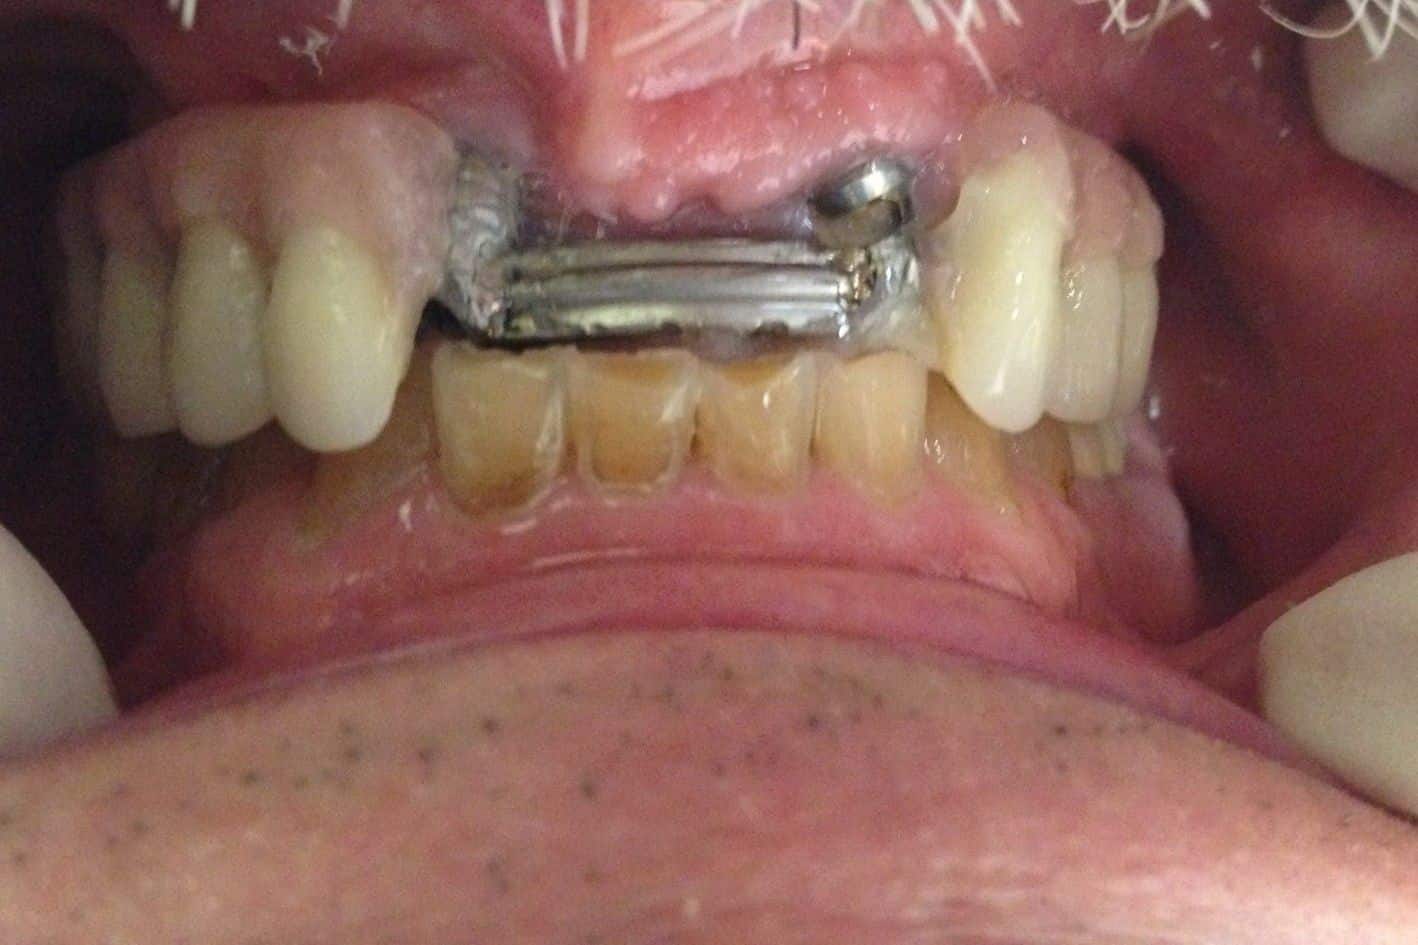
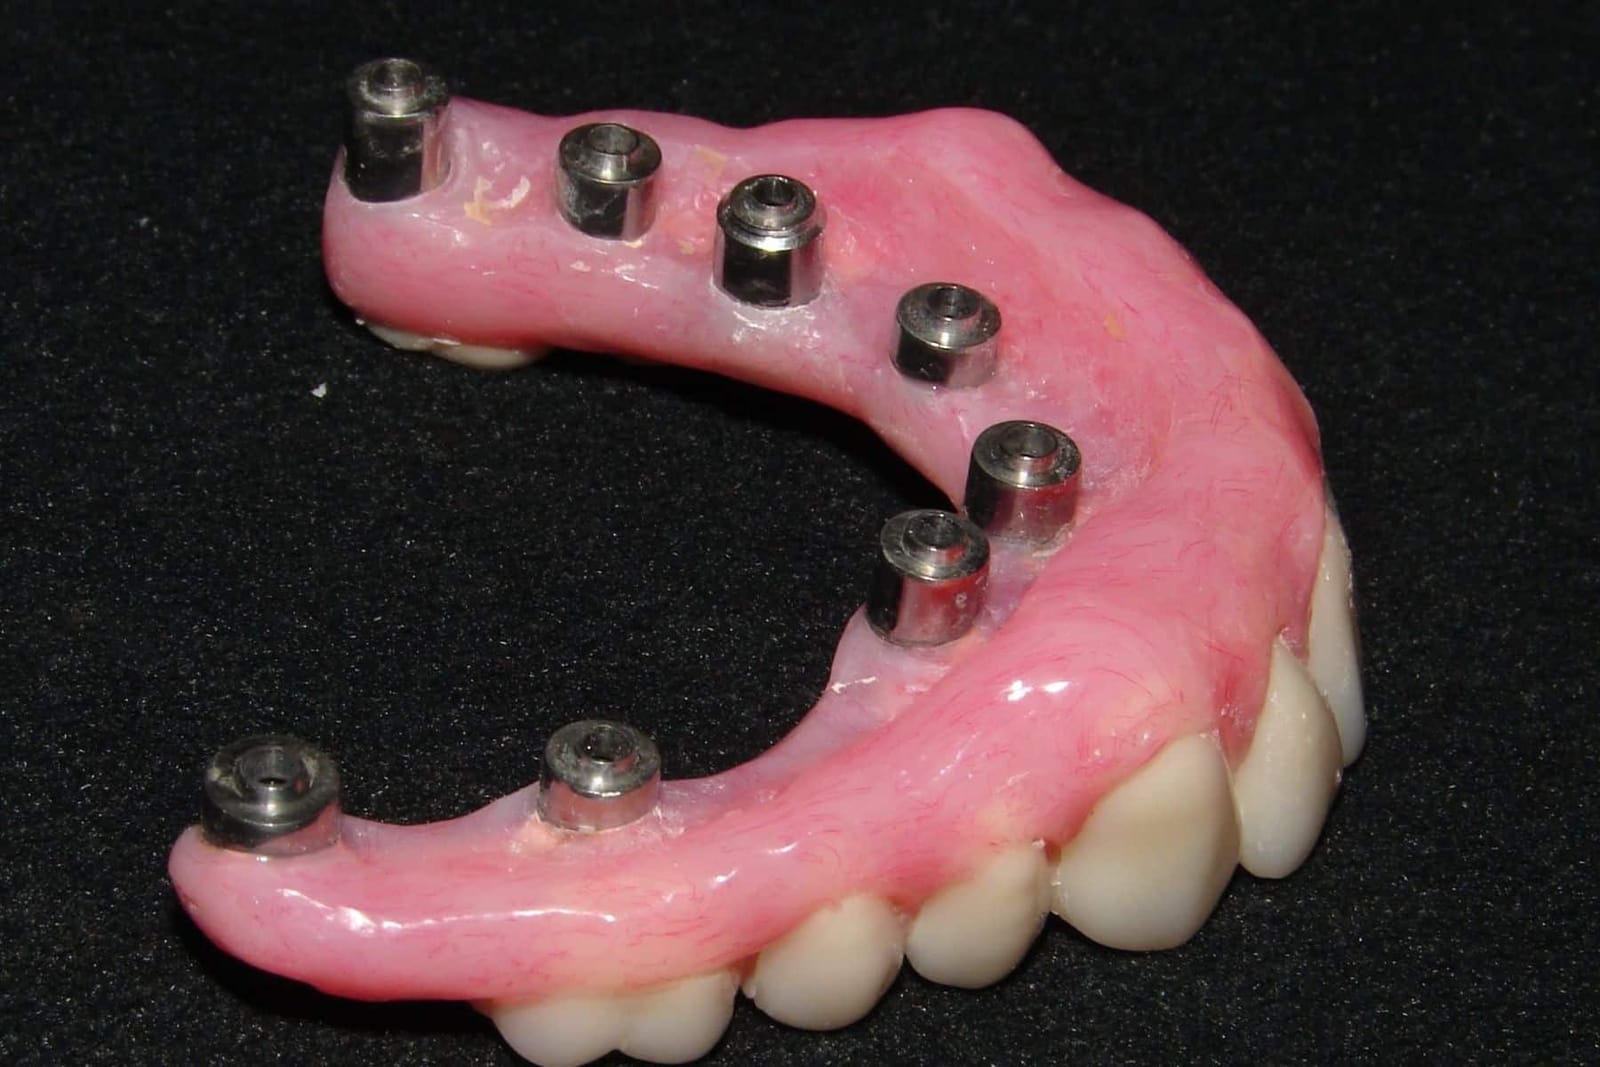
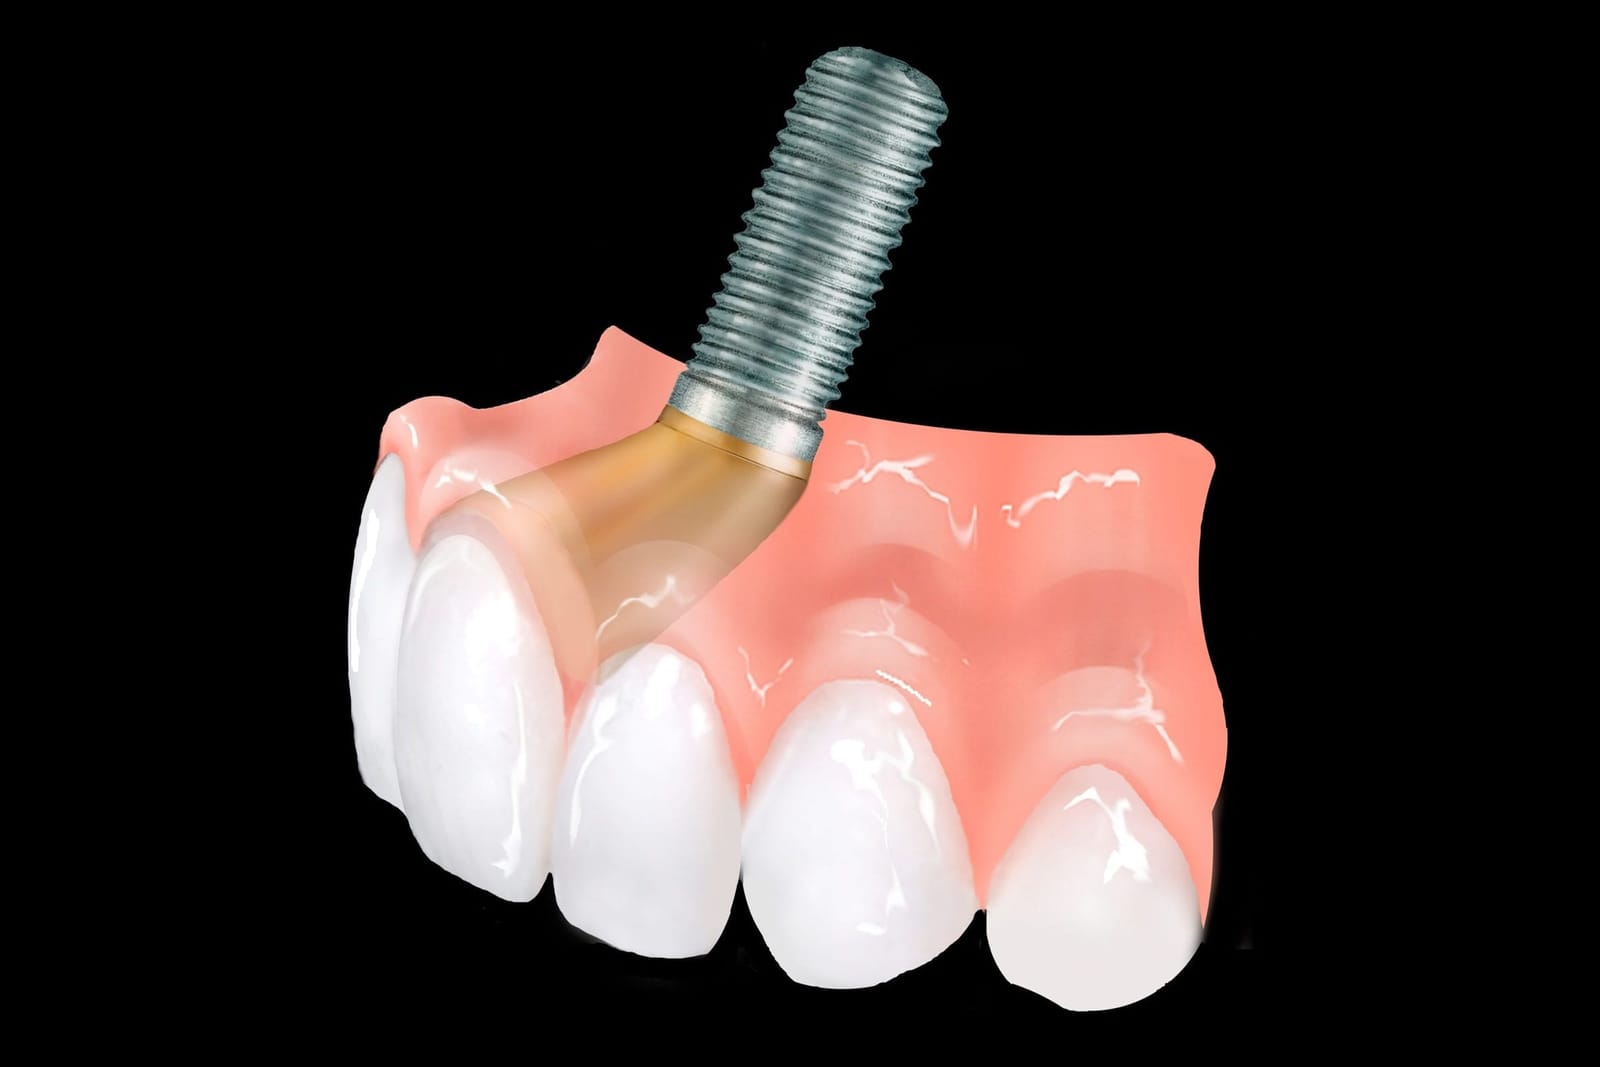
The mouth keeps changing. The prosthesis does not.
Bone and gum under an upper prosthesis remodel for years. A shape that fitted the tissue on the day of delivery can be sitting on a gap, or pressing a ridge, a decade later. That is why Dr. Reshad designs the tissue contact to be checked and adjusted, not sealed and forgotten.
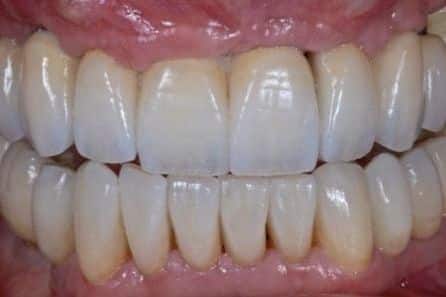
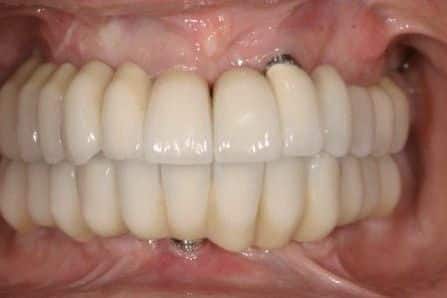
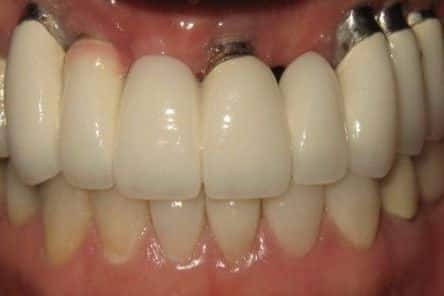
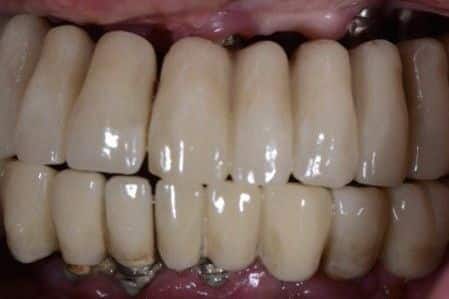
The teeth are designed first. Everything else is built to reach them.
Esthetic form starts with the incisal edge: how much tooth shows at rest, where it sits against the lip, the angle of the front teeth. From there come length, width, the gum line and the proportion of one tooth to the next. Dr. Reshad fixes all of this in a full-contour wax-up before any surgery, so the implants are placed to serve the teeth and not the other way round.
A prosthesis that was shaped after the implants went in has to accept wherever they exit. That is how teeth end up too long, too flat, leaning the wrong way, or with a screw hole through the front of an incisor.
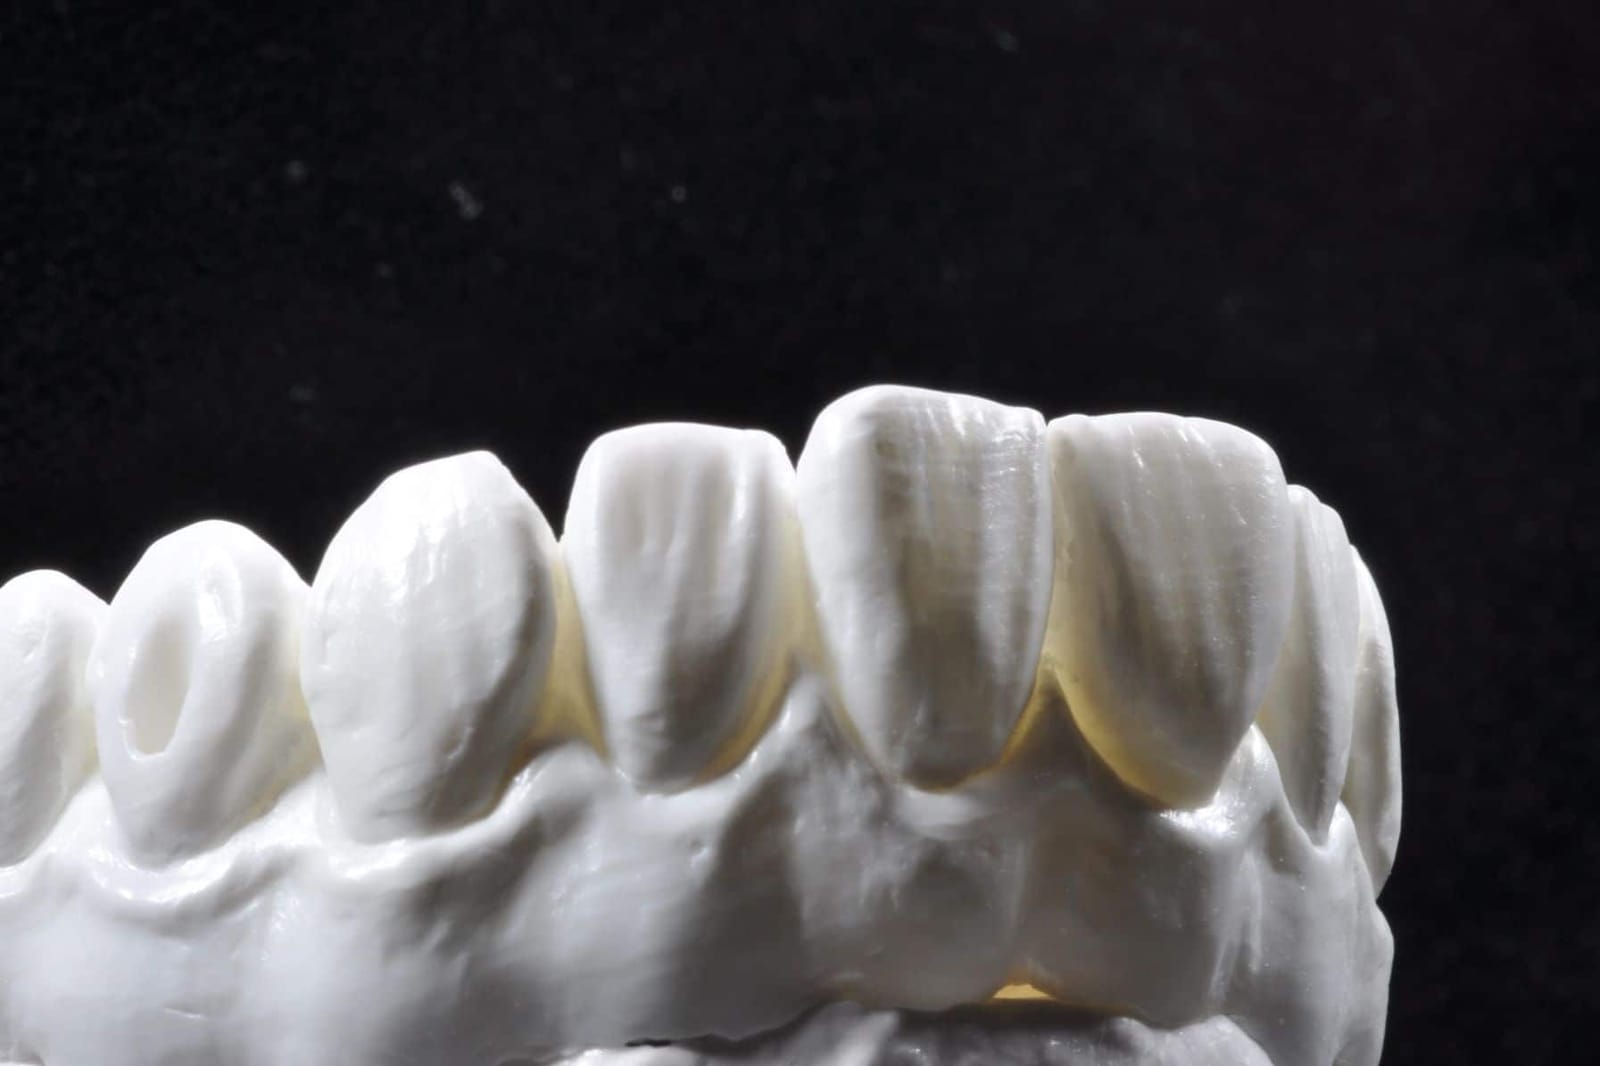
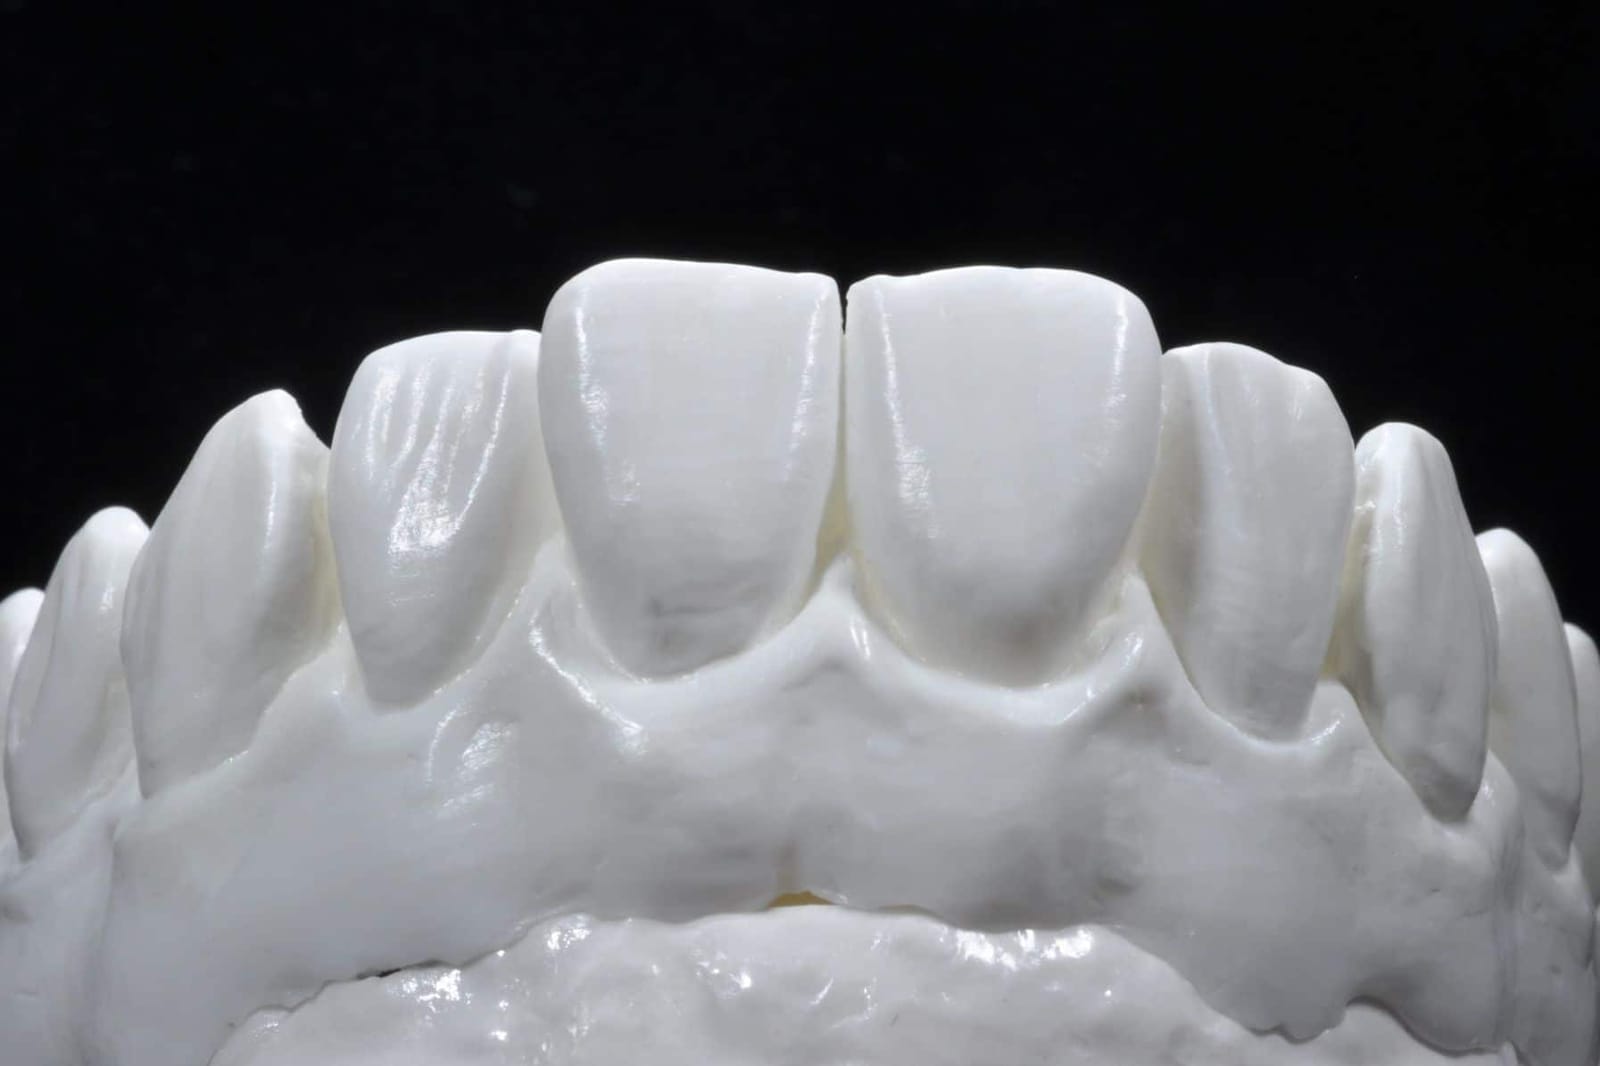
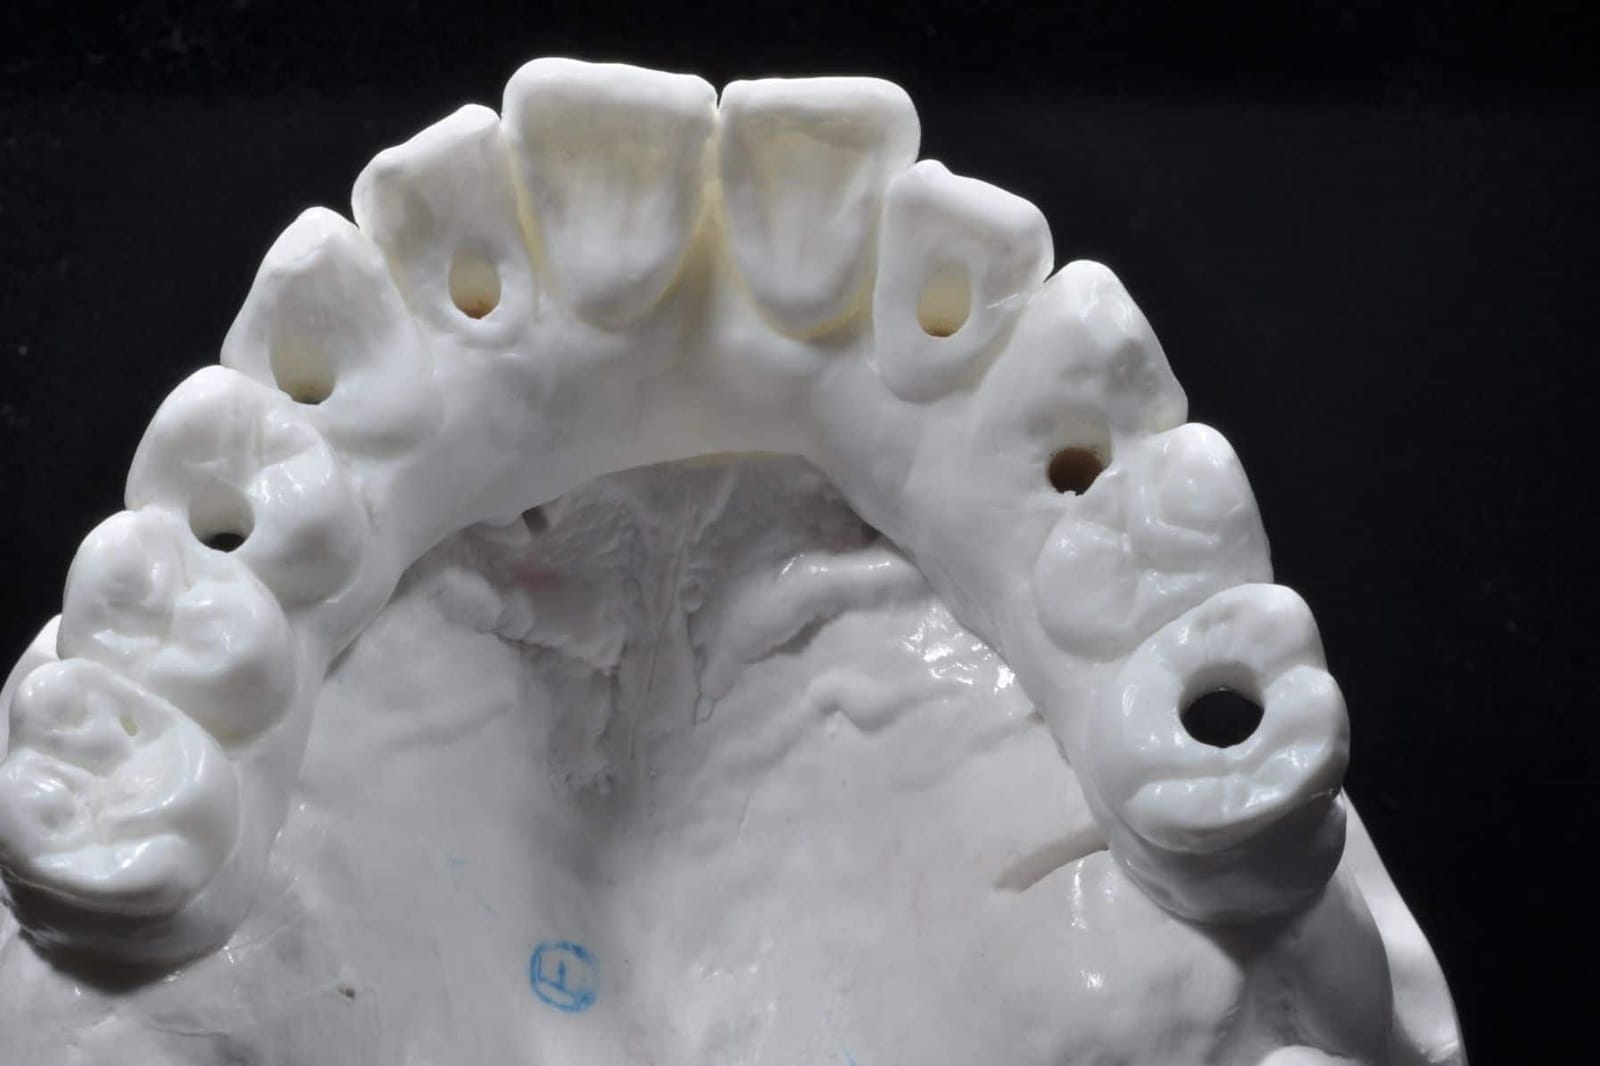
The lip and smile line are their own chapter: see the lip-line classification on the All-on-X page.
A tooth should rise out of the gum, not sit on top of it.
Emergence is the profile a tooth makes as it leaves the gum. Natural teeth emerge from about 3 mm below the gum line, and that depth is what gives a crown its root-like neck and a gum its scalloped edge. Dr. Reshad plans the bone level so that every implant exit sits within the outline of the tooth it will carry, about 3 mm below the finished gum line. Too shallow and the tooth looks stuck on; too deep and the gum cannot be kept clean. Off to the side and you get the restorative shelf.
On the provisional, the contour just under the gum (the subcritical contour) is kept concave to give the tissue room to thicken, while the contour at the gum line (the critical contour) sets where the margin sits. The provisional is the tool that shapes the gum before the final is made.
3 mmideal emergence depth below the gum line
Su H, González-Martín O, Weisgold A, Lee E. Considerations of implant abutment and crown contour: critical contour and subcritical contour. Int J Periodontics Restorative Dent 2010;30:335-343.
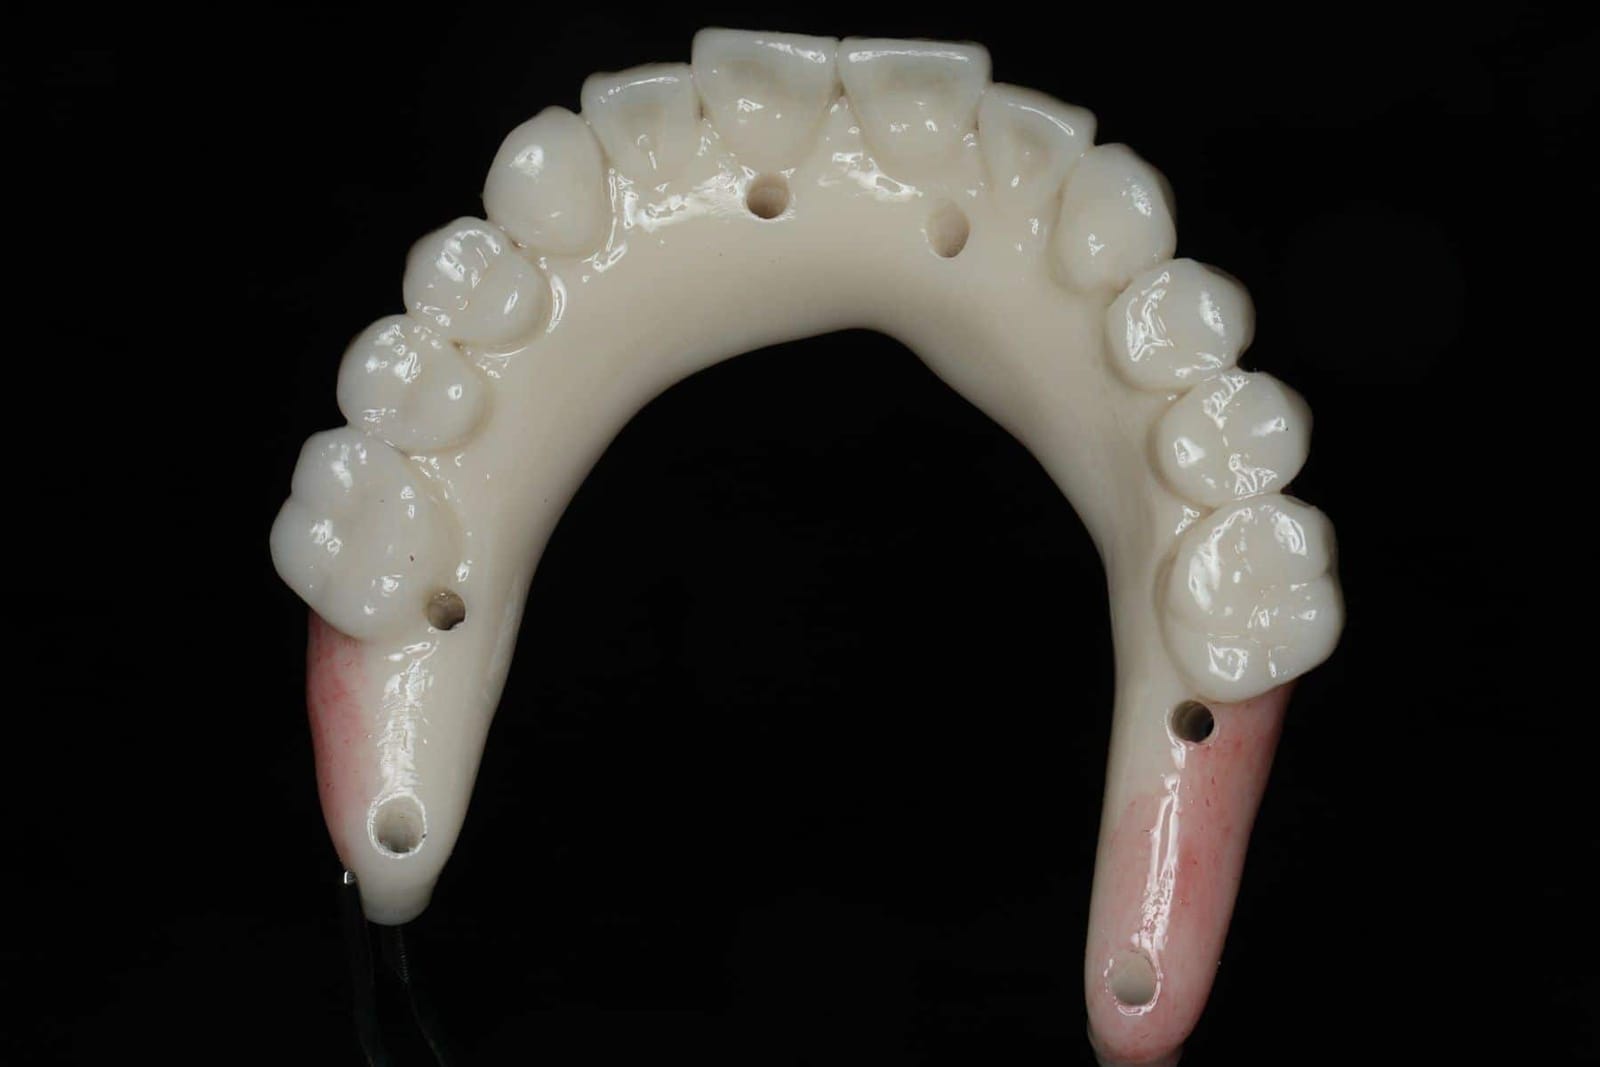
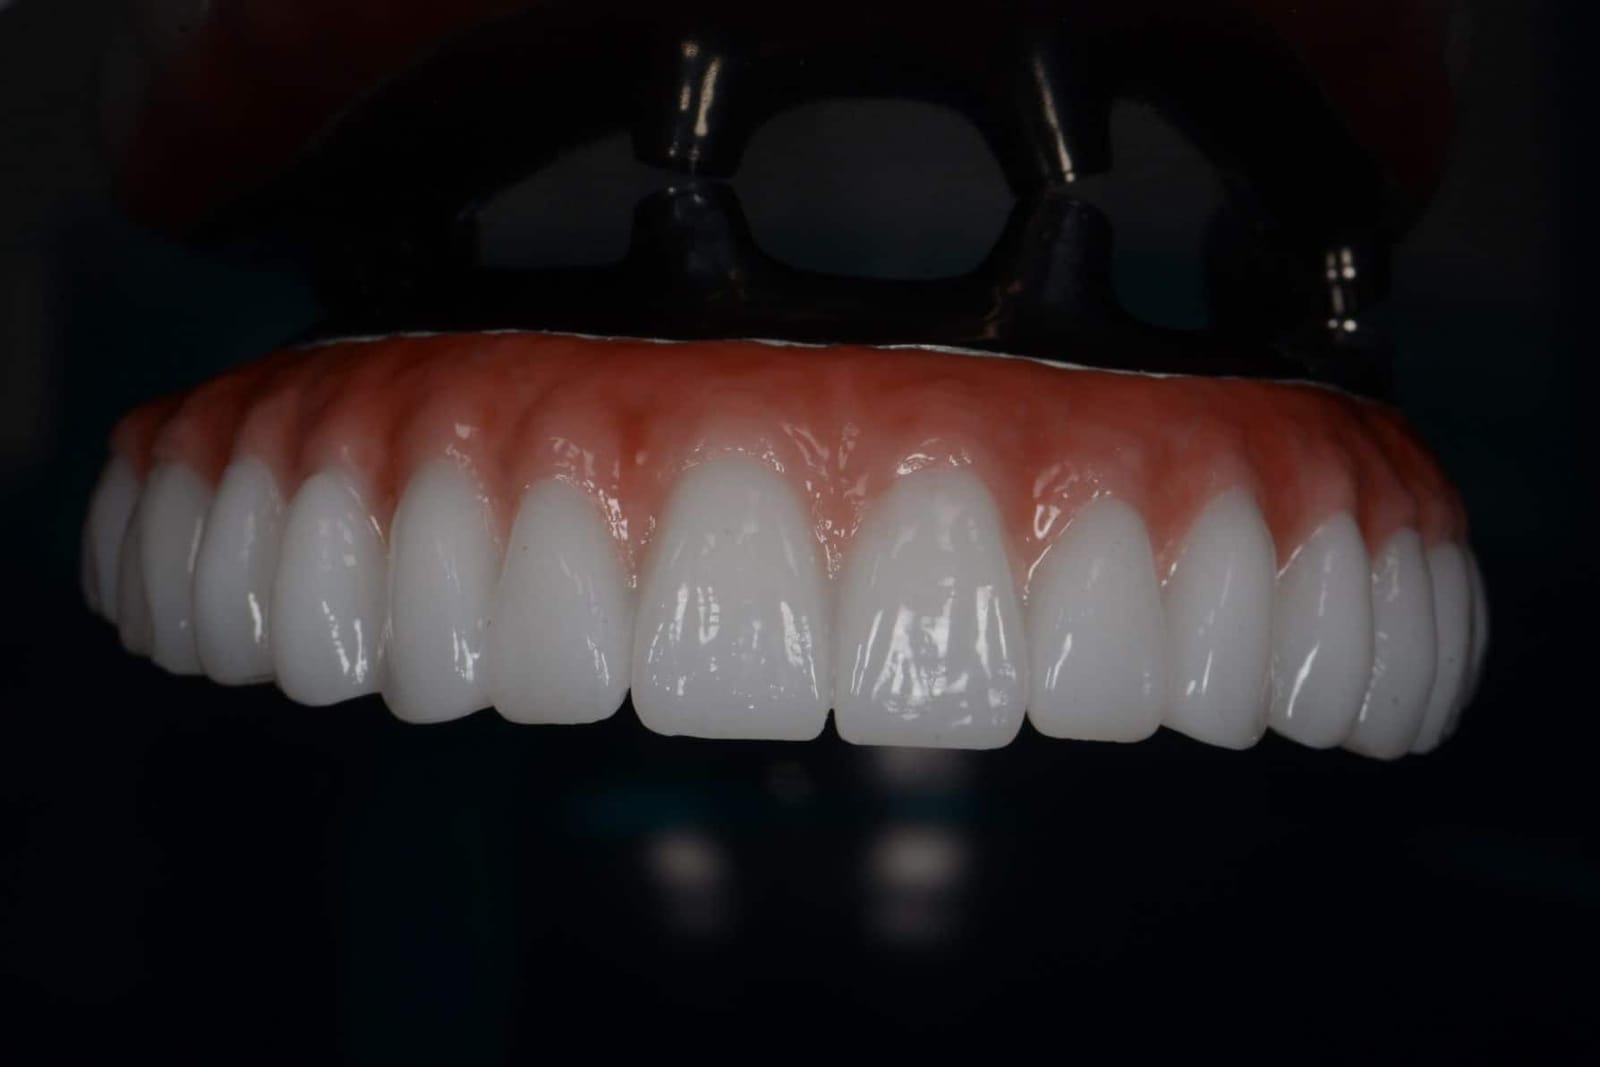
Where the bridge meets the gum, the shape is a rule, not a preference.
Between the implants, the teeth are pontics: they have no root and no implant, and they rest on the gum. How they rest decides whether that gum stays pink and tight or red, swollen and sore. Prosthodontics has known the answer since Stein's work in the 1960s, and Zitzmann, Marinello and Berglundh confirmed it under the microscope in 2002: a convex, polished pontic in light contact with the tissue keeps healthy keratinised gum underneath it. A concave one does not.
| Pontic design | Underside | What happens to the gum | Verdict |
|---|---|---|---|
| OvateSits into a shaped site | Convex, polished, emerges from the tissue like a natural tooth | Light pressure, the gum fills to it. Cleansable with floss or a water flosser. The design Dr. Reshad uses wherever the tissue allows. | Preferred |
| Modified ridge lapTouches the front of the ridge only | Convex on the front, open behind | Cleansable. Looks natural from the front. Less tissue support than ovate; the fallback where the ridge is too flat to shape. | Acceptable |
| Ridge lapSaddles the ridge | Concave, wraps over the gum | Traps plaque and food under a surface nothing can reach. Inflammation, odour, bleeding. The commonest reason an otherwise good bridge is unpleasant to live with. | Avoid |
- 01Convex undersurface. Never concave, never flat. Water and a brush must be able to sweep under it.
- 02Highly polished. Glazed or polished zirconia where it touches the gum. Rough surfaces hold plaque.
- 03Light tissue compression. The provisional presses the gum gently so it heals to the shape of the pontic.
- 04Sculpt the soft tissue. The provisional is adjusted over weeks until the gum has the form the final will sit in.
- 01Less food trapping. Nothing to pack under, nothing to dig out after every meal.
- 02Contours you can clean. Floss and a water flosser pass under every tooth, so the gum underneath stays healthy for years.
- 03No speech impairment. No air leaking under a lifted edge, no bulk behind the front teeth.
- 04A gum line that looks grown. The tissue takes the shape of the teeth, and the join stops being visible.
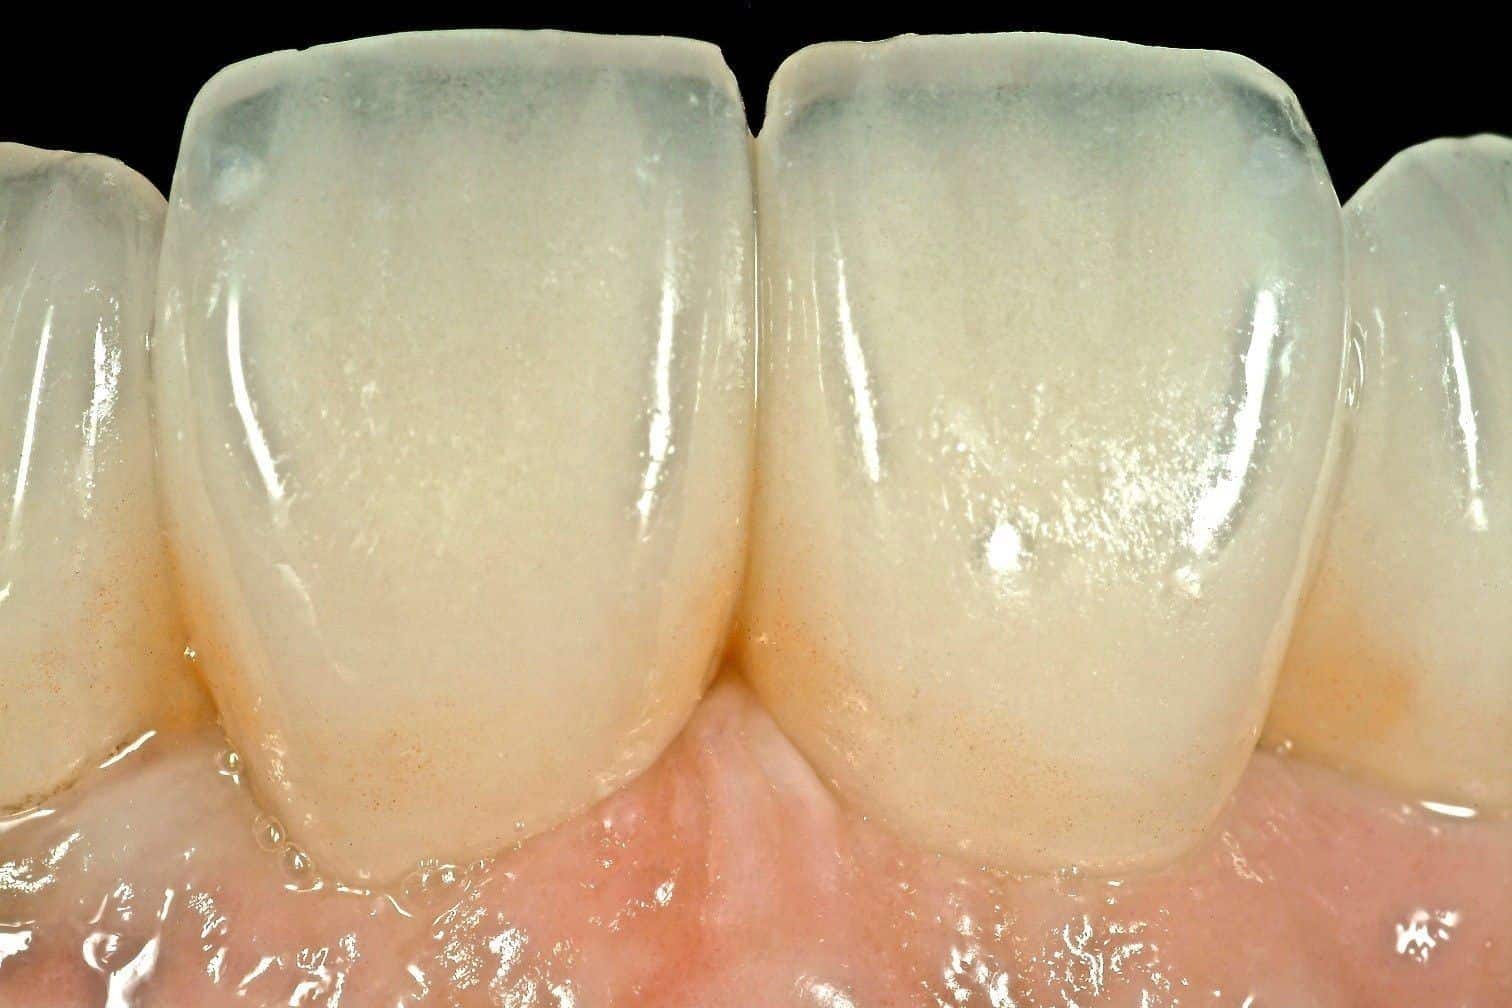
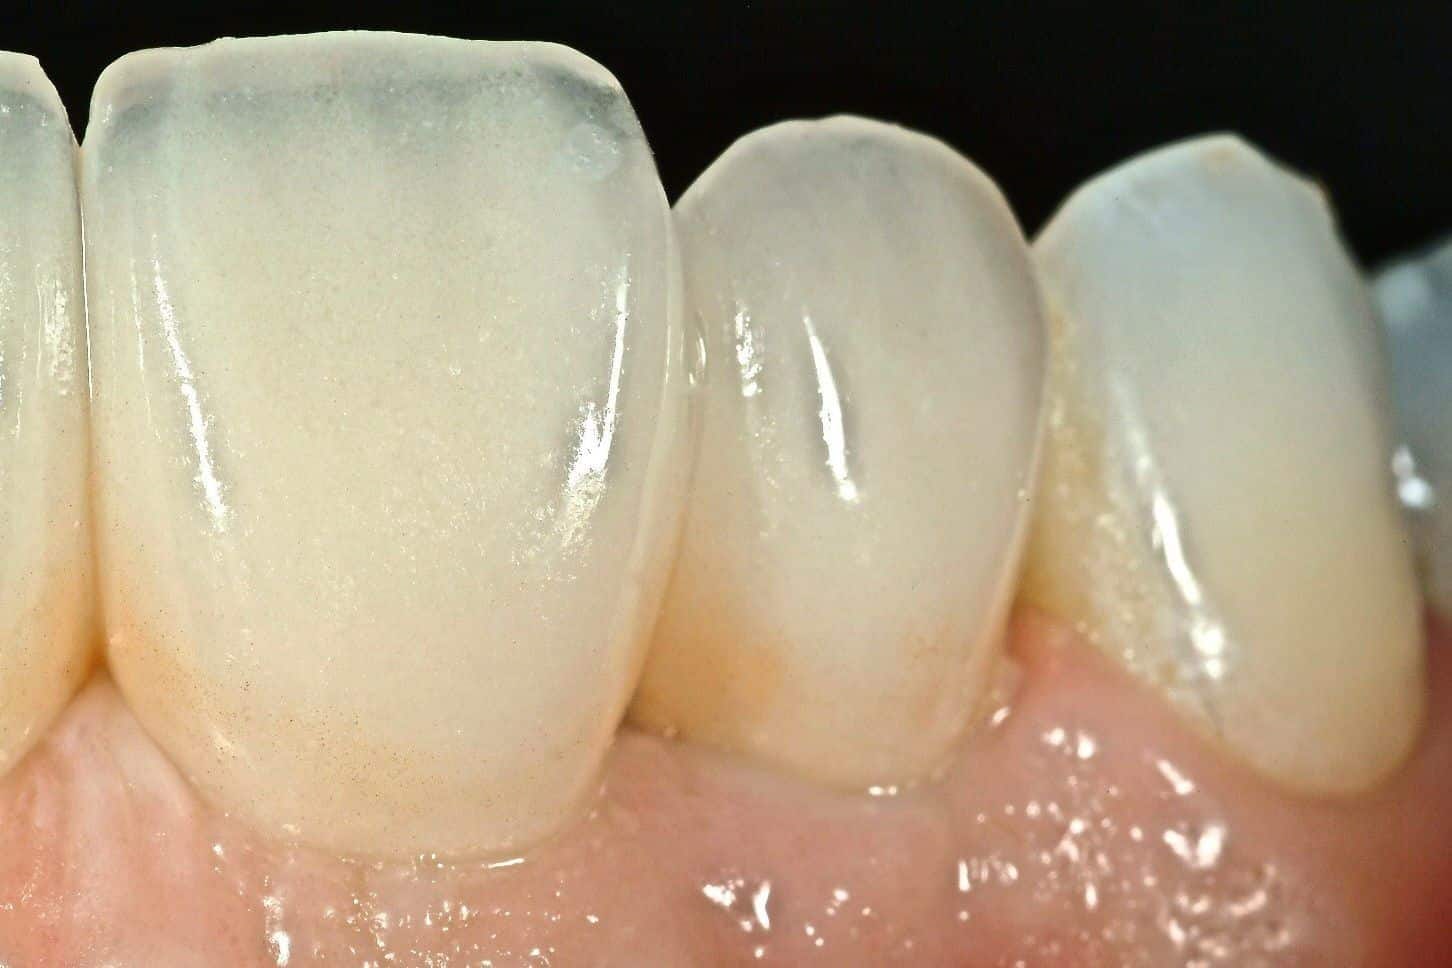
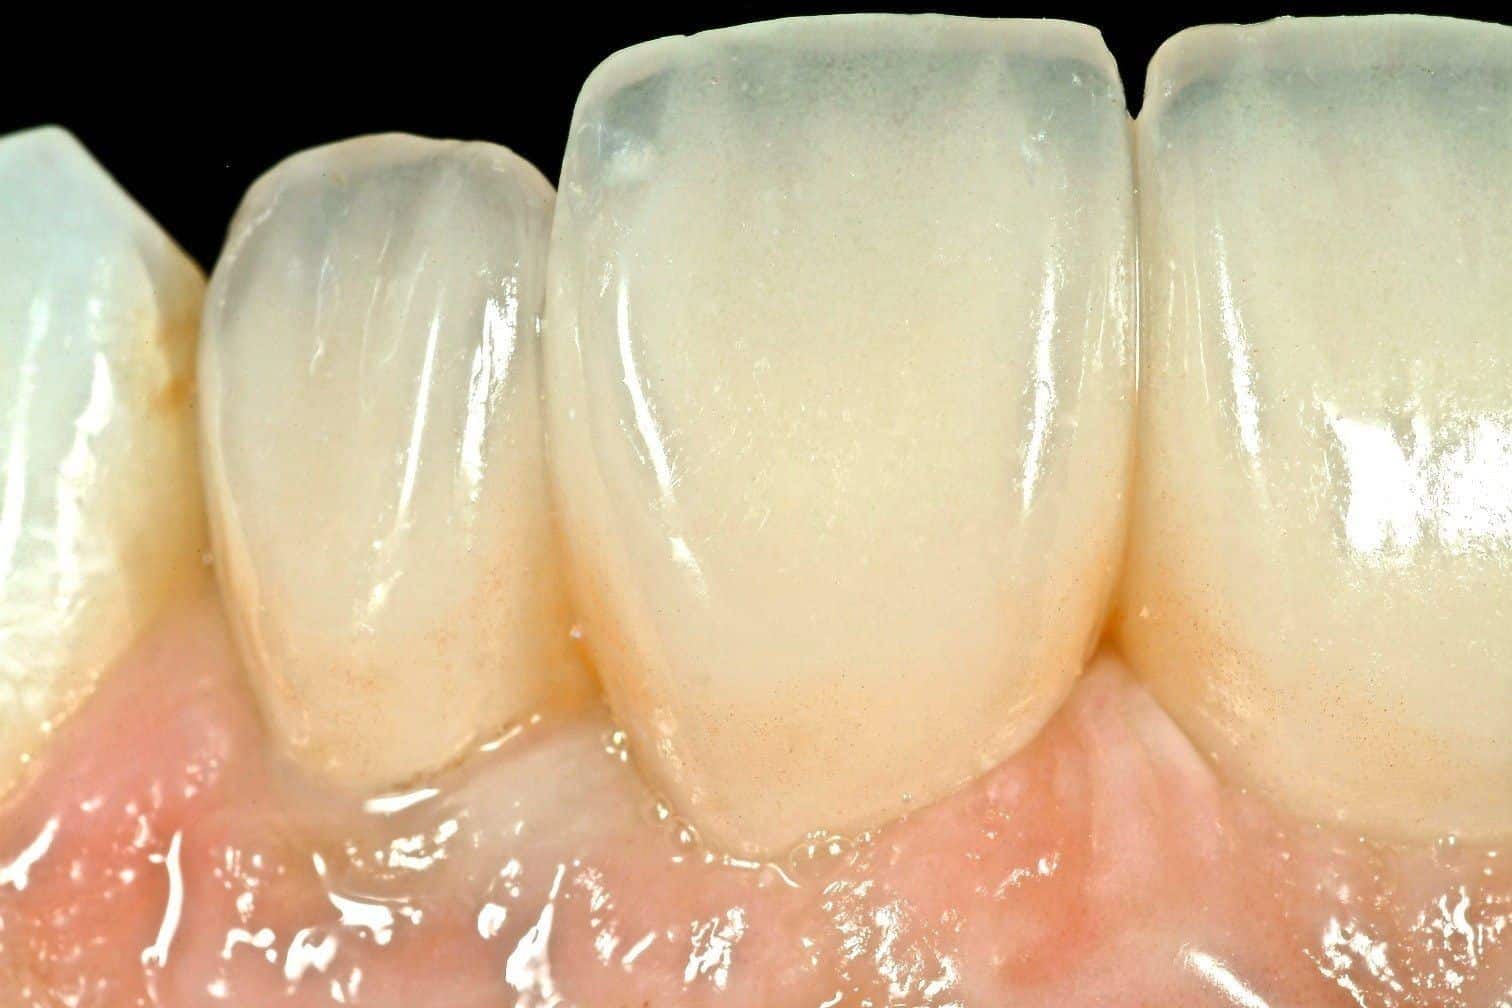
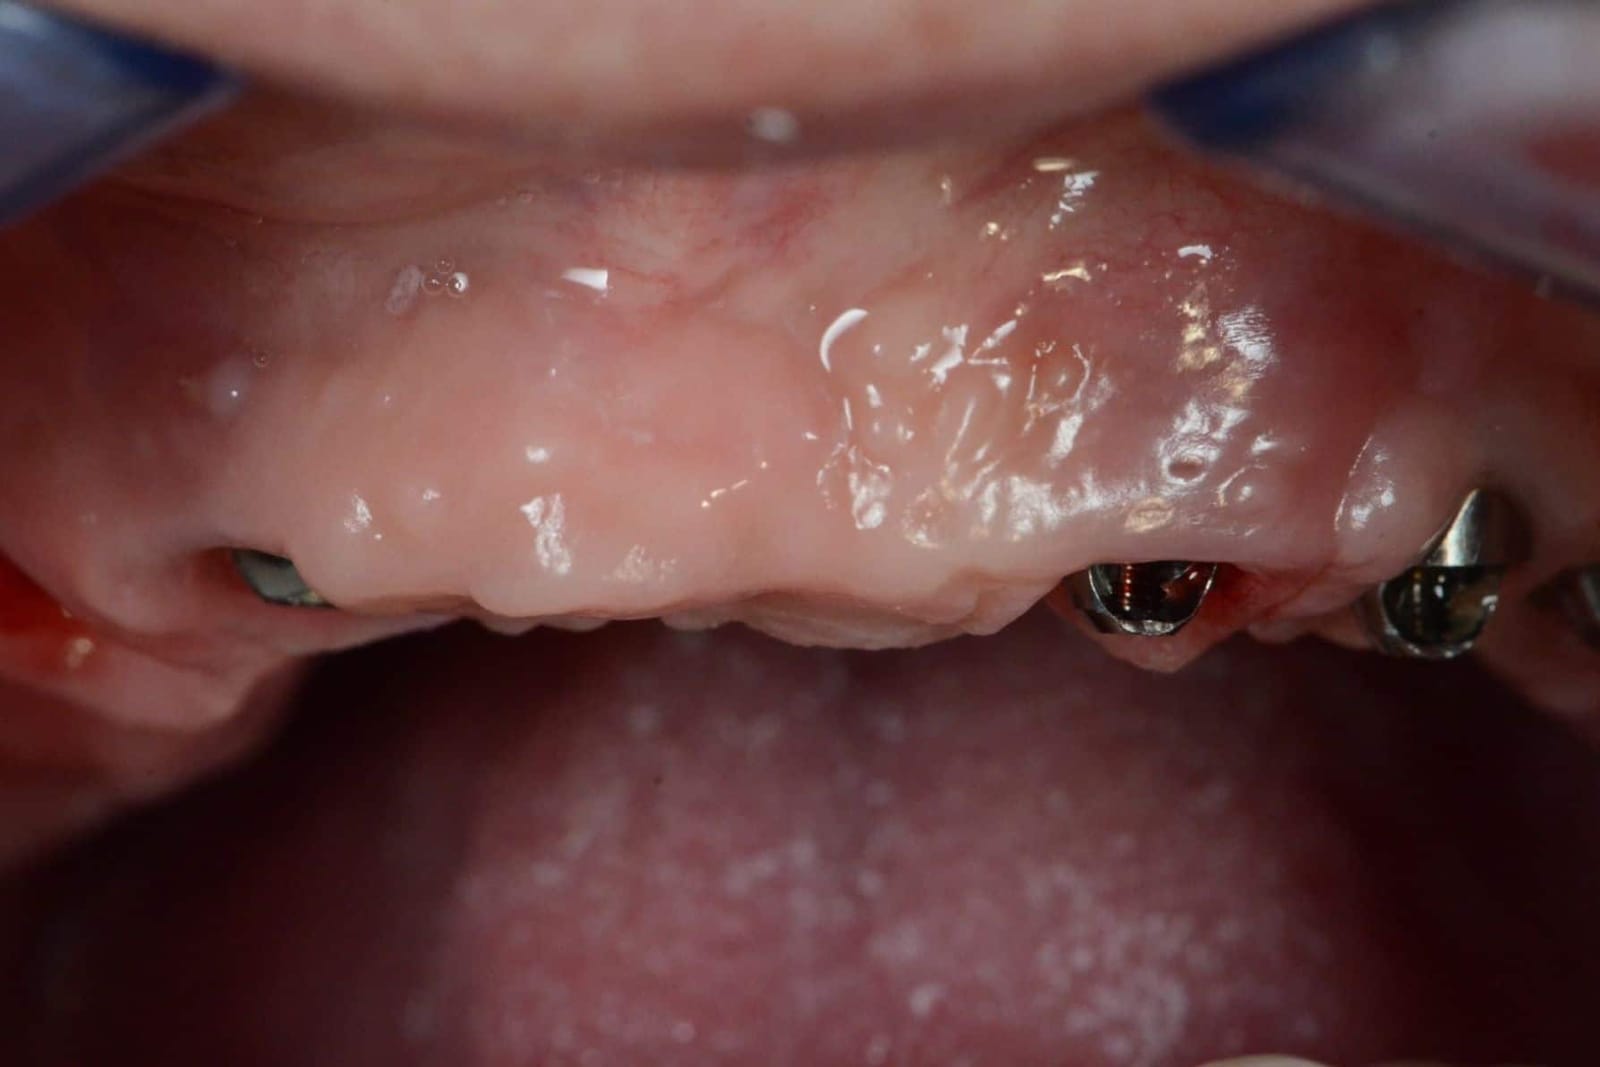
The gum takes time to settle into its new shape. In the first weeks it is actively remodelling; by a year the sites under well-designed pontics are among the quietest tissue in the mouth. That is the point of doing the shaping with a provisional and only then copying the result into the final.
Stein RS. Pontic-residual ridge relationship: a research report. J Prosthet Dent 1966;16:251-285. Zitzmann NU, Marinello CP, Berglundh T. The ovate pontic design: a histologic observation in humans. J Prosthet Dent 2002;88:375-380.
If you cannot clean it, it was not finished.
A full-arch bridge is in the mouth for decades. The one daily test it has to pass is this: can a brush, floss or water flosser reach every surface that touches gum? Dr. Reshad applies the test to the provisional before the final is ever made, and he teaches patients how to pass floss under the bridge before they leave with it.
The enemies are the same every time: a concave or flat undersurface, an unpolished surface, a bulky flange that was added to hide a seam, and an implant exit outside the tooth that creates a shelf. Each one is a place bacteria live and a toothbrush does not go. Inflammation around implants (peri-implant mucositis, and in time peri-implantitis) is far more common under prostheses that cannot be cleaned, and the first treatment is often to reshape the prosthesis itself.
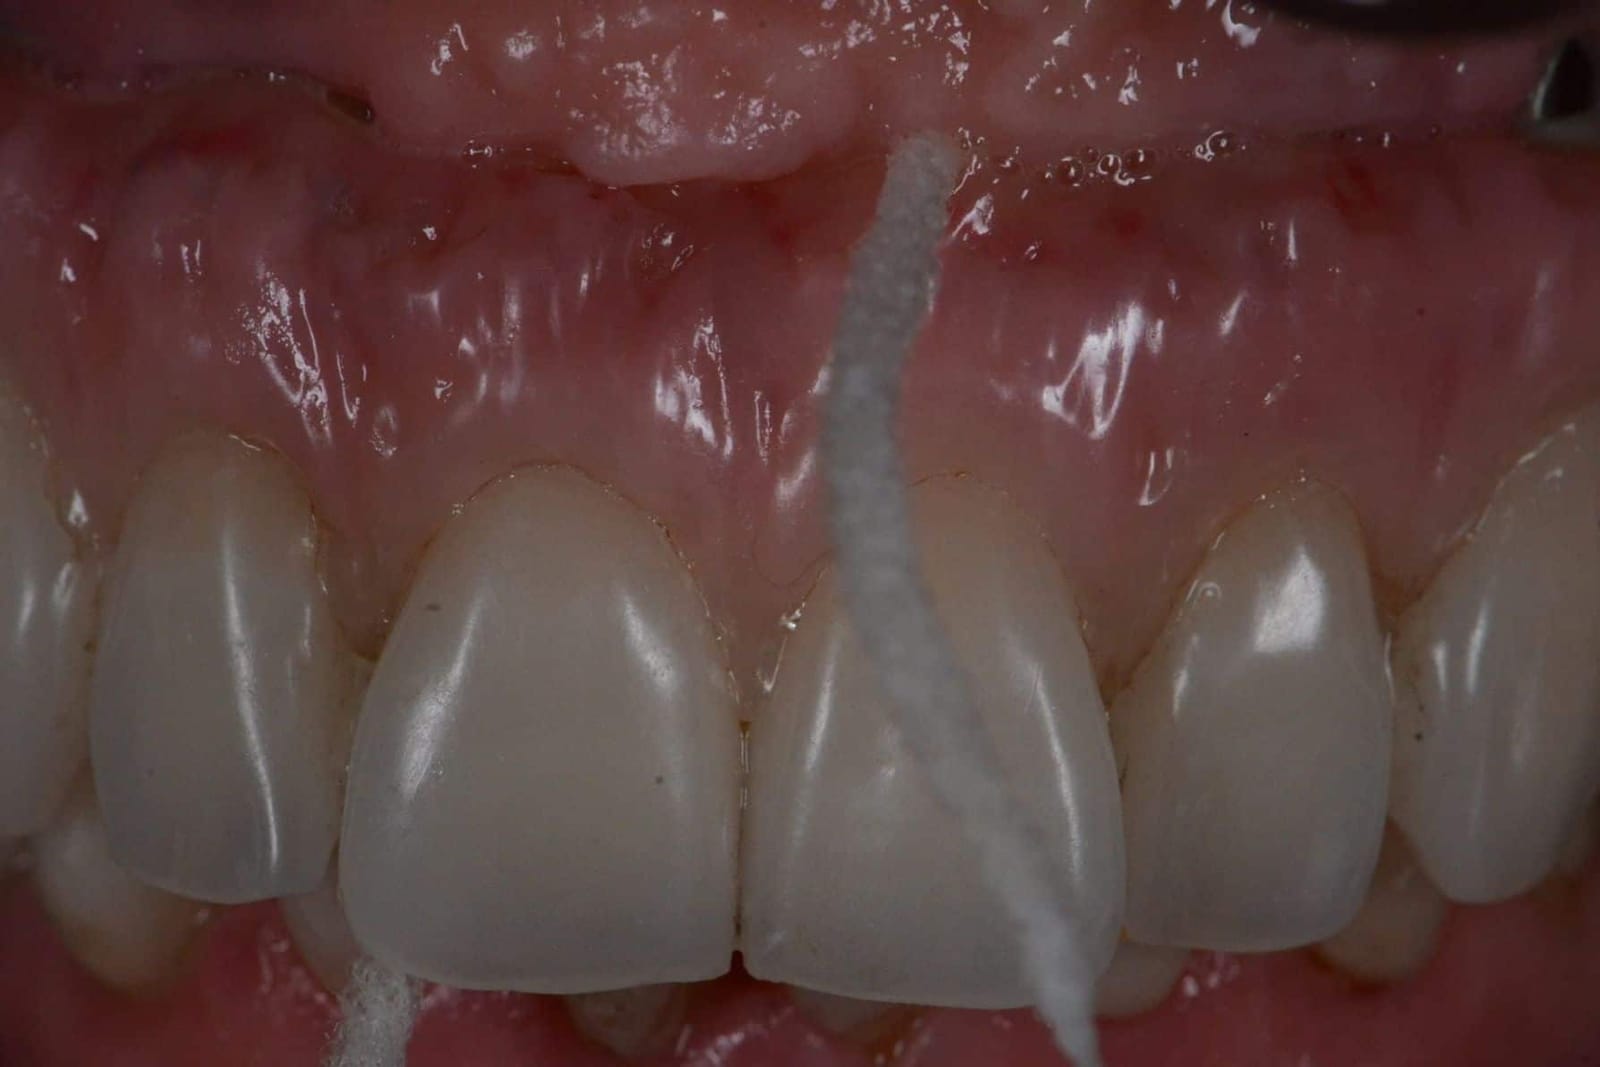
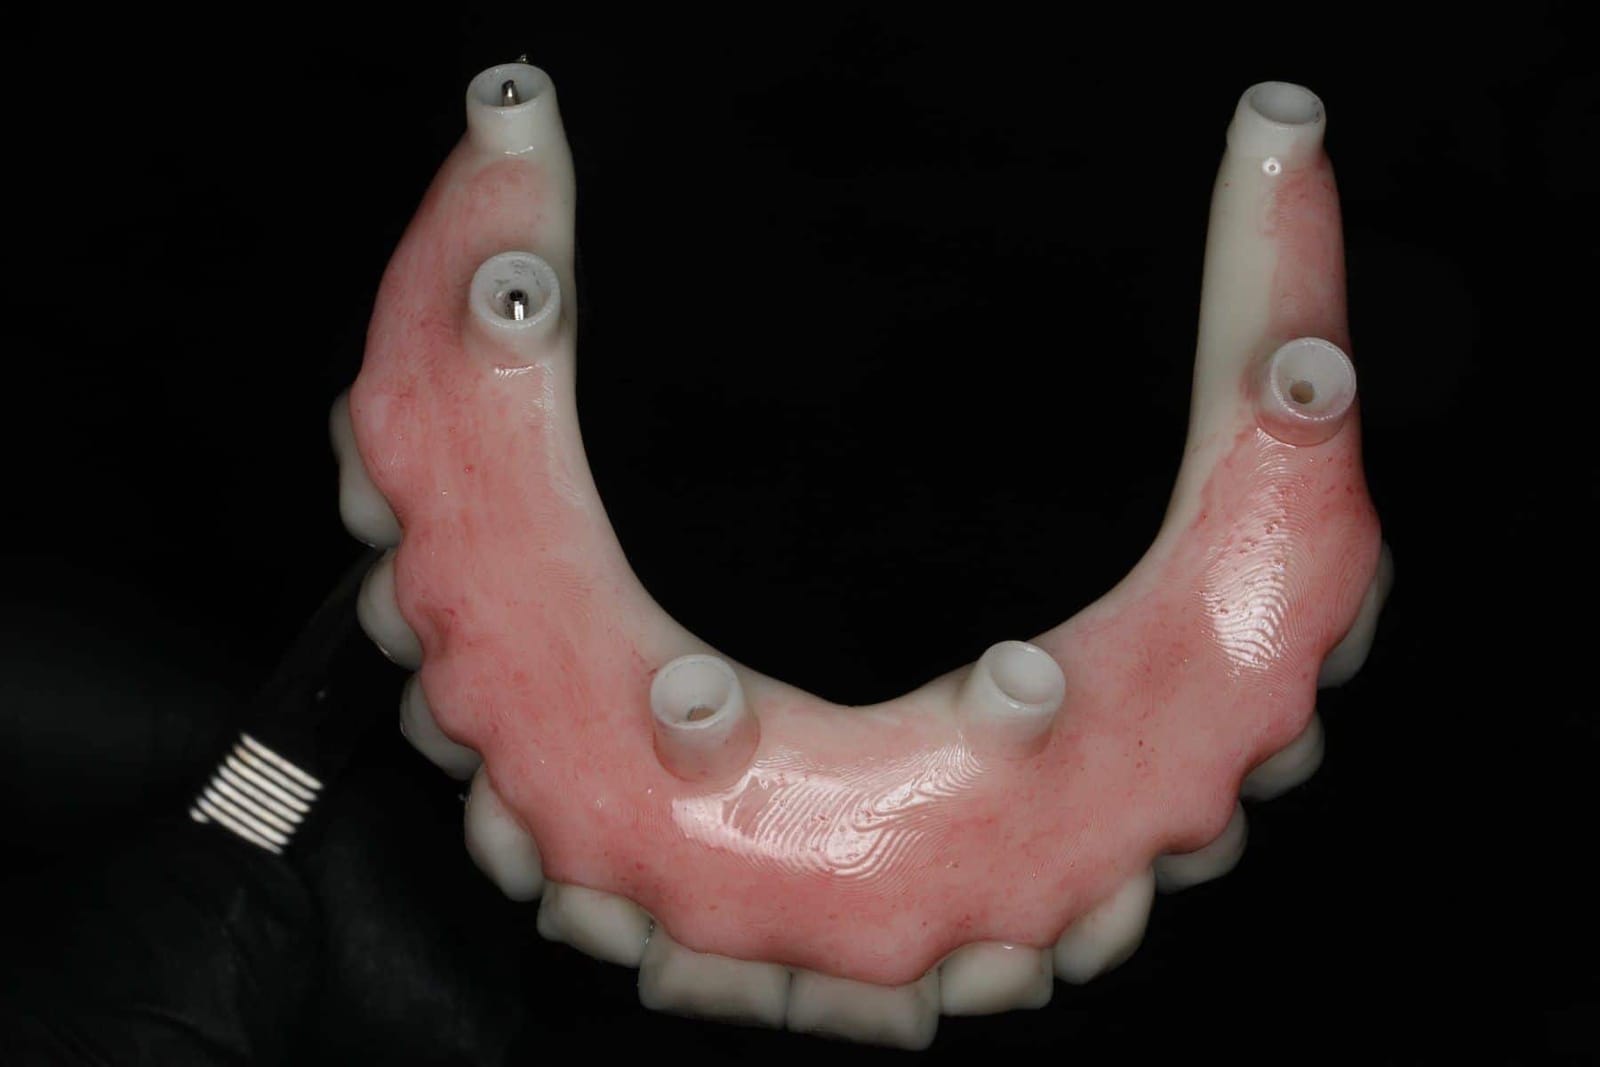
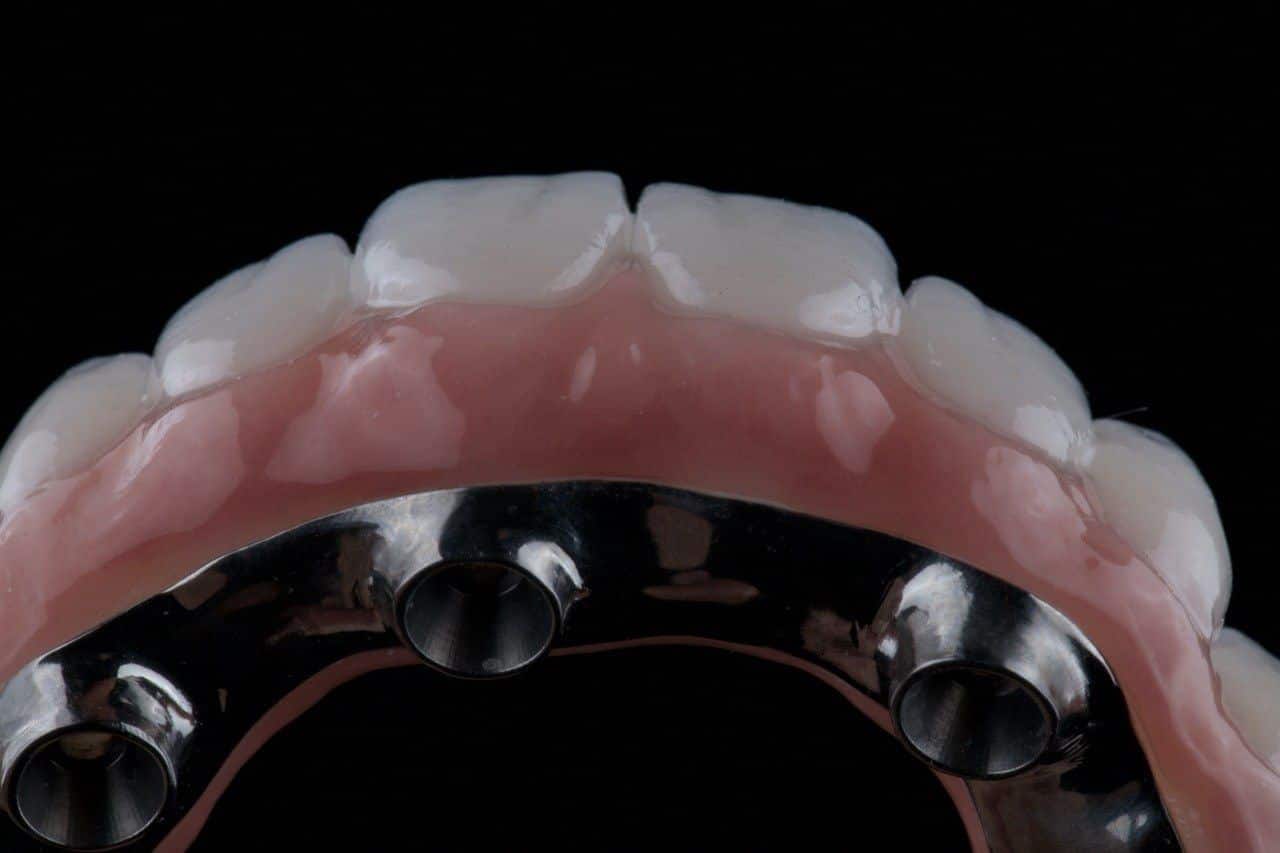
The inside of the teeth is where speech is made.
Every S you say is a thin jet of air pushed through a narrow channel just behind the upper front teeth, with the sides of the tongue braced against the palatal surfaces of the upper teeth. Change that channel and the S changes. A prosthesis that is thick behind the front teeth, or that carries a ledge of acrylic across the front of the palate, turns the S into a lisp or a whistle, and the tongue never quite learns its way round it.
Comfort lives in the same place. The tongue wants the shape it grew up with: a smooth, thin slope from the back of the front teeth into the palate, no steps, no ridges, no bulk. Dr. Reshad shapes the palatal contour on the provisional, has the patient read aloud with it in, and only then copies it into the final.
For the full story of speech and the incisal edge, see speech on the All-on-X page. The form rules are these:
- No bulky acrylic behind the front teeth. The palatal contour is thin, with no air leaks under it.
- A smooth slope, not a step. From the back of the incisors into the palate in one continuous curve.
- Set and test the edges out loud. F, V and S on the provisional, before anything is final.
- Warn the patient, and wait. Speech adapts over weeks. Judge it after the tongue has had time.
| You hear | Usual cause in the shape | First fix |
|---|---|---|
| Lisp | Incisors too far back, or a bulky anterior palate | Thin the anterior palate |
| Whistle | Channel behind the incisors too narrow or too sharp | Open and smooth the channel |
| Muffled, “mouth full” | Palate too thick, tongue space lost | Reduce palatal bulk |
| Air escaping, wet sound | Gap under a lifted edge or between pontic and gum | Close the contact, reshape the pontic |
Heydecke G, McFarland DH, Feine JS, Lund JP. Speech with maxillary implant prostheses: ratings of articulation. J Dent Res 2004;83:236-240.
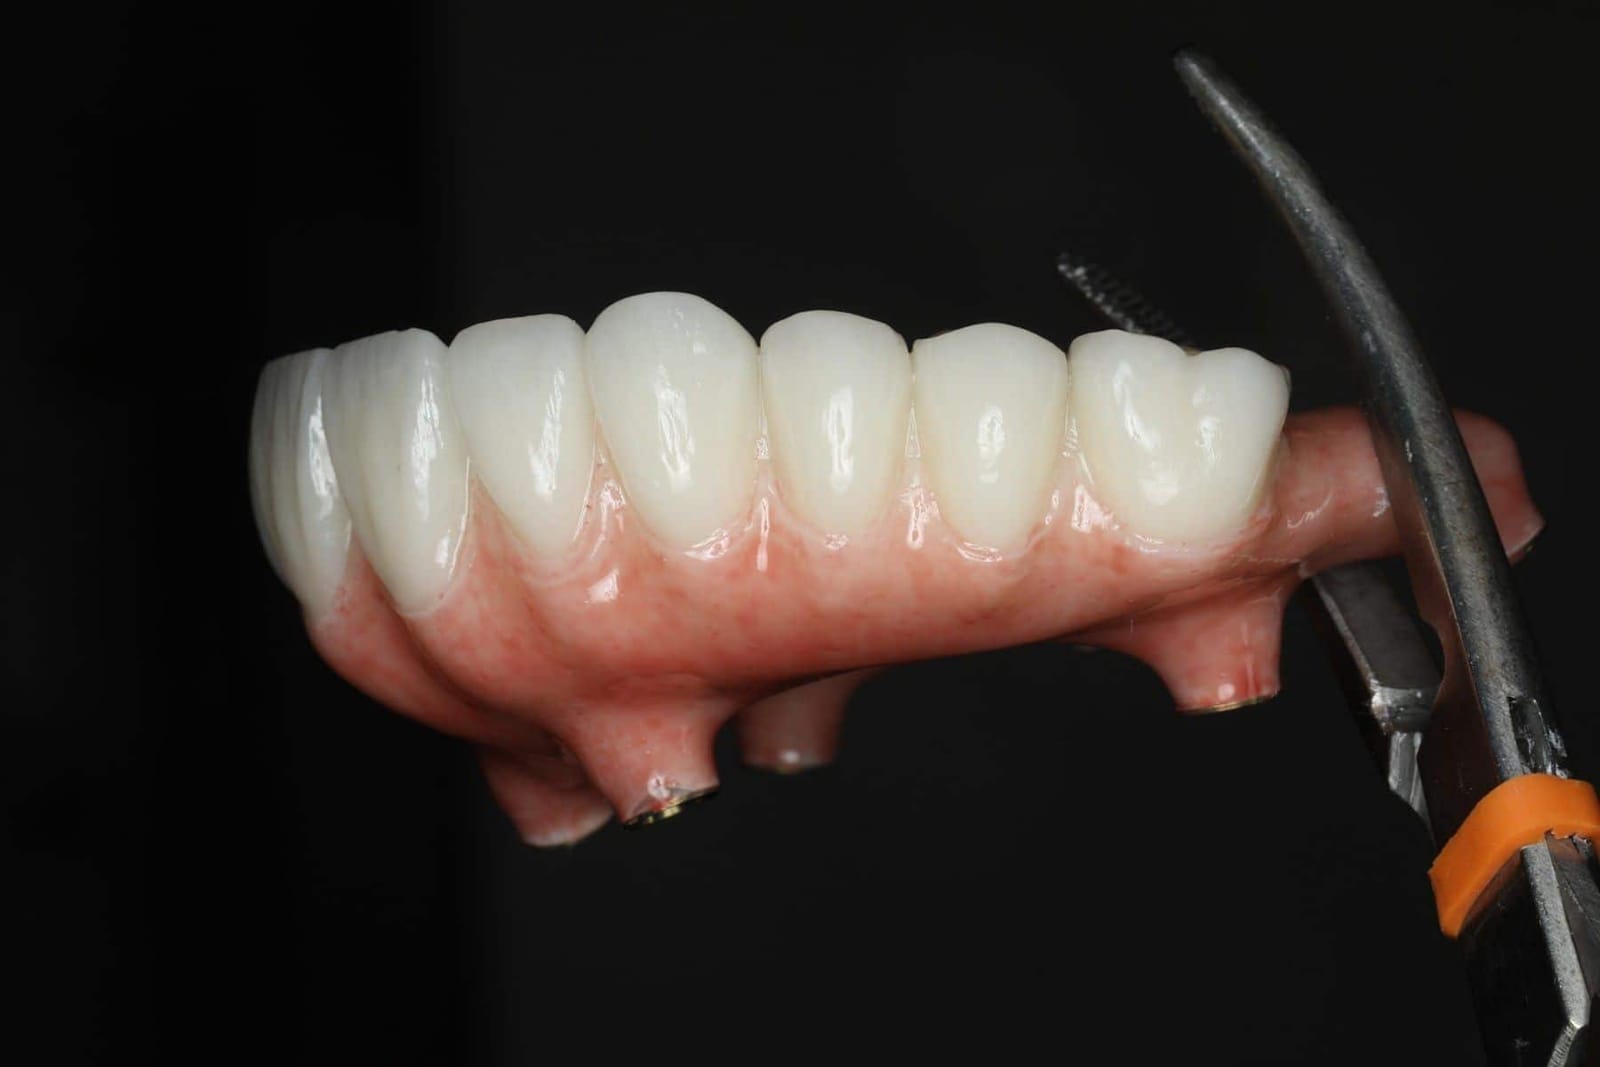
From provisional to definitive, the shape is tested before it is made.
A quad-zygoma case: four zygomatic and two pterygoid implants, no grafting. The provisional was worn, cleaned, spoken with and adjusted. Only then was the definitive made, as a copy of a shape that had already passed every test.
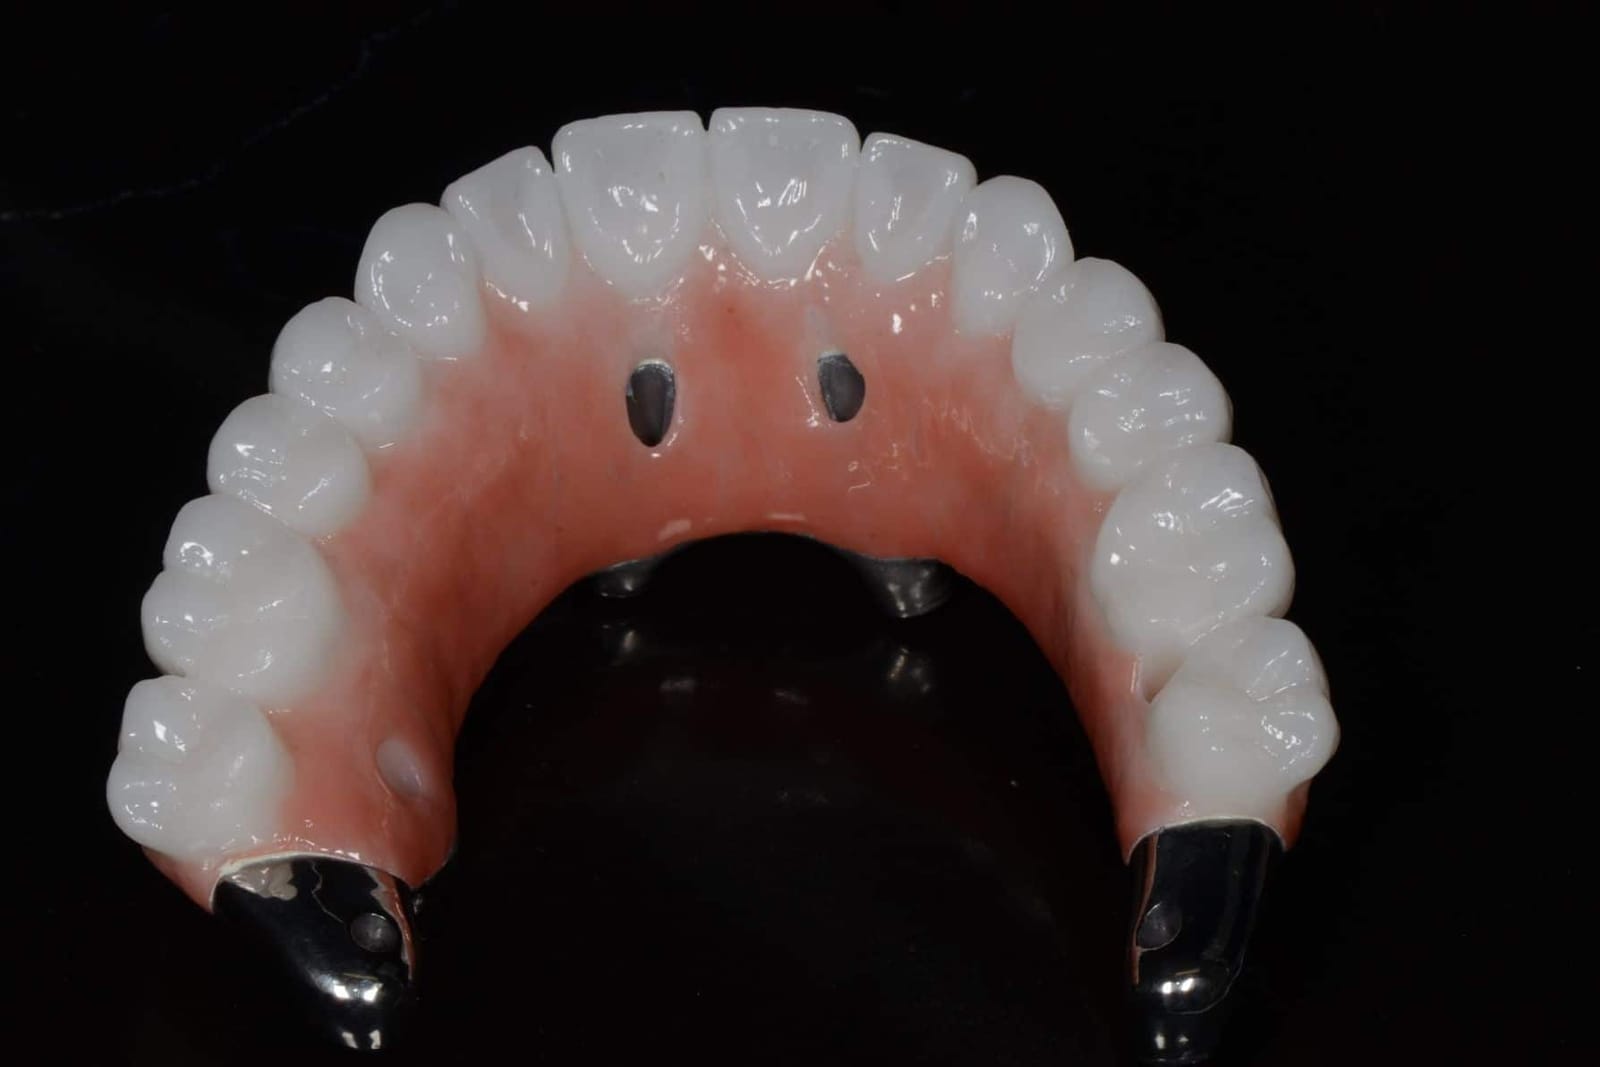
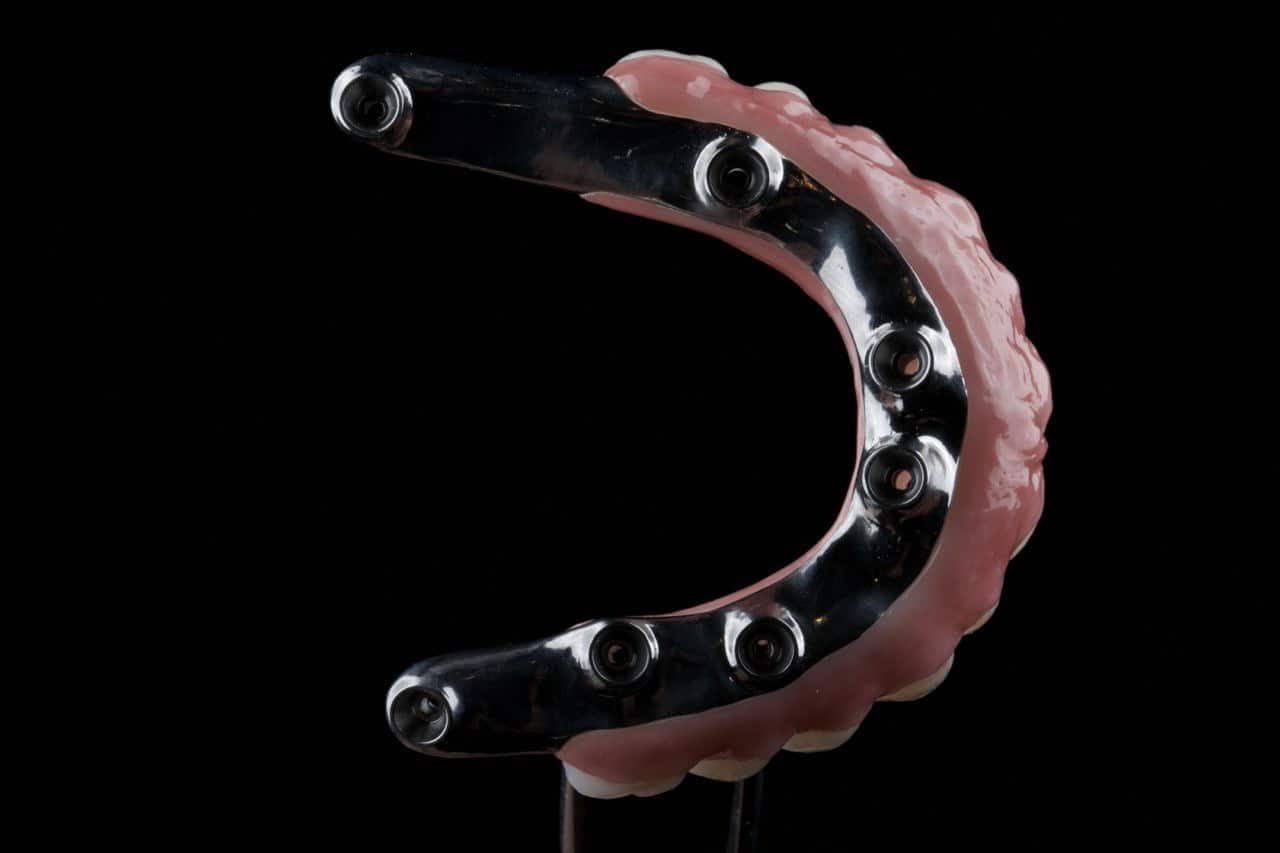
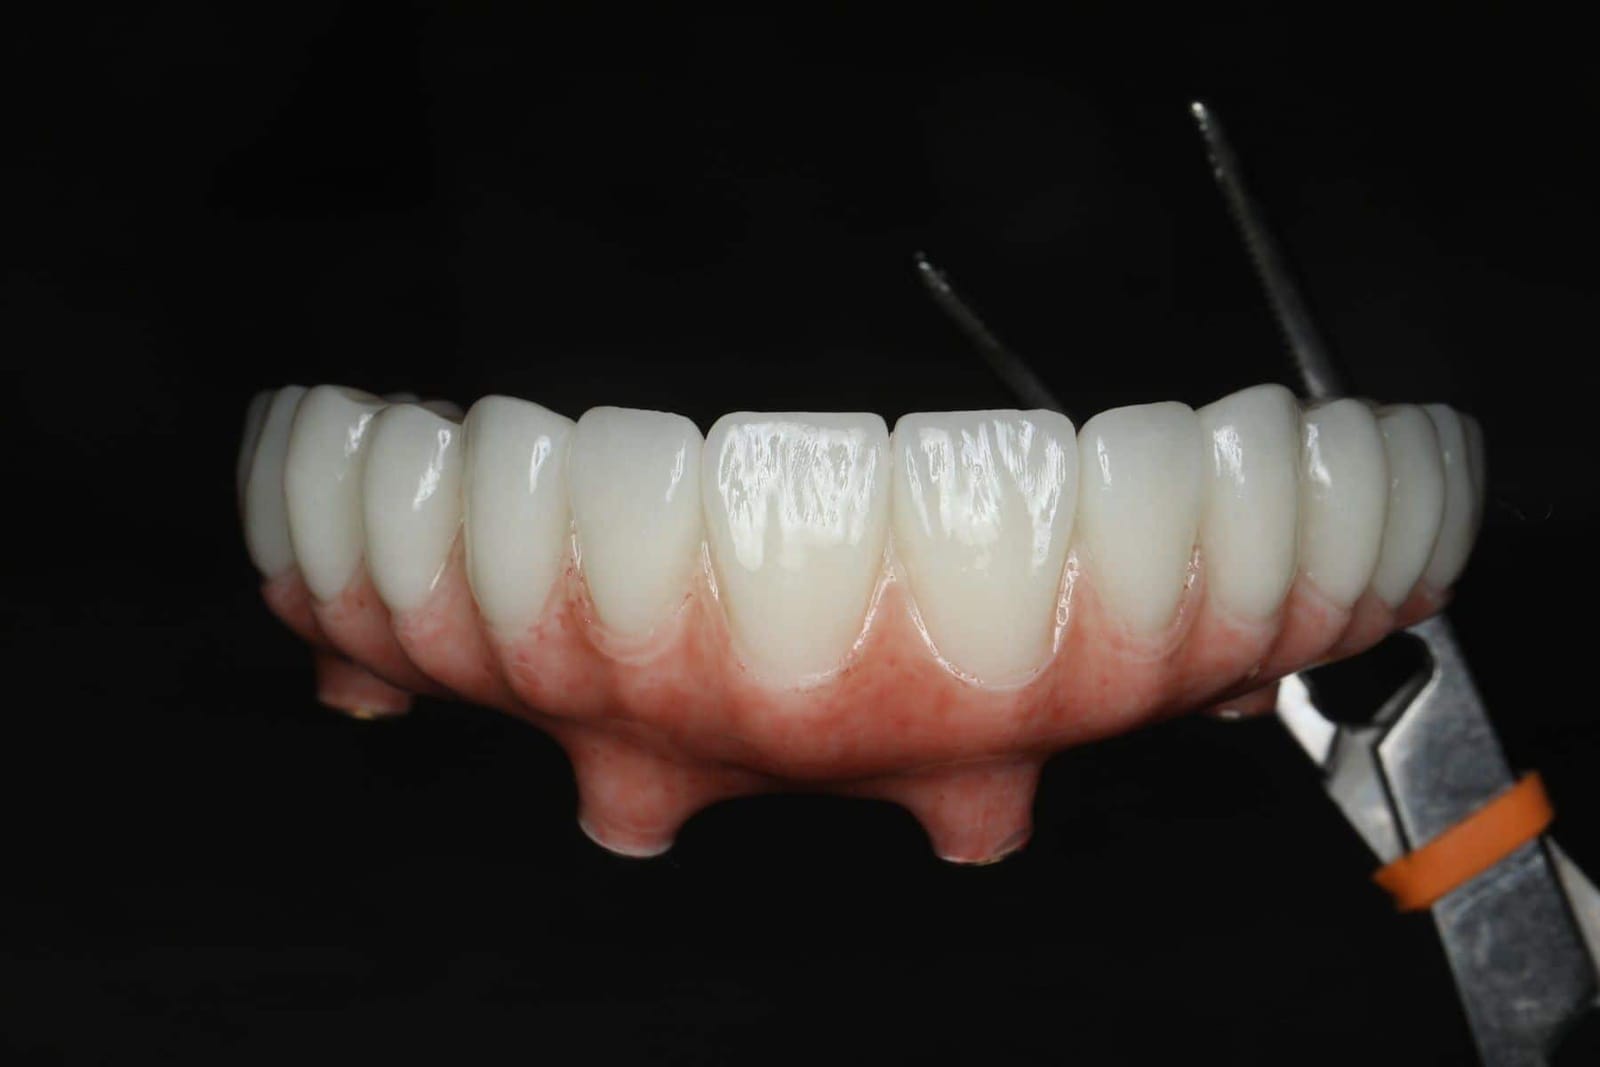
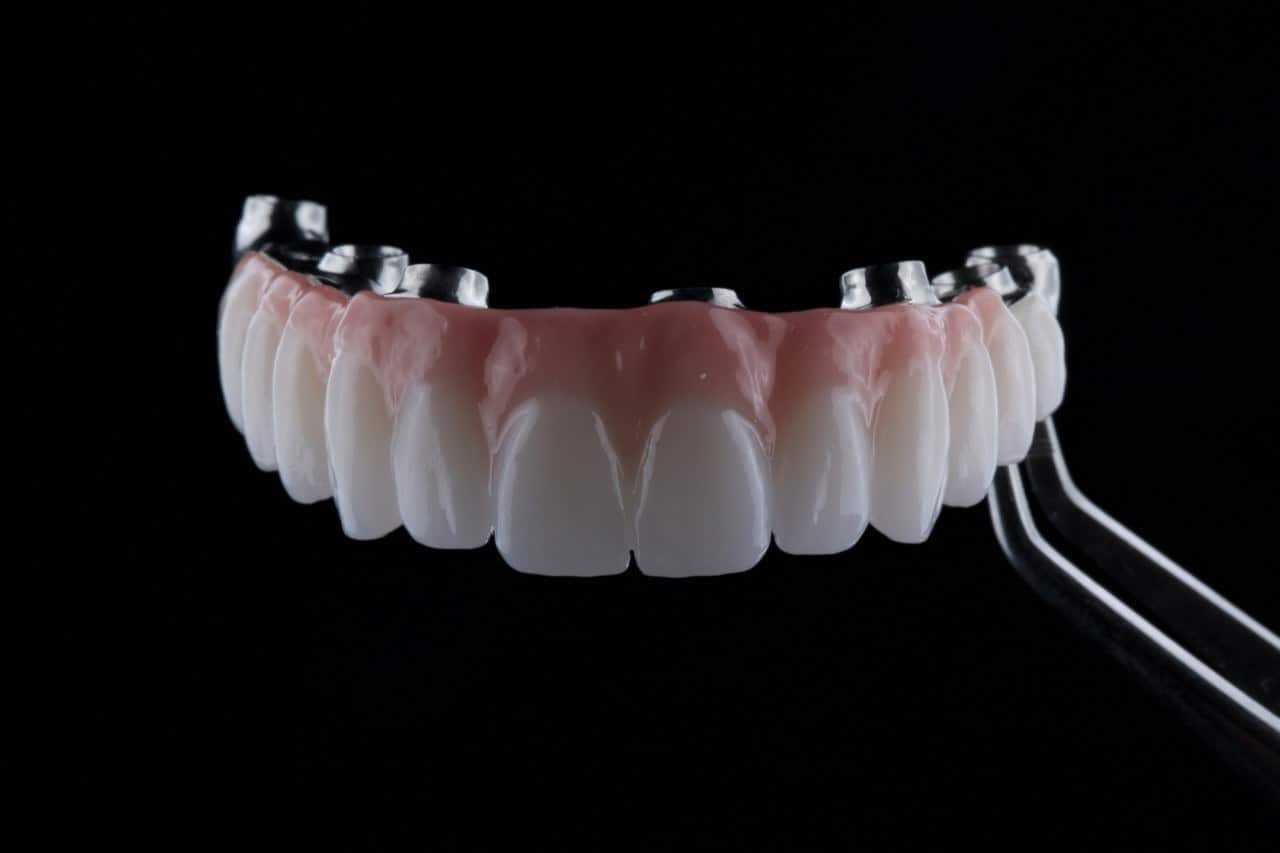
What a second opinion on form actually checks.
The prosthesis comes out. Dr. Reshad looks at its underside, its palate and the gum it has been sitting on, and asks five questions.
- Is the underside convex and polished? Or is there a concave saddle, a flat shelf, a rough patch, with the tissue under it inflamed.
- Where do the implants exit? Inside the teeth, or beside them with a ledge.
- Can floss pass under every tooth? Tested in the chair, not assumed.
- What is the palate doing to your speech? Read aloud, with and without the prosthesis.
- Can it be reshaped, or must it be remade? Many form problems can be corrected on the existing prosthesis. Some cannot, and he will say which.
DDS, MSc (Distinction), FICD, MICOI. The specialty whose training is the shape of teeth and their relationship to the tissues.
Fixed and Operative Dentistry. Published author in peer-reviewed journals and textbooks.
This is the form chapter of the full-arch maxilla lecture he gives internationally, written for patients.
“A prosthesis is finished when the patient can clean it, speak with it and forget it is there. Strength and a nice smile are the entry fee, not the result.”
If your teeth are strong, white and still miserable to live with, the shape is the place to look.
Bring the prosthesis and the history. In one visit you will know which of the five jobs it is failing, and whether reshaping or remaking is the answer.
Sources. Stein RS. Pontic-residual ridge relationship: a research report. J Prosthet Dent 1966;16:251-285. · Zitzmann NU, Marinello CP, Berglundh T. The ovate pontic design: a histologic observation in humans. J Prosthet Dent 2002;88:375-380. · Su H, González-Martín O, Weisgold A, Lee E. Considerations of implant abutment and crown contour: critical contour and subcritical contour. Int J Periodontics Restorative Dent 2010;30:335-343. · Heydecke G, McFarland DH, Feine JS, Lund JP. Speech with maxillary implant prostheses: ratings of articulation. J Dent Res 2004;83:236-240. · Salama M, Ishikawa T, Salama H, Funato A, Garber D. Advantages of the root submergence technique for pontic site development in esthetic implant therapy. Int J Periodontics Restorative Dent 2007;27:521-527. Images. Clinical photographs and wax-ups are from Dr. Reshad's lectures and his own patients, shared with consent, with no faces shown.
Told there is not enough bone? You may not have heard the whole story.
If you have been told there is not enough bone, that implants are not for you, or that a denture is all that is left, you may not have heard the whole story. Two areas of the face keep strong bone when the jaw has shrunk away: the cheekbone, and the plates at the very back of the upper jaw. Implants anchored there can hold fixed teeth, often without a bone graft and often on the day of surgery.
- 30+ years
- in full-arch reconstruction
- 96%
- of zygomatic implants still in place after six years
- 1 day
- to fixed teeth, often, without a graft first
- 2 anchors
- that keep their bone: the cheekbone and the pterygoid plates
She had already been through it once. Hear how it ended.
“I was told I could only have four implants on top and four on the bottom, and that was why there weren’t enough teeth. Now my teeth go all the way back. I can chew, and I got my smile back. Dr. Reshad and his team completely changed my story.”
“You don't have enough bone.” It is not the end of the conversation.
When upper teeth are lost, the bone that held them shrinks. Behind it, the sinus expands into the space. After years of missing teeth, a failed bridge or a loose denture, there can be too little bone left in the upper jaw to hold a conventional implant.
The traditional answer is grafting: build the bone back, wait months for it to heal, then place implants. For many patients that works well. For others it means a year or more of surgery, healing and temporary teeth, and some grafts do not take.
There is another way. The cheekbone and the bony plates at the back of the upper jaw stay dense and strong when the jaw itself has shrunk. Implants anchored there can support a full set of fixed teeth without rebuilding the jaw first.
You are allowed to be sceptical.
Most people who find this page have already been through a lot. Teeth lost one by one. A denture that never felt like part of them. Treatment that cost a great deal and did not last. And then the words that close the door: there is no bone, there is nothing more we can do.
If that is you, being wary of one more dentist is reasonable. You should not have to take anyone's word for it, including ours. So the first visit is not a sales conversation. It is a diagnosis, and an honest answer.
Sometimes that answer is that fixed teeth are possible after all. Sometimes it is that a well-made removable option is genuinely the better choice for you. Either way, you will understand why, and you will hear it plainly.
What happens at your first visit
- 01We listen first. What happened before, what you were told, what you want, and what worries you.
- 02We look properly. A 3D scan of the bone, your face and your bite, read together, including the cheekbone and the back of the jaw that standard plans never look at.
- 03You see your options. On your own scan, in plain language, with what each one involves and what it costs.
- 04You decide, in your own time. Nothing is booked on the day. Nothing begins until you have a written plan, with fees, that you have agreed to.
Three ways to rebuild an upper jaw.
- StandardStandard full arch
Four implants where bone allows. The back teeth hang off the last implant as a cantilever (dashed).
- PterygoidAdd pterygoid implants
Implants behind the sinus support the molars. No overhang, a wider spread, no sinus graft.
- ZygomaticZygomatic implants
Long implants angled up into the cheekbones. With four, no jaw bone is needed at all.
Regular implantPterygoid or zygomatic implantUnsupported cantilever
| Bone grafting, then implants | Pterygoid implants | Zygomatic implants | |
|---|---|---|---|
| Anchors in | New bone built in the jaw or sinus | The pterygoid plates behind the upper jaw | The cheekbone |
| Best for | Moderate bone loss, younger patients, time to wait | Missing back teeth, a large sinus, no bone at the molars | Severe bone loss across the upper jaw |
| Fixed teeth | Usually after several months of healing | Often the same day | Often the same day |
| Trade-off | Time, more surgeries, a graft can fail | Demanding surgery, harder to reach for cleaning | Specialist surgery and 3D planning |
None of these is right for everyone. The choice depends on your scan, your bite, your lip line and your health, and it is made before any surgery is booked.
Anchored in the cheekbone.
A zygomatic implant is a long implant that starts where your teeth will sit and reaches up into the cheekbone, the zygoma. The cheekbone does not shrink when teeth are lost, so it gives a strong, stable anchor even when the upper jaw itself has very little bone.
Depending on what remains, a plan may use two zygomatic implants at the back with regular implants at the front, or four zygomatic implants with none in the jaw at all. The second approach is called a quad zygoma.
The path of each implant follows the shape of your own cheekbone and sinus wall, read from a 3D scan, rather than a fixed route. This anatomy-guided approach, known as ZAGA, keeps the implant head where the tooth needs it and protects the seal of bone and gum around it.
96%of zygomatic implants still in place after six years
98%when fixed teeth were attached straight away
1 dayto fixed teeth, against more than a year with grafting first
Survival: review of 18 long-term studies, 1,349 zygomatic implants, average follow-up over six years (Int J Implant Dent, 2023). Time to teeth: multicentre randomised trial (Eur J Oral Implantol, 2018). In that trial, the zygomatic approach also had fewer failed implants and fewer failed bridges than grafting followed by conventional implants.
Support where the molars used to be.
Most full-arch plans stop at the premolars, because the bone behind them is thin and the sinus sits low. The back teeth of the bridge then hang off the last implant, unsupported. That overhang is called a cantilever, and it is where many full-arch bridges start to fail: screws loosen, frameworks crack, implants are overloaded.
A pterygoid implant passes through the back of the upper jaw, behind the sinus, into the pterygoid plates, a column of dense bone at the base of the skull. It gives the bridge a support point at the molars, so the back teeth are held up from underneath instead of hanging in the air.
- Posterior support
- You chew on molars carried by an implant, not by a lever.
- Wider spread
- Implants spaced from front to back hold a bridge the way a table stands best on legs at its corners.
- No sinus graft
- The implant goes around the sinus rather than needing it to be filled.
- Less load on the others
- In engineering studies, a pterygoid implant reduced the stress on the angled back implant by up to 80%.
The limits
Pterygoid implants are placed at an angle, at the very back of the mouth, in an area the surgeon cannot see directly. The anatomy varies from person to person, so every implant is planned in 3D on your own scan before surgery, by a team that does this routinely.
Most failures, when they happen, happen in the first year. That is why the first set of fixed teeth is a provisional, and the final teeth are made once the implants have proved themselves. Studies report high survival, but long-term data are more limited than for conventional or zygomatic implants.
Back to front: how the plan is built.
Instead of rebuilding bone first, the plan uses the strongest bone that is already there, working from the back of the jaw forward. Each letter is a place to anchor. If one site is not strong enough on the day, the next option takes over during the same surgery.
- PPterygoidDense bone behind the sinus. Molar support first, so there is no overhang at the back.
- AAnteriorImplants in the front of the jaw, including the bone beside and below the nose.
- TTiltedAngled implants that run along the sinus wall in the middle of the jaw.
- ZZygomaticThe cheekbone, used where the other sites cannot carry the bridge.
- iImplantsAll of them joined by one fixed bridge, usually on the day of surgery.
Use the bone you have, in the best place it exists, before asking you to grow new bone.
PATZi protocol: Ponnusamy S, Gonzalez J, Holtzclaw D. Int J Oral Maxillofac Implants 2023;38(5):996-1004.
The surgery is the start. The teeth are the treatment.
An implant in the cheekbone is only as good as the teeth it holds. Where the implants come out of the gum decides where the teeth can go, how the bite works, how your lip sits, how you speak, and whether you can clean underneath the bridge. Get that wrong and a perfectly placed implant still gives a poor result.
So every case is planned from the teeth backwards. The position of the front teeth, the smile line, the bite and the space for the bridge are set first, and the implants are placed to serve them.
The implants are placed by an experienced surgical specialist working from that plan, and Dr. Reshad designs, fits and maintains the teeth.
This kind of planning is one of many parts of prosthodontic training in full mouth reconstruction that are not taught in dental school. Dr. Reshad has more than thirty years of full-arch experience and has taught implant prosthodontics internationally.
A standard plan that didn't fit, rebuilt to fit her.
She came to us after an All-on-4 elsewhere. Her jaw hurt, opening and closing was a daily struggle, and she did not like her smile. Four implants, clustered at the front, were carrying the whole arch. She needed the problem solved, not patched again.
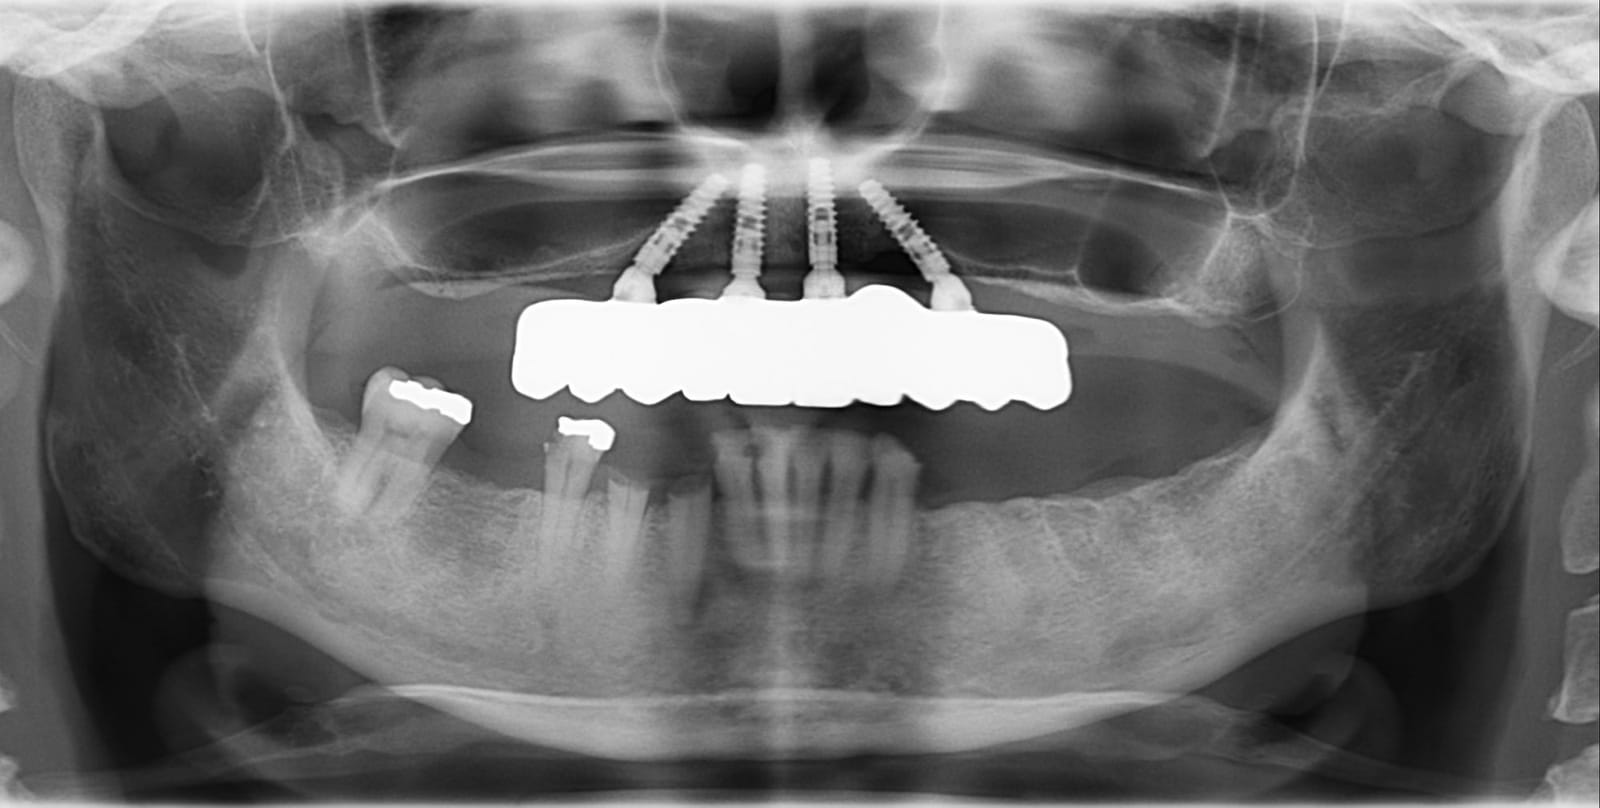
Her X-ray showed four implants grouped in the front of the upper jaw, with nothing supporting the back teeth. Giving her proper function, a comfortable jaw and a smile she liked needed more support, further back than a standard plan ever looks.
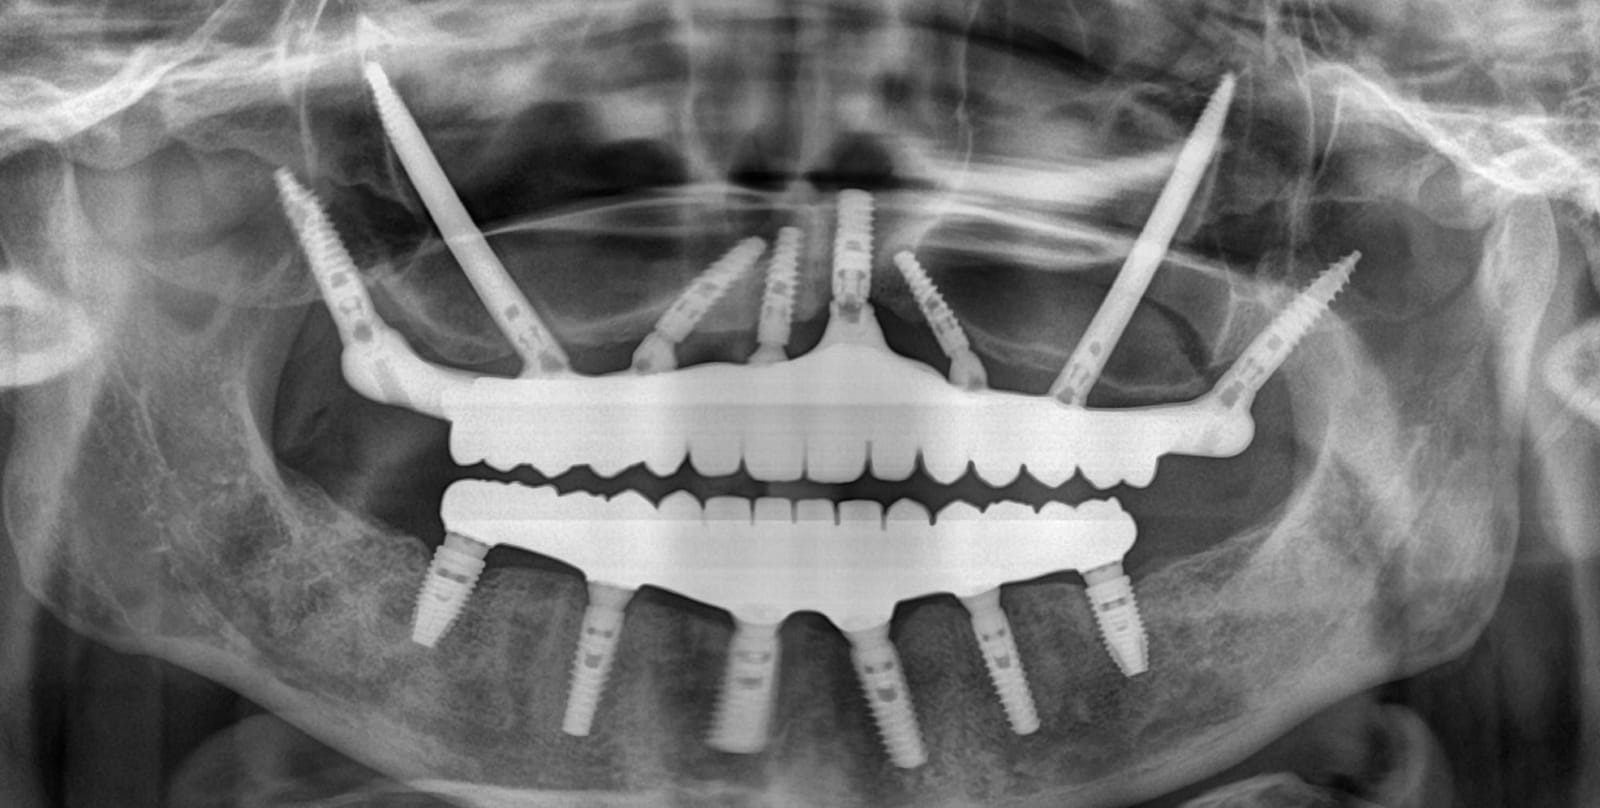
Pterygoid implants at the very back for molar support, zygomatic implants anchored in the cheekbones, and implants at the front, all joined by one bridge. The arch now runs to the molars, with no overhang and the right number of teeth for real chewing.
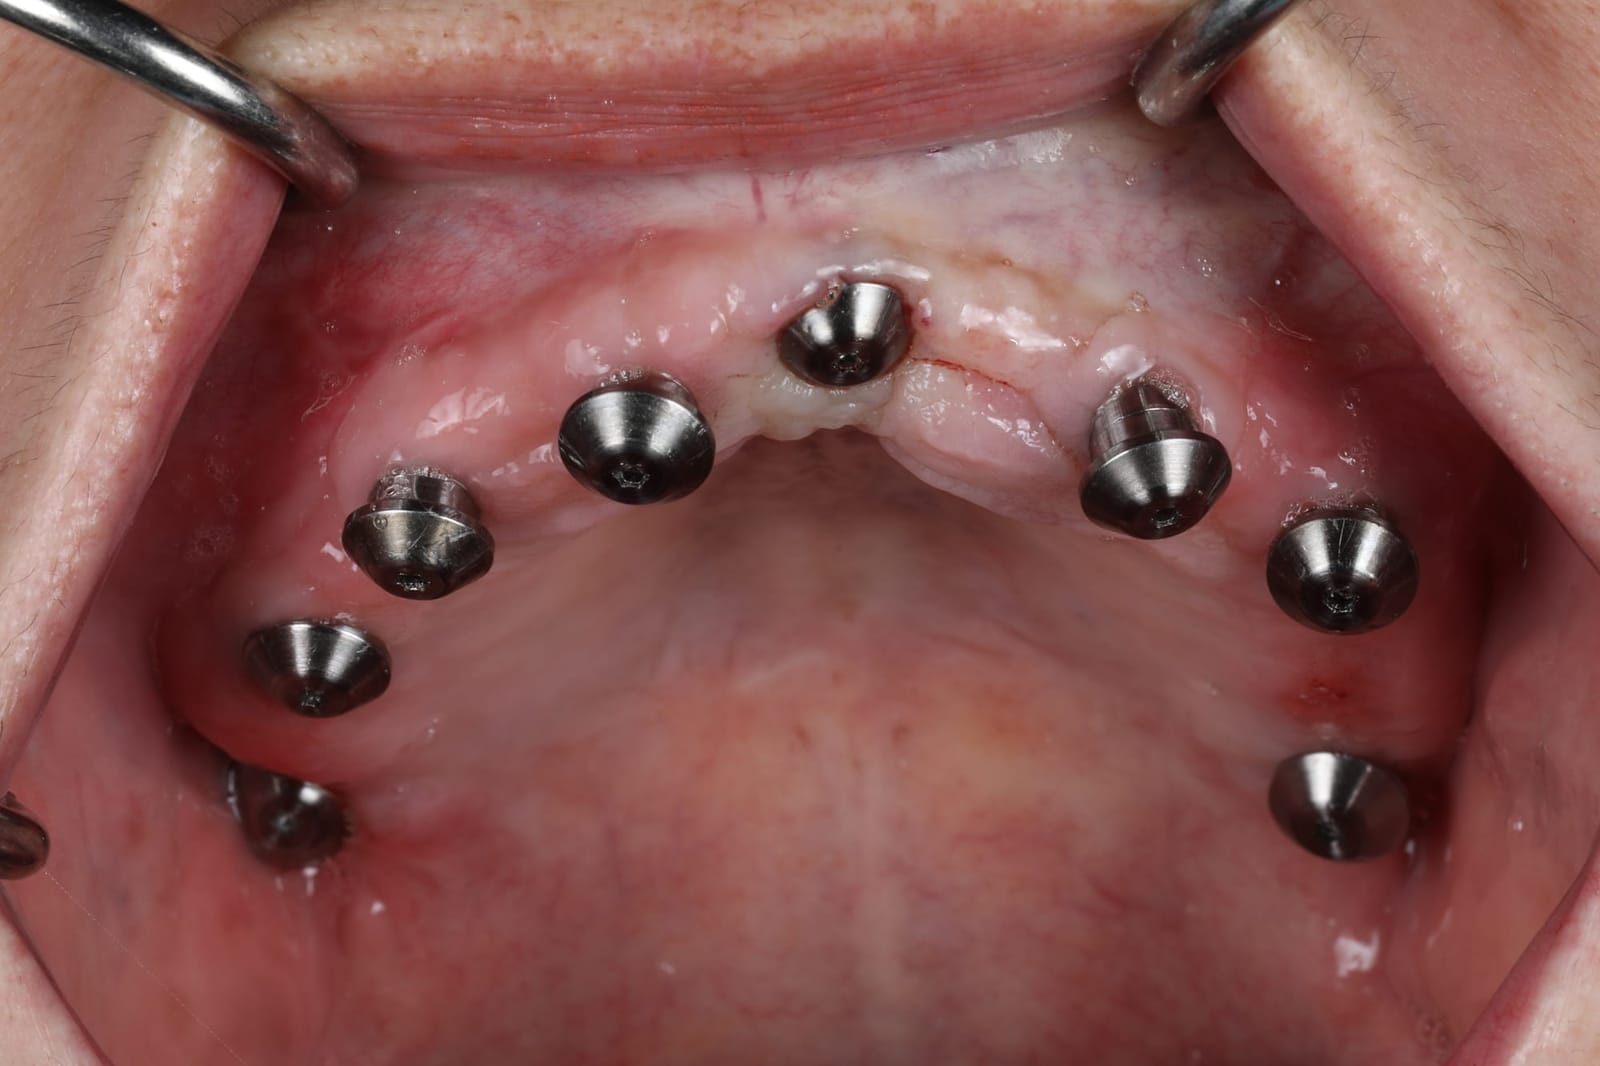
Seen from below, the implants now run around the whole arch, from the front teeth to the molars. That spread is what lets one bridge carry a full set of teeth without an overhang at the back.
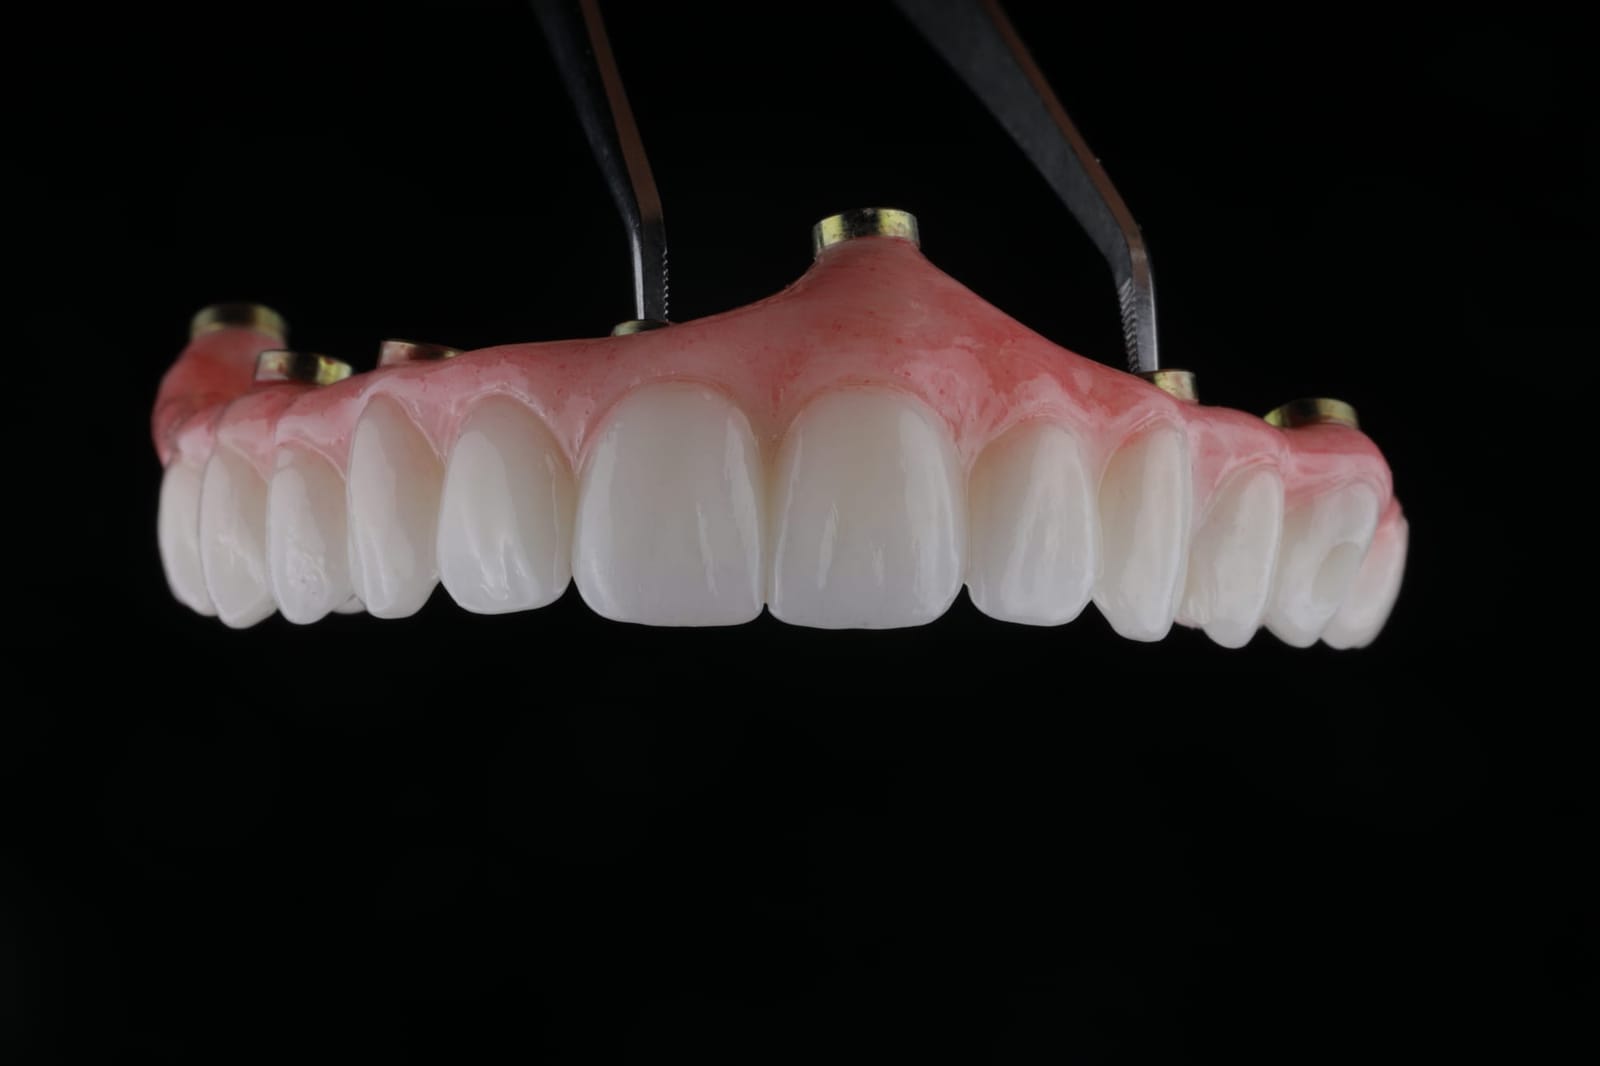
She left surgery with fixed teeth. For four months she ate, spoke and saw them in her own face, and her family weighed in. She chose a brighter shade for the final teeth, a decision made from months of living with them, not minutes in a chair.
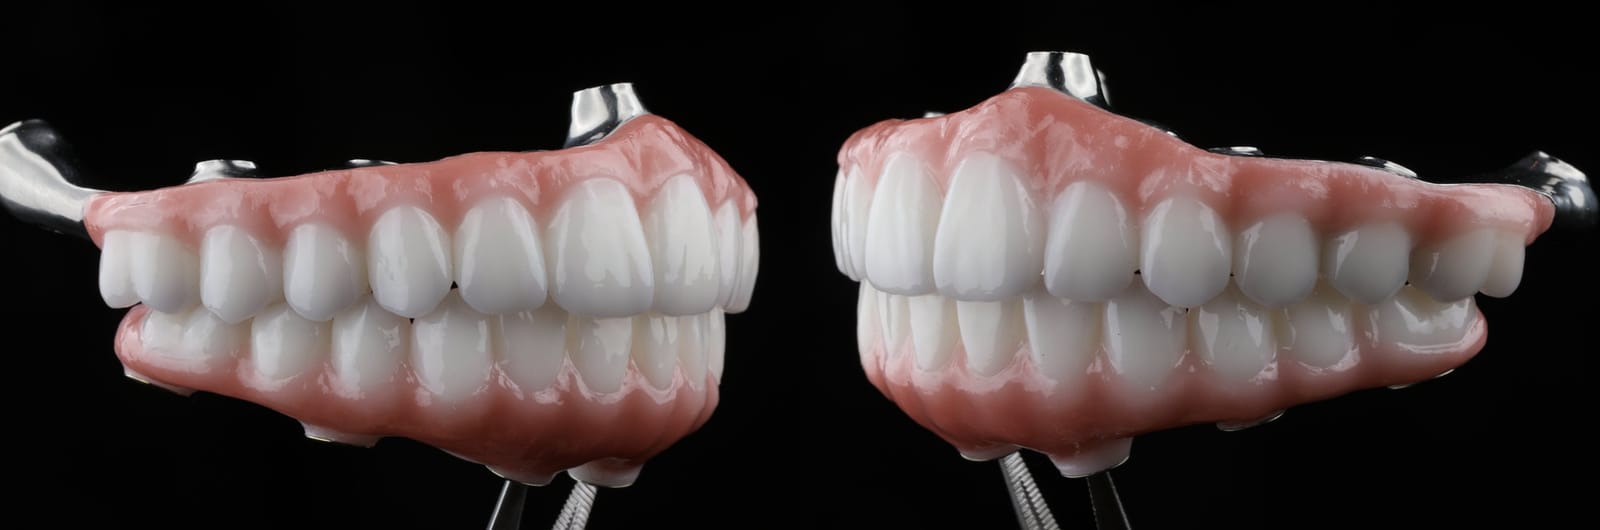
The final bridges use a titanium framework with a zirconia superstructure, the combination with the best long-term survival in Dr. Reshad's own published data. Bite, implant positions and jaw movement were planned as one system, so the jaw moves smoothly and comfortably.

A comfortable jaw, a full set of teeth to the molars, and a smile she chose herself.
Every full-mouth reconstruction is challenging, and surprises can happen even with the best planning. When earlier treatment has not worked out, the aim is simply to find the right plan from here.
Who is a candidate?
- Not enough bone. You have been told there is not enough bone for implants in your upper jaw.
- Grafts. You have had bone grafts that failed, or you would rather avoid grafting.
- A denture. You wear an upper denture and want fixed teeth.
- An overhang. You have a full-arch bridge with long, unsupported back teeth, or one that keeps breaking.
- Failing teeth. Your upper teeth are failing and you want to move to fixed teeth with as few surgeries as possible.
It may not be right if you have untreated sinus disease, certain medical conditions or a history of radiation to the area. A scan and an examination will tell.
Bring your scans and your questions. Nothing is decided on the day.
Bring your X-rays, a plan you have been given, or simply your questions. You will leave with an honest answer, even if it is not the one you expected.
Sources. Brennand Roper M, Vissink A, Dudding T, et al. Long-term treatment outcomes with zygomatic implants: a systematic review and meta-analysis. Int J Implant Dent 2023;9:1-22. · Davó R, Felice P, Pistilli R, et al. Immediately loaded zygomatic implants vs conventional dental implants in augmented atrophic maxillae: 1-year post-loading results from a multicentre randomised controlled trial. Eur J Oral Implantol 2018;11(2):145-161. · Ponnusamy S, Gonzalez J, Holtzclaw D. The PATZi protocol. Int J Oral Maxillofac Implants 2023;38(5):996-1004. · Aparicio C. A proposed classification for zygomatic implant patients based on the zygoma anatomy guided approach (ZAGA). Eur J Oral Implantol 2011;4(3). · Bidra AS, Huynh-Ba G. Implants in the pterygoid region: a systematic review of the literature. Int J Oral Maxillofac Surg 2011;40(8):773-781. · Broumand V, Kirchhofer J. Pterygoid implants as alternative to bone augmentation in implant dentistry. Br Dent J 2025;238(2):99-109. Images. Photographs, radiographs and video are of Dr. Reshad's own patient, shared with consent; her full case is on this site.
Implant teeth do not break by accident. They break where the bite was never planned.
A chipped tooth on your bridge. A screw that keeps loosening. A piece that came off at the back. If you have fixed implant teeth and this sounds familiar, the implants are probably fine. What failed is the plan for how your jaw closes. This page explains how Dr. Mamaly Reshad builds that plan before any teeth are made, in the order he teaches it to dentists, and how he finds the cause when someone else's work has failed.
- 95%+
- of implants survive ten years
- Mechanical
- the leading complications: chipping, screws, frames
- 4 steps
- most offices skip before making the teeth
- ~2%
- of dentists are prosthodontists
Full-mouth reconstruction is always difficult. For everyone.
Rebuilding an entire mouth on implants is among the most demanding things in dentistry, and it is demanding for every clinician who takes it on. There are surprises during treatment: bone that is not where the scan said it would be, a bite that will not settle, a provisional that fractures without warning. Even with careful planning and the best of efforts, complications can still happen, and when they do it is rarely because somebody did not care.
So this page is not a verdict on anyone else's work. If you have had a difficult outcome, your previous dentist may well have done everything reasonably expected. What this page offers is a way of understanding why implant teeth fracture and loosen, grounded in how the lower jaw actually works, so that the cause can be found and the next attempt rests on a stable foundation. That is the point of a second opinion: not blame, but a clear diagnosis and a plan.
Three things matter. One of them keeps the other two alive.
Every full-arch case has to get three things right: the biology (bone and gum), the esthetics (the smile) and the function (how the teeth meet). The longer Dr. Reshad practises, the more of his attention goes to function, because a beautiful prosthesis that fractures is a disaster the patient lives with, and a functional one buys the biology time and keeps the esthetics on the face.
The research says the same thing. Implants survive: above 95 percent at ten years. What fails is the prosthesis, and it fails mechanically: chipped veneers, loose screws, cracked frames. The common driver is overload, from long cantilevers, poor fit, grinding, and lost support at the back. Function is not the third circle. It is the one holding the other two up.
Papaspyridakos et al. 2012 (systematic review); Bozini et al. 2011; Wittneben et al. 2014; Chrcanovic et al.
Fix the mandible first. Brånemark knew it sixty years ago.
The first osseointegrated bridges went into edentulous lower jaws. Per-Ingvar Brånemark's first patient, in 1965, received fixtures in the front of the mandible, a cast framework and acrylic teeth: a stable base first, then the occlusion. The ten-year report came in 1977, the fifteen-year follow-up in 1981. Sixty years on, the sequence has not changed. Stabilise the lower jaw, then build the bite on it.
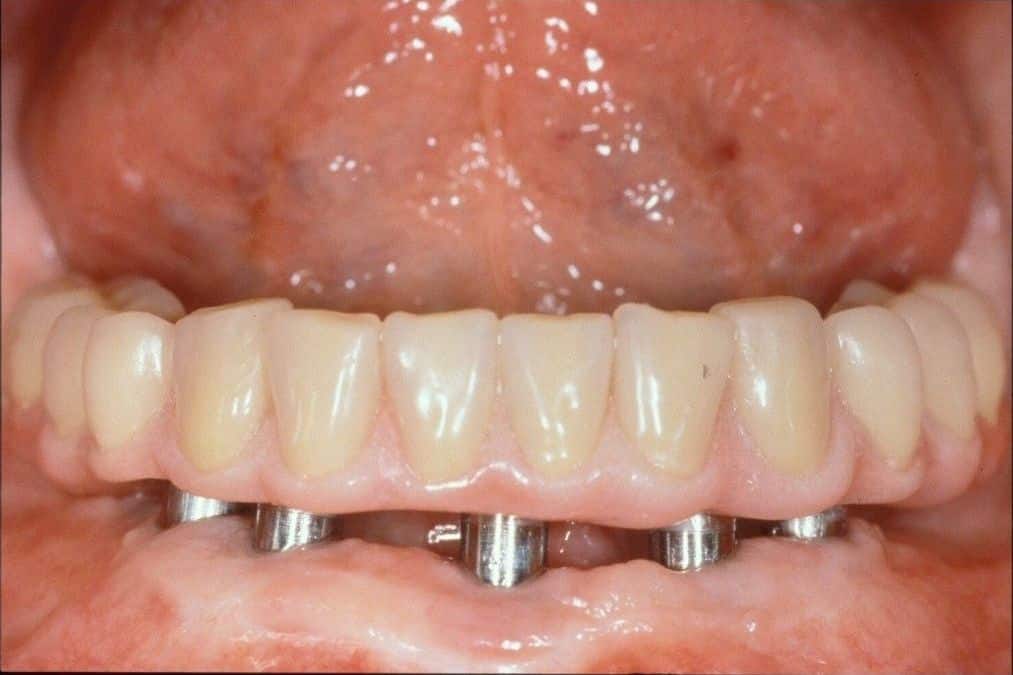
Brånemark PI et al. Scand J Plast Reconstr Surg 1977;11(suppl 16). Adell R, Lekholm U, Rockler B, Brånemark PI. Int J Oral Surg 1981;10:387-416.
Six steps, one mandible.
This is the sequence Dr. Reshad teaches and the sequence he uses on every patient. Foundation first. Then the levers. Then the occlusion.
- 01The tripodStabilise the mandible first.Read it below ↓
- 02BiomechanicsSpread, short levers, passive fit.Chapter to come
- 03Space and supportRestorative space. Eight occluding units.Chapter to come
- 04Zero cantileverImmediate load, zirconia, the failed All-on-4.Chapter to come
- 05Anterior guidanceSet it, verify it, test drive it.Read it below ↓
- 06The neutral zoneOne case, from collapse to delivery.Chapter to come
Foundation first. Then the levers. Then the occlusion.
This page covers step one, the tripod, and step five, anterior guidance, in full. The other four follow as their own chapters.
A stable mandible is the foundation. Without it the case falls apart before it is finished.
Your lower jaw rests on three points: the two joints at the back, and the front teeth. Dr. Reshad calls it the inverted tripod. When all three are stable at the right height, the back teeth hold the bite open and the front teeth guide the jaw. Lose any leg and the whole structure shifts, and something has to take the load that the lost leg was carrying. That something is usually a tooth on your bridge.
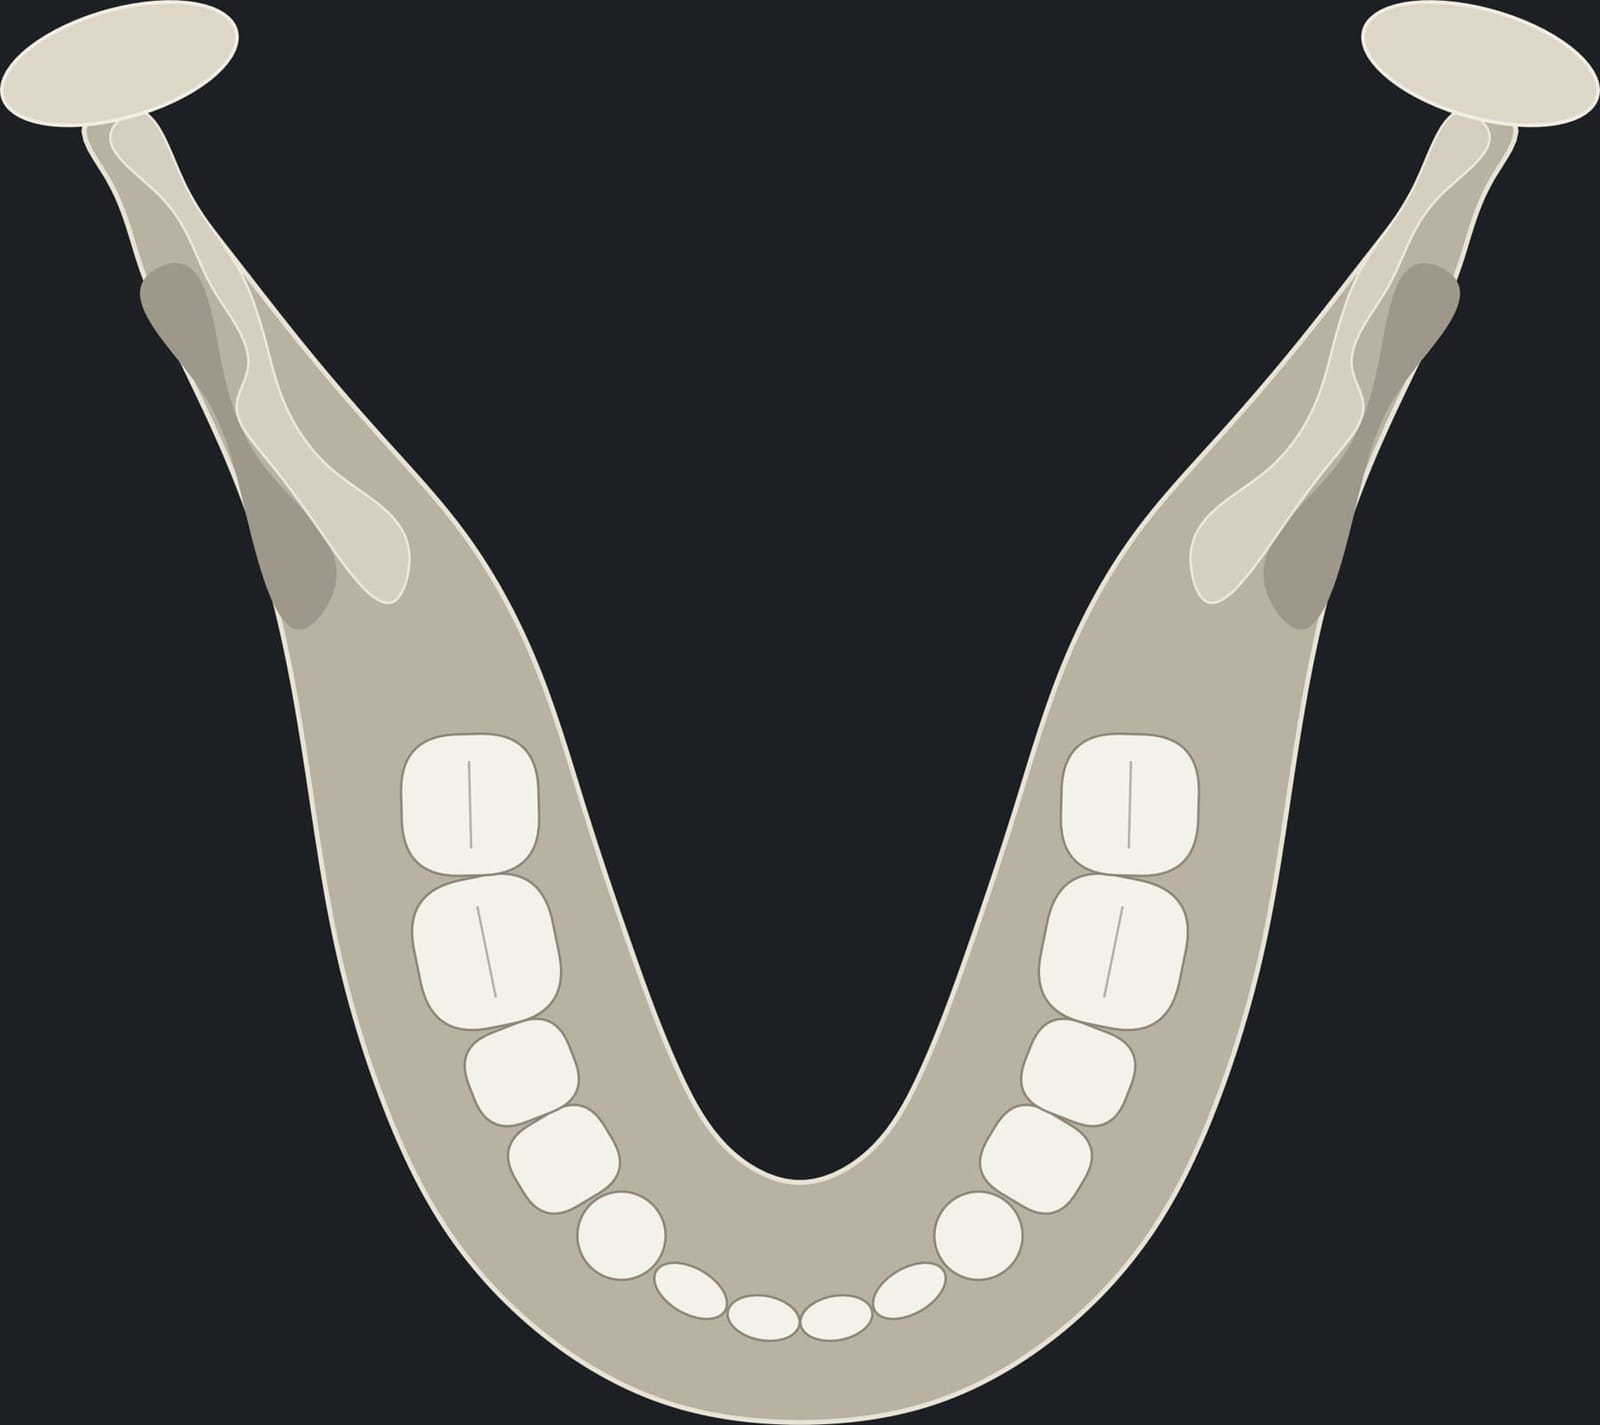
Dawson PE. Functional Occlusion: From TMJ to Smile Design. Mosby, 2007.
It is common to build the new teeth into the bite you walked in with. In a collapsed mouth, that bite is the problem.
When teeth have worn, drifted or been lost, the jaw closes into a collapsed, over-closed position and the muscles learn to hold it there. Build implant teeth into that position and you have built the failure in. Dr. Reshad adds four steps before any teeth are made. They take time, and they are easy to leave out under the pressure of a busy schedule. They are the difference between a bite you can find again and one you cannot.
The common approach
- 01Take the bite as it is. The patient closes “where it feels normal”, which in a collapsed arch is the wrong place.
- 02Make the teeth to that bite. The over-closure, the drift and the lost height are copied into the new prosthesis.
- 03Adjust when it chips. Grind here, add there, replace the screw. Repeat.
What Dr. Reshad does first
- 01Deprogram. Release the muscles. A collapsed bite hides the true joint position, so the muscles are switched off before anything is recorded.
- 02Record centric relation. Not the habitual bite. In a collapsed arch the habitual bite is the wrong position; centric relation is the one the joints return to every time.
- 03Restore the vertical. Open the jaw back to the height that was lost, and record it in that joint position.
- 04Reposition the teeth. Move drifted, collapsed teeth to where esthetics and function say they belong, on the trial teeth, before anything is final.
“Centric relation is repeatable. The habitual bite is not. So I rebuild from a position I can find again, every time. That is predictability.”
Every incisor touches. Both canines touch. Nothing else holds the height.
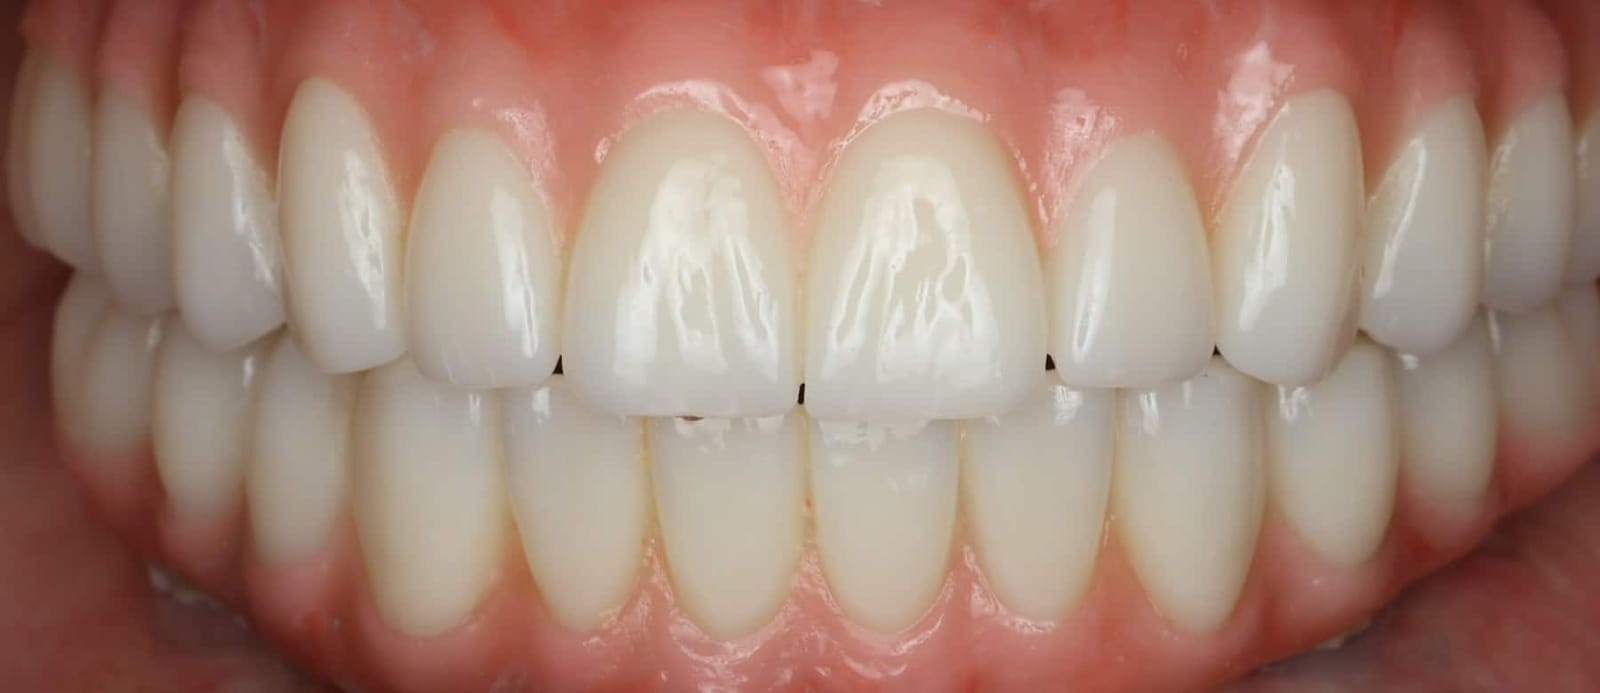
A stable stop is a sharp lower edge meeting a defined shelf on the back of the upper tooth. Every incisor, and a solid stop on each canine. When those stops exist, the bite stays open at the right height. When they are missing, teeth migrate, the front overloads, and the bite closes down year by year.
Dr. Reshad also refuses “freedom in centric”: a broad, flat closing area where the patient cannot find where to bite. He builds a controlled centric: the back teeth hold firmly, the front contacts are slightly lighter, and a thin shim between the front teeth drags but does not tear. Guided, not overloaded.
- Stable stop. Every incisor touches a sharp edge on a defined cingulum. Both canines hold on each side.
- No stop. Migration and overload. Nothing holds the vertical and the bite closes.
A small change at the front costs the back of the mouth.
This is the animation Dr. Reshad shows dentists. Watch what one poorly planned decision at the front does to the molars.
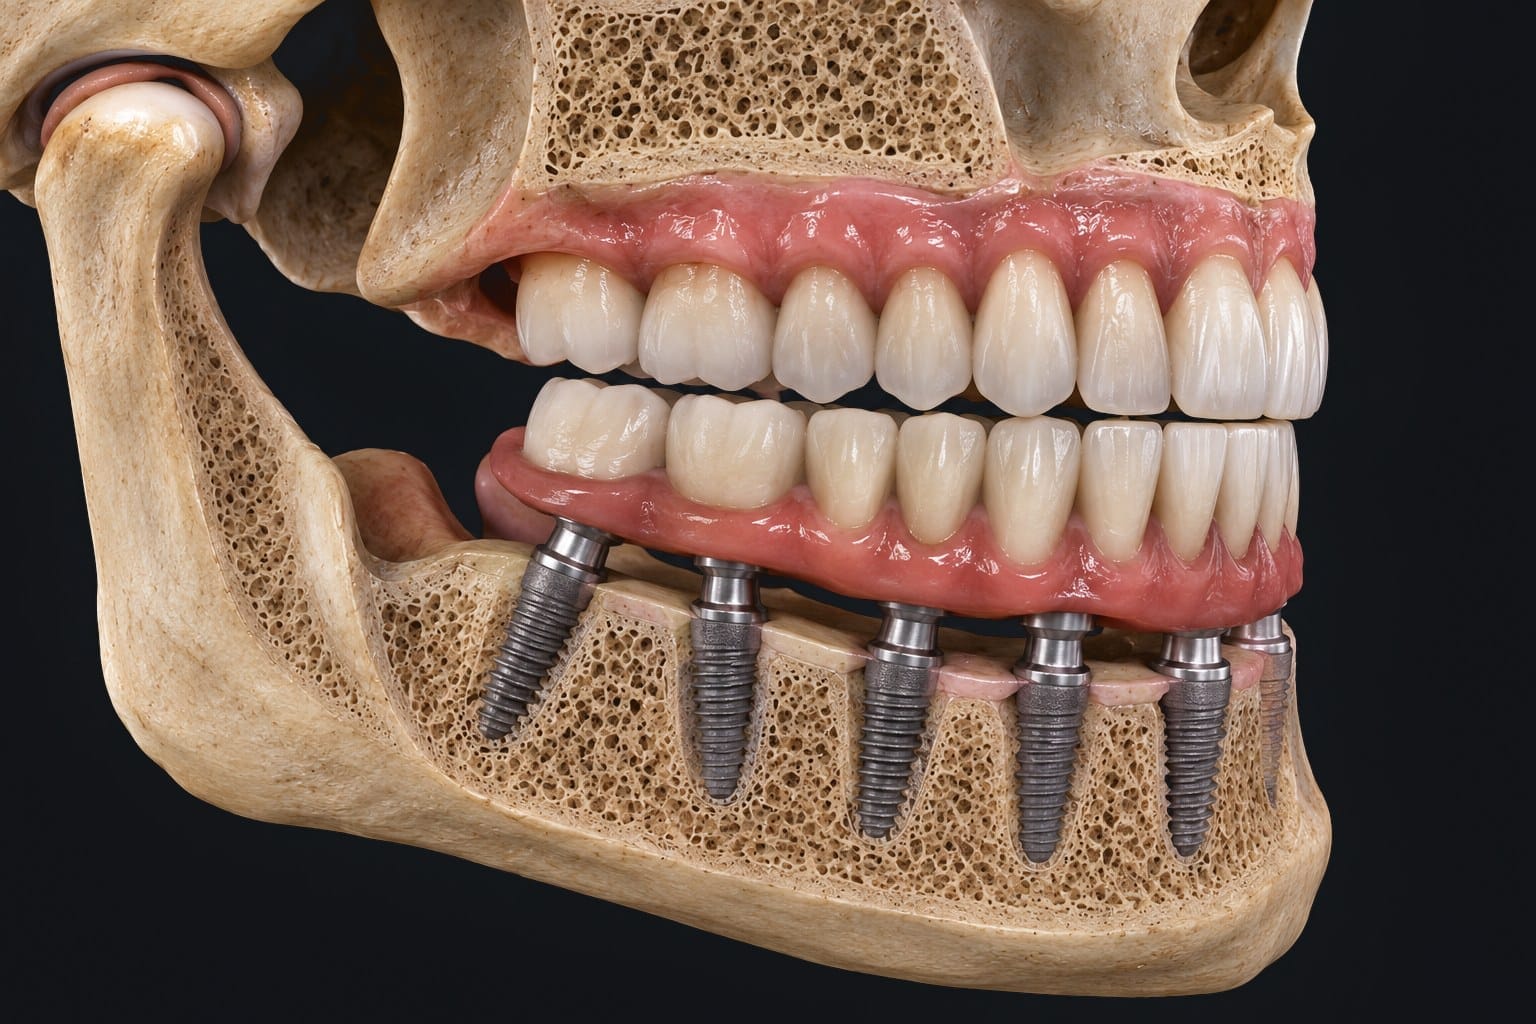
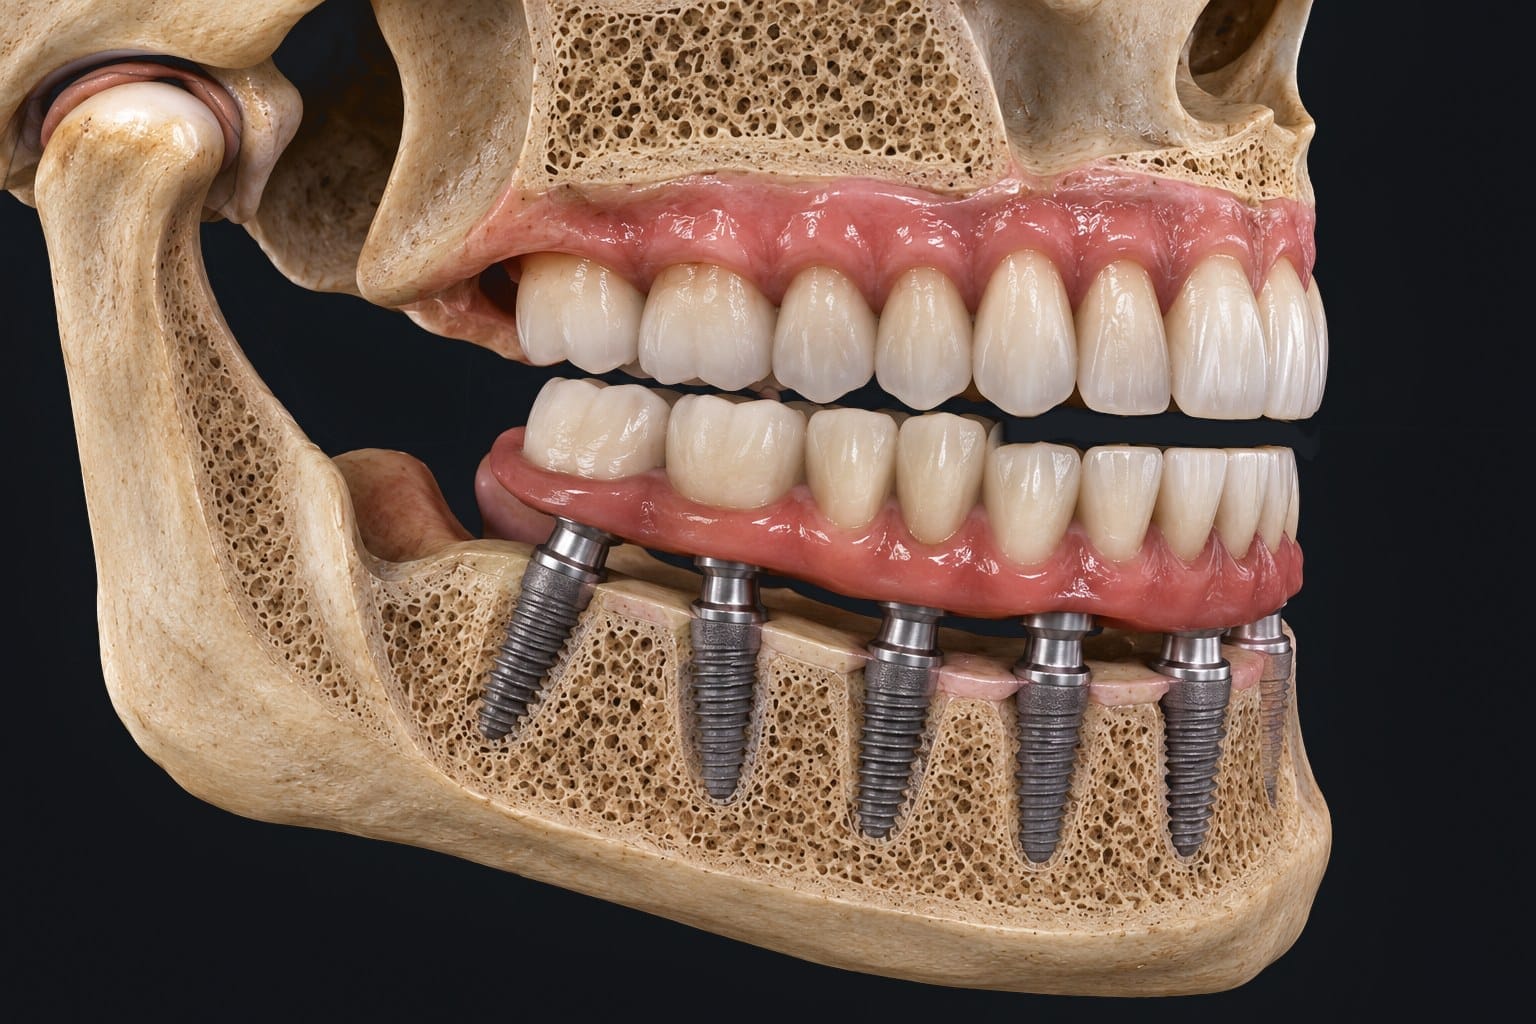
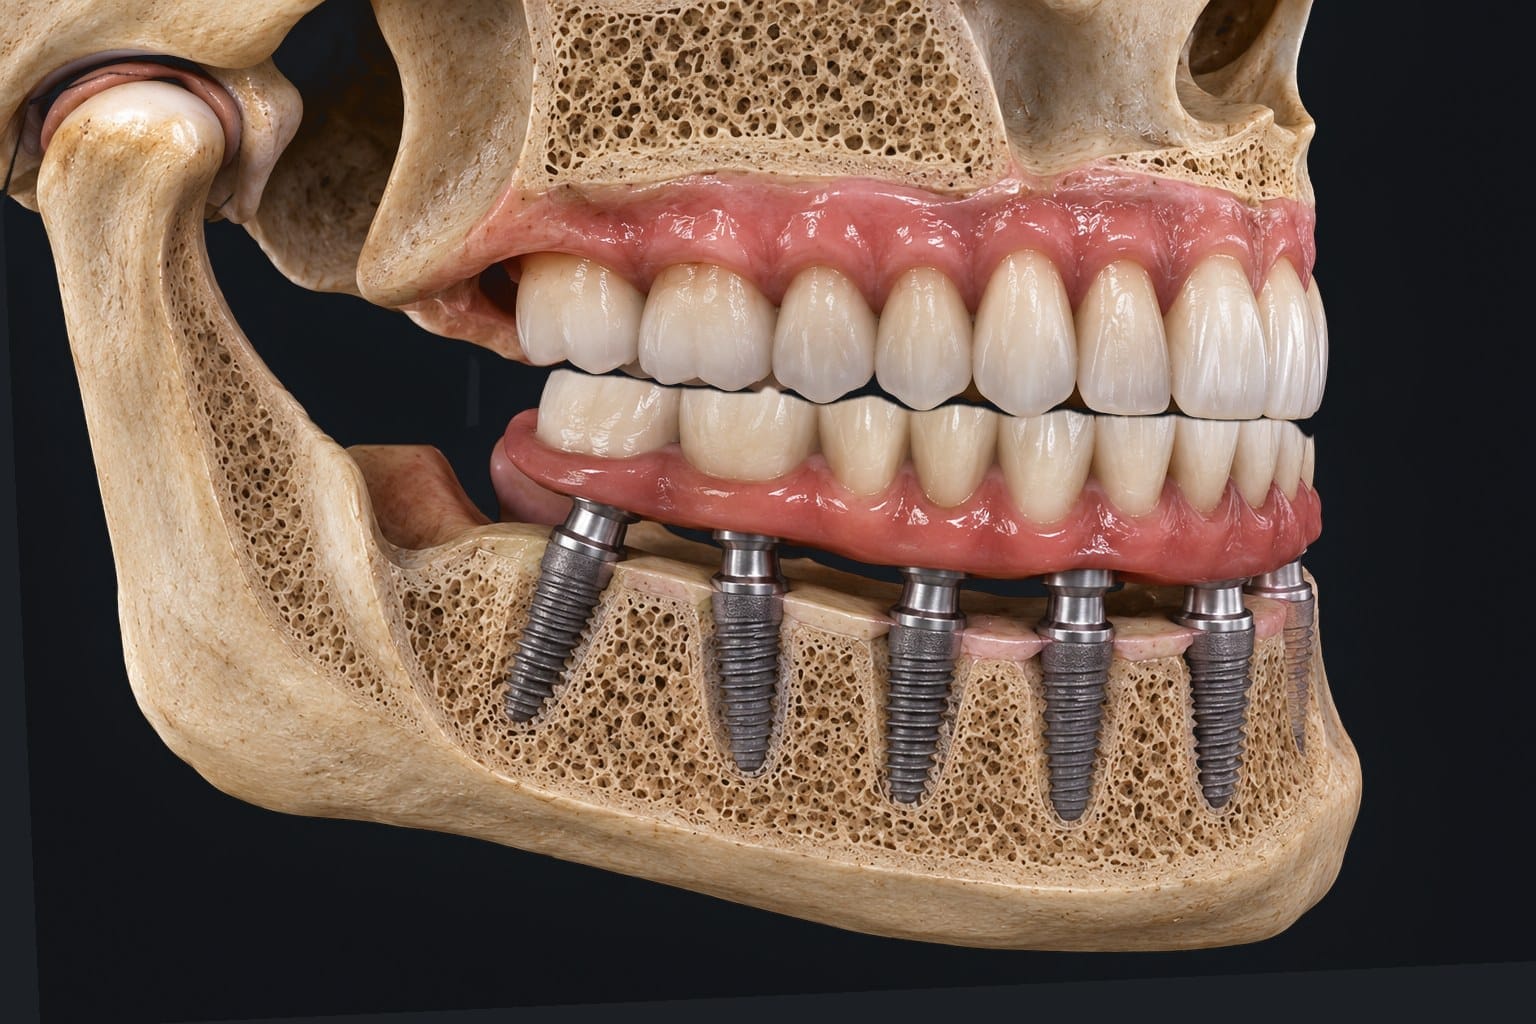
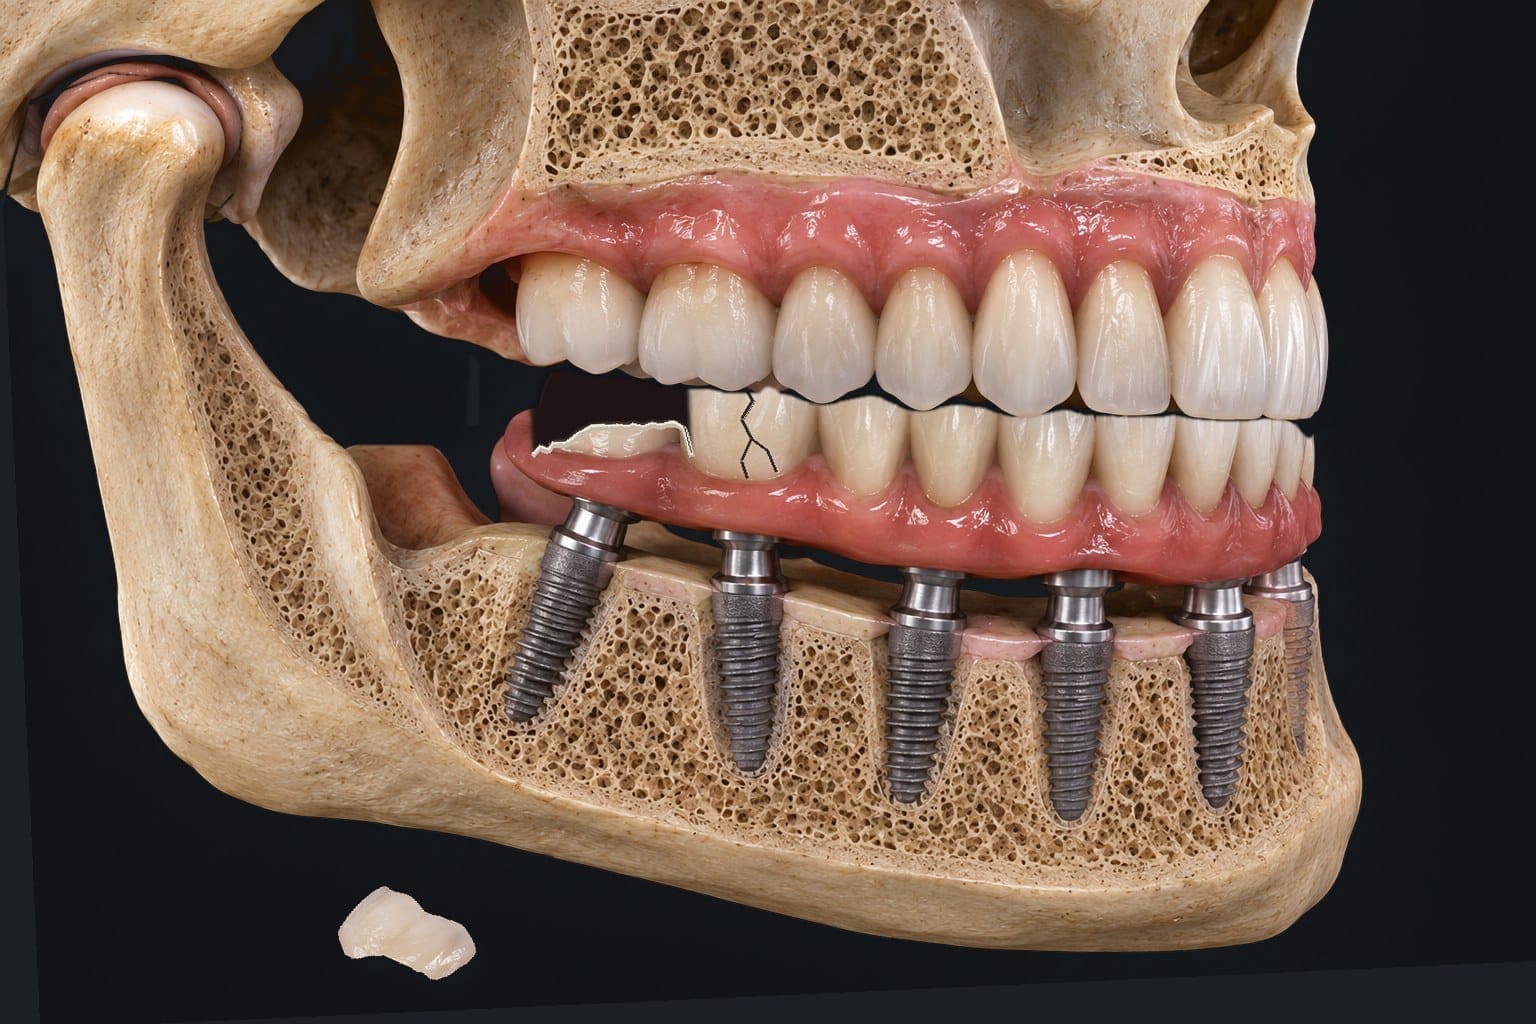
01 · Anterior teeth reduced. Poor planning removes the canine stop.
- 01Anterior teeth reduced. Poor planning removes the canine stop.
- 02The mandible over-closes. The front collapses into a deep bite.
- 03Second molar space collapses. The vertical room for a tooth at the back is gone.
- 04Fractures, lost molars. The thin back teeth crack and the second molars become hard to restore.
Lose the front, break the back.
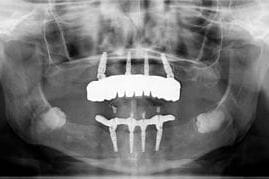
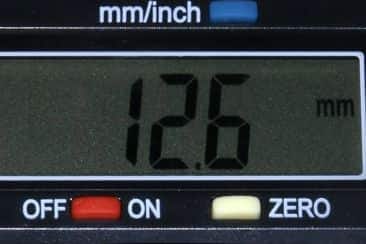
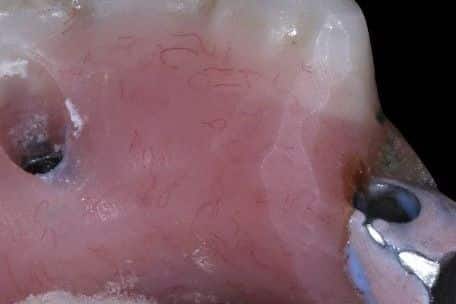
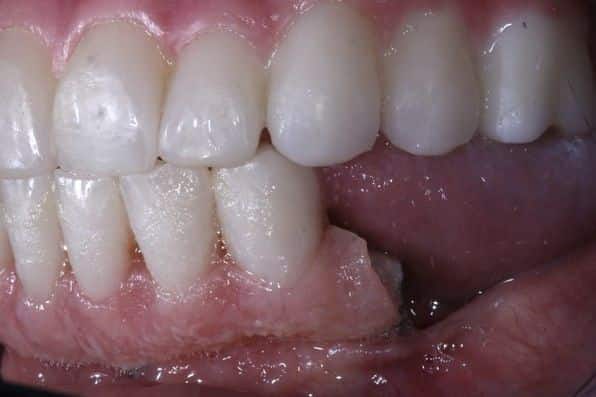
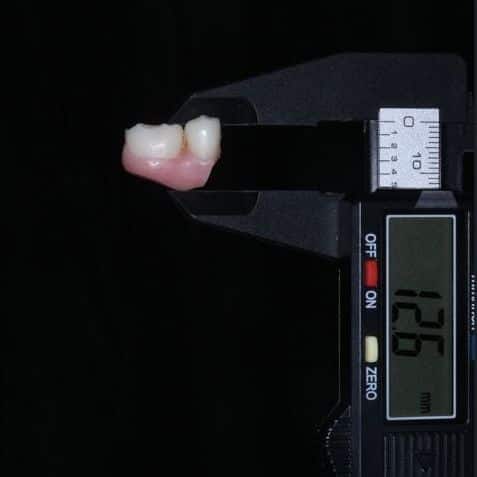
This patient arrived with a lower implant bridge whose back segments kept snapping off. The answer was at the front. Years of grinding had worn the upper front teeth down, the lower jaw had closed, and the vertical height was lost. With the height gone, the space at the back shrank until there was no longer room for teeth, acrylic and a framework. We measured 12.6 millimetres where a hybrid prosthesis needs 15 to 17. With that little room, the thin posterior segments were always going to be at risk.
That is how Dr. Reshad reads a failed case: not “the bridge is weak”, but “which leg of the tripod was lost, and where did the load go”. Here it went to the back, and the back broke.
12.6 mmmeasured posterior space · a hybrid needs 15 to 17
Zitzmann NU, Marinello CP. 2000.
Protect the front, or the back pays for it. The tripod works both ways.
Four rules Dr. Reshad applies to every full arch.
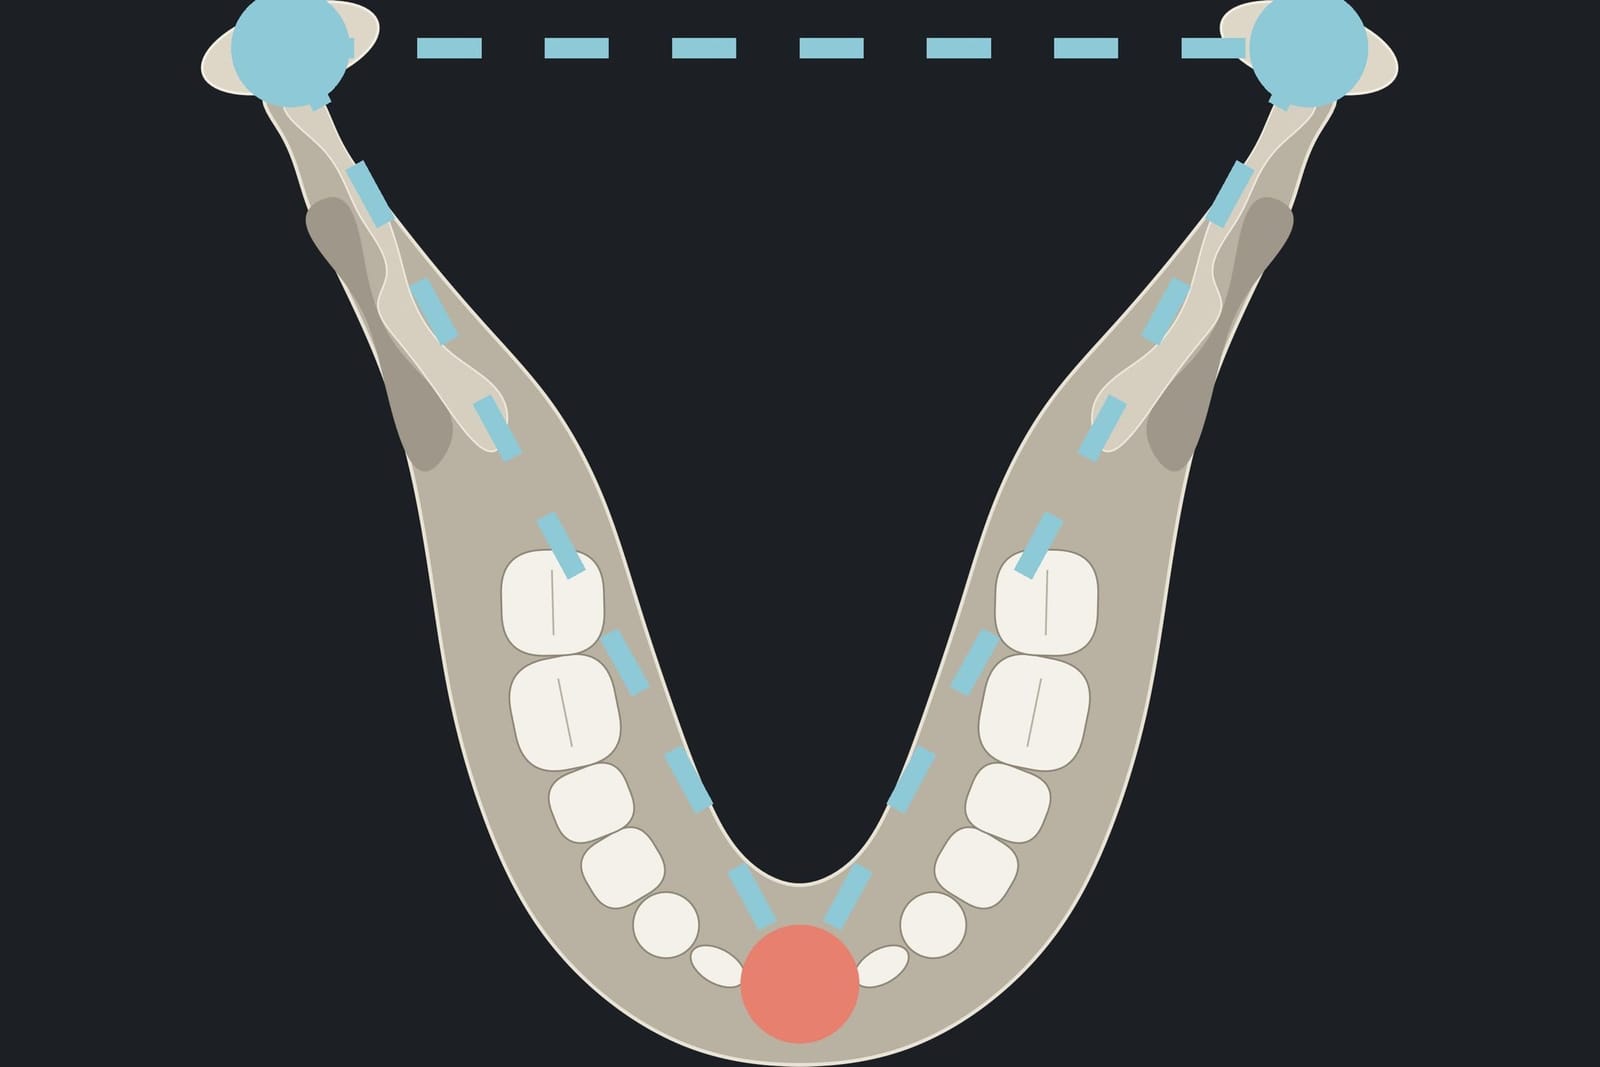 01Stabilise the mandibleFirst
Fixed, early. The tripod before anything else.
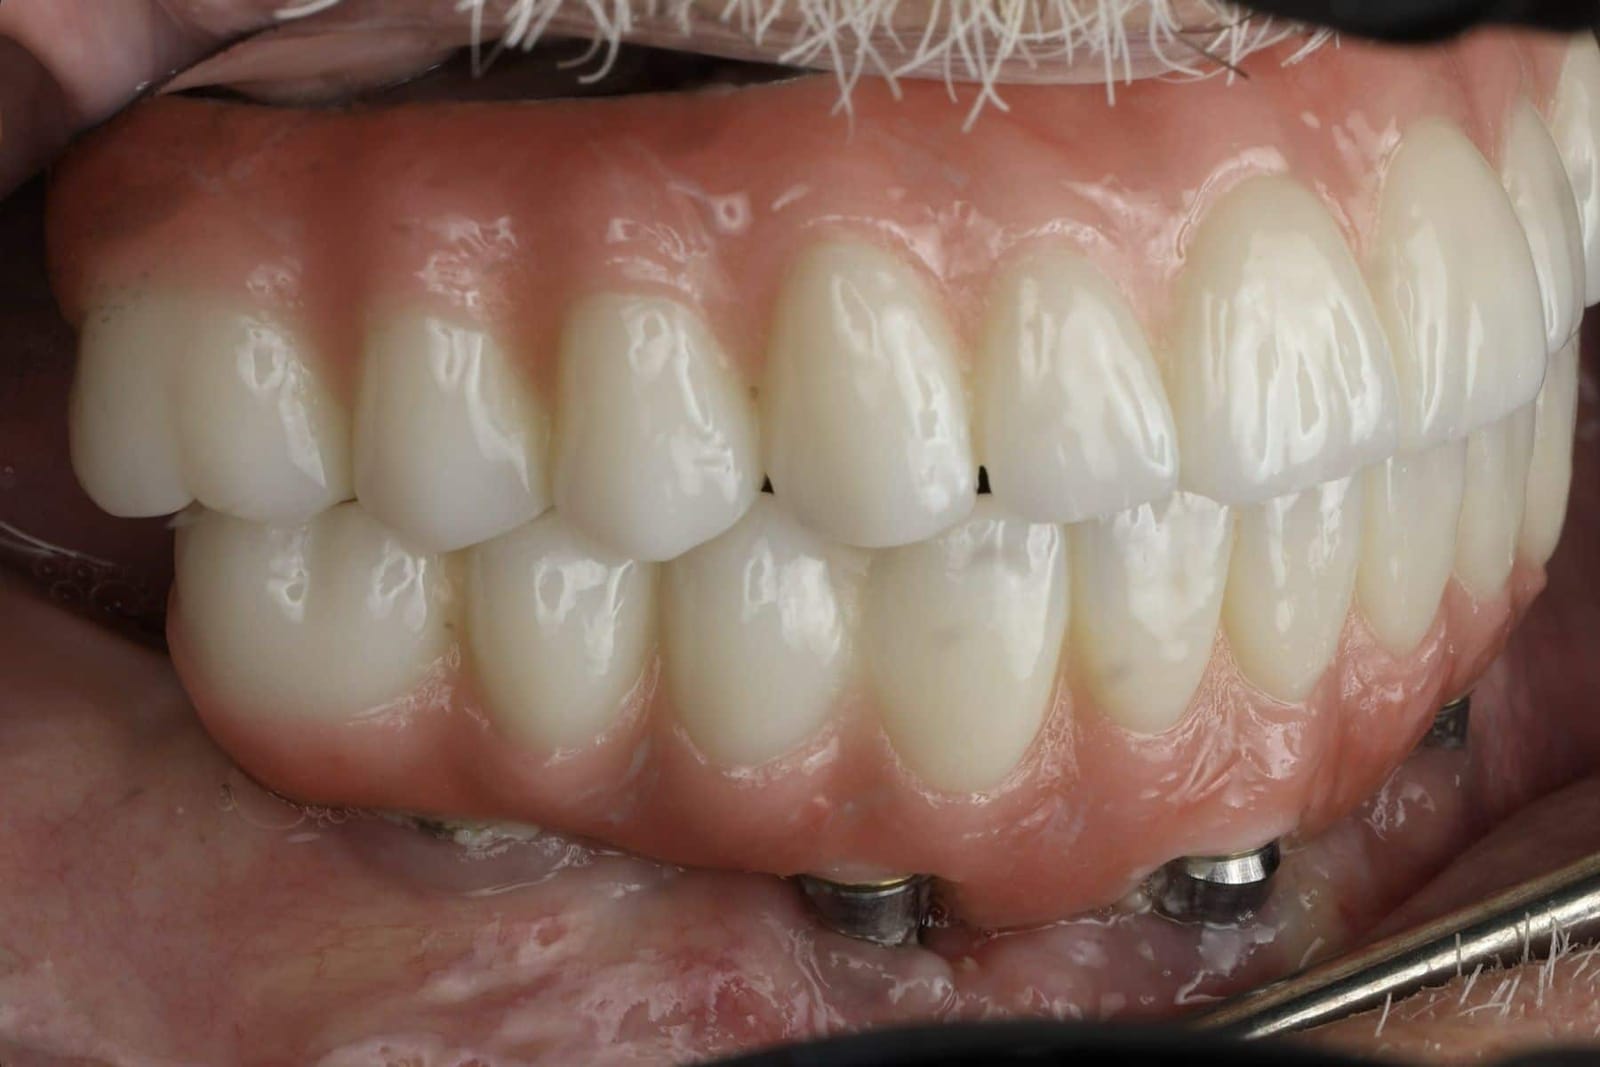 02Posterior support8 units
At least eight occluding units so the back carries the load.
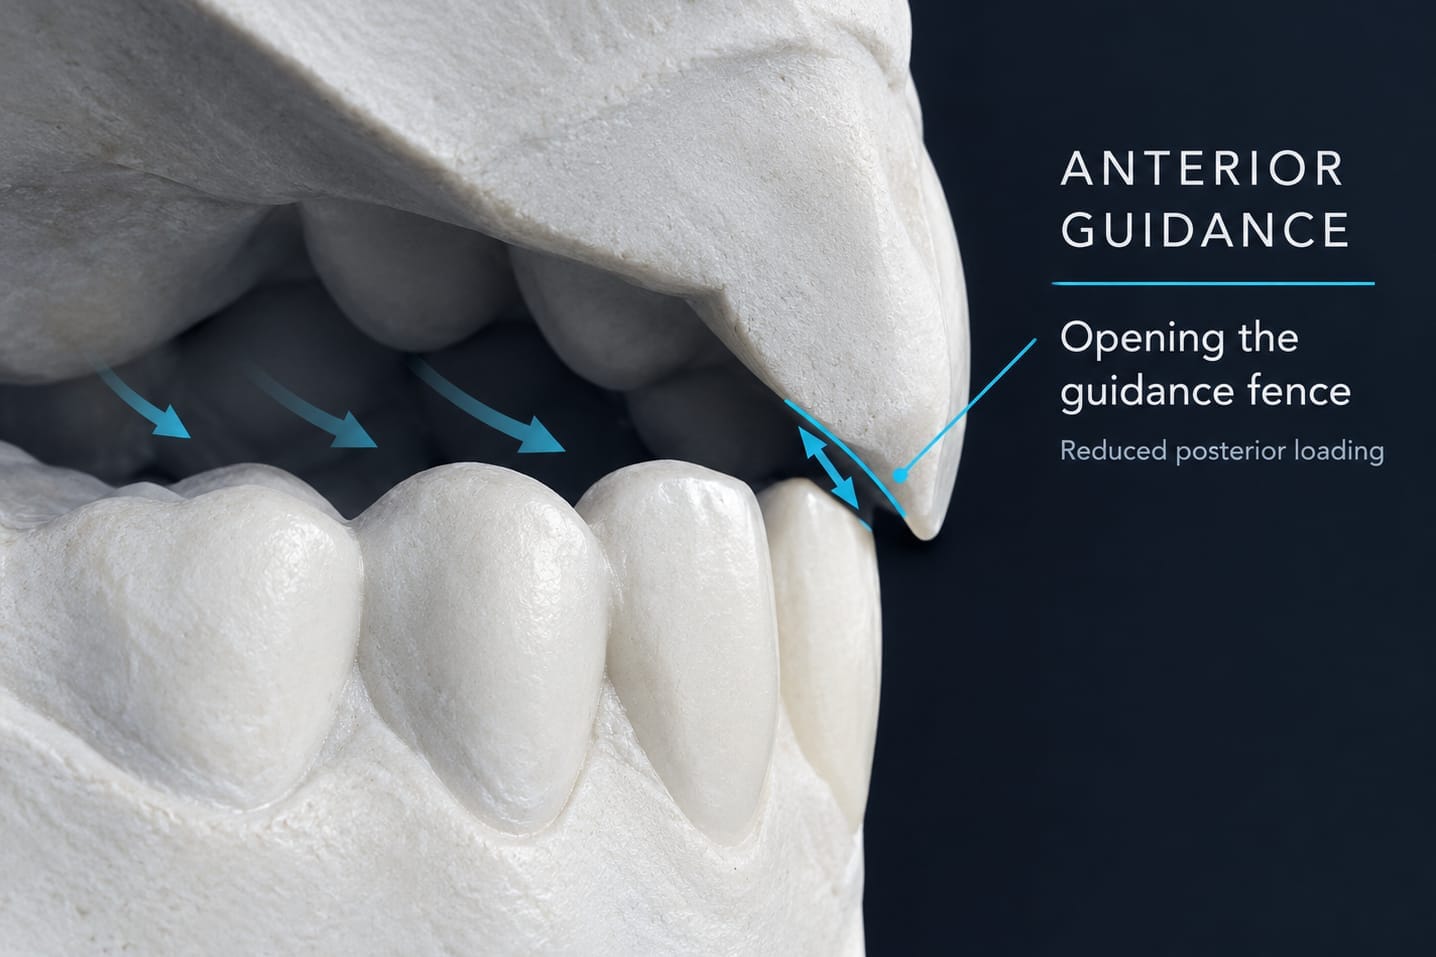 03Anterior guidanceShallow
A mutually protected occlusion: the front guides, the back is unloaded on movement.
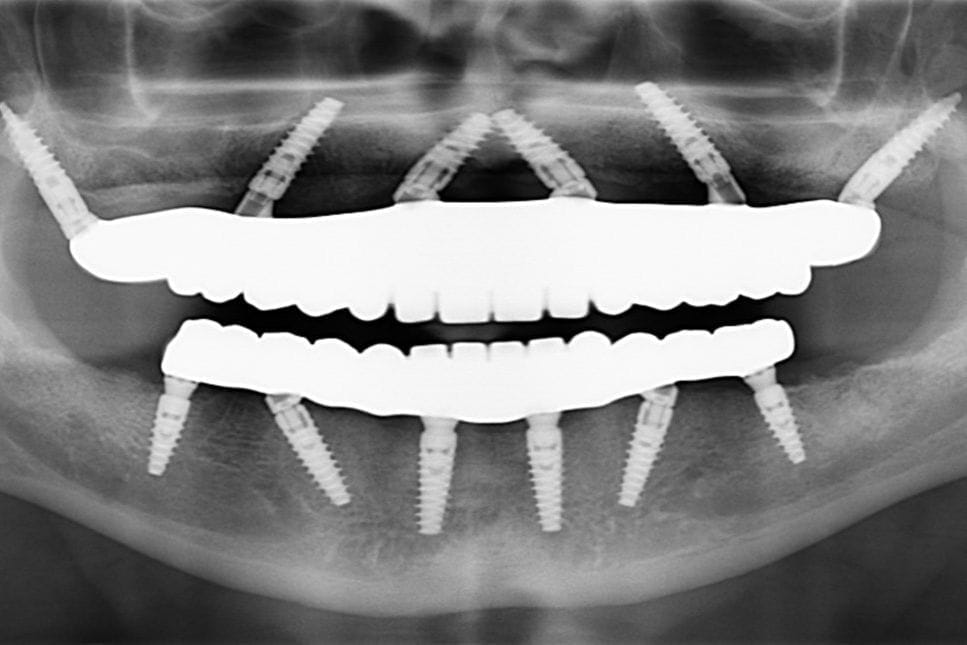 04Minimise cantileversSpread
Pterygoid, zygomatic or more implants, so no long lever hangs off the end.
Stable mandible. Posterior support. Guided front. No long levers.
What a second opinion with Dr. Reshad actually looks at.
A second opinion here looks past the bridge to the tripod it sits on. The questions are the same ones on this page, asked about your mouth.
- Are the joints seated? Deprogrammed, and recorded in centric relation, not the bite you have learned to hold.
- Are there anterior stops? Every incisor, both canines. If not, what has been drifting and overloading.
- Was the vertical lost? And did the lost height take the posterior space with it. Measured, in millimetres.
- Where did the load go? Cantilevers, fit, grinding, missing posterior units. The fracture tells you.
- Can it be rebuilt on a stable base? A straight answer: adjust, remake, or add support first.
DDS, MSc (Distinction), FICD, MICOI. The specialty that plans the whole result and works backwards to the surgery.
Fixed and Operative Dentistry. Published author in peer-reviewed journals and textbooks.
This page is section one of the full-arch mandible lecture he gives internationally, written for patients.
“Decide where the teeth belong first. Then make everything else serve that position.”
If something on your bridge keeps breaking, stop replacing it and find out why.
Bring the bridge, the history and the radiographs if you have them. One visit, and you will know which leg of the tripod was lost and what it would take to rebuild on a base that holds.
Sources. Papaspyridakos P et al. Implant and prosthodontic survival rates with implant fixed complete dental prostheses in the edentulous mandible after at least 5 years: a systematic review. Int J Oral Maxillofac Implants 2012. · Bozini T et al. 2011. · Wittneben JG et al. 2014. · Chrcanovic BR et al. · Dawson PE. Functional Occlusion: From TMJ to Smile Design. Mosby, 2007. · Brånemark PI et al. Scand J Plast Reconstr Surg 1977;11(suppl 16). · Adell R et al. Int J Oral Surg 1981;10:387-416. · Zitzmann NU, Marinello CP. 2000. Images. Diagrams and animation frames are from Dr. Reshad's lectures. Clinical photographs are of his own patients, shared with consent, with no faces shown.
The inside of your front teeth matters as much as the outside.
Everyone looks at the front of the front teeth. Almost nobody looks at the back of them. Yet the back surface of the upper incisors is a ramp that your lower jaw rides on every time you chew, speak or grind, and its angle decides how much force every tooth in your mouth takes. Get it right and the teeth stay pretty for longer, the jaw is comfortable and nothing chips. Get it wrong and the prettiest teeth in the world start breaking. This is the part of the design that is always overlooked, and the part Dr. Mamaly Reshad spends the most time on.
- ≈35%
- less force for every 10° the ramp is flattened
- 15 to 20%
- of the lower incisor should overlap, no more
- 4 steps
- set, verify, test, copy
- Weeks
- of test driving on provisionals before anything is final
A ramp on the back of the upper teeth. The lower teeth glide along it.
When you slide your lower jaw forward or to the side, the lower front teeth travel along the inside surface of the upper front teeth. That surface is a ramp. As the jaw slides along it, the back teeth are lifted apart so they do not grind against each other. Dentists call this anterior guidance: the front teeth guide the jaw and protect the back teeth.
The angle of the ramp is everything. A steep ramp (a deep bite with the upper teeth hanging well down over the lowers) is a wall the jaw has to climb. The muscles work harder, the front teeth take a heavy sideways load, and sooner or later something gives: a chip, a loose screw, a cracked tooth, a sore jaw. A shallow, smooth ramp lets the jaw glide, keeps the back teeth apart with little effort, and spreads the force where it belongs.
“Shallow and smooth. The lower incisors glide along the upper lingual surface. That is the whole design, and it decides whether the case lasts.”
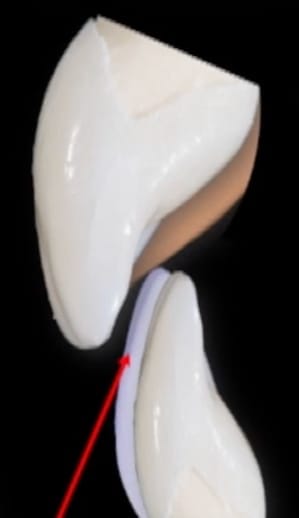
Set. Verify. Test. Copy.
Anterior guidance is never guessed and never left to the laboratory. It is built in four steps, and nothing becomes final until the patient has lived with it.
- 01SetDecide where the upper front teeth belong: how much shows, how long they are, and the angle of the front face. The front of the tooth sets the lip; the back of the tooth sets the ramp.
- 02VerifyCheck the position against the lips, speech and the plane of the back teeth. Mock-ups on the model, then in the mouth, from every angle.
- 03TestProvisionals. The patient wears the design for weeks, chews, talks and, if they grind, grinds. The guidance is adjusted until it is comfortable and nothing marks.
- 04CopyThe proven ramp is recorded and transferred to the final restoration exactly. The laboratory copies a shape that has already passed, rather than inventing one.
The front of the tooth sets the lip. The back of the tooth sets the ramp.
Dr. Reshad starts at the edge of the upper front teeth. How much tooth shows when the lips are relaxed tells him the length. The profile of the front face, checked from the side with the lips at rest and smiling, sets lip support and the start of the guidance: a labial face roughly 90 degrees to the biting plane is the starting point, then it is adjusted to the lip, to speech and to the shape of the jaws. Only when the front is right is the back surface designed, and the rule for the back is simple: as little vertical overlap as the bite allows, and a ramp that is shallow and smooth.
There is a trade-off he watches closely. Longer front teeth look younger, but a longer tooth is a longer lever, so it feels more force. When he makes the teeth longer he flattens the guidance to pay for it.
- 0.5 to 4 mm
- tooth showing at restAround 0.5 to 2 mm for a man, 2 to 3 mm for a conservative female smile, 3.5 to 4 mm for sparkle.
- 90°
- front face to the biting planeThe starting profile, then adjusted to lip support, speech and the skeletal pattern.
- 15 to 20%
- vertical overlapThe upper edge should overlap no more than a fifth of the lower incisor's height. Longer teeth? Open the bite to keep it there.
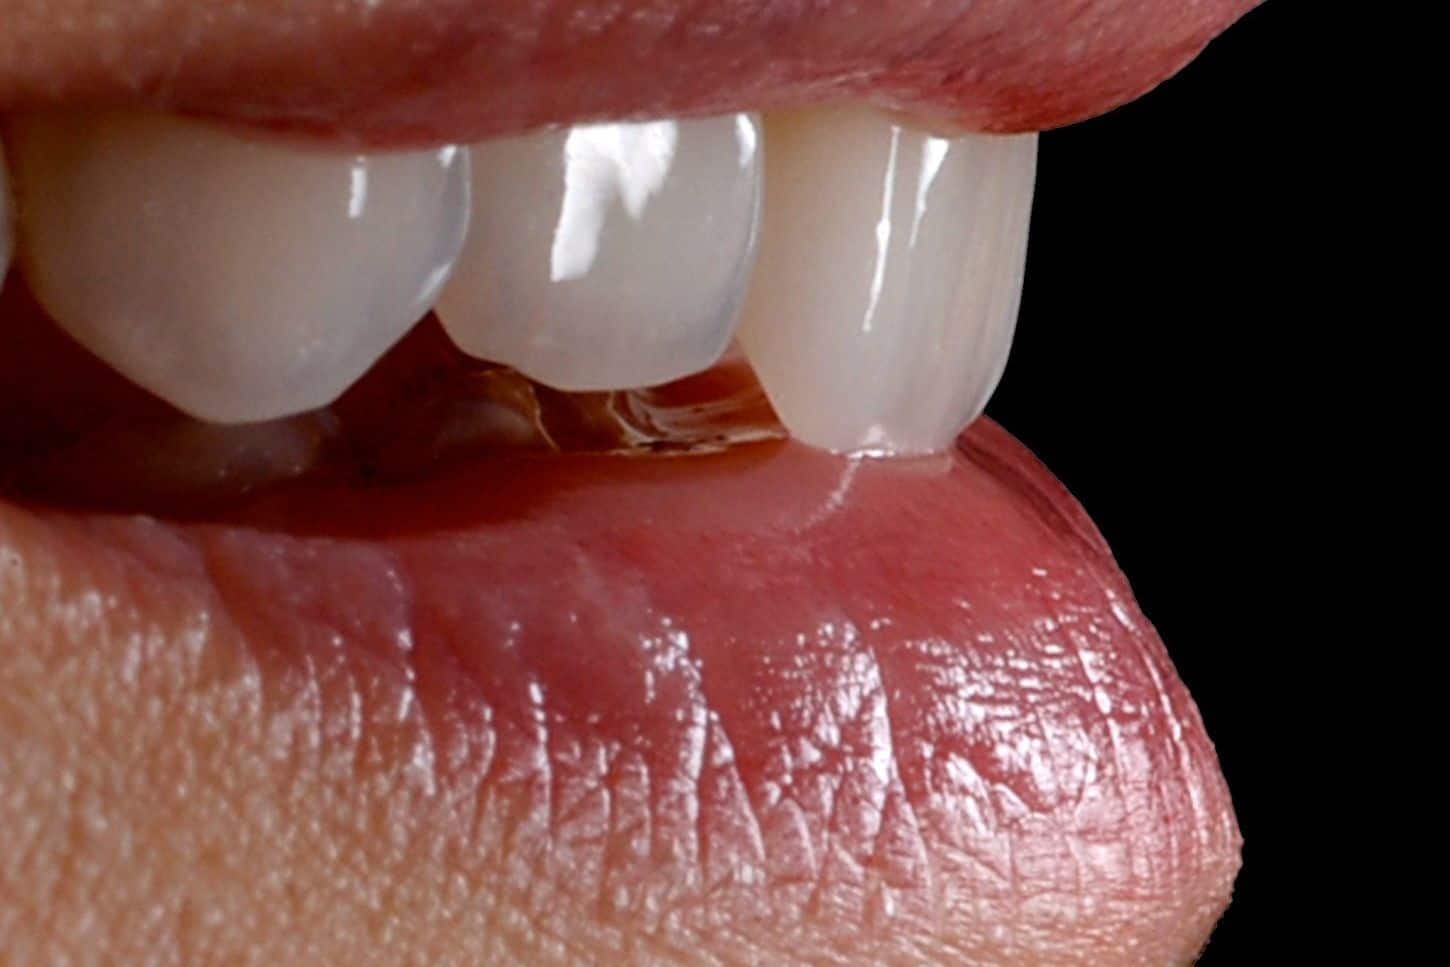
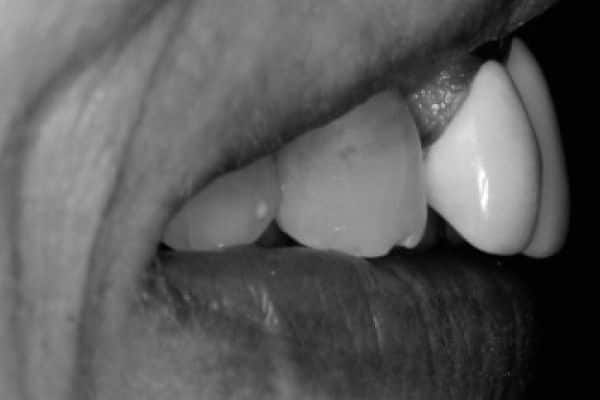
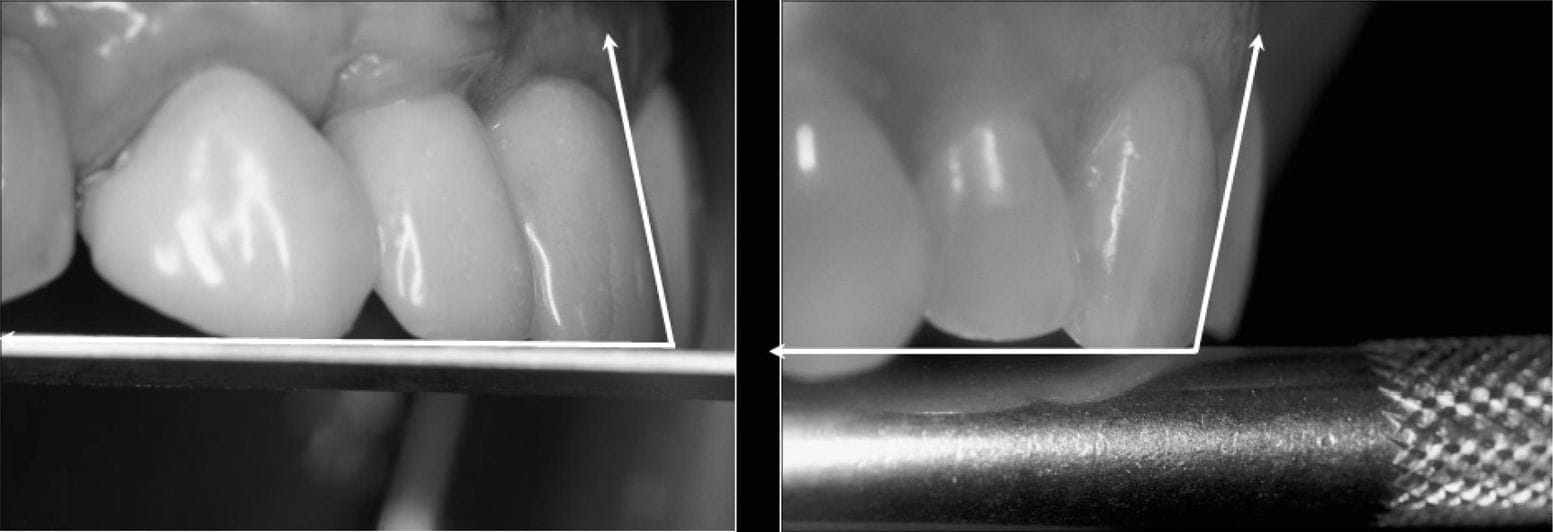
A deep bite is a fence. A shallow one is a ramp.
When the upper front teeth overlap the lower ones deeply and tightly, every forward or sideways movement of the jaw has to climb a steep wall of enamel or porcelain. That wall is the fence, and the force on the teeth that form it is high. Dr. Reshad does two things on every case where he can: he reduces the vertical overlap, and he flattens the angle the lower jaw rides on. The fence opens into a ramp. The back teeth still separate as the jaw glides, but gently, and the front carries a fraction of the load.
The research puts a number on it. Weinberg measured the force on the front teeth as the guidance angle changed: for every 10 degrees the ramp is flattened, the force applied drops by about 35 percent. Williamson and Lundquist showed with muscle recordings that a flatter guidance means the jaw muscles work less hard. Flatter is kinder, to the teeth and to the joints.
≈35%less force for every 10° flatter · Weinberg 1998
It matters even more when the front teeth are on implants. A natural tooth has a ligament that feels load and warns you. An implant cannot feel. A deep, steep front relationship fences the lower jaw in and turns every forward movement into a bending load on the implant, with nothing to tell you it is happening. That is why Dr. Reshad opens the fence first, and will not load anterior implants immediately until it is open.
- 01Increase the overjet. Room to leave the closed position before the incisors touch. No ligament to warn you, so build in the room.
- 02Flatten the guidance. Shallow anterior guidance and reduced cusp inclines: less sideways load.
- 03Match the envelope. Incisal edge and inside contour kept outside the path the jaw actually uses (Kois and Felder).
- 04No immediate function. Open the fence first, then decide about loading.
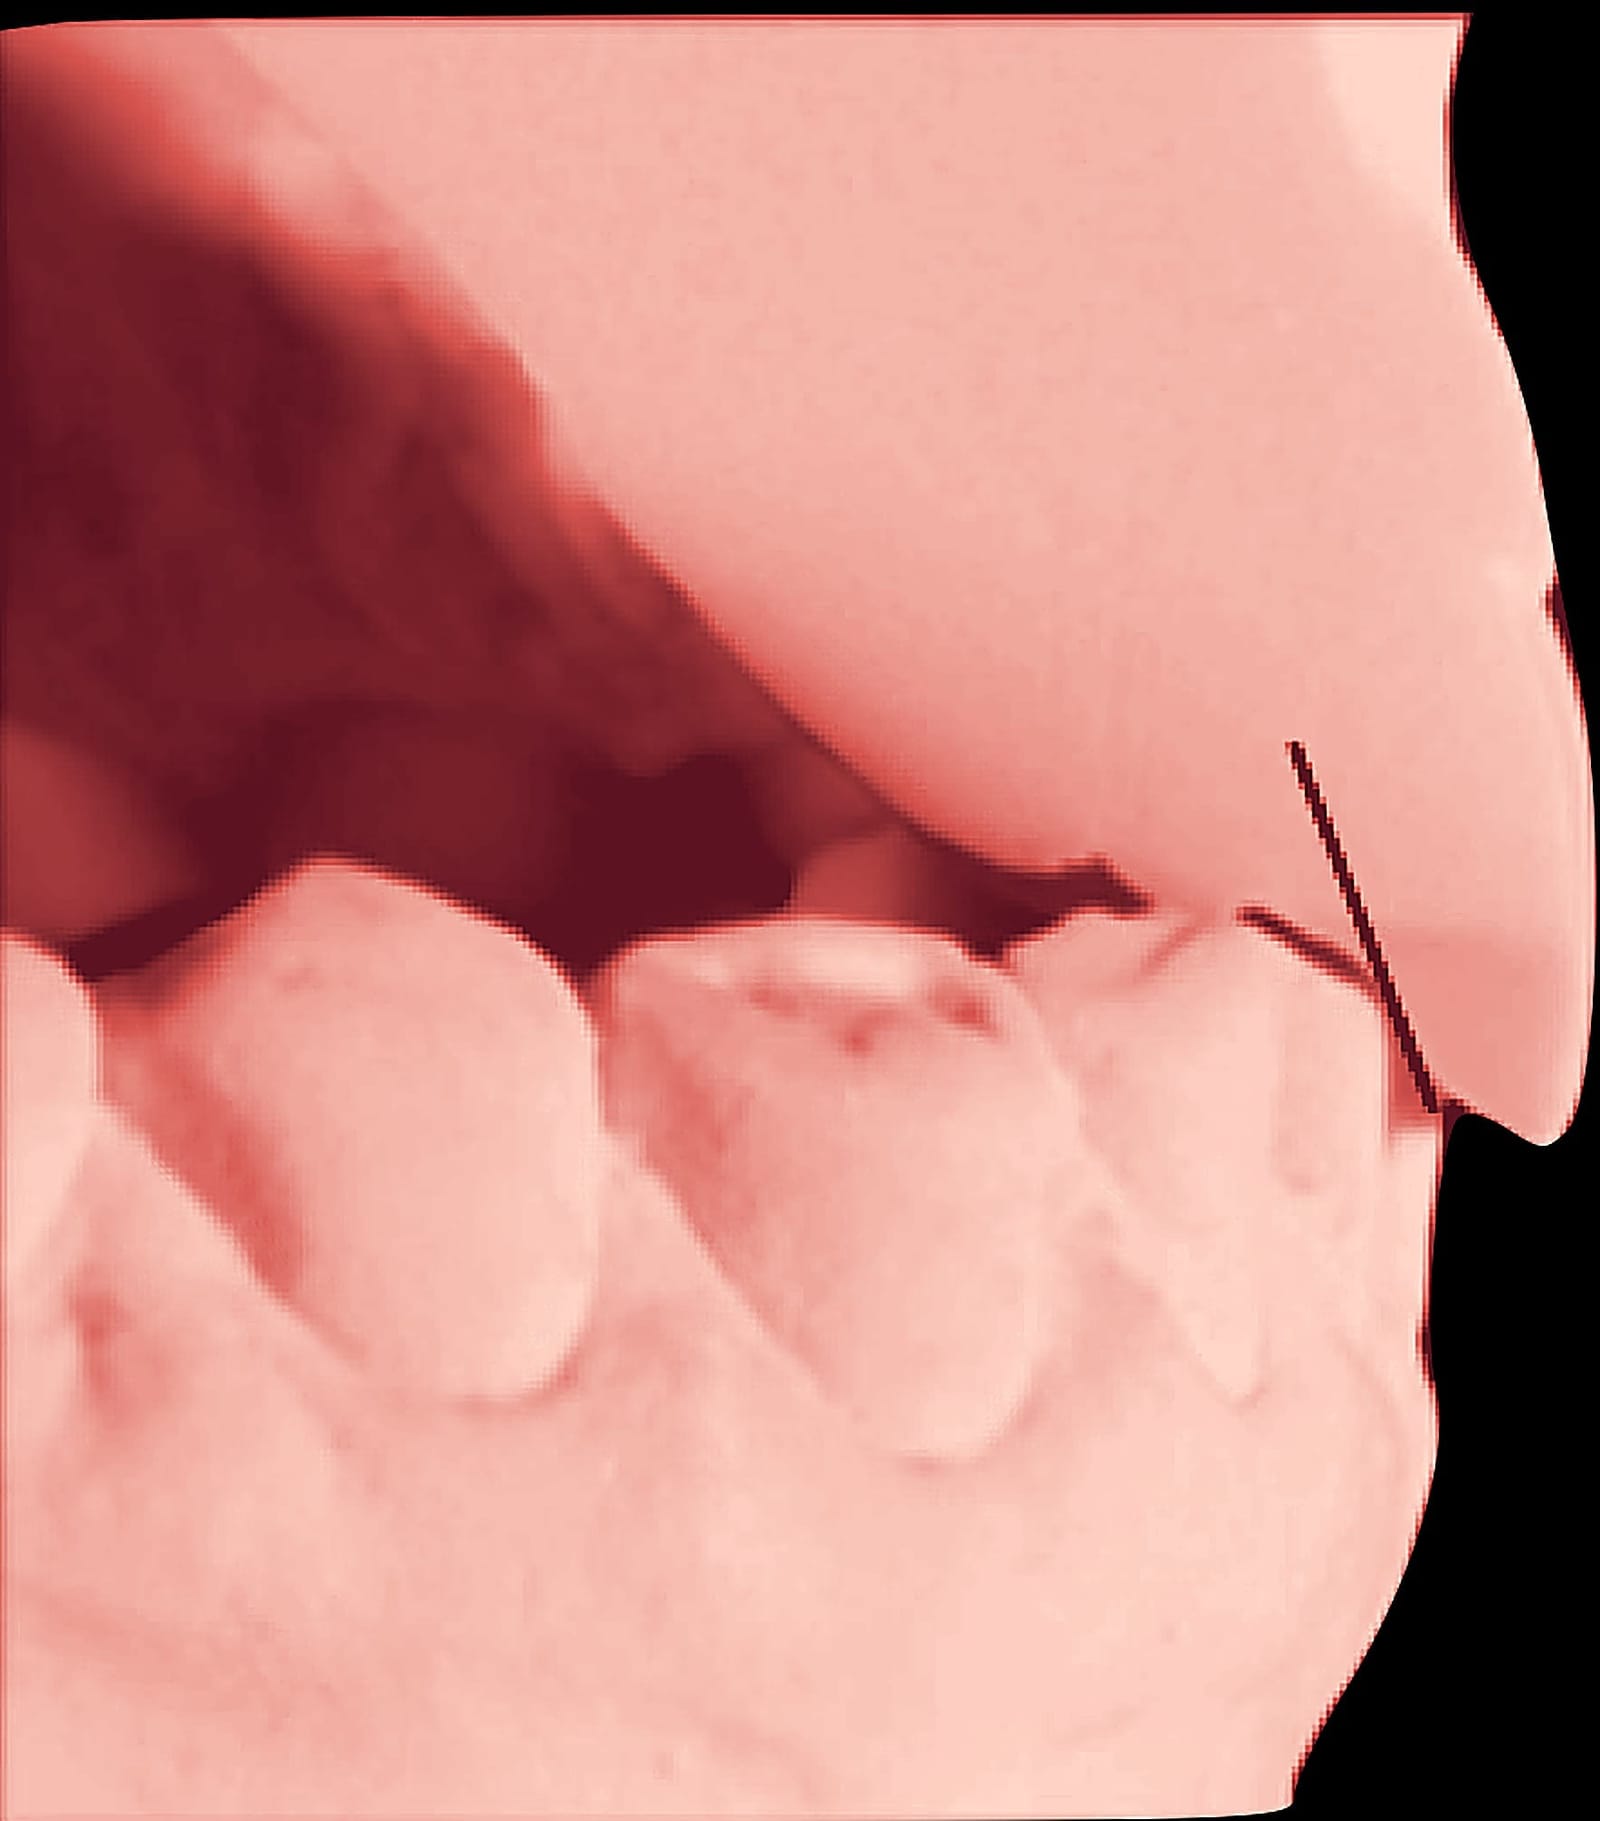
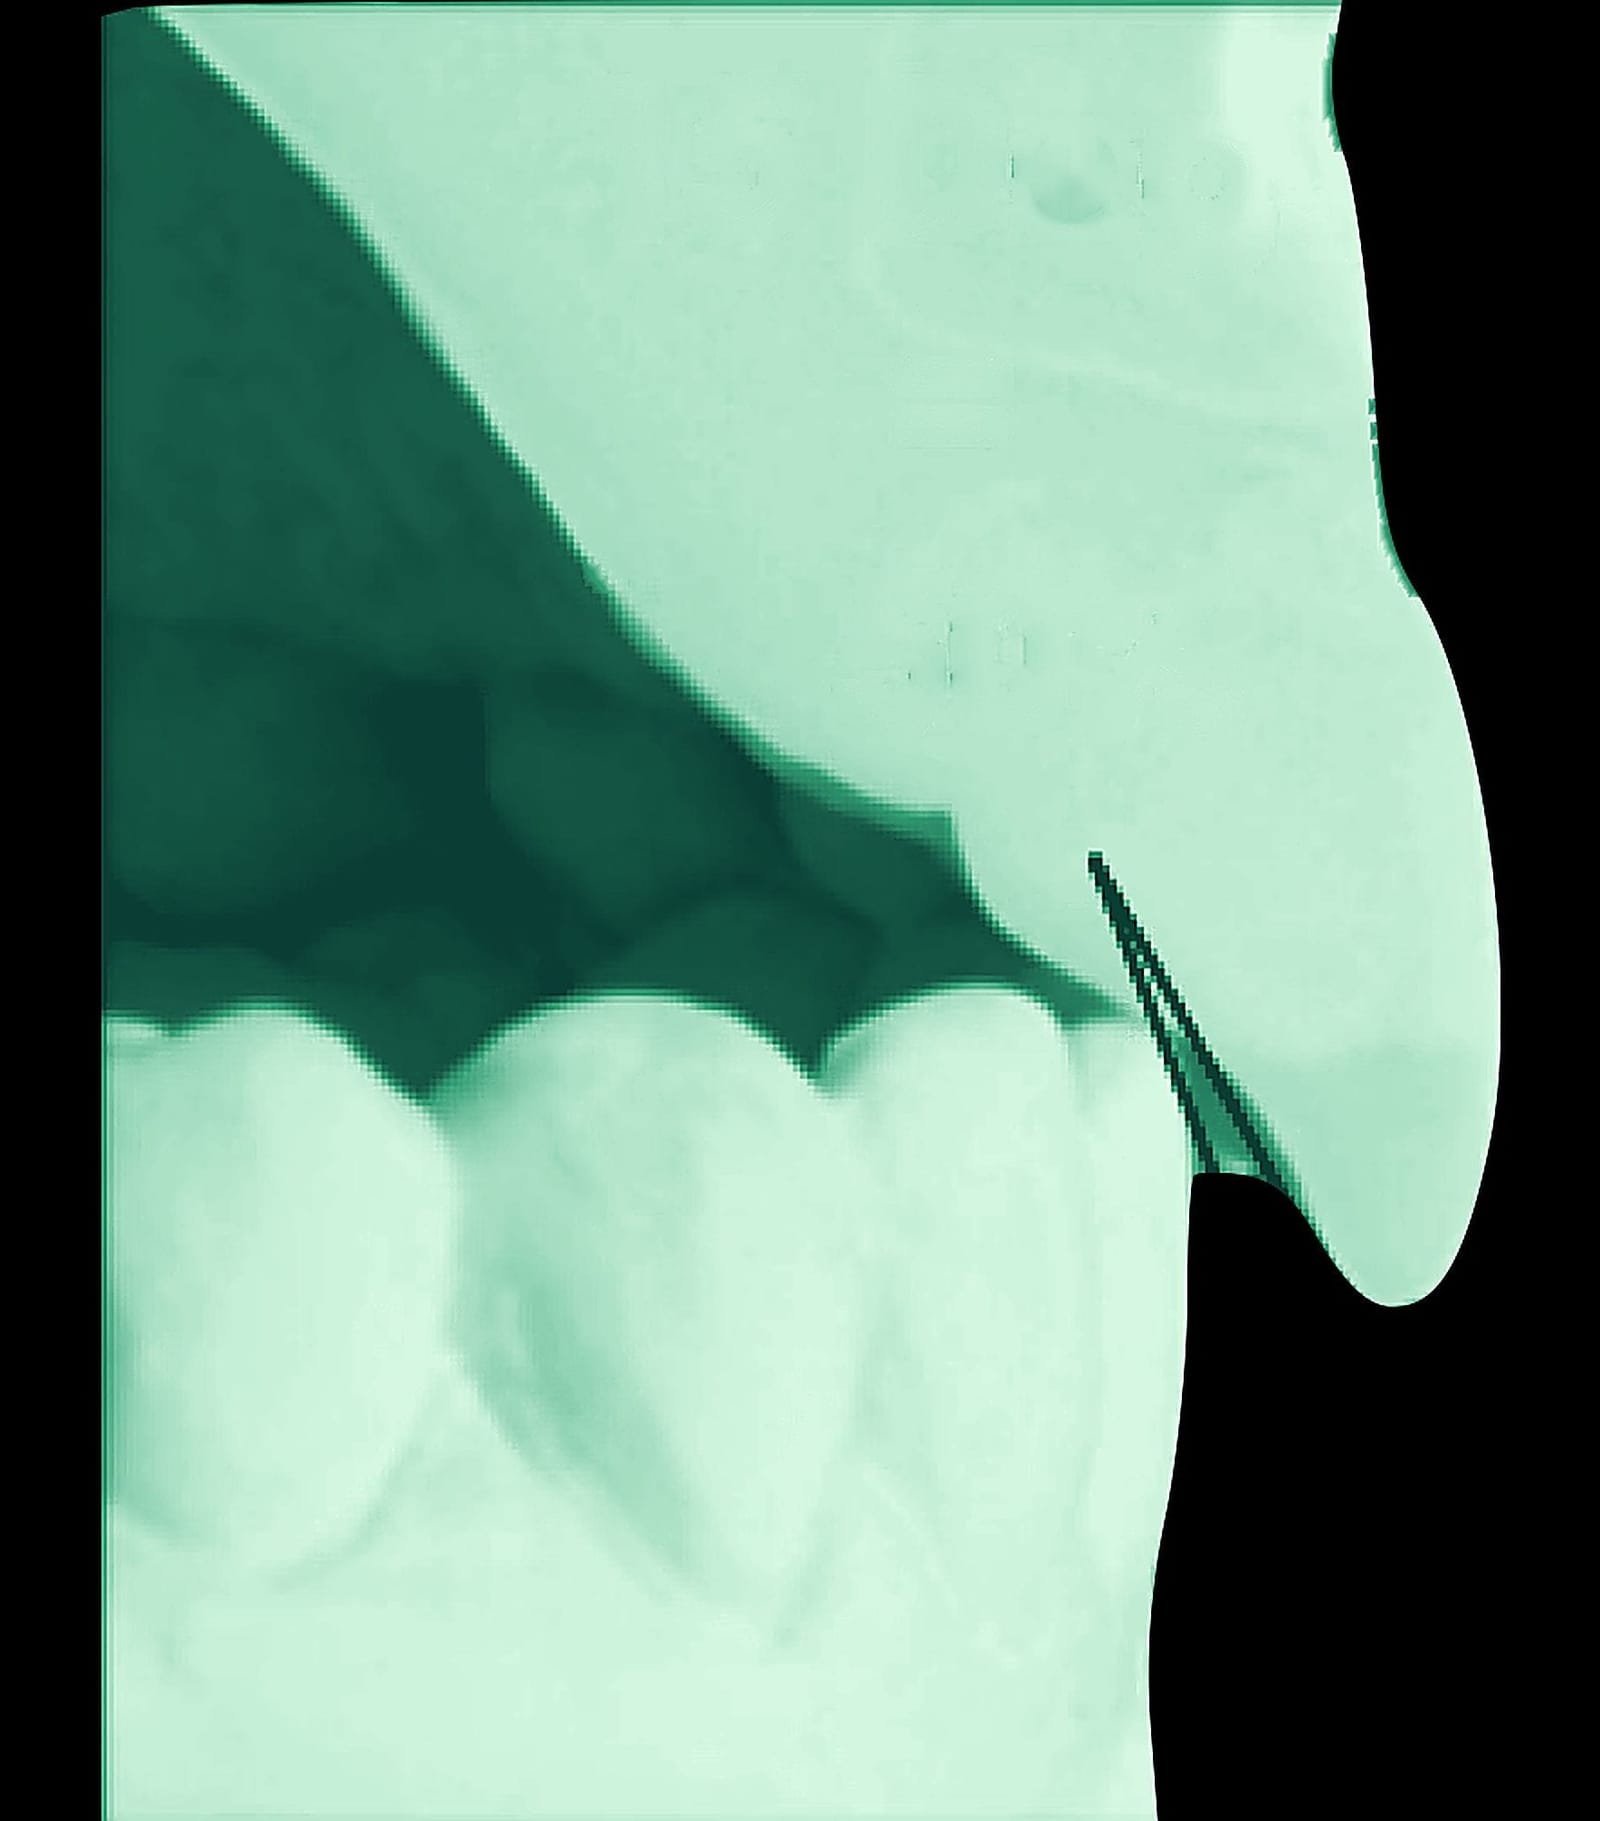
Composite of stone-model photographs and incisor renderings from Dr. Reshad's lecture. Movement is illustrative, not to scale.
Teeth worn to the dentin, a bite rebuilt.
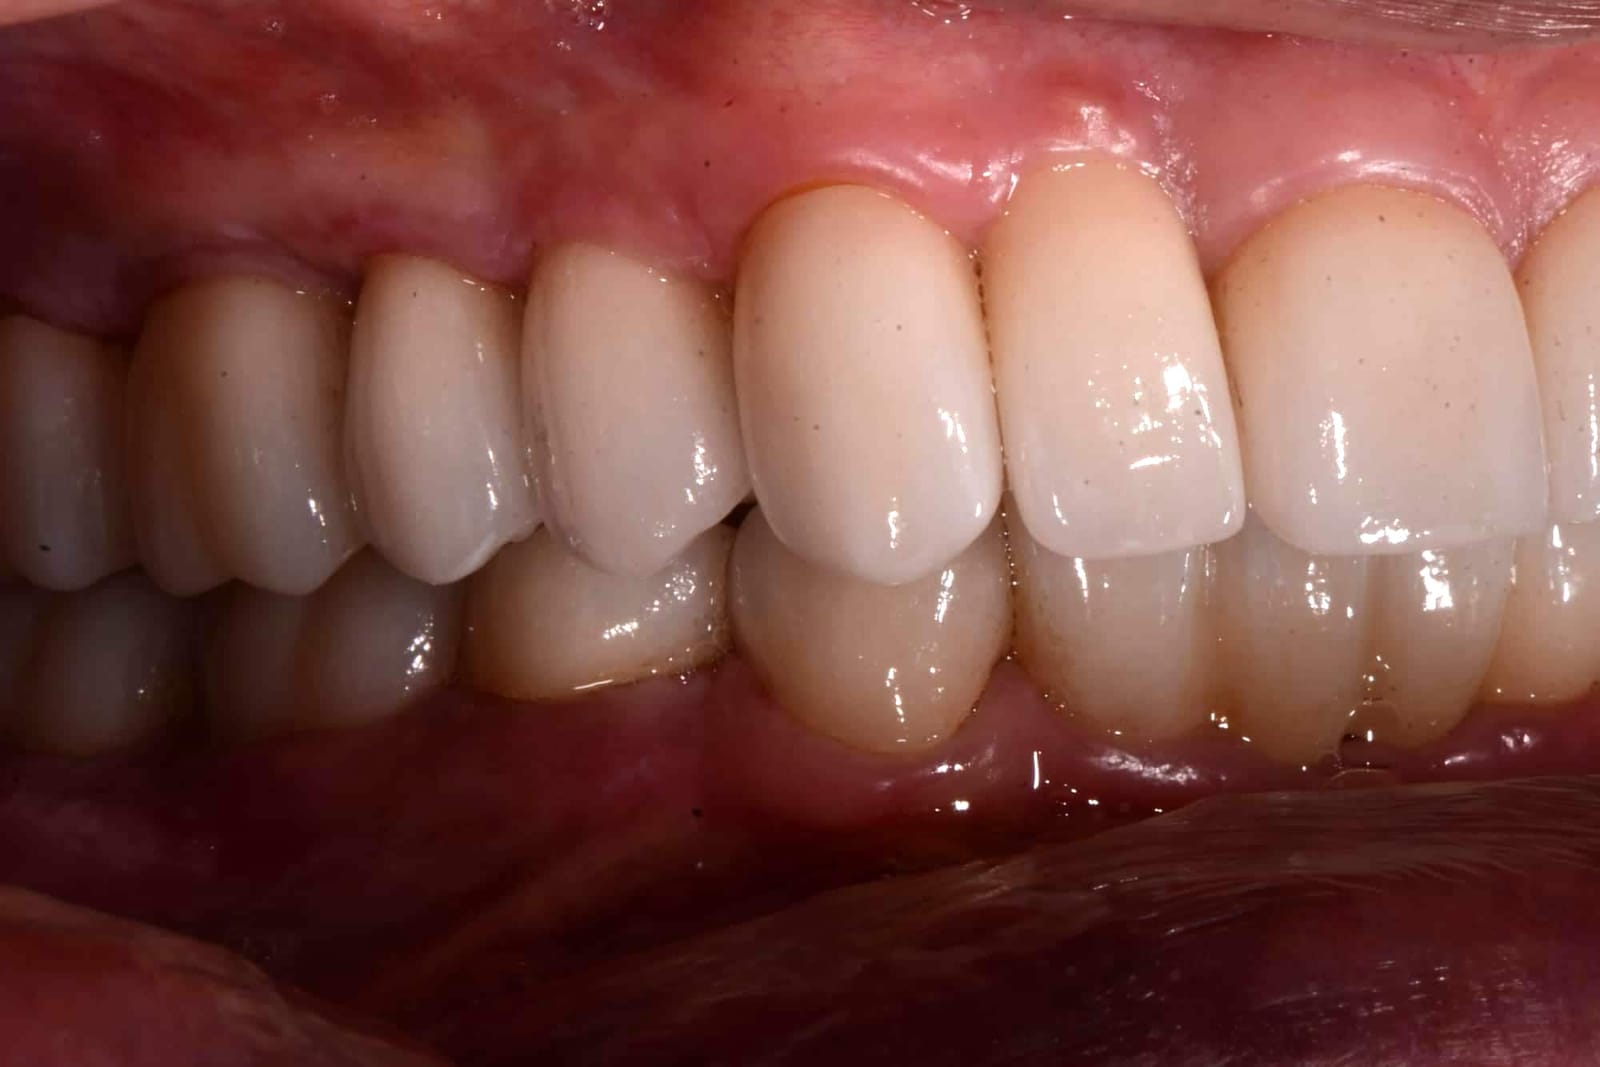
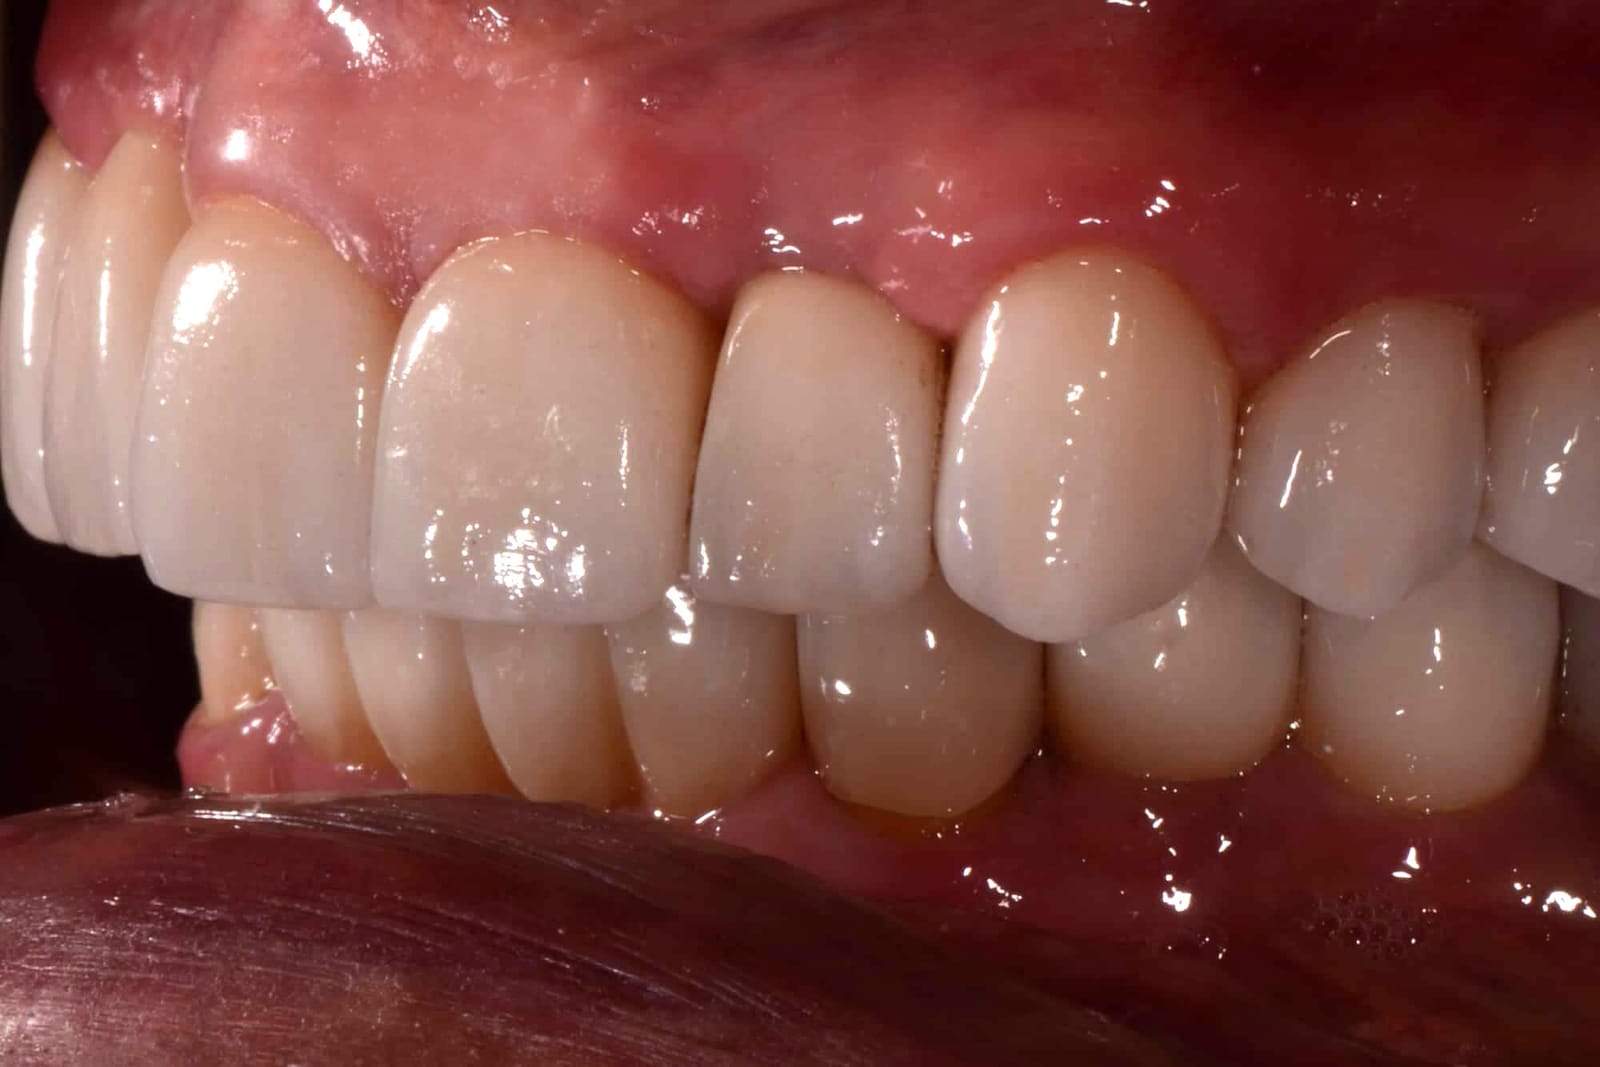
He arrived with his upper front teeth closed down over the lowers so far that they covered more than the whole lower tooth, against an ideal of 15 to 20 percent. None of his lower front teeth showed at rest. The fence was total: every movement ground enamel away and strained the jaw muscles. The bite was opened, the overlap reduced and the guidance flattened before anything was made final, then both arches were rebuilt at the new position. In the after photographs the lower teeth are visible, the front teeth meet on a shallow ramp, and the jaw ache has gone.
His lower front teeth were replaced on implants, so the fence had to be opened before they went in: overbite reduced, a millimetre of overjet, the guidance flattened so the lower incisors leave the closed position without touching.
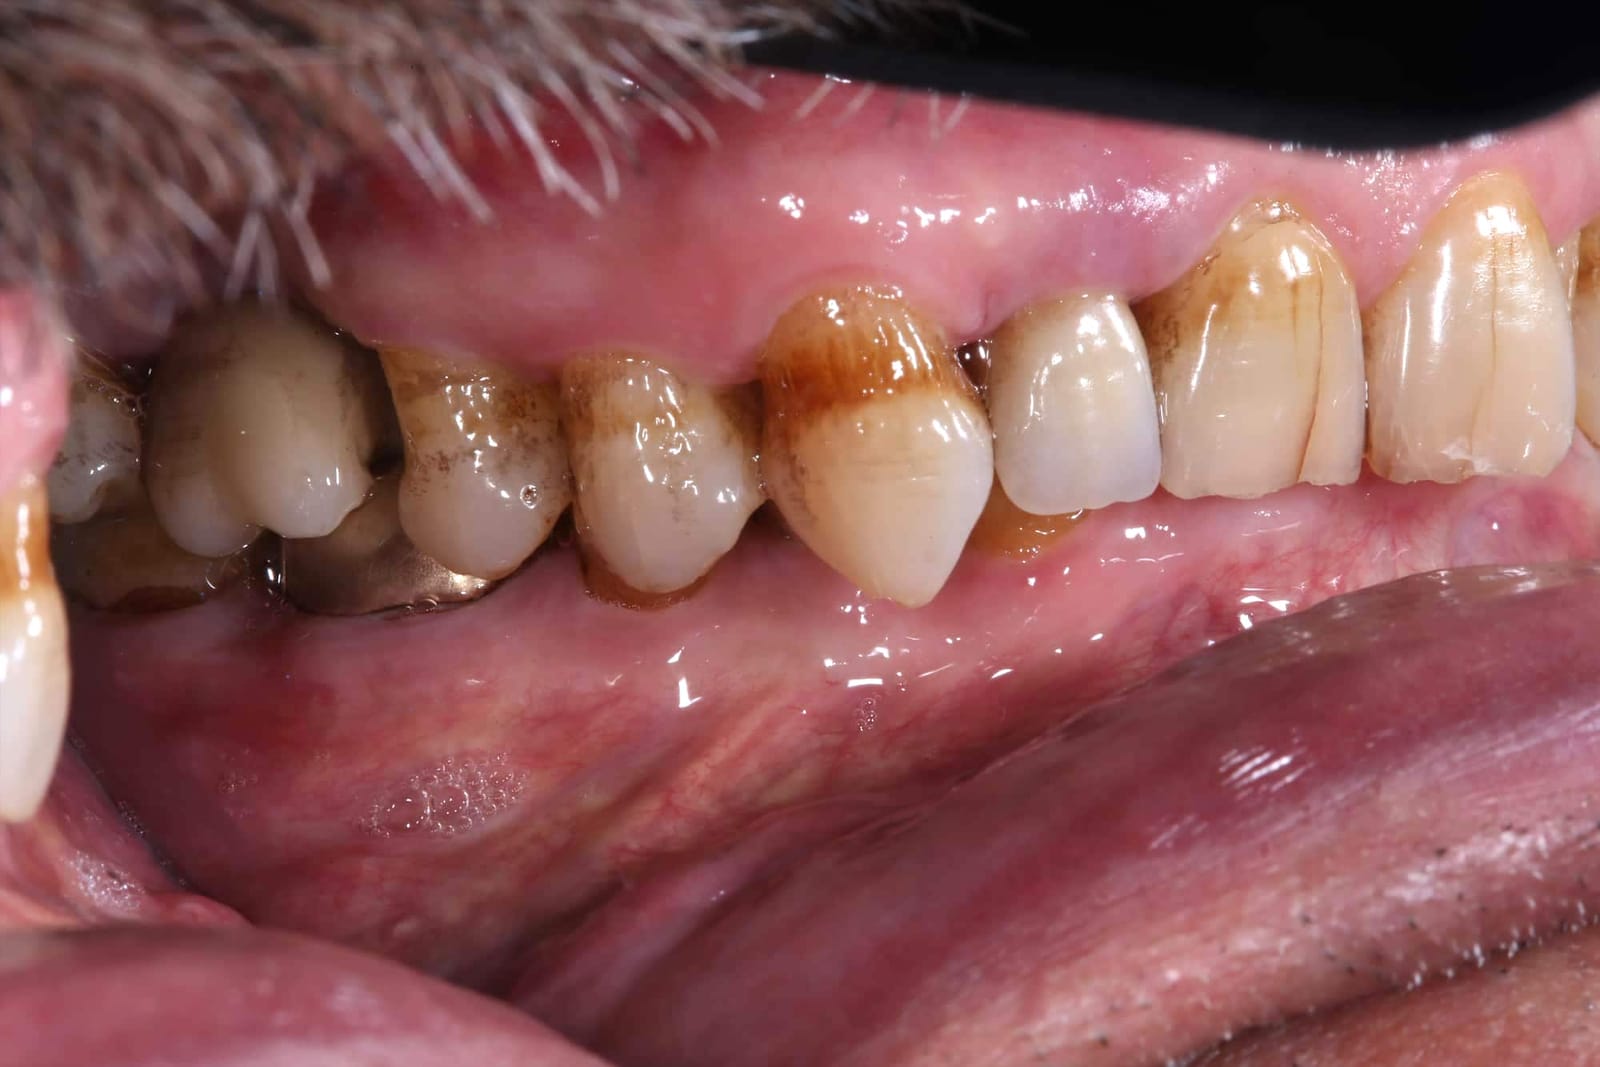
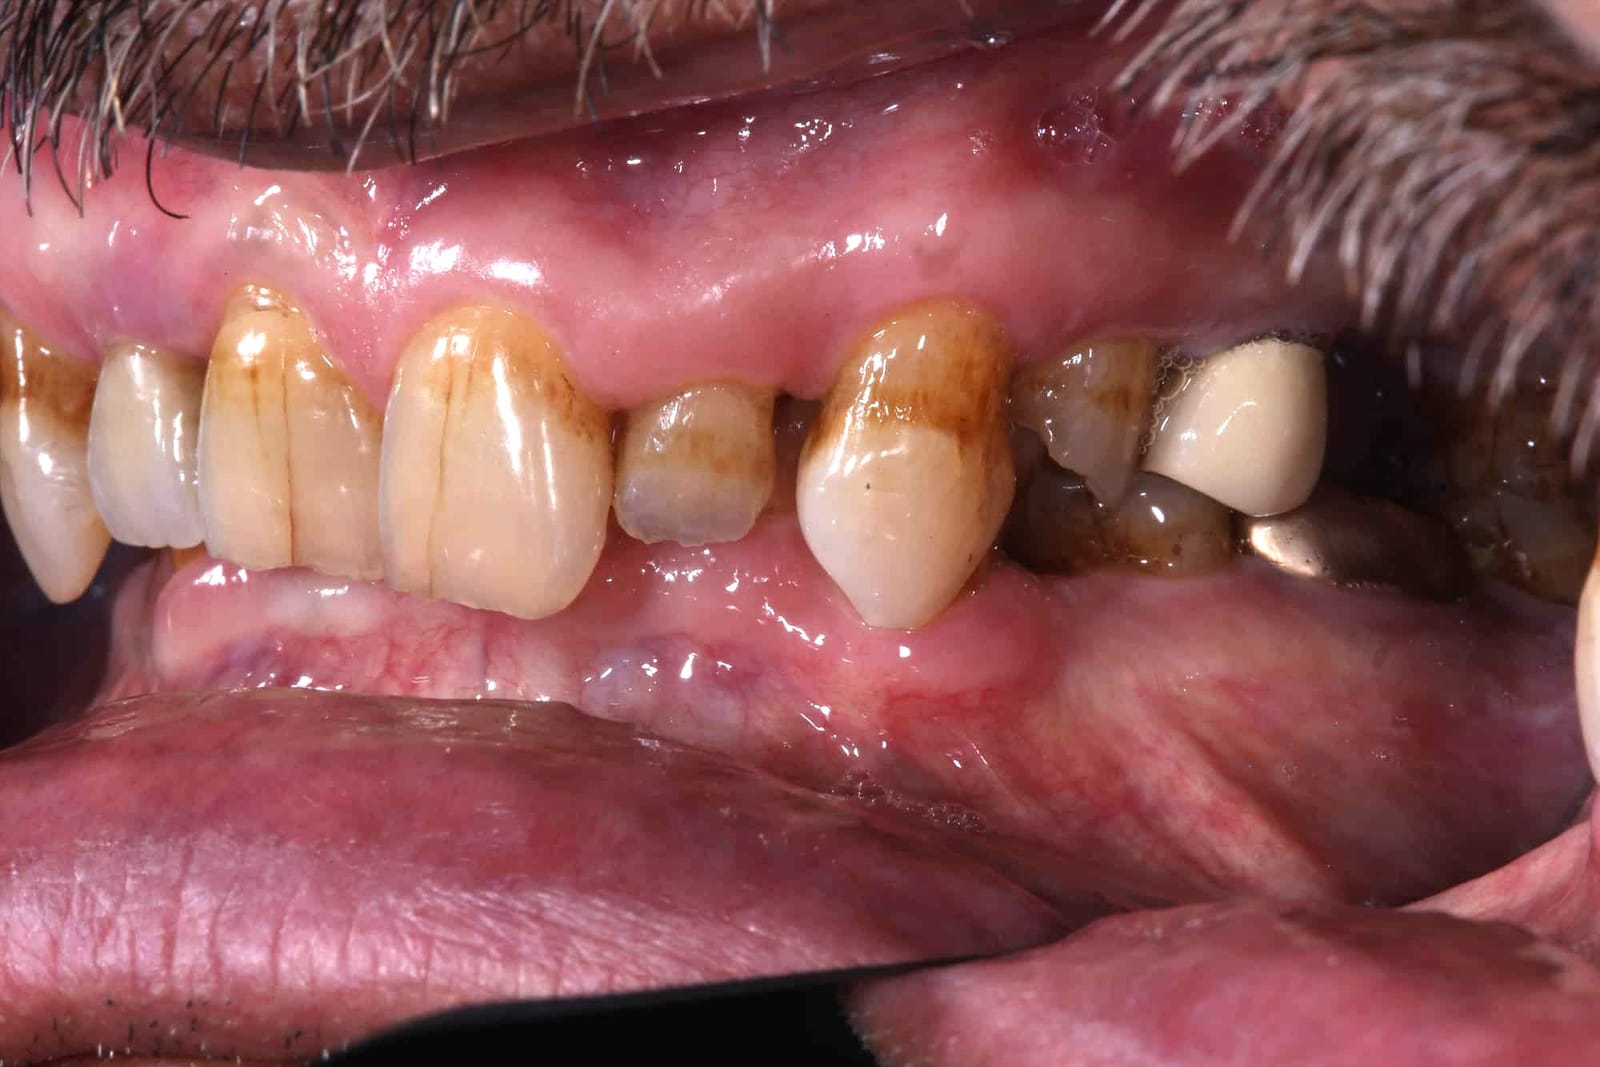
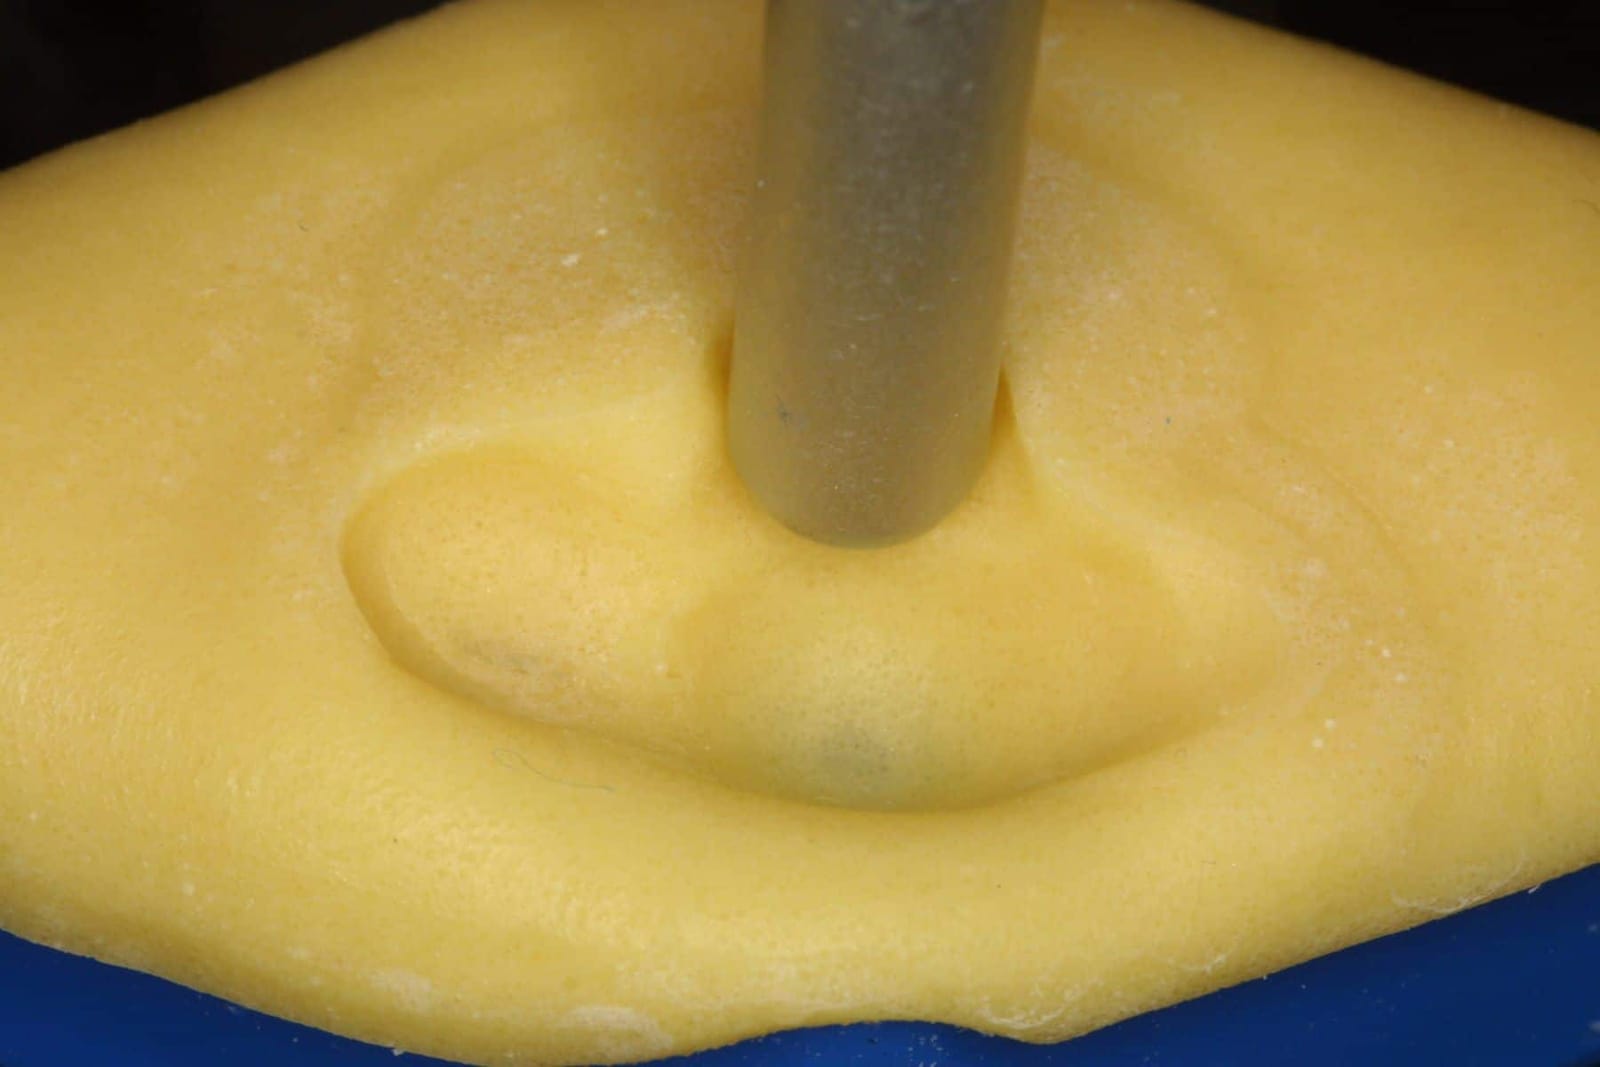
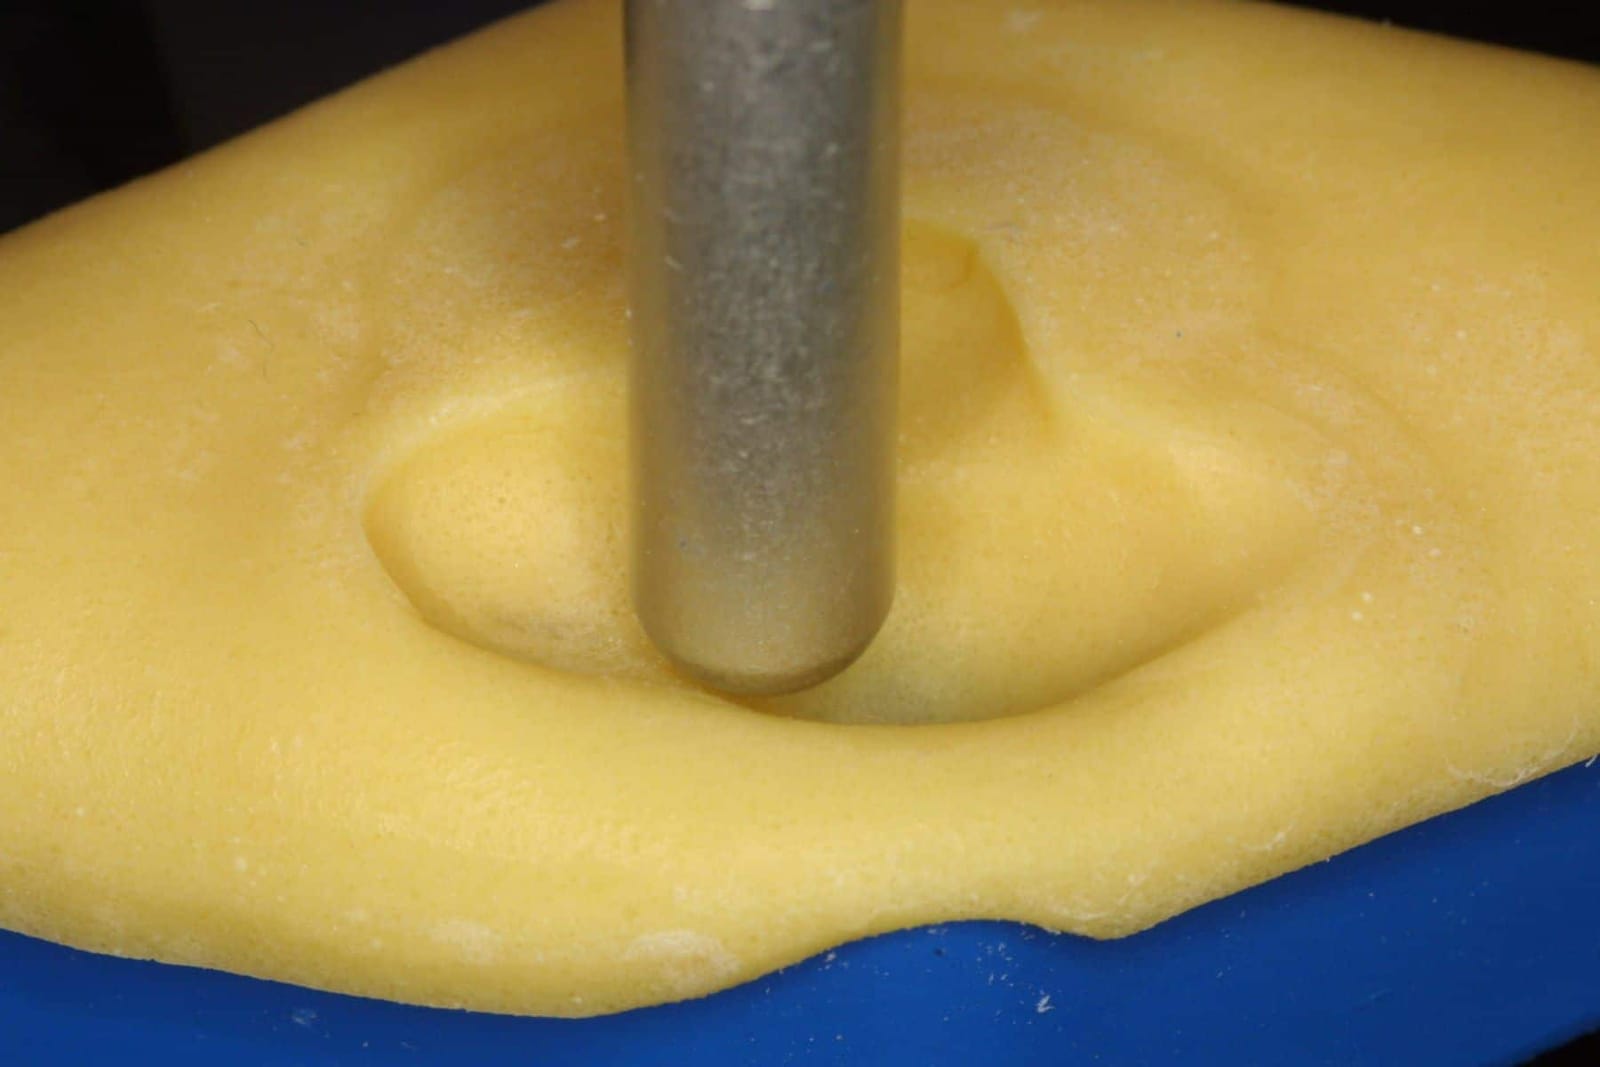
Once his provisional guidance had passed the test drive, the path his lower teeth take along the new ramp was recorded on a custom incisal table, in resin on the articulator, so the laboratory could copy it exactly into the final restorations.
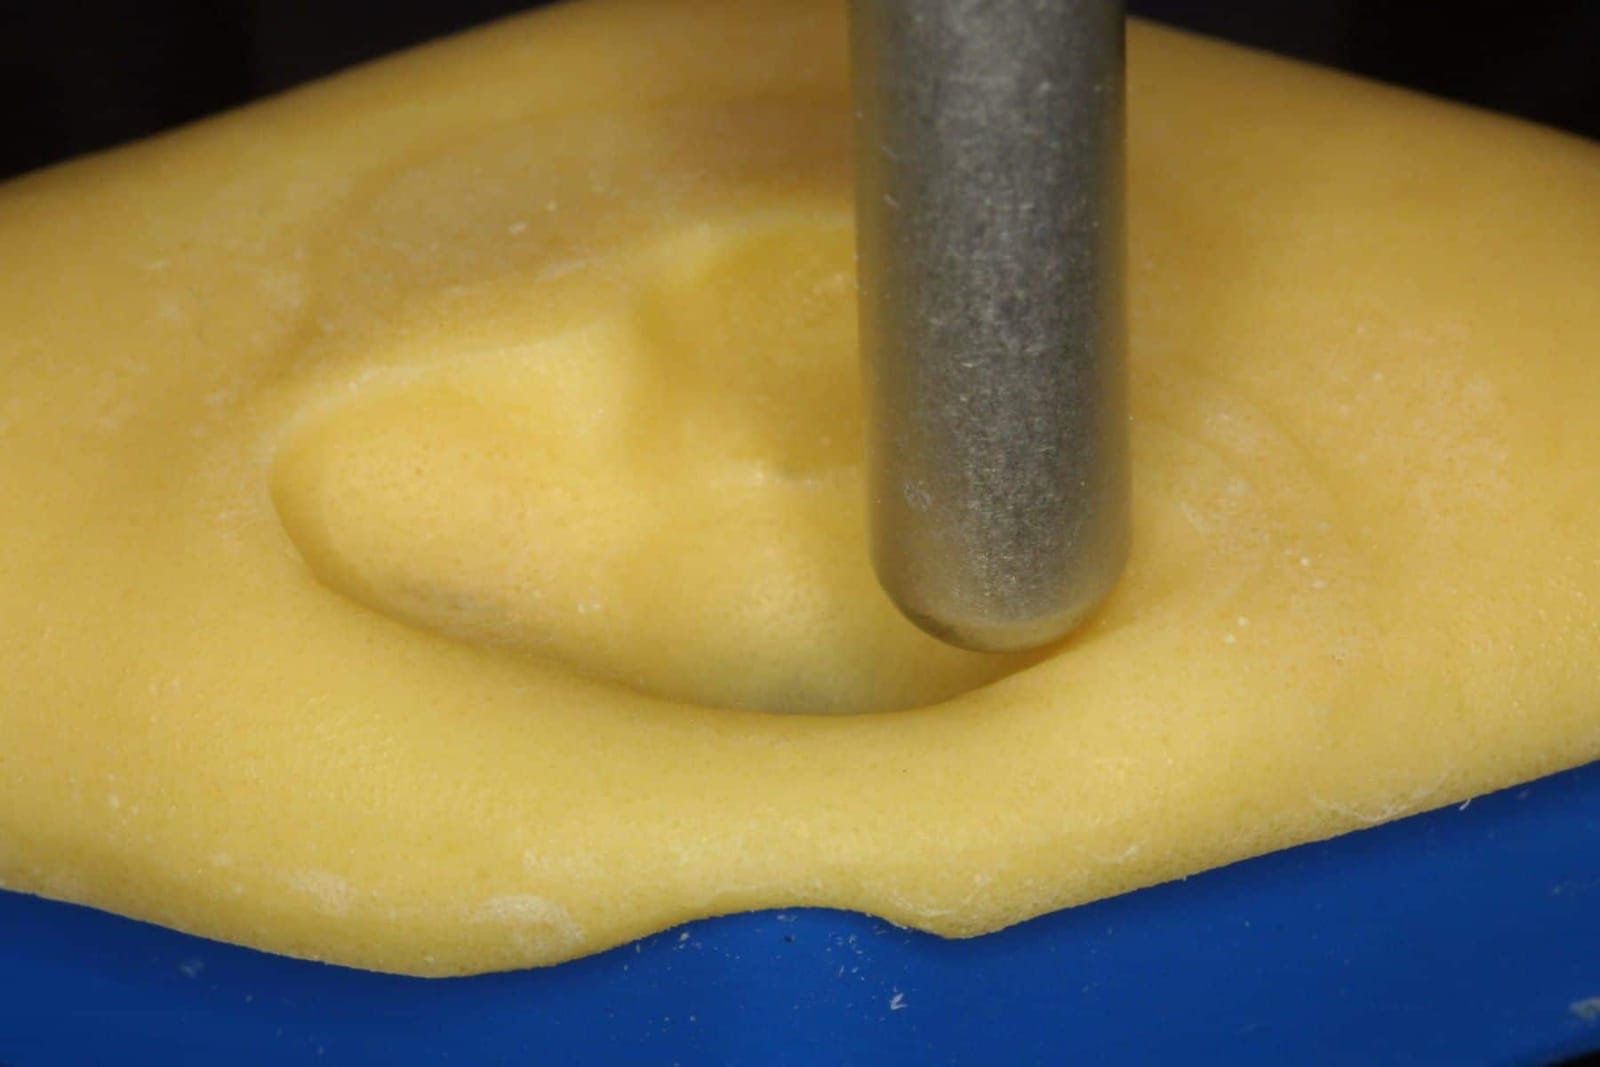
Mock it up. Check it from every angle.
Before anything is made in porcelain, the length and profile are mocked up on models and in the mouth, and checked against three things: the lips at rest and smiling, the sounds F, V and S, and the plane of the back teeth. The lower front teeth are set too: they must not show more than about 3 mm against the resting lower lip, or the face reads as old and collapsed, and their edges must sit where they will meet the upper ramp cleanly.
This is the point where most problems are caught. A tooth that is a millimetre too long, a ramp that is a few degrees too steep, a lower edge that lands in the wrong place: all of it is cheap to change in a mock-up and expensive to change in zirconia.
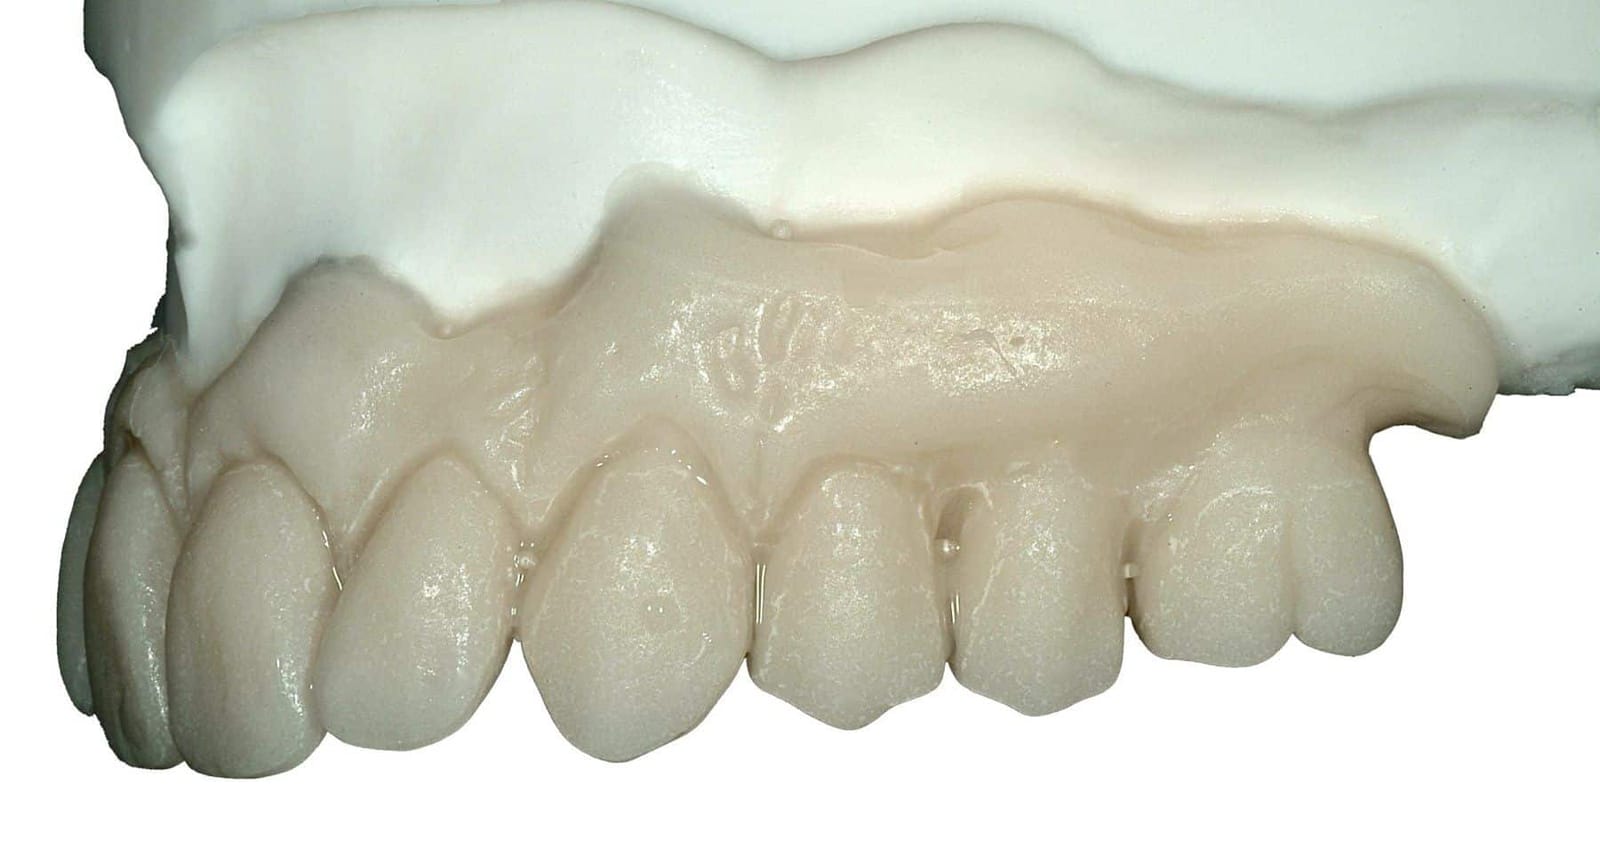
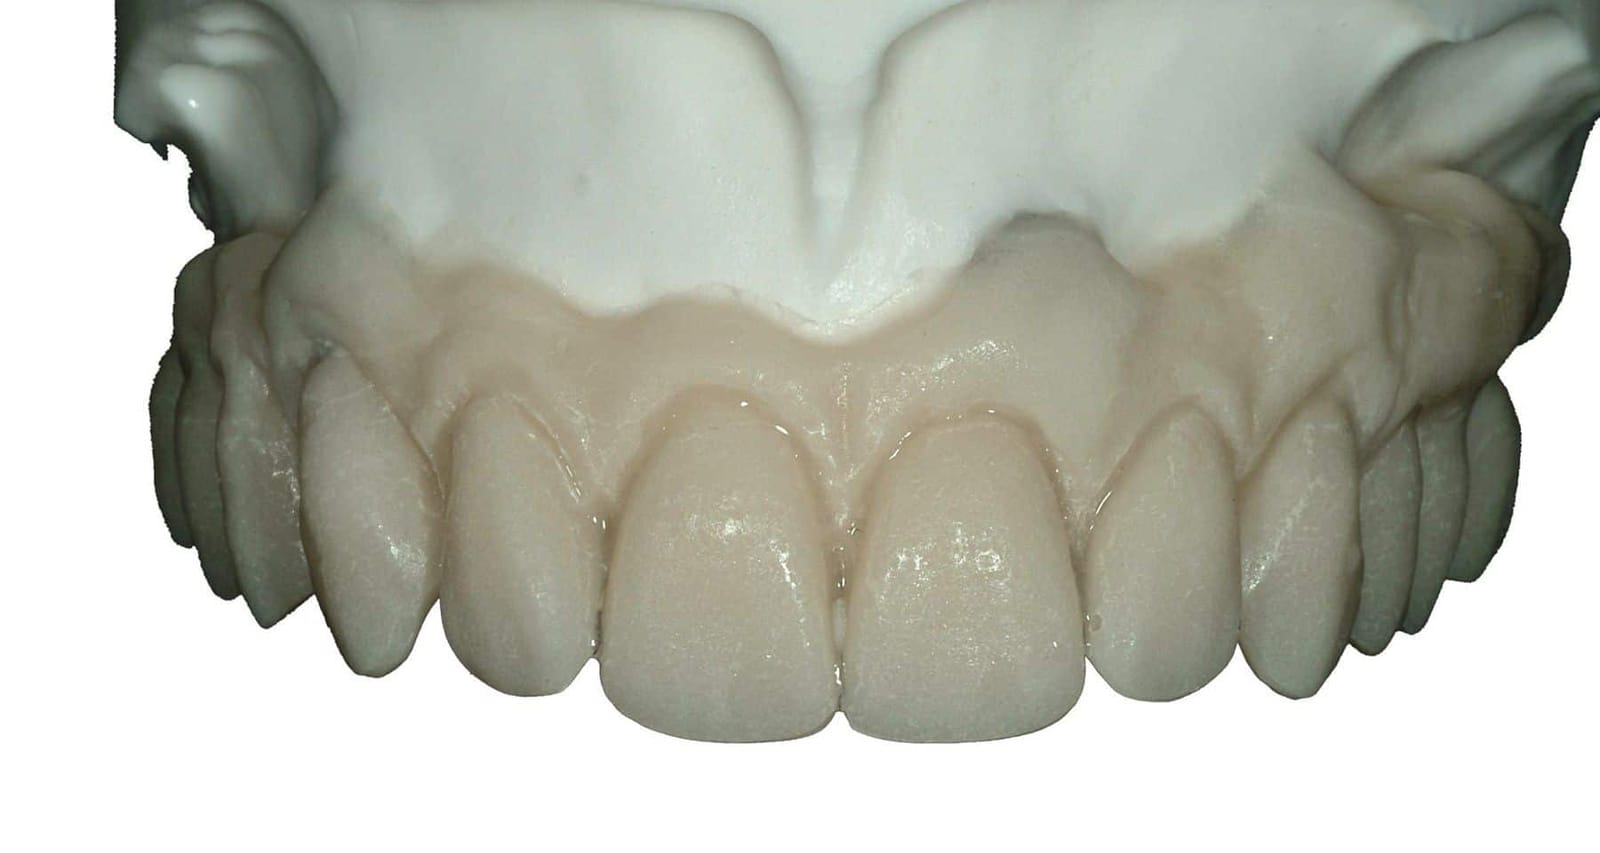
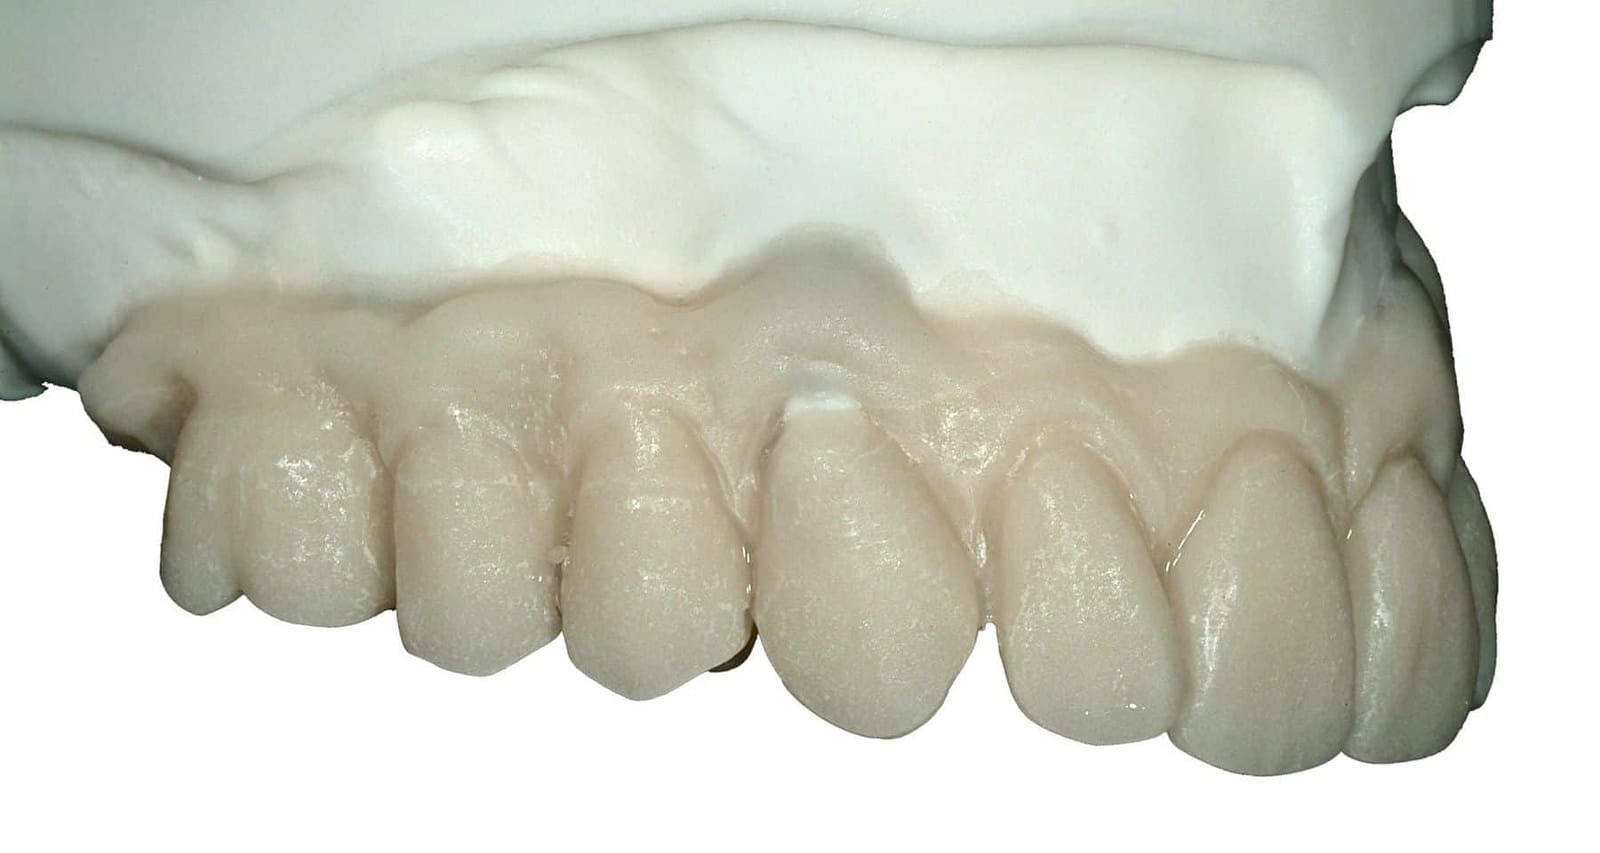
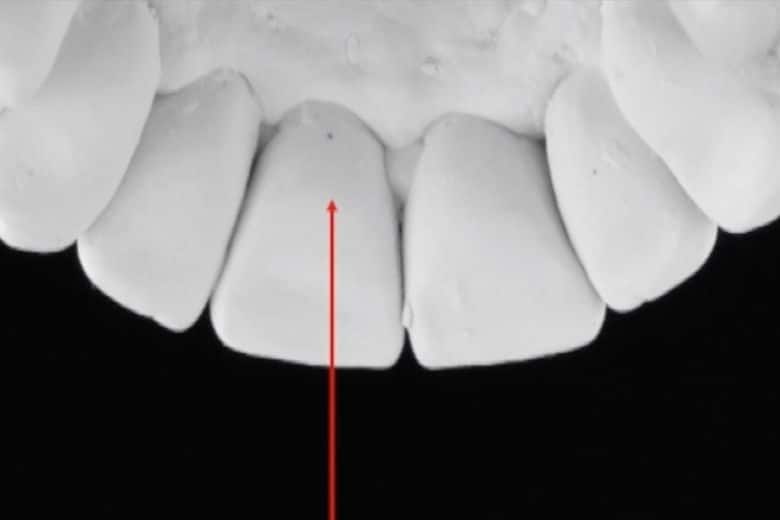
Test drive the guidance before it is final.
The provisionals are the test drive. The patient wears them for weeks and uses them hard. Dr. Reshad checks where the lower teeth mark the ramp, adjusts the angle until the glide is smooth and the back teeth separate without effort, and listens to the patient. If the patient grinds at night, the provisional shows exactly where, and the design is changed before a single tooth is made in its final material.
- Where do the lower teeth mark the ramp? The wear marks on the provisional are the map. The angle is adjusted until the glide is smooth.
- Do the back teeth separate without effort? On every forward and sideways movement.
- Is the jaw comfortable? Nothing in the way, no morning ache, no sense of being locked in.
- Has speech settled? F, V and S, read aloud, after the tongue has had a few weeks.
What has been proven is copied, not reinvented.
Once the provisional guidance has passed, it is recorded. The path the lower teeth take along the ramp is captured on a custom incisal table (the old way, in resin on the articulator) or scanned (the contemporary way), and the laboratory builds the final teeth to that exact path. The final restoration therefore inherits a ramp the patient has already lived with, rather than one a technician guessed from a model.
That is the difference between a smile that looks good on delivery day and one that still looks good, and feels good, ten years on. The inside of the teeth is where that difference is made.
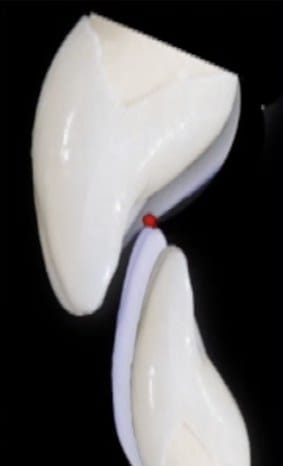
Rebuilding the ramp from both sides.
Worn lower front teeth are a common reason the guidance has gone. The lower edge has shortened and tipped back, so the upper tooth has nothing to guide, and if the upper is simply rebuilt thicker on its inside to reach the lower, the palate becomes bulky and the ramp steep. Dr. Reshad's rule is to share the contour: restore the lower incisors in height and bring them slightly forward, and add only a little to the inside of the uppers, so neither tooth has to carry the whole correction.
One check keeps it honest: the upper teeth must still dominate the smile. The lowers are brought back to where they belong, not beyond it.
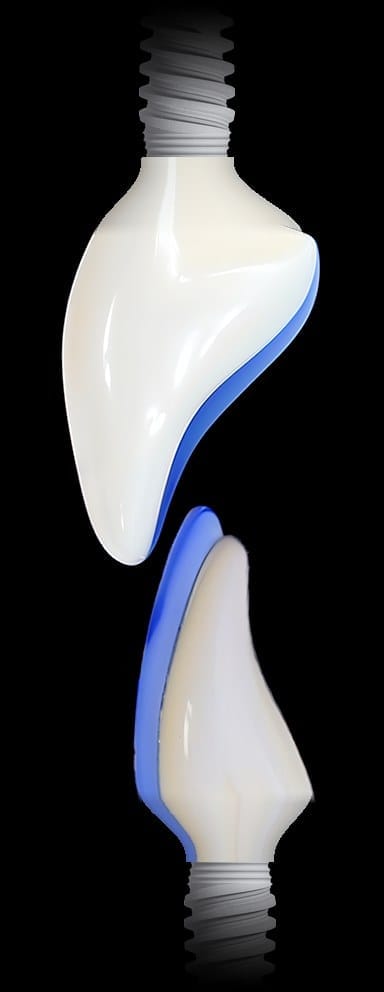
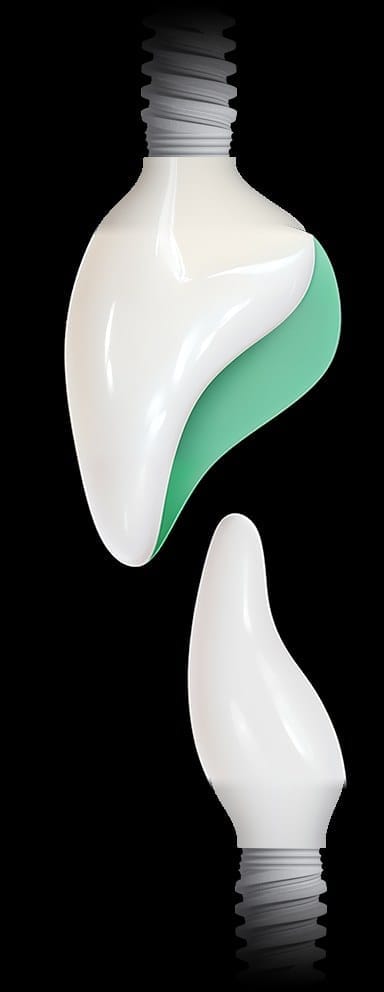
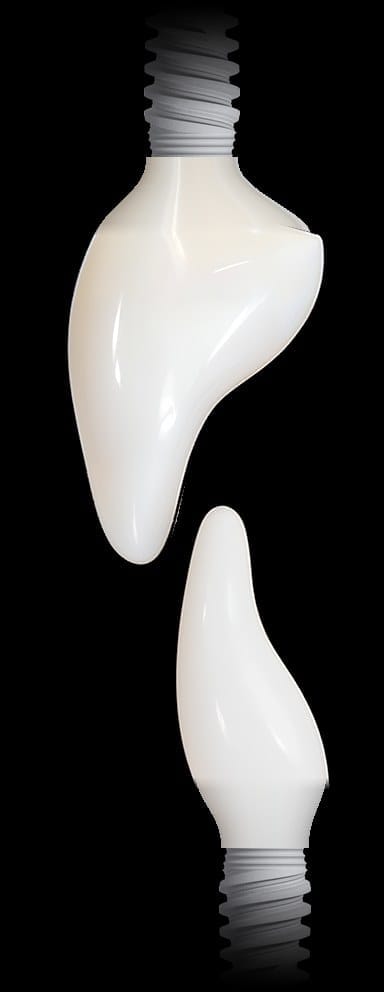
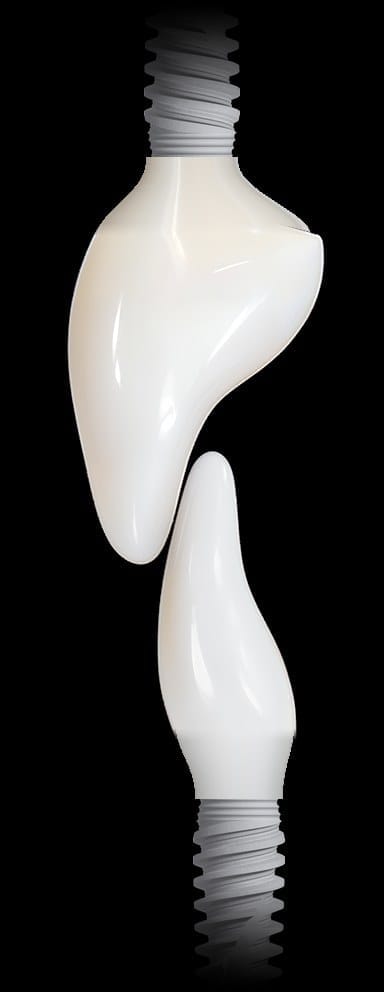
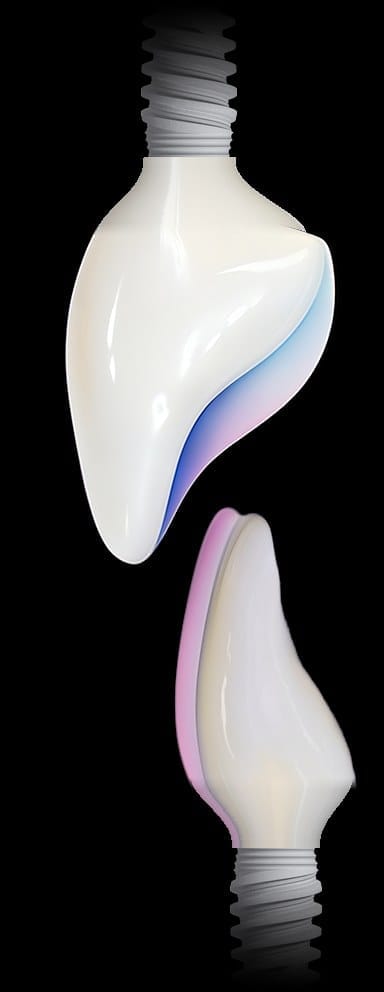
His lower front teeth were rebuilt in height and angle, and the uppers still dominate.
The same patient as above. His lower incisors had worn so short that none of them showed at rest. They were restored on implants in height and brought forward, the uppers took only a little on the inside, and the ramp between them was rebuilt shallow and smooth. In the after photograph the lowers are visible again, meeting the uppers on a ramp rather than locked behind a fence.
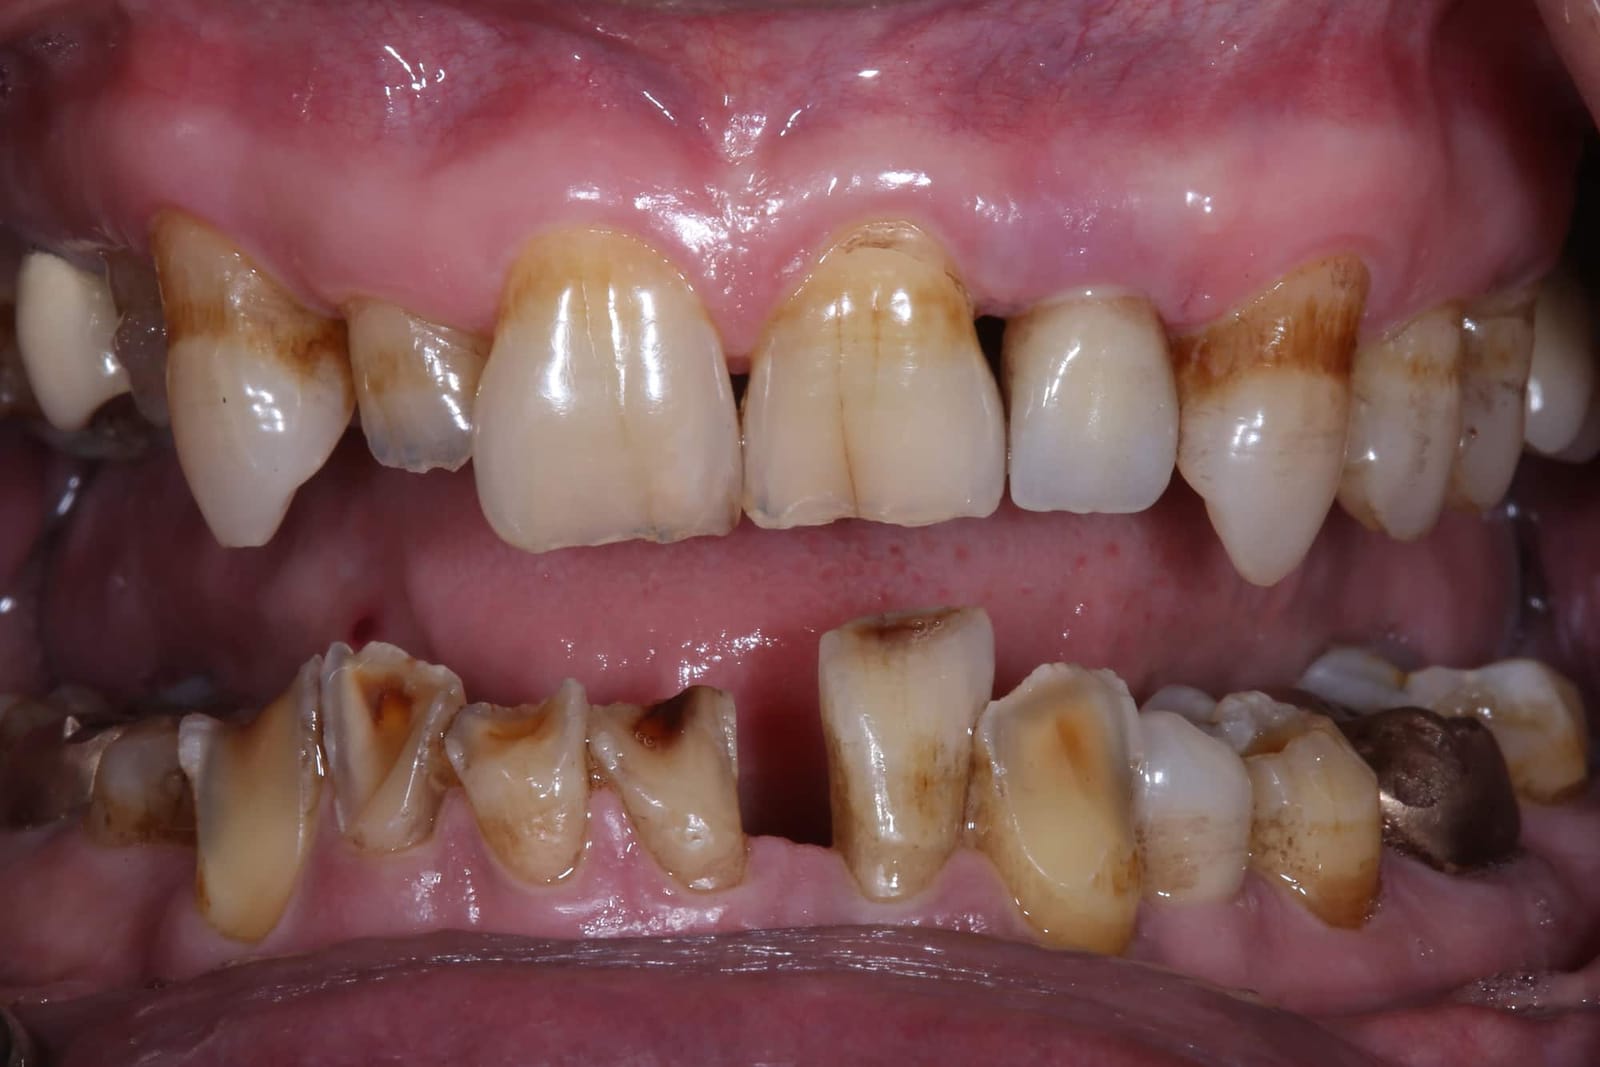
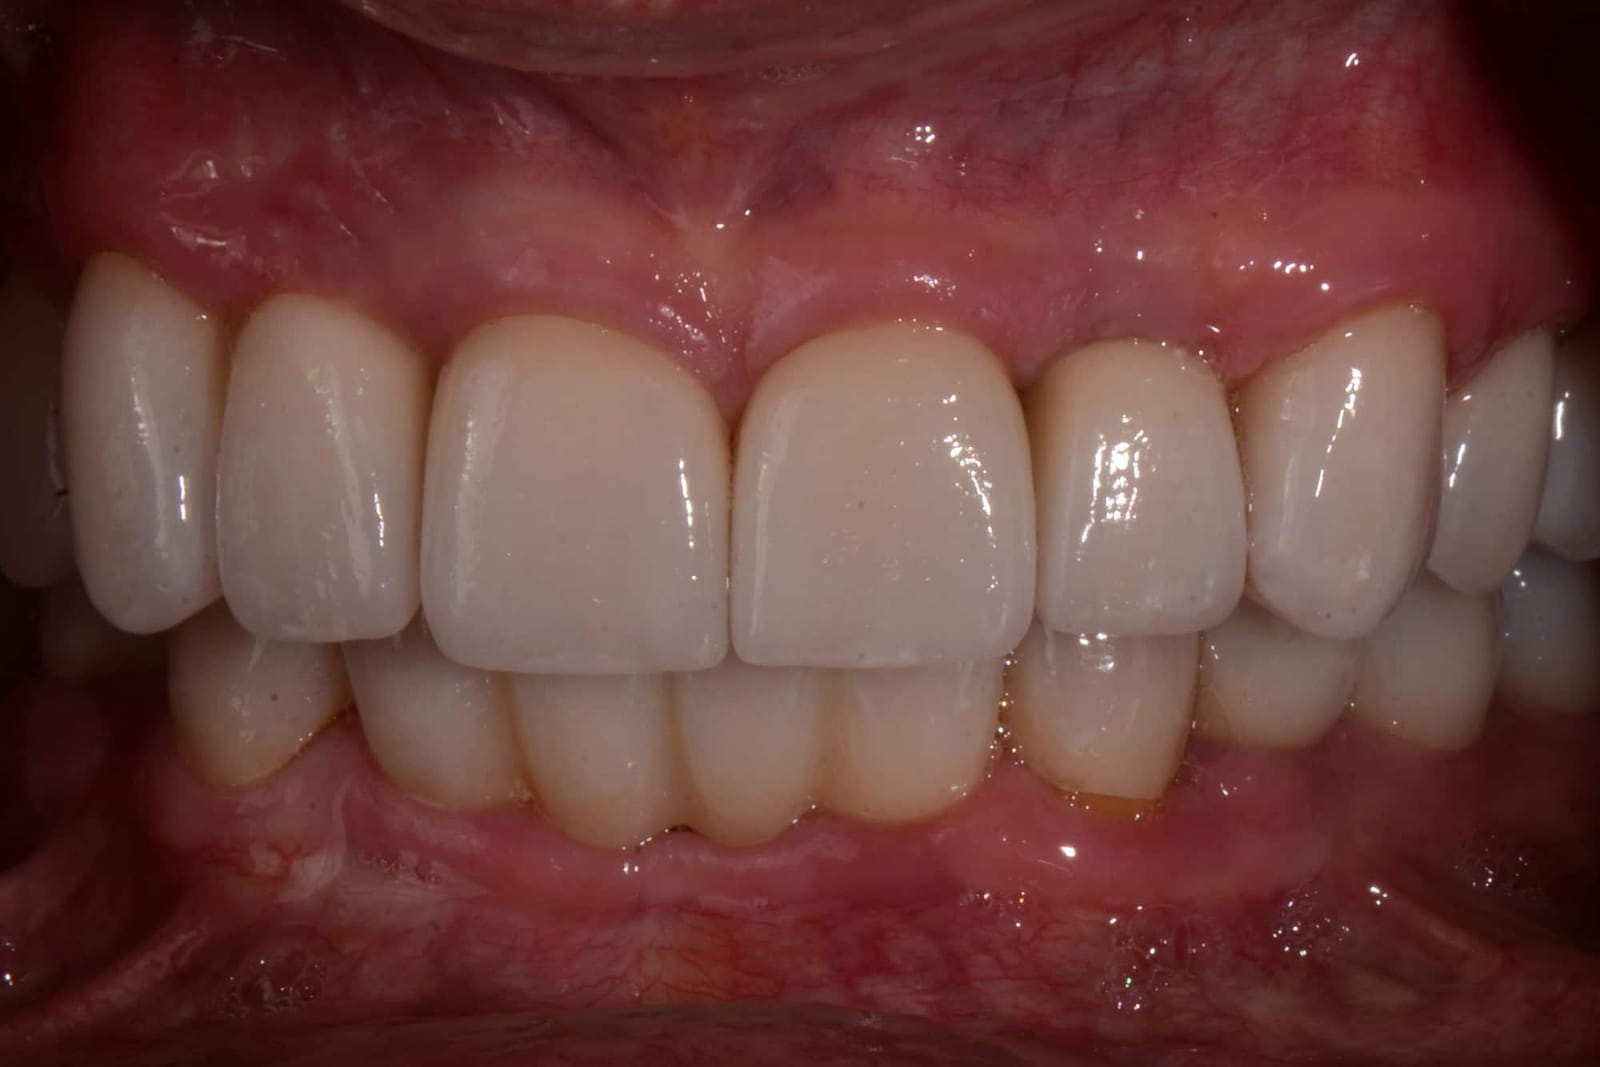
Three ways to make space at the front, used together in this case.
New front teeth need room: room for the ceramic, room for the implant parts beneath it, and room for a ramp that is shallow rather than a wall. In a bite that has collapsed, that room does not exist. It has to be created, and there are three ways to do it. In this case all three were used.
- Open the fence. Reducing the overlap and flattening the guidance takes the lower teeth out from behind the uppers. That alone frees space at the front and turns the fence into a ramp.
- Place the implants deeper. The lower front teeth were on implants, and setting those implants deeper in the bone effectively intrudes the lower front teeth, buying room above them for properly shaped, properly angled crowns.
- Open the vertical dimension. Raising the bite to a new, measured jaw position creates room in the whole mouth at once, front and back, and that is where the lower incisors were rebuilt in height.
Each of these changes the whole bite, not just the front teeth. Open the vertical and every back tooth has to be rebuilt to meet at the new height. Intrude the lowers and the ramp has to be redesigned. Open the fence and the lips, the speech and the smile all move with it. Deciding how much of each to use, in what order, and then rebuilding every contact from measured jaw movements on an adjustable articulator, is the work of a prosthodontist with years of experience at this level. It is complex, it is unforgiving of guesswork, and it is the reason these cases are not general dentistry.
What a second opinion on guidance actually looks at.
Chipped edges, a tooth that keeps coming loose, a sore jaw in the morning, a bite that never felt settled. Before anything is repaired again, Dr. Reshad looks at the ramp.
- How deep is the overlap? Measured against the lower incisor. More than a fifth of its height is a fence.
- How steep is the ramp? The angle the lower jaw has to climb, read from the marks the lower teeth leave.
- Do the back teeth separate? Smoothly, and without effort, when the jaw slides.
- Is there a step or a lock? A two-step biting plane, or an envelope the jaw cannot move within.
- Can it be flattened on what is there? Often the inside of the teeth can be reshaped. Sometimes the teeth have to be remade. He will say which.
DDS, MSc (Distinction), FICD, MICOI. The specialty that designs how teeth meet and move, not only how they look.
Fixed and Operative Dentistry. Published author in peer-reviewed journals and textbooks.
This is the anterior guidance chapter of the full-arch lecture he gives internationally, written for patients.
“Good design on the inside is what keeps the outside looking good for longer. It is the part nobody sees and the part that decides everything.”
If the outside of your teeth looks right and they still keep breaking, look at the inside.
Bring the history and the chips. In one visit you will know how deep the overlap is, how steep the ramp is, and whether it can be flattened on the teeth you have.
Sources. Weinberg LA. Int J Prosthodont 1998;11:55: for every 10° reduction in the angle of disclusion, about a 35% reduction in force applied. · Williamson EH, Lundquist DO. Anterior guidance: its effect on electromyographic activity of the temporal and masseter muscles. J Prosthet Dent 1983;49:816-823. · Dawson PE. Functional Occlusion: From TMJ to Smile Design. Mosby, 2007. · Kim Y, Oh TJ, Misch CE, Wang HL. Occlusal considerations in implant therapy. Clin Oral Implants Res 2005;16:26-35. · Kois JC, Phillips KM. Occlusal vertical dimension: alteration concerns. Compend Contin Educ Dent 1997. · Rangert B et al. Load factor control. Int J Prosthodont 1995. Images. Renderings, models and clinical photographs are from Dr. Reshad's lectures and his own patients, shared with consent, with no faces shown. Profile photographs cropped to the lips.
Everyone will promise you new teeth. Ask who has watched theirs last thirty years.
In a full mouth reconstruction on implants the teeth are the visible part. The frame underneath them decides how long they last, and it is the part almost nobody talks about. Dr. Mamaly Reshad, a prosthodontist now practising in Beverly Hills, has spent more than thirty years designing full-arch frameworks, helping to develop them, and following his own patients for decades to see what holds up. He knows what works, how to design it properly and how to make it last. This is how he chooses and builds the frame, written for the person whose mouth it is.
The opening of Dr. Reshad's framework lecture, given to full-arch clinicians in Melbourne in 2026: four ways to build the arch, and one question asked of each of them. How long has it actually been followed, and by whom?
- 30+ years
- designing and following full-arch implant frameworks
- 4 ways
- to build the arch, and one question asked of each: how long has it lasted?
- 6 questions
- answered before a material is chosen
- 8 rules
- the laboratory follows so zirconia does not break
He has watched every full-arch design come and go. He helped develop some of them.
Dr. Reshad's involvement with full-arch implant frameworks goes back to the gold bars of the 1990s. In 2009 he published the component prosthesis in the Journal of Prosthetic Dentistry: a milled titanium bar carrying individual zirconia crowns, one of the first uses of CAD/CAM to correct badly angled implants. He is credited as its inventor, it is cited in textbooks, and clinicians around the world still make it. It was the state of the art, and at the time it was the right treatment.
What set him apart was what he did next: he followed it. Years of recalls on his own patients, and on the cases reviewed in the advanced prosthodontics programme at USC, showed that a design that looked right on the day could ask a great deal of maintenance by year ten. That is a lesson most clinicians never learn, because most never look back that far. He took it as the brief for everything since: not just a good design, but a design built for longevity.
Materials and techniques have improved enormously, and he has refined how they are used, with his master technical team, through every generation of framework. The result is that many of the reconstructions he has made are holding up as well as or better than the best lines on the survival graph below. That is the promise of this chapter: something that works for a long time, built on proper observation, an understanding of the science and the materials, and the right handling of them in the laboratory and at the chair.
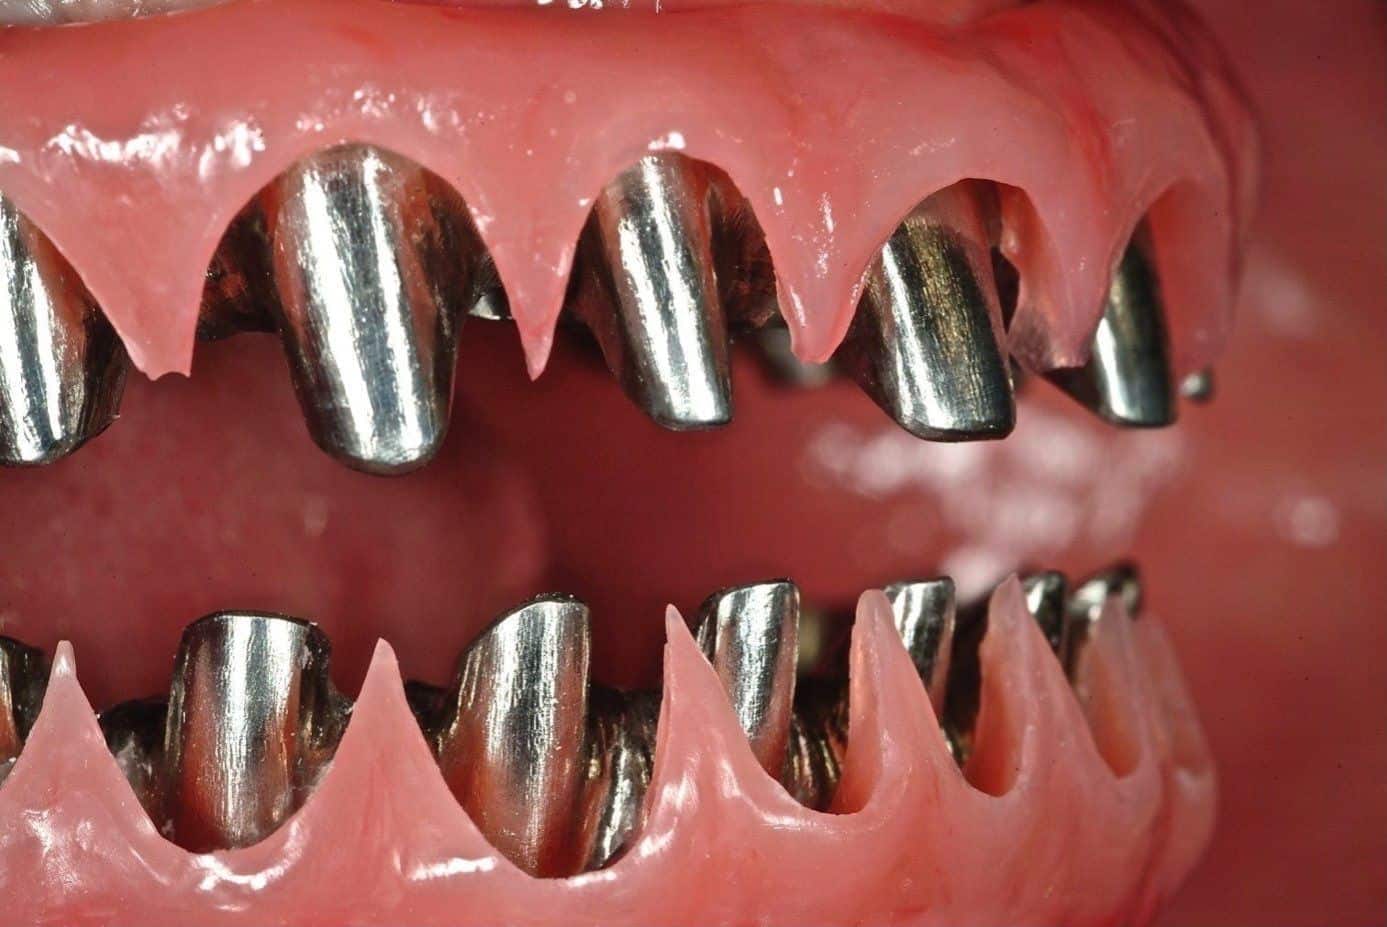
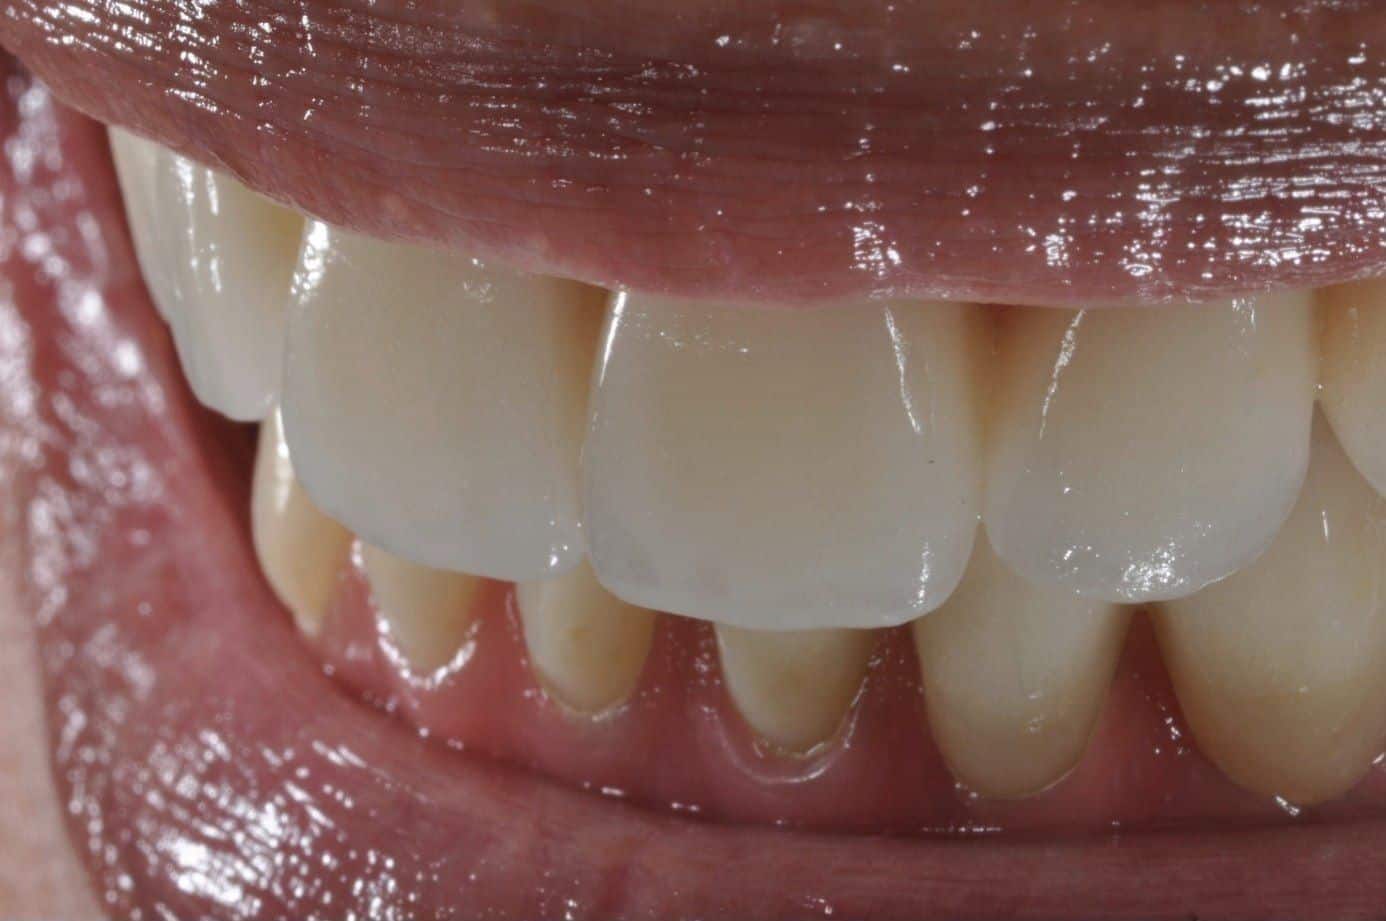
Twelve years ago the honest answer was “no evidence”. Now there is some, and most of it is still too short to promise anything on.
In 2013 Dr. Reshad stood on a lecture stage and asked what evidence there was for the frameworks being sold for full-arch implant teeth. The answer was one line on a graph: the acrylic hybrid, and nothing for anything newer. In 2026 there are eight lines, and still only one of them runs past eight years. Every other material is being placed on the strength of two to five years of follow-up.
Reading that graph properly is a skill, and it is the one that separates a specialist from a brochure. He judges a material by the length of its line, not the height. He asks whether a study counted the prosthesis or just the implant, whether it counted repairs as failures, how many patients were still being followed when the line ended, and who paid for the study. A survival figure quoted without those answers is not evidence; it is marketing. Different designs fail at different rates, and the graph shows it, but only if you know which questions to put to it.
The other half of his evidence is his own observation. Years of following patients in the advanced prosthodontics programme at USC, where every case is reviewed and recalled, and more than thirty years of watching full mouth reconstructions in practice, his own and other people's: what wore, what chipped, what broke, and when. The literature tells him what has been measured. His recalls tell him what it looks like in a real mouth at year fourteen. Every full mouth reconstruction he builds rests on both.
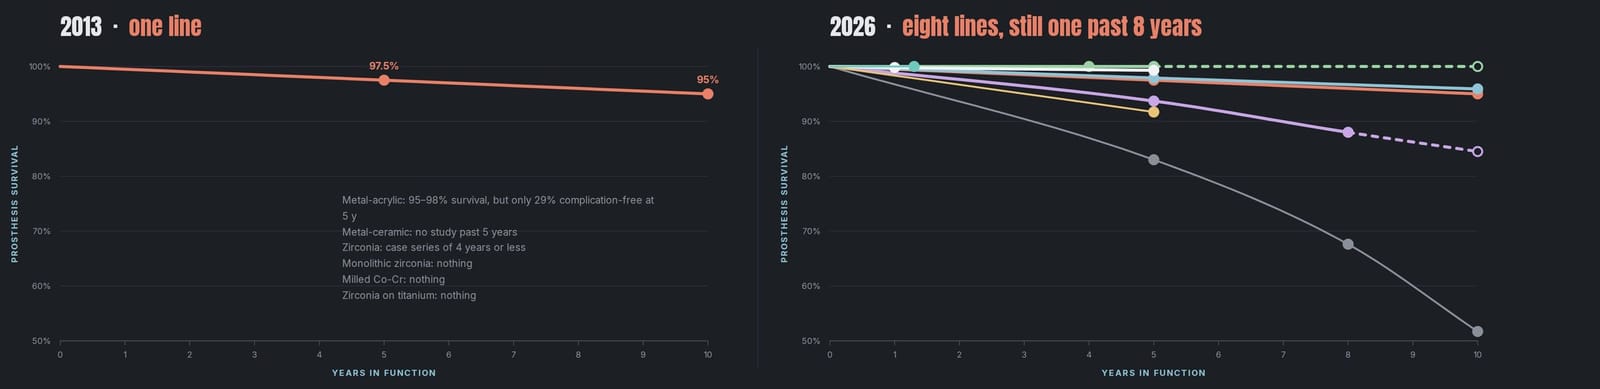
What counts as evidence on this page: prosthesis survival, not implant survival; complete-arch, implant-supported, fixed; life-table or Kaplan-Meier data where it exists, pooled reviews where it does not. Measured points are reported as measured; projections are called projections.
Four ways a reconstruction can let you down, and each one is a design decision.
Implants almost never break. What breaks is what sits on them, and it breaks in a pattern. Over three decades of examining full-arch work, his own and the many cases that come to him for a second opinion, Dr. Reshad has seen every version of that pattern. Once you can read it, you can see on the day of design whether a prosthesis will be back in the chair in five years, or still quietly working in fifteen.
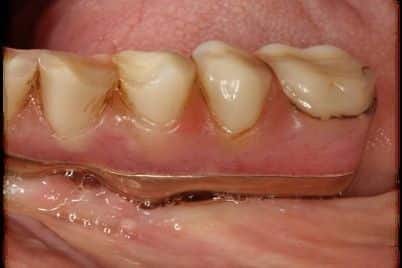
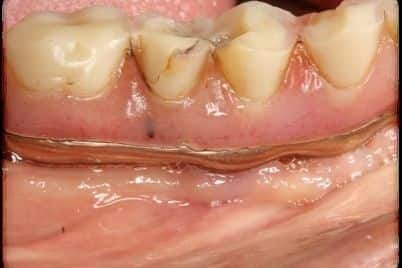
01 · Wear. The lower acrylic bridge grinds flat.The classic lower “hybrid” (acrylic teeth on a titanium bar) is the oldest full-arch design and still the one with the best ten-year record. But its teeth are plastic. Against natural teeth or another implant bridge they wear flat, the bite collapses, and the teeth have to be replaced. A grinder wears them in a few years. In the right mouth it still has a place, with the replacement of the teeth planned before delivery. 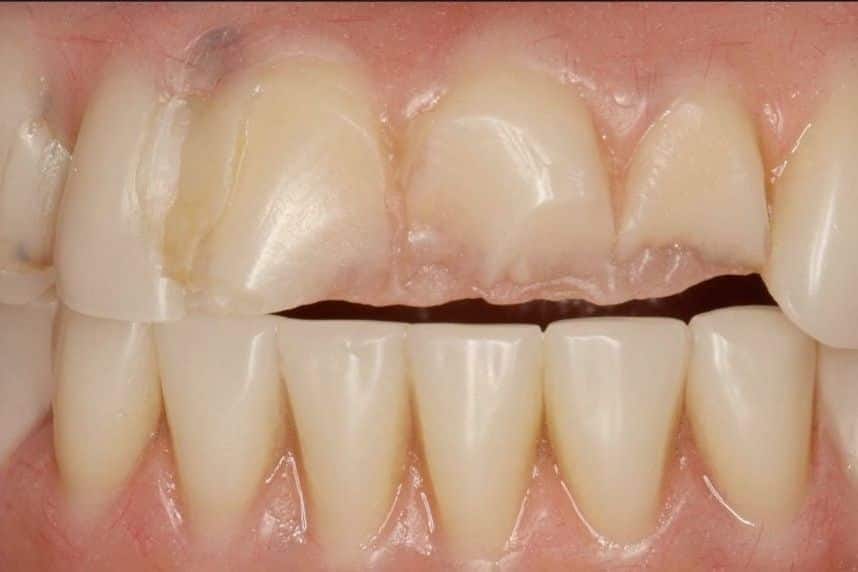
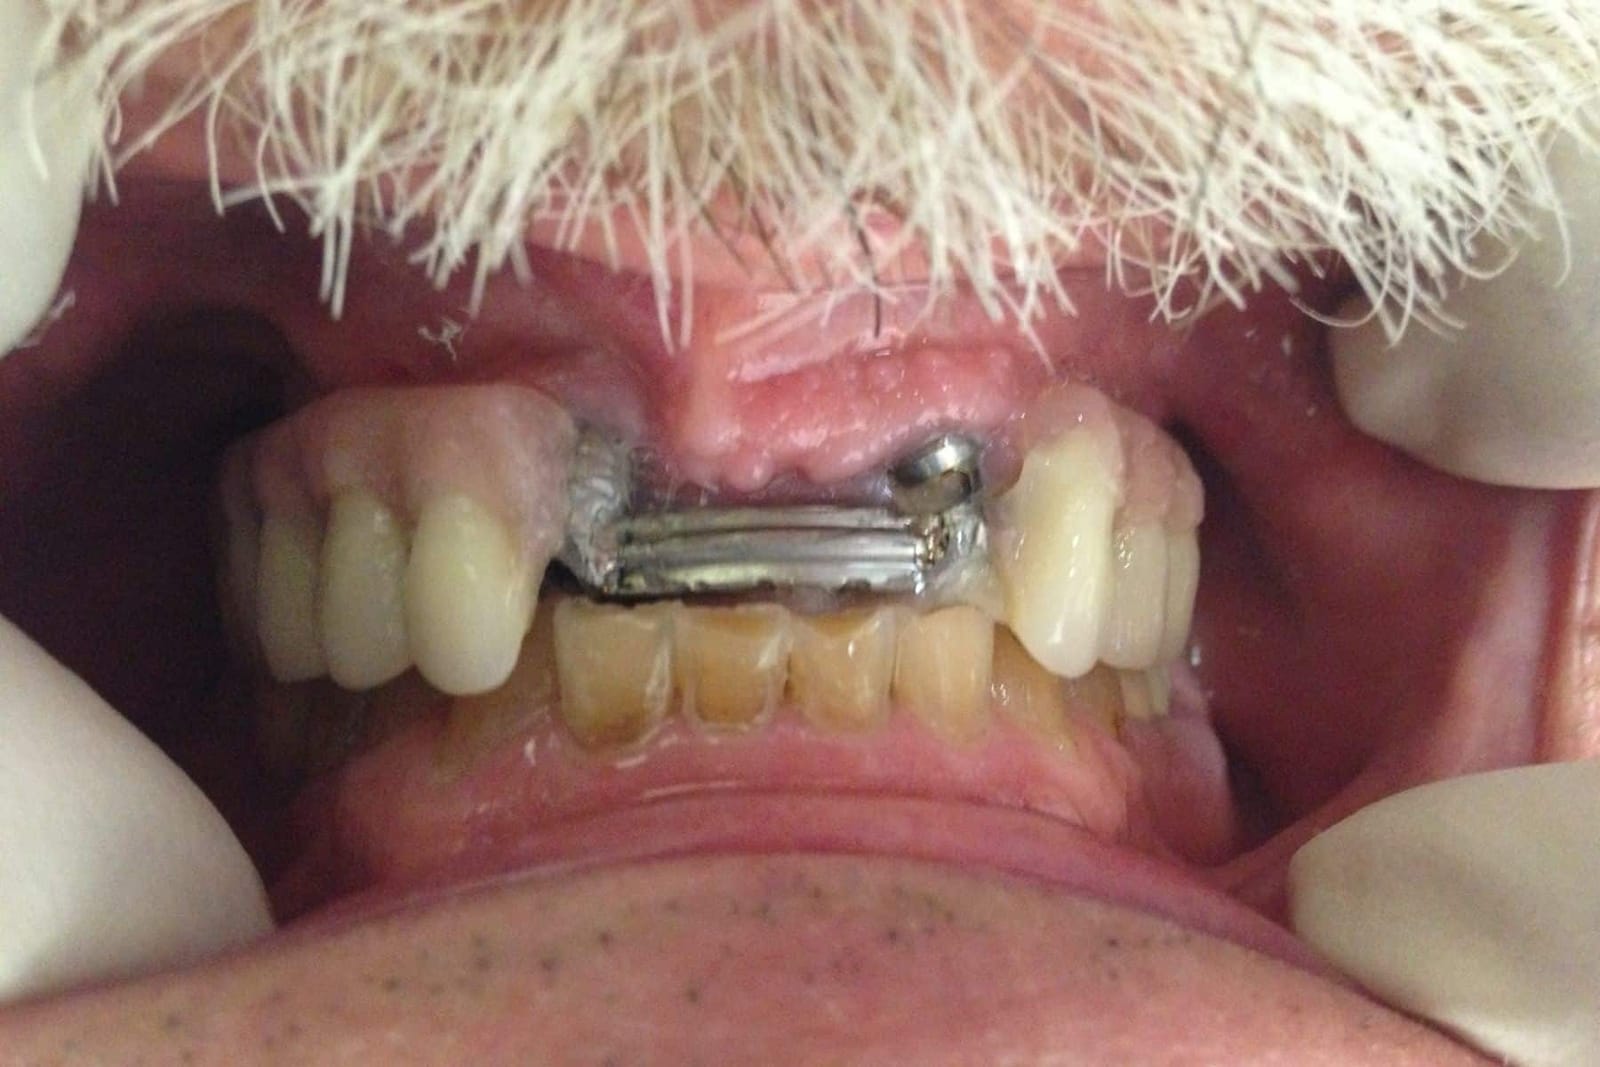
02 · Fracture. The upper front teeth shear off.The upper arch fails differently. Plastic teeth on an upper implant bridge are prone to shearing off at the front, at the gum line, where every bite and every forward slide lands first. The literature says so, and so do the failed upper bridges that come through Dr. Reshad's practice for a second opinion: in the series he has reviewed, 62% of the fractures were upper front teeth. He has never made this design and has always taught against it at USC. An upper acrylic bridge against a fixed lower bridge is a maintenance contract, not a restoration. 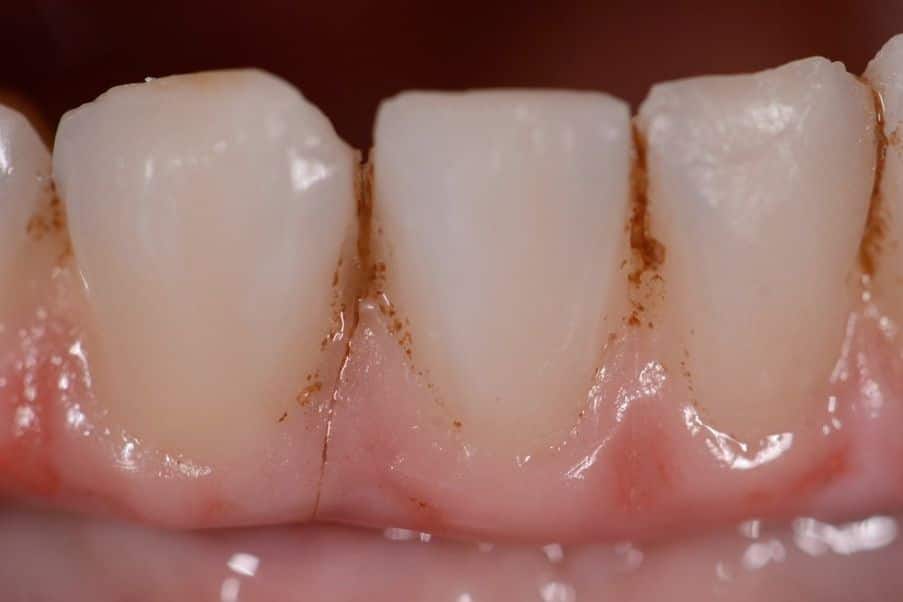
03 · Chipping. Layered porcelain comes away from the core.Porcelain layered over a zirconia or metal core gives the prettiest teeth and the worst chipping record: one prosthesis in every three to five chips within a few years. A chipped bridge counts as “surviving” in most studies because it is still in the mouth. To the patient it is a failure, and Dr. Reshad counts it as one. 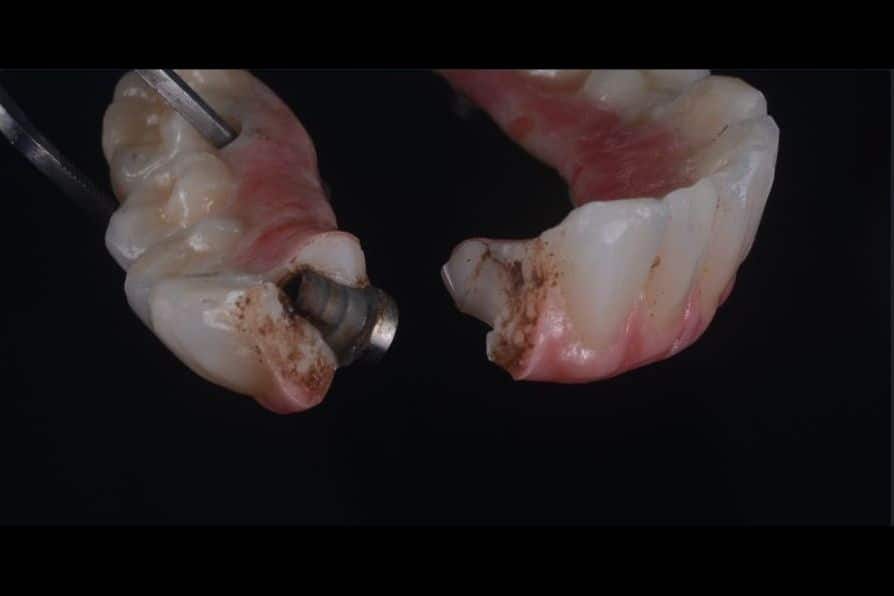
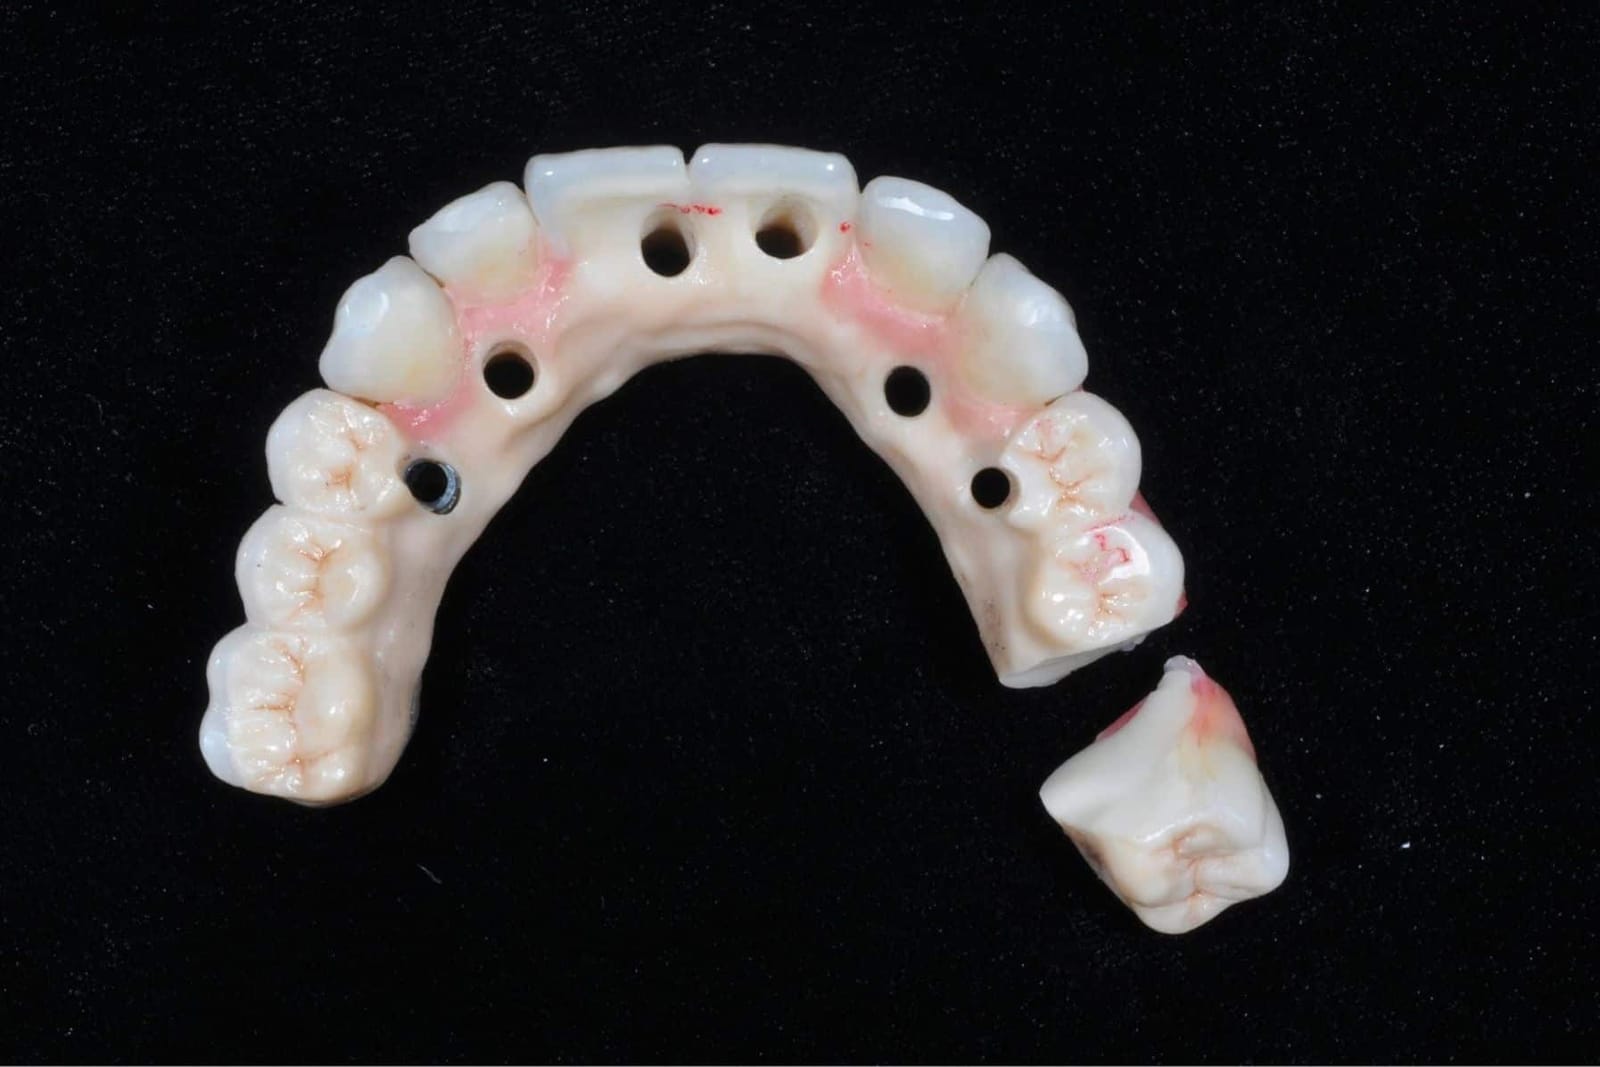
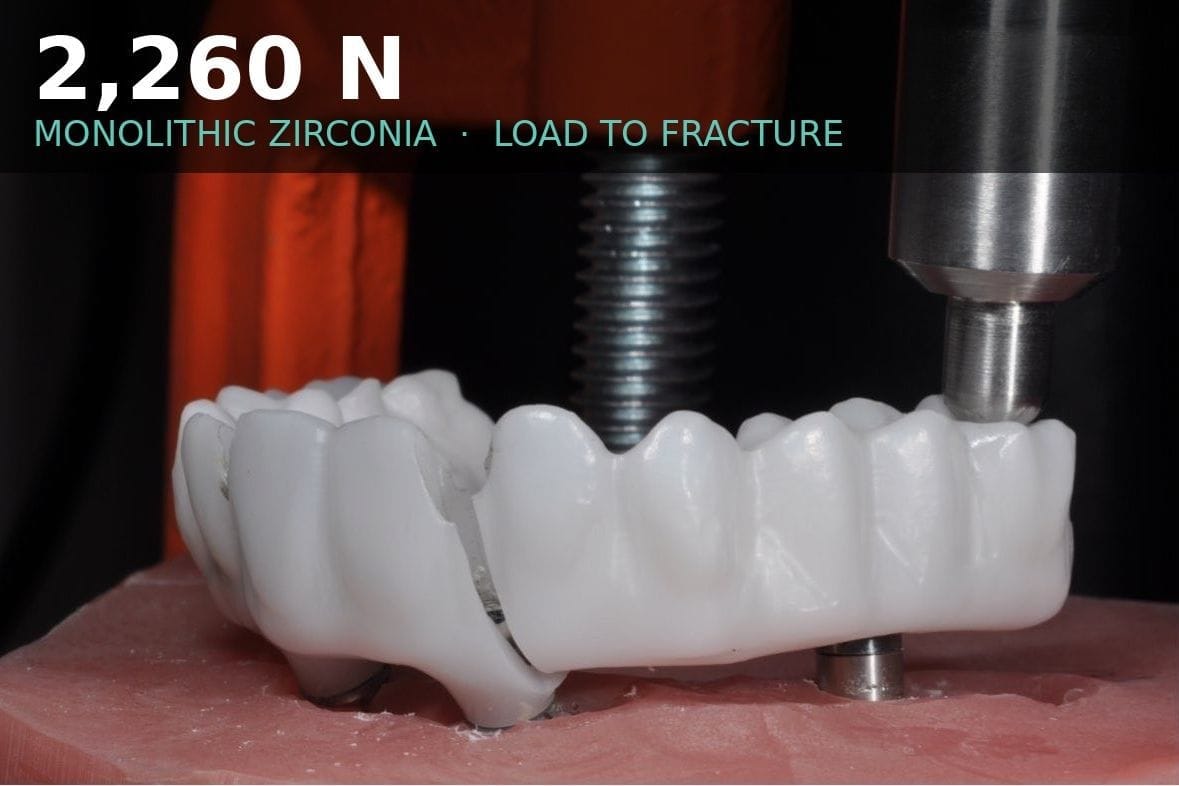
04 · The cracked frame. Zirconia breaks where it was starved of space.Solid (monolithic) zirconia does not chip. It breaks only where it is thin: through a screw channel, at a narrow connector, behind a long cantilever. In this bridge the crack ran from the channel through the thinnest wall, distal to the last implant. Tall insert, thin wall, cantilever. Every rule broken at once. The rules are below.
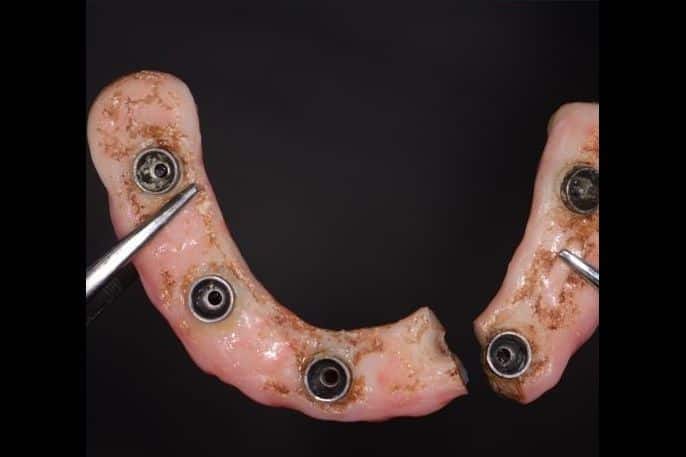
95% in the papers. 52% in the clinic. Same prosthesis. The difference is who was counting.
When you are quoted a success rate for full-arch implant teeth, ask what was counted. Most studies count a prosthesis as surviving as long as it is still in the mouth. The teeth can be replaced, the porcelain repaired, the crowns recemented, and it still “survives”. Pooled reviews put the metal-acrylic hybrid at about 95% survival at ten years. One university clinic that counted every remake found only 52% of the same prosthesis still original at ten years. Forty-three points apart, for the same object.
Dr. Reshad's rule is simple: maintenance is failure. A full mouth reconstruction that keeps you coming back to the chair has not succeeded, whatever the paper says. By that measure, only one material comes close to the 95% benchmark at ten years, and the chart shows which.
- Metal-acrylic hybrid
- 9%
- Metal-ceramic
- 10%
- Layered zirconia
- 29%
- Milled cobalt-chromium + porcelain
- 70% at 5.7 y
- Monolithic zirconia
- about 1% chip
Papaspyridakos P et al. 2012 and 2014; Heydecke G et al. 2012; Barootchi S et al. 2020 (51.7% complication-free, n=43); Gallucci GO et al. 2023 meta-analysis; Kwon T, Bain PA, Levin L. J Dent 2014. All figures as presented in Dr. Reshad's 2026 framework lecture.
The lower jaw wears. The upper jaw breaks. Same material, same laboratory, opposite outcome.
Dense bone, a short lever and usually a denture on the other side make the lower jaw forgiving: an acrylic hybrid there wears flat over ten years and nothing breaks. The upper jaw is softer bone, a longer lever and the teeth that take every forward movement of the bite. The same acrylic bridge there sheds its front teeth. Both arches “survive”. Only one of them stays out of the chair. This is why Dr. Reshad does not use one material for both arches and does not quote one survival figure for a whole mouth.
Six questions are answered before any material is chosen.
Most failed full mouth reconstructions were chosen the other way round: the material first, and the mouth made to fit it. Very often it is the laboratory that dictates the material, because it is what they are comfortable making. They have never met the patient, they are not clinicians, and they do not carry the science or the responsibility for what happens at year ten. Sometimes the patient arrives having decided already, from an AI answer, a friend's experience or another dentist's offer. None of these is a design. Dr. Reshad scores every case against the same six questions and lets the answers rule materials out. There is usually more than one right answer. There are always wrong ones, and it is in the specialist's own interest to avoid them, because a prosthesis that comes back is his problem too.
- 01Where do the screws come out?If an implant's screw channel would exit through the face of a front tooth even after angled corrections, the design changes. Some materials cannot hide it; some can.
- 02How much room is there at the back?Measured, not guessed: from the implant to the opposing tooth. Acrylic on titanium needs the most room, about 15 mm. Monolithic zirconia works in less. Too little room and the frame is thin where it must be thick.
- 03What bites against it?Natural teeth, a denture or another implant bridge. Implant against implant is the hardest service a prosthesis can see, because neither side gives.
- 04Upper or lower?The maxilla fractures, the mandible wears. The same design is not right for both.
- 05How hard do you bite, and how far back does the bridge reach?Bite force and the length of any cantilever behind the last implant. A heavy bite on a long cantilever rules out brittle materials.
- 06How wide is the arch?A wide smile and a big arch mean a long span of material under load. Some frames tolerate it; some are limited by the size of the block they are milled from.
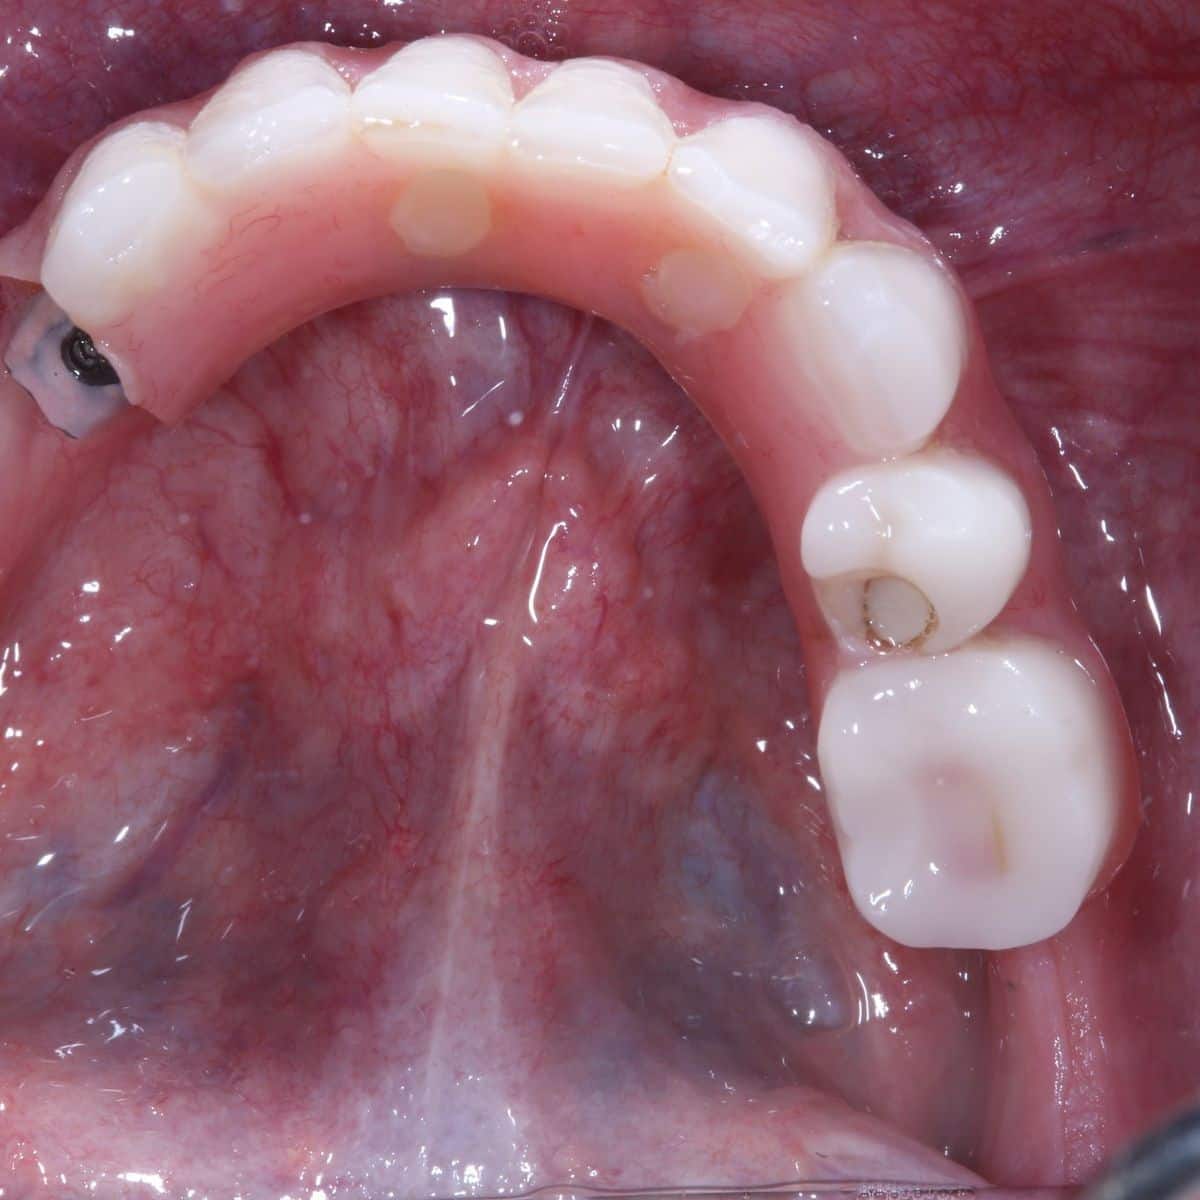
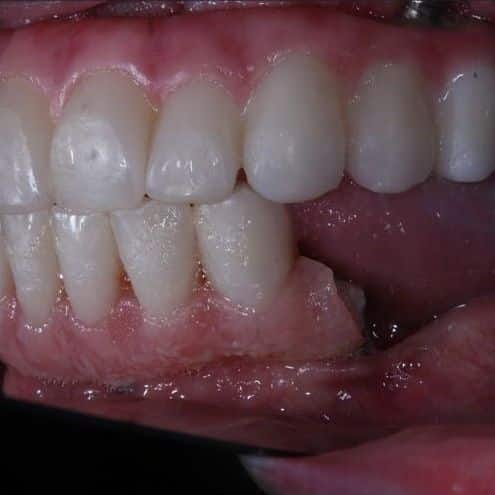
Even the right material breaks in a thin section. Measuring first is what lets the design give it the thickness it needs.
What Dr. Reshad would place in 2026, and what to expect from each.
Every full-arch implant prosthesis is one of four constructions. Each has a place; each has a failure it is known for. A patient choosing a full mouth reconstruction should be able to name which one they are being offered and why.
Acrylic teeth on a titanium bar (the “hybrid”)
WhenLower jaw. Opposing a denture. Budget.
What to expectThe oldest design in the room and the only one with a real ten-year record above 95%. Its teeth do not last that long: plan their replacement before it is delivered. Not for the upper jaw against a fixed lower.
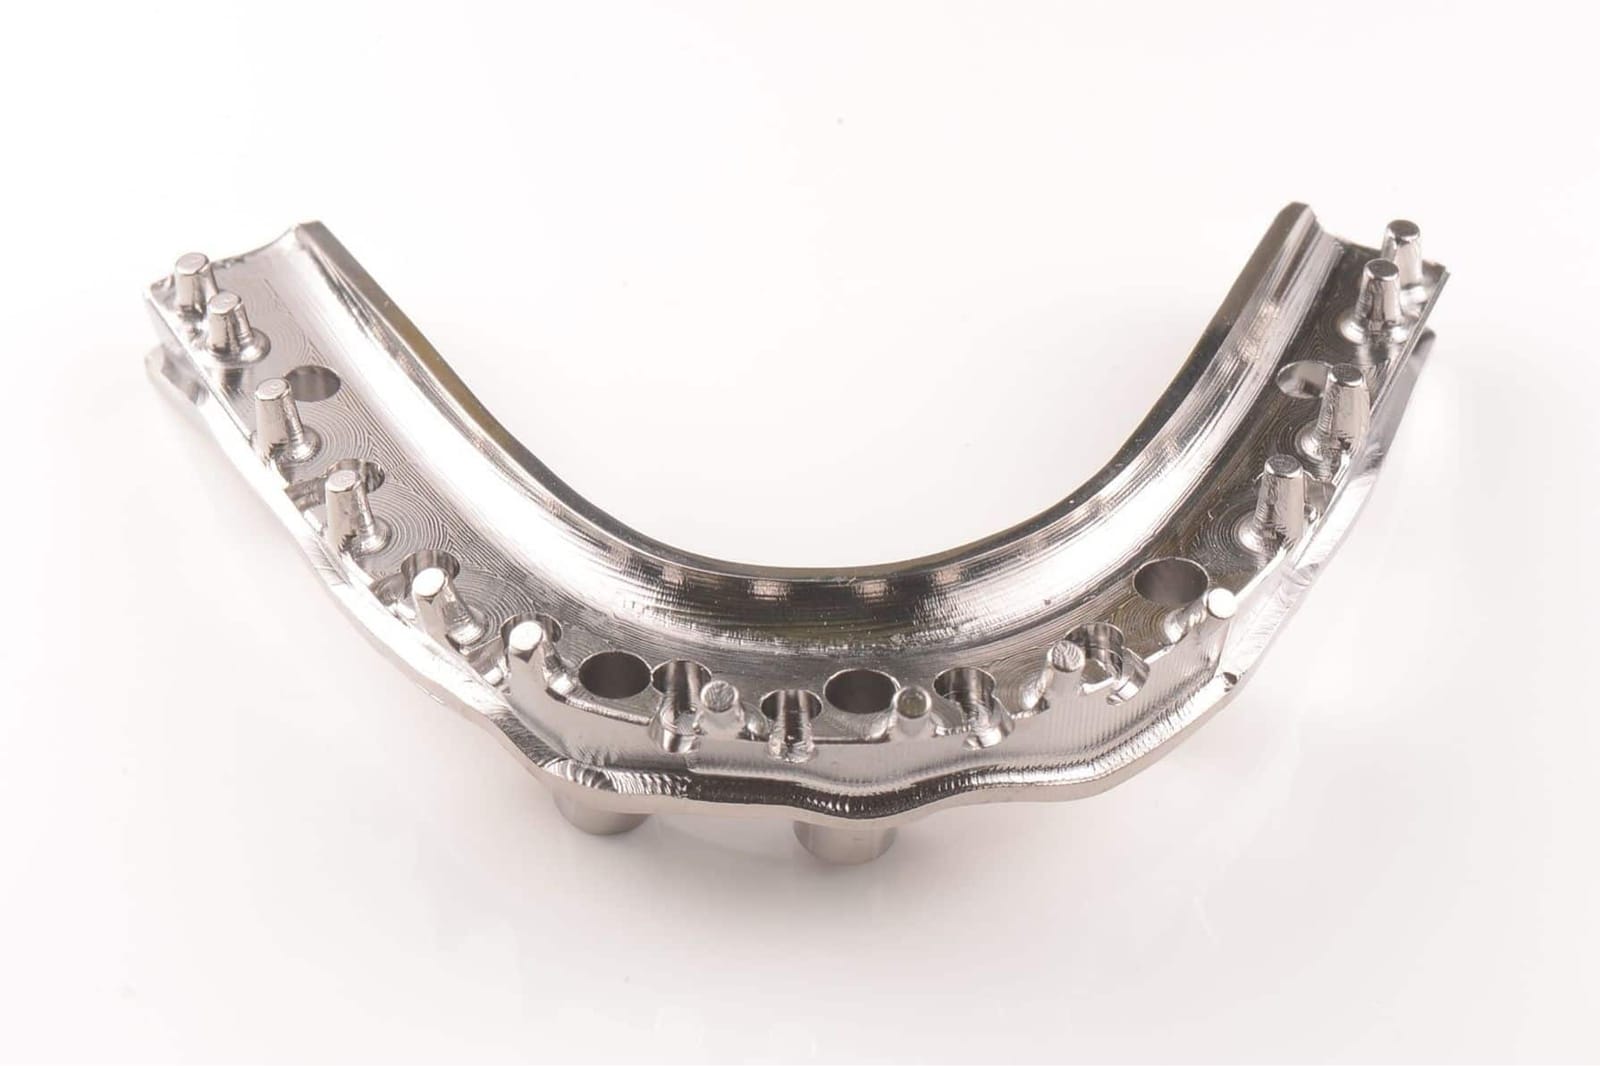
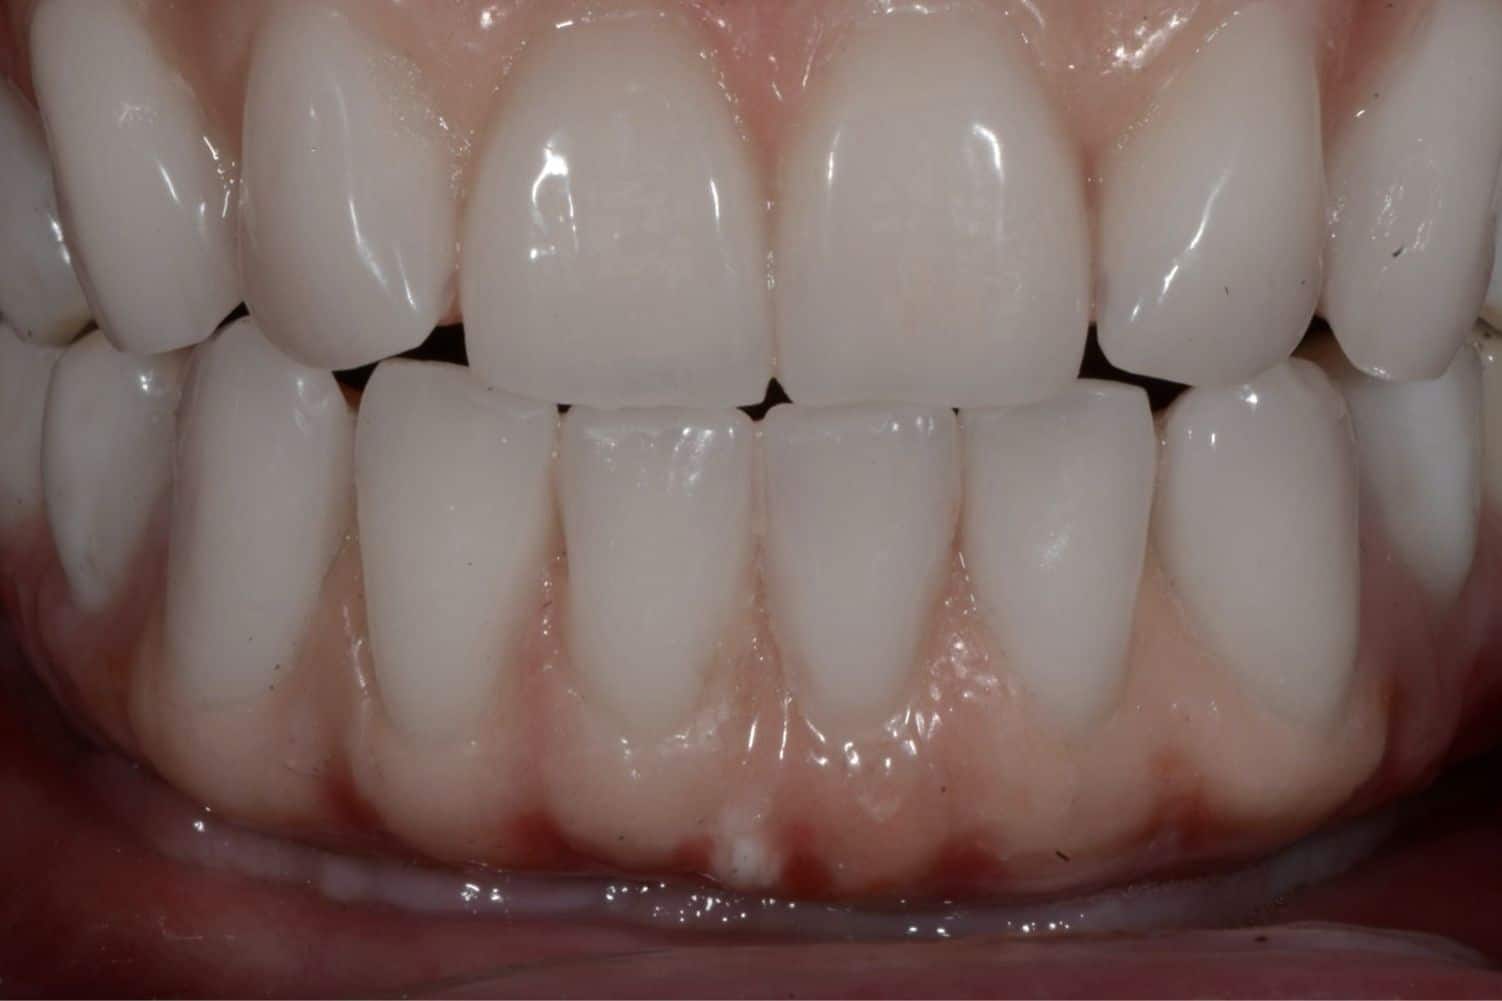
Milled cobalt-chromium with porcelain
WhenRarely. Only when the space at the back is so limited that nothing else can carry a strong bite in a very thin section.
What to expectThe strongest frame available, milled from a solid block; nothing has broken in the published series. But it is hard to fabricate, costly for the patient, and the porcelain layered on it can chip, so it is a poor choice for anyone who grinds. The pros and cons are weighed and explained, then decided together. Better still is to plan the case properly so there is enough room front and back and this material is never needed.
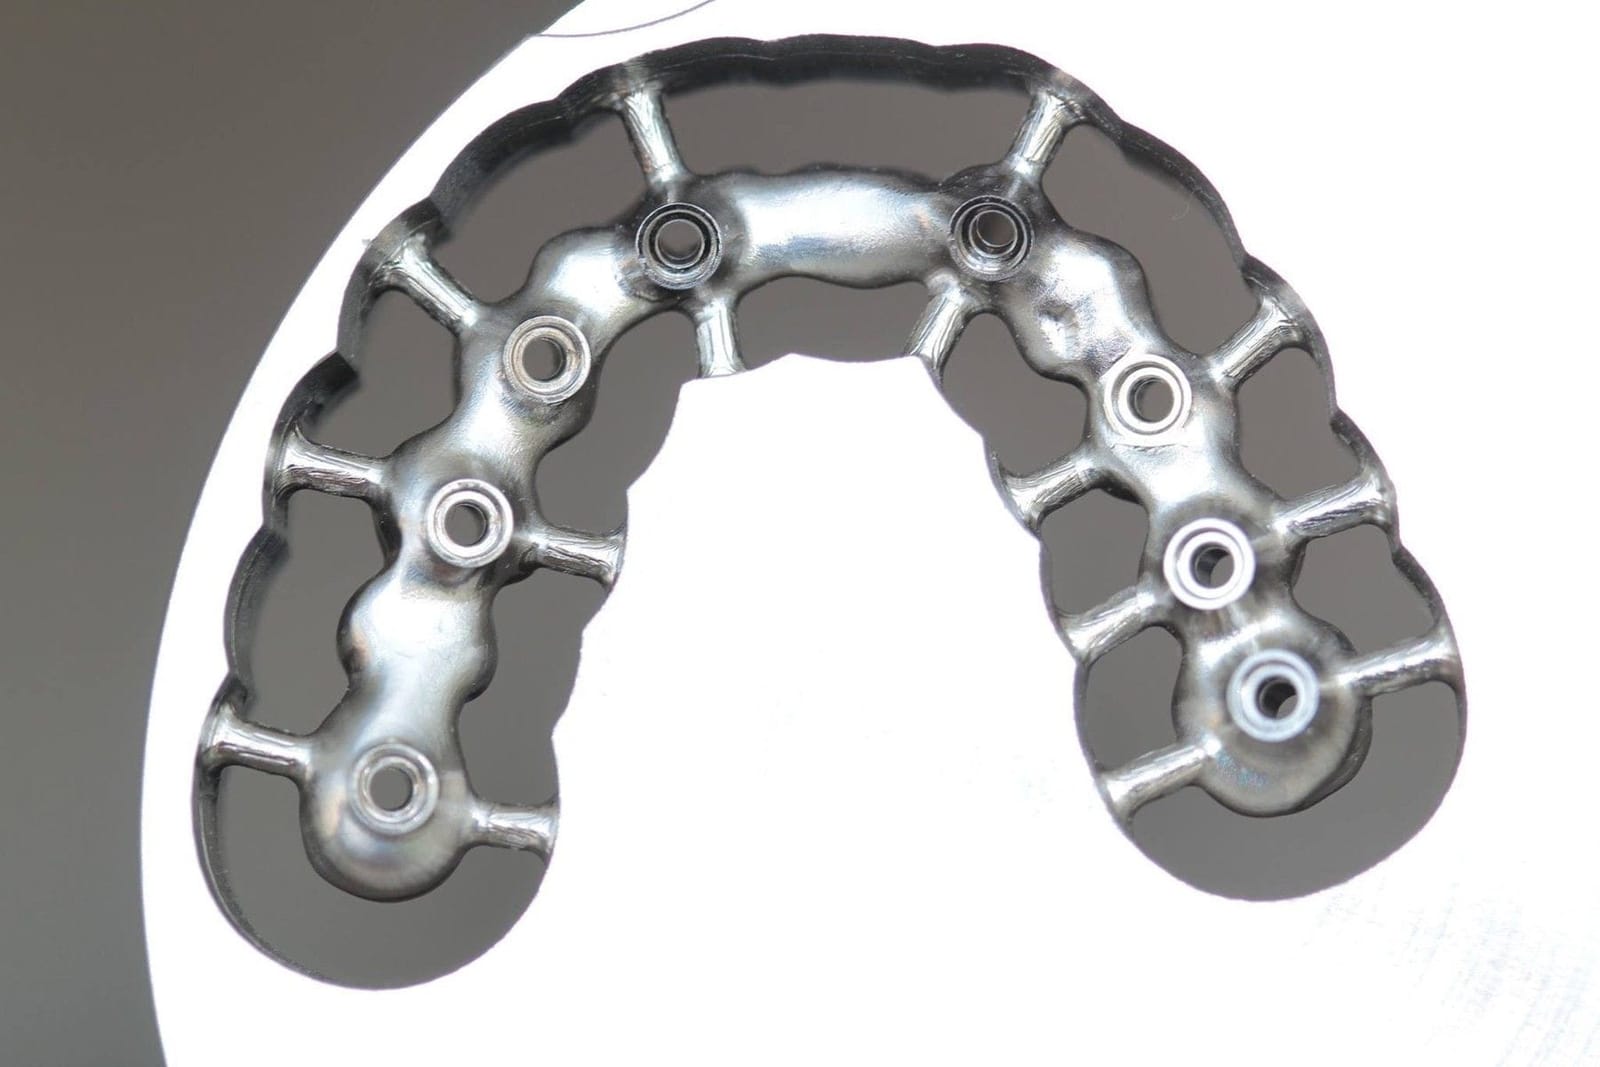
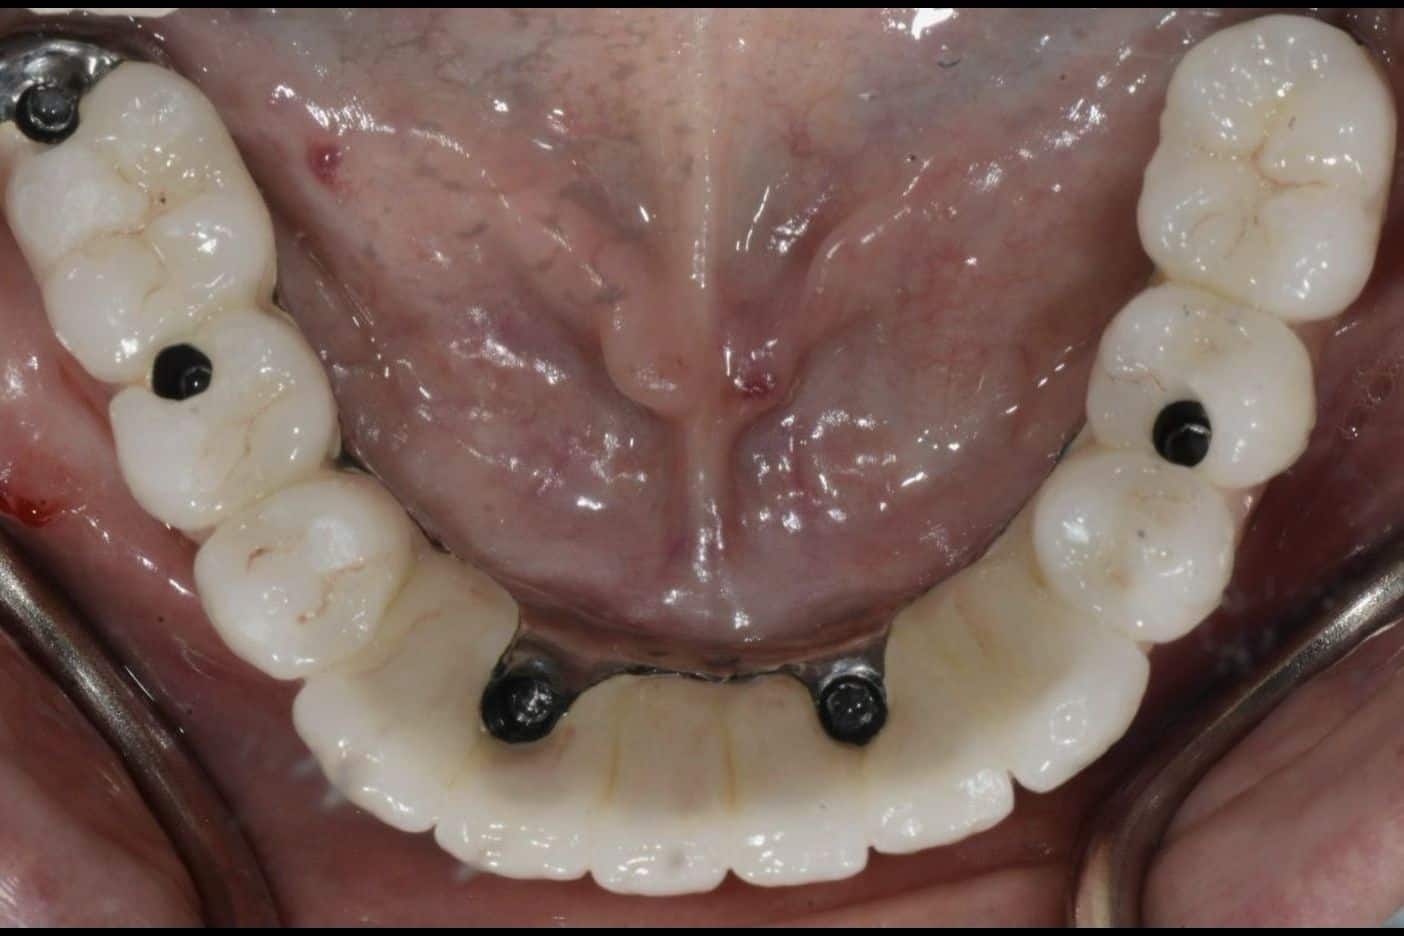
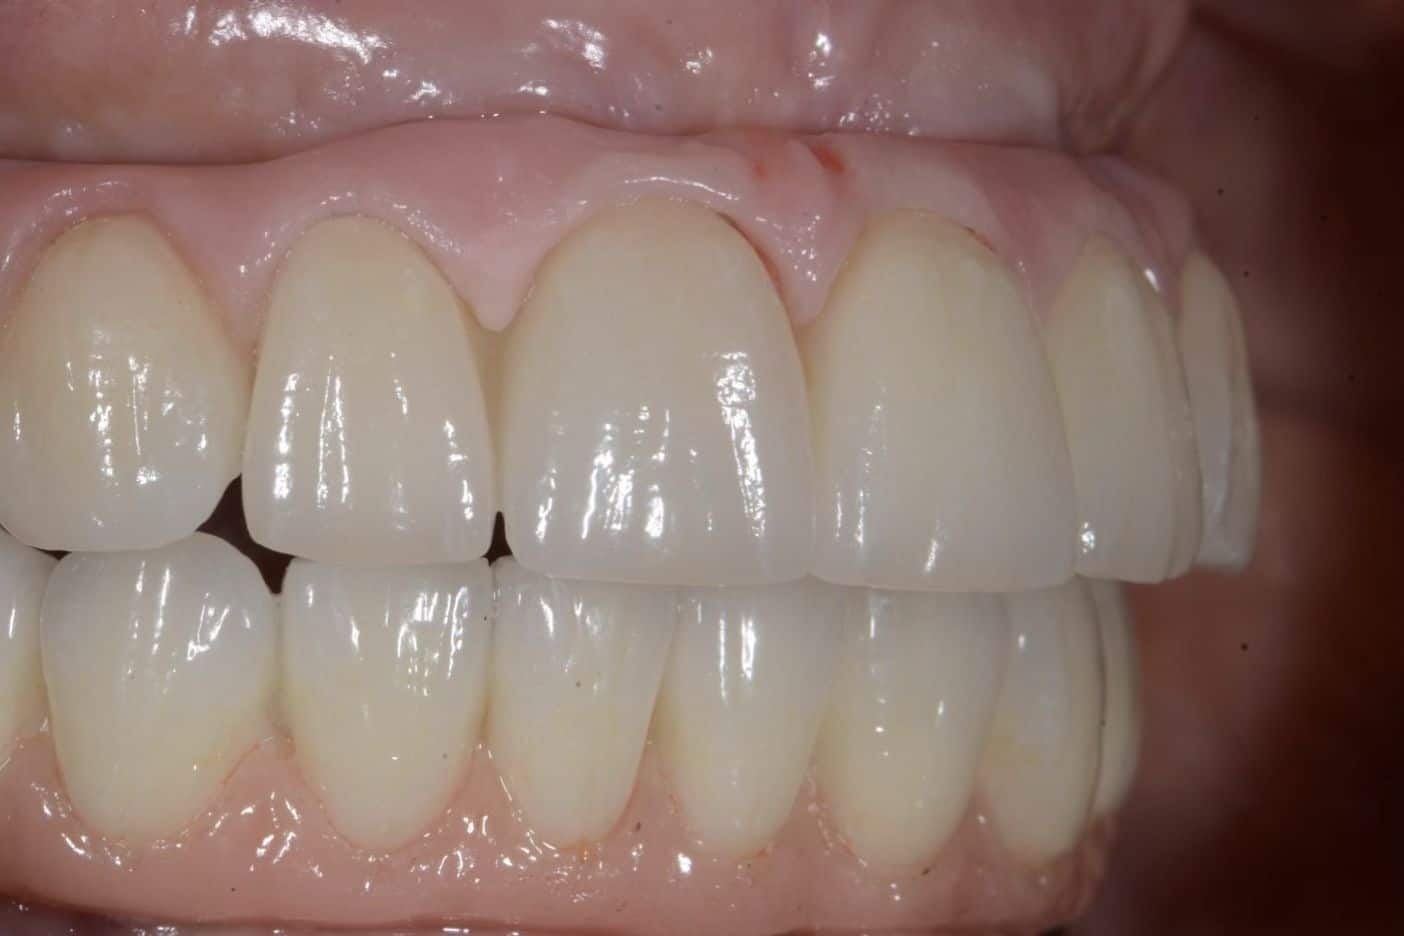
Monolithic zirconia
WhenThe material of choice in Dr. Reshad's practice, when it is used properly.
What to expectSolid zirconia, no layered porcelain on any biting surface, polished rather than glazed. Thirteen studies, roughly 6,100 prostheses, and one message: it does not chip. It breaks only where it is starved of room. Given the right thickness, the right spread of implants, no cantilevers, proper space management, a laboratory that treats it correctly, a clinician who respects it at the chair and a patient who looks after it, it stands the test of time beautifully, and the evidence supports that.
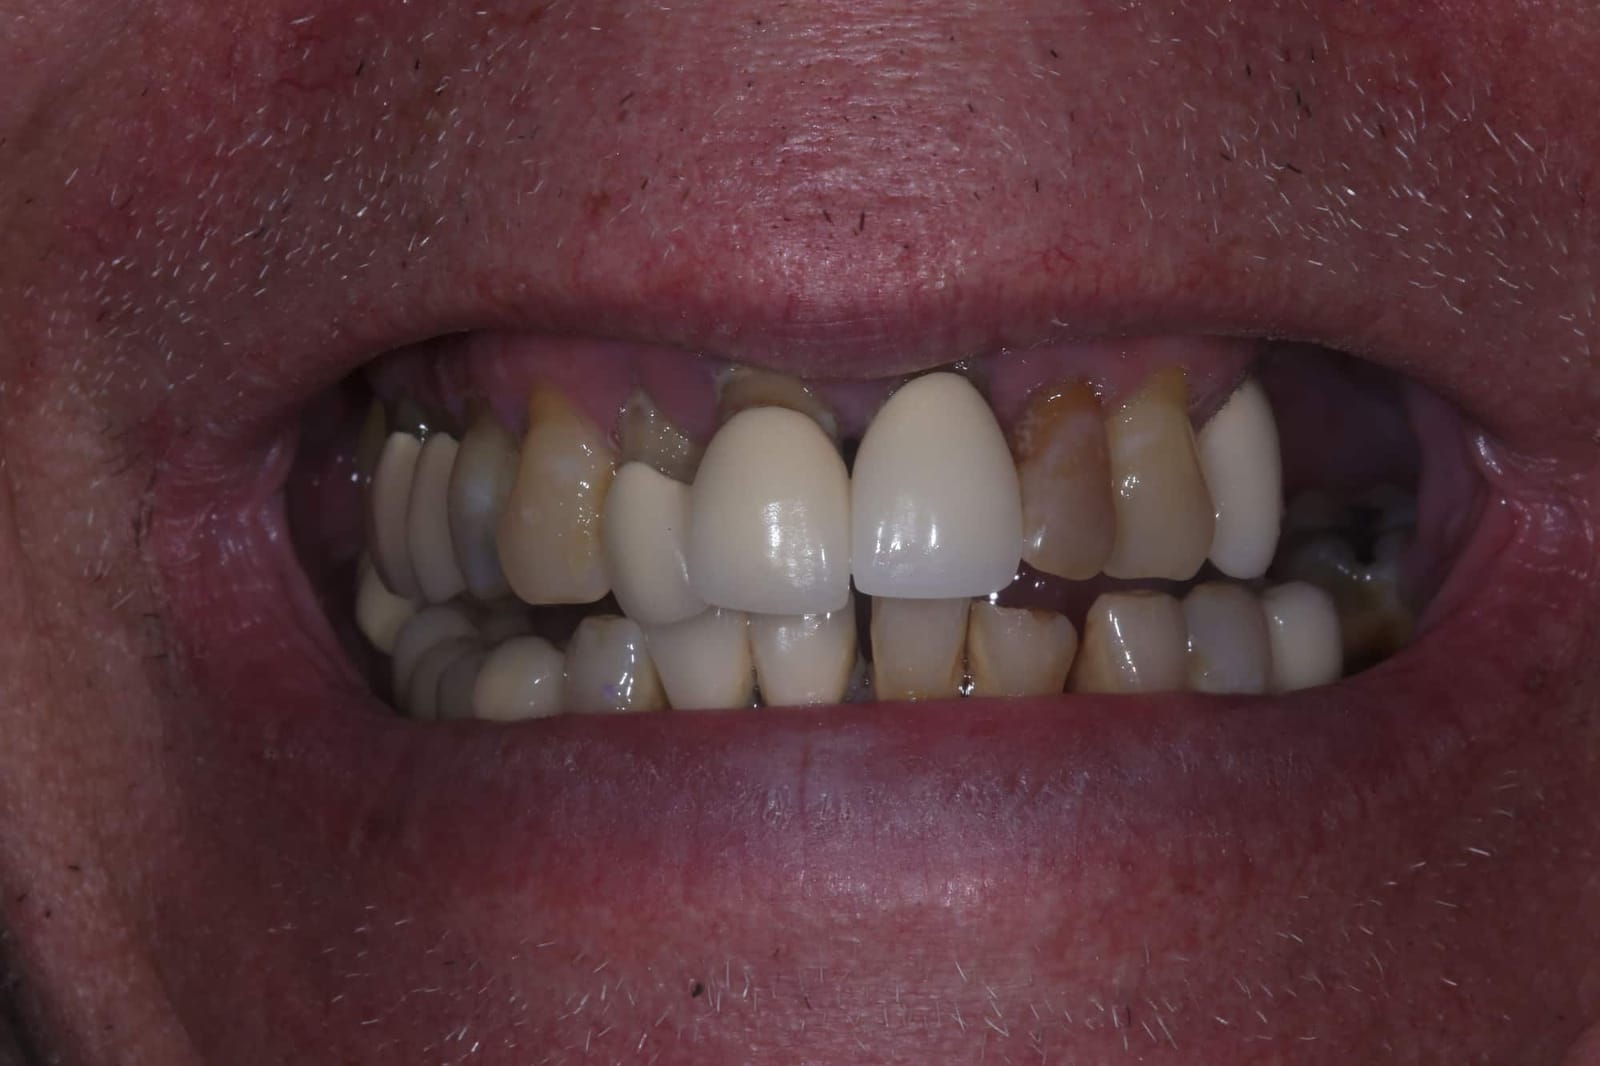
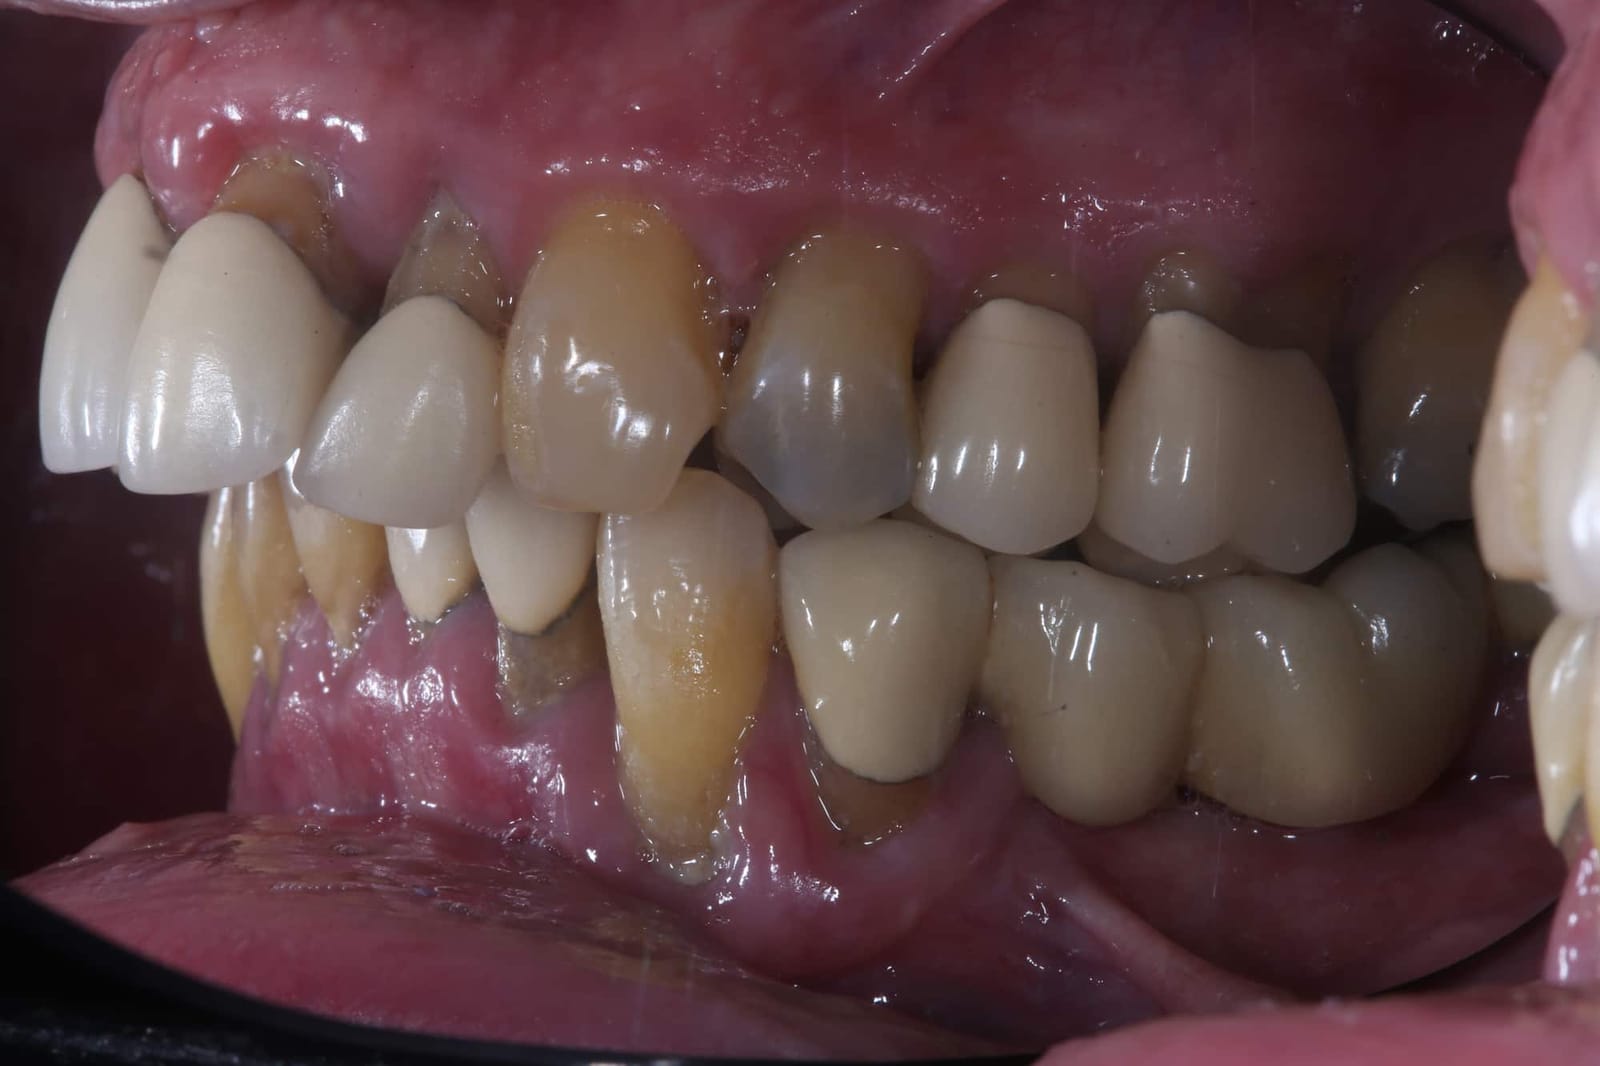
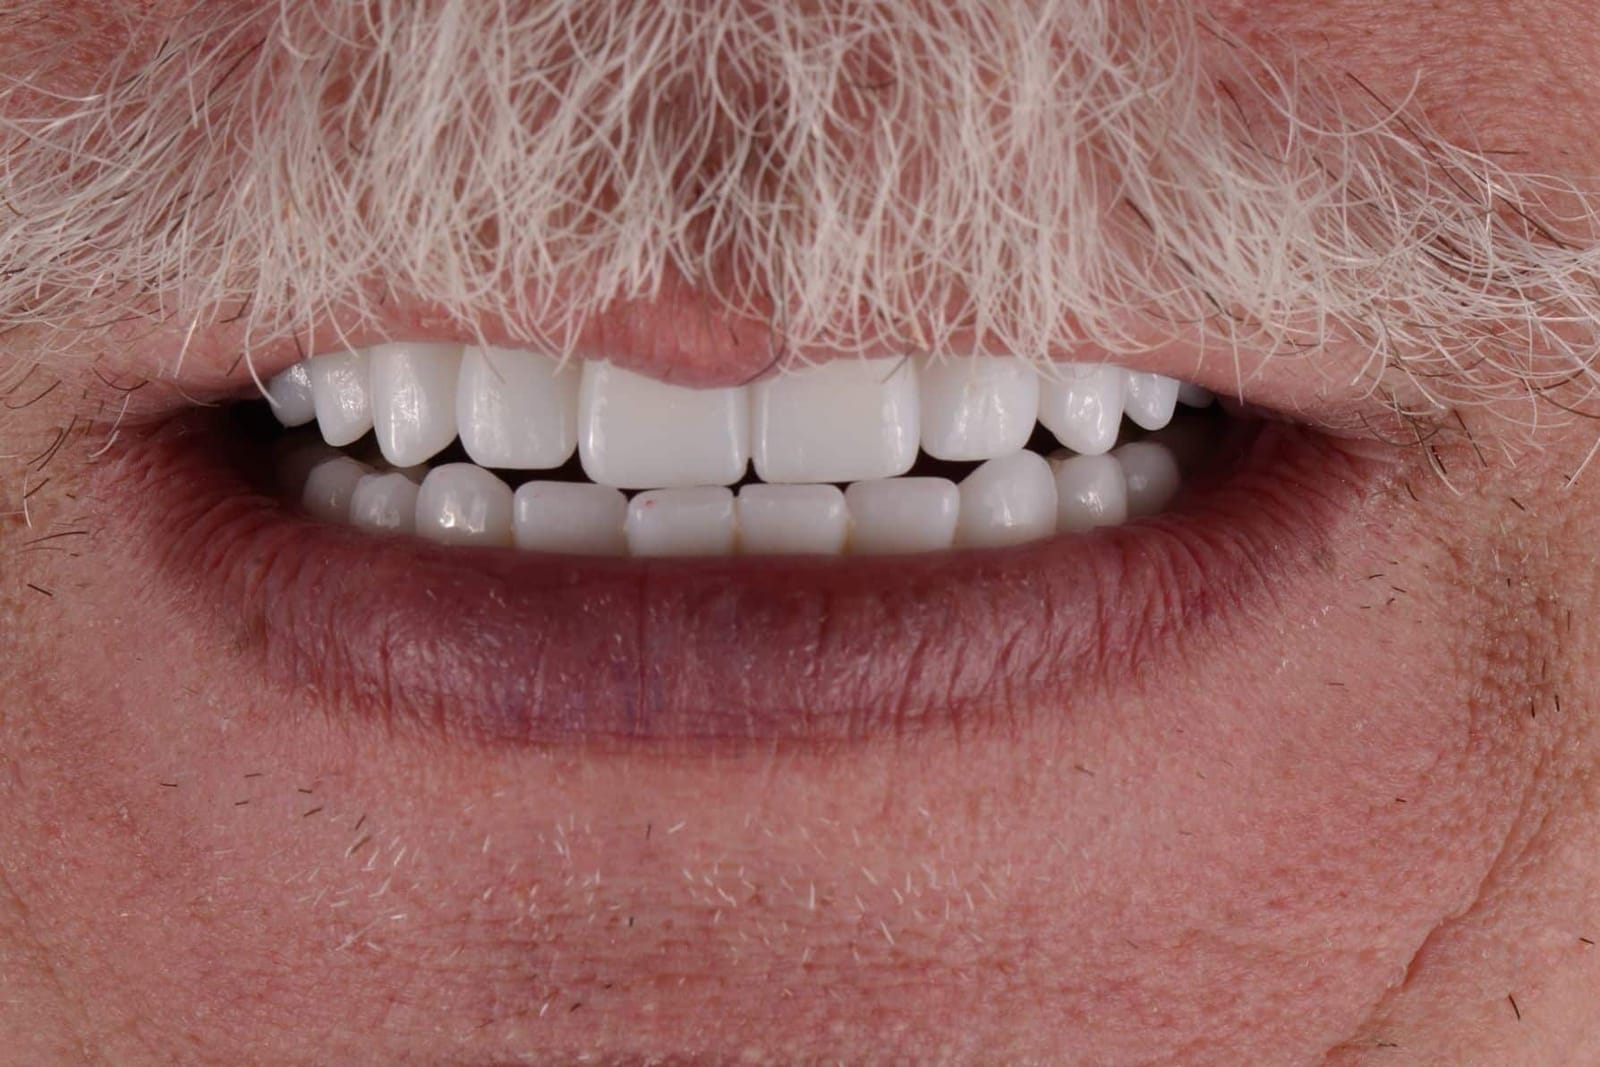
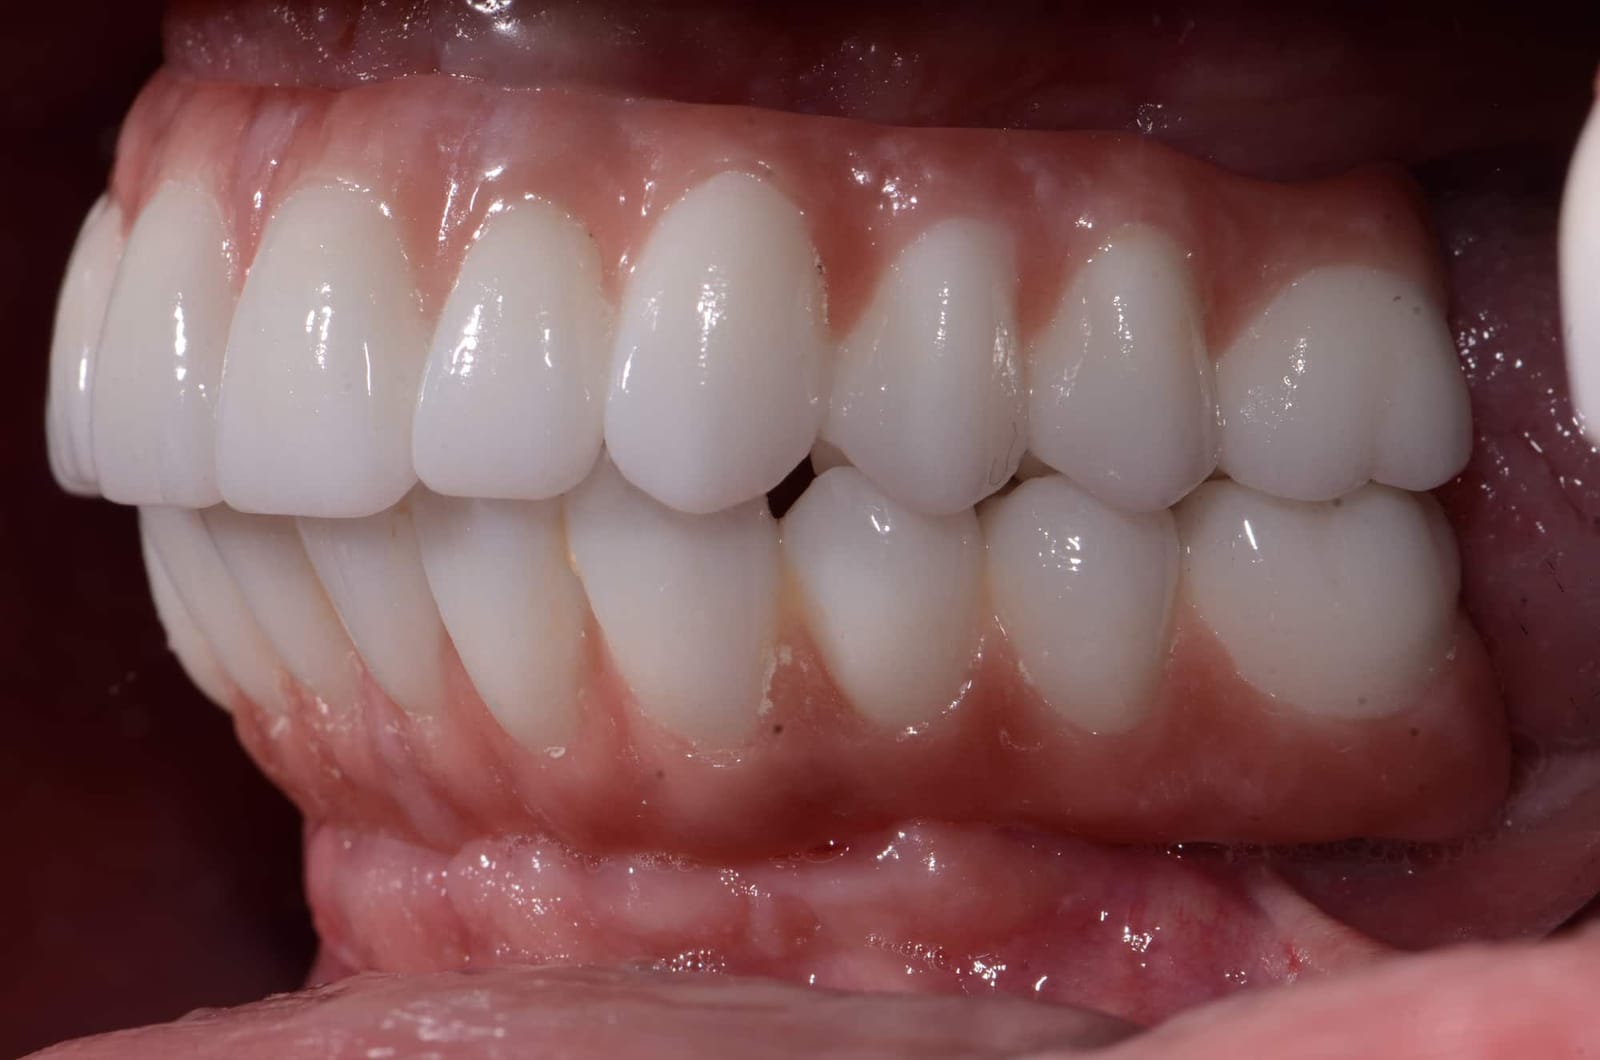
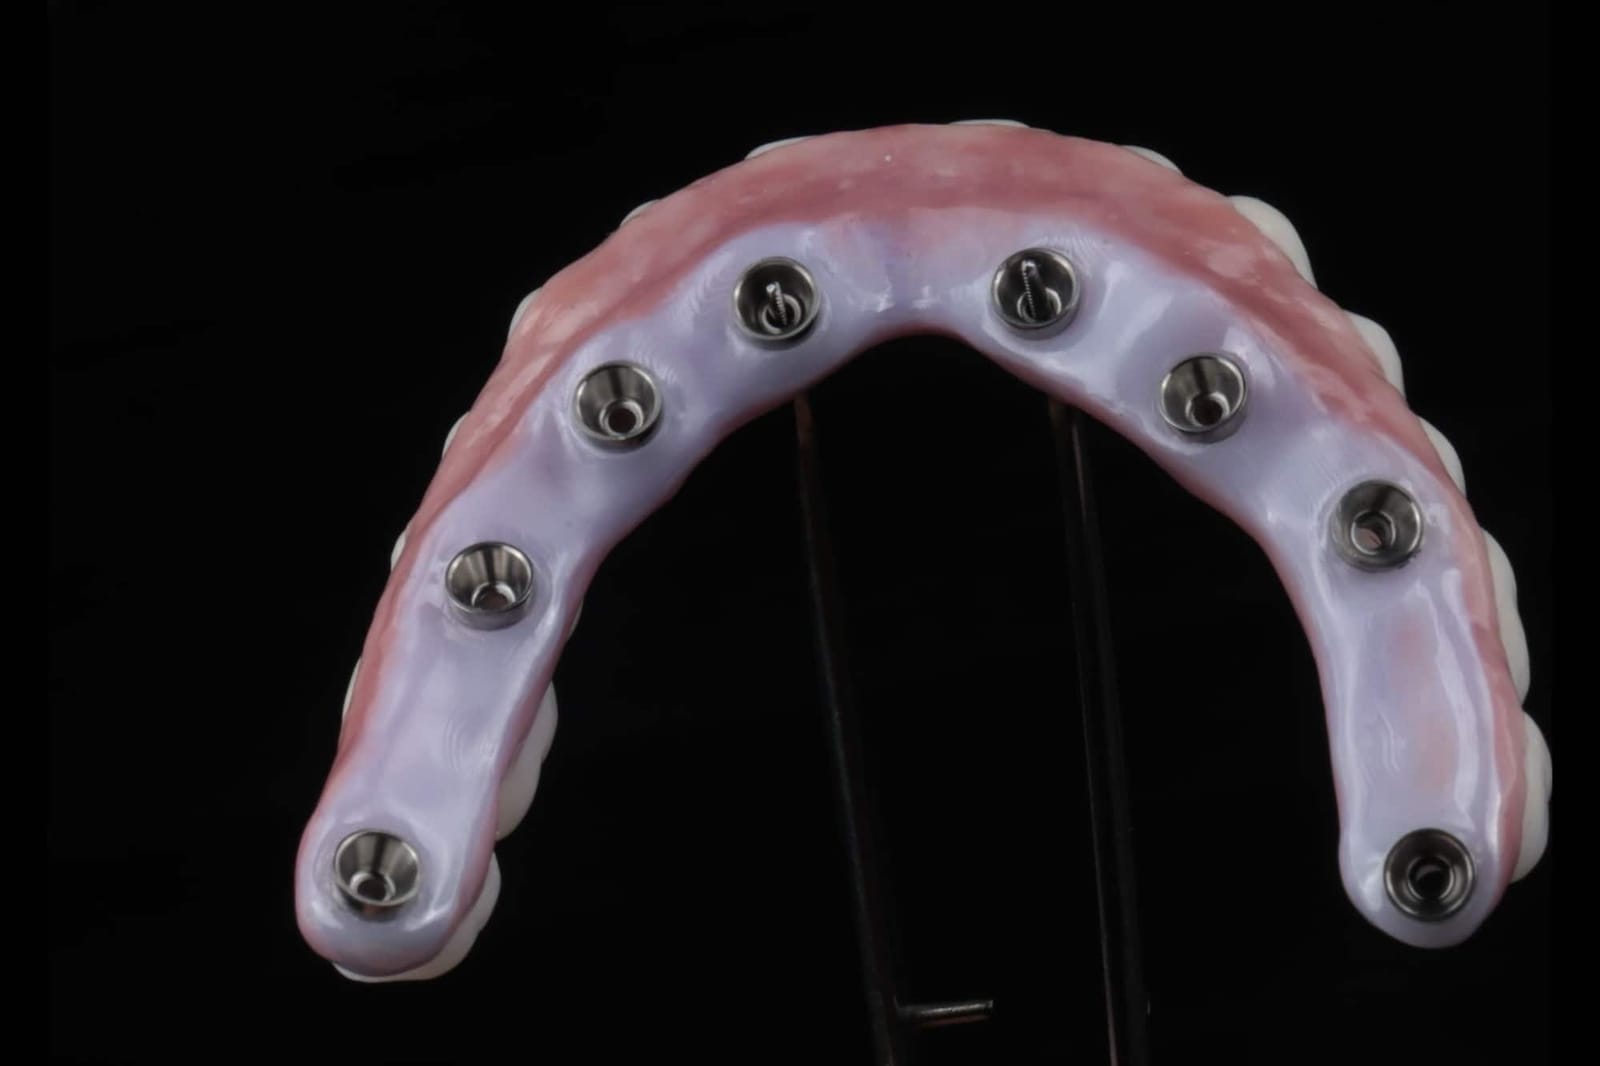
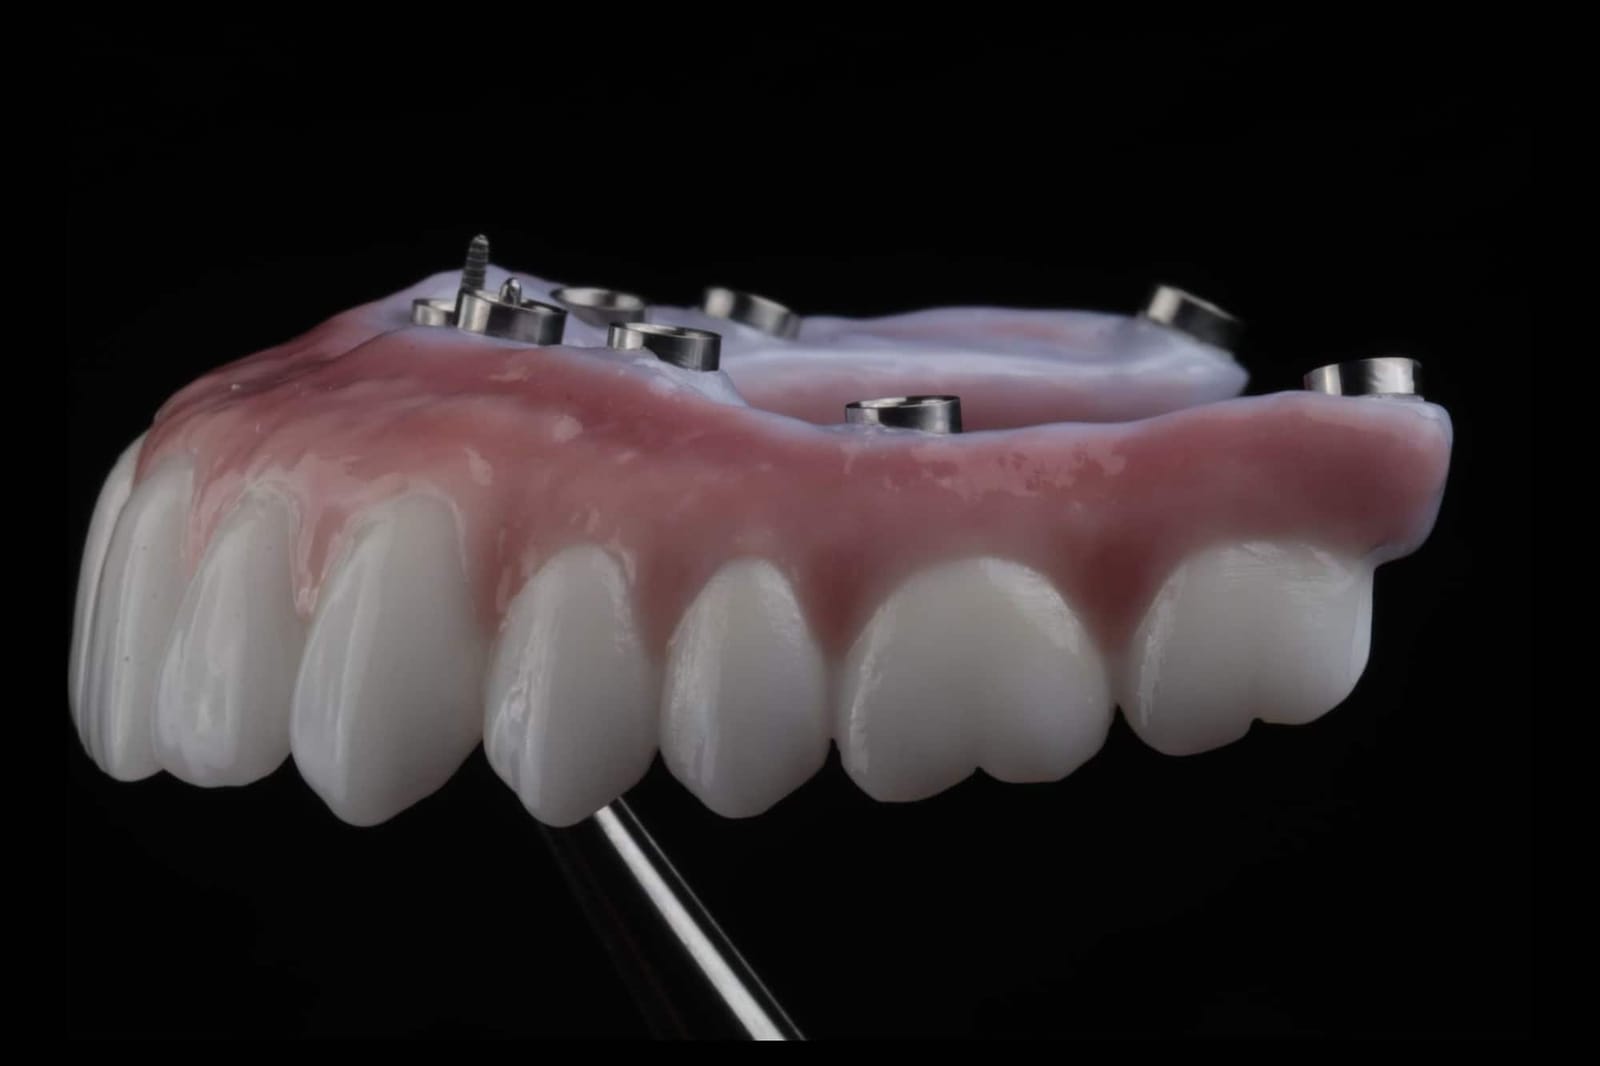
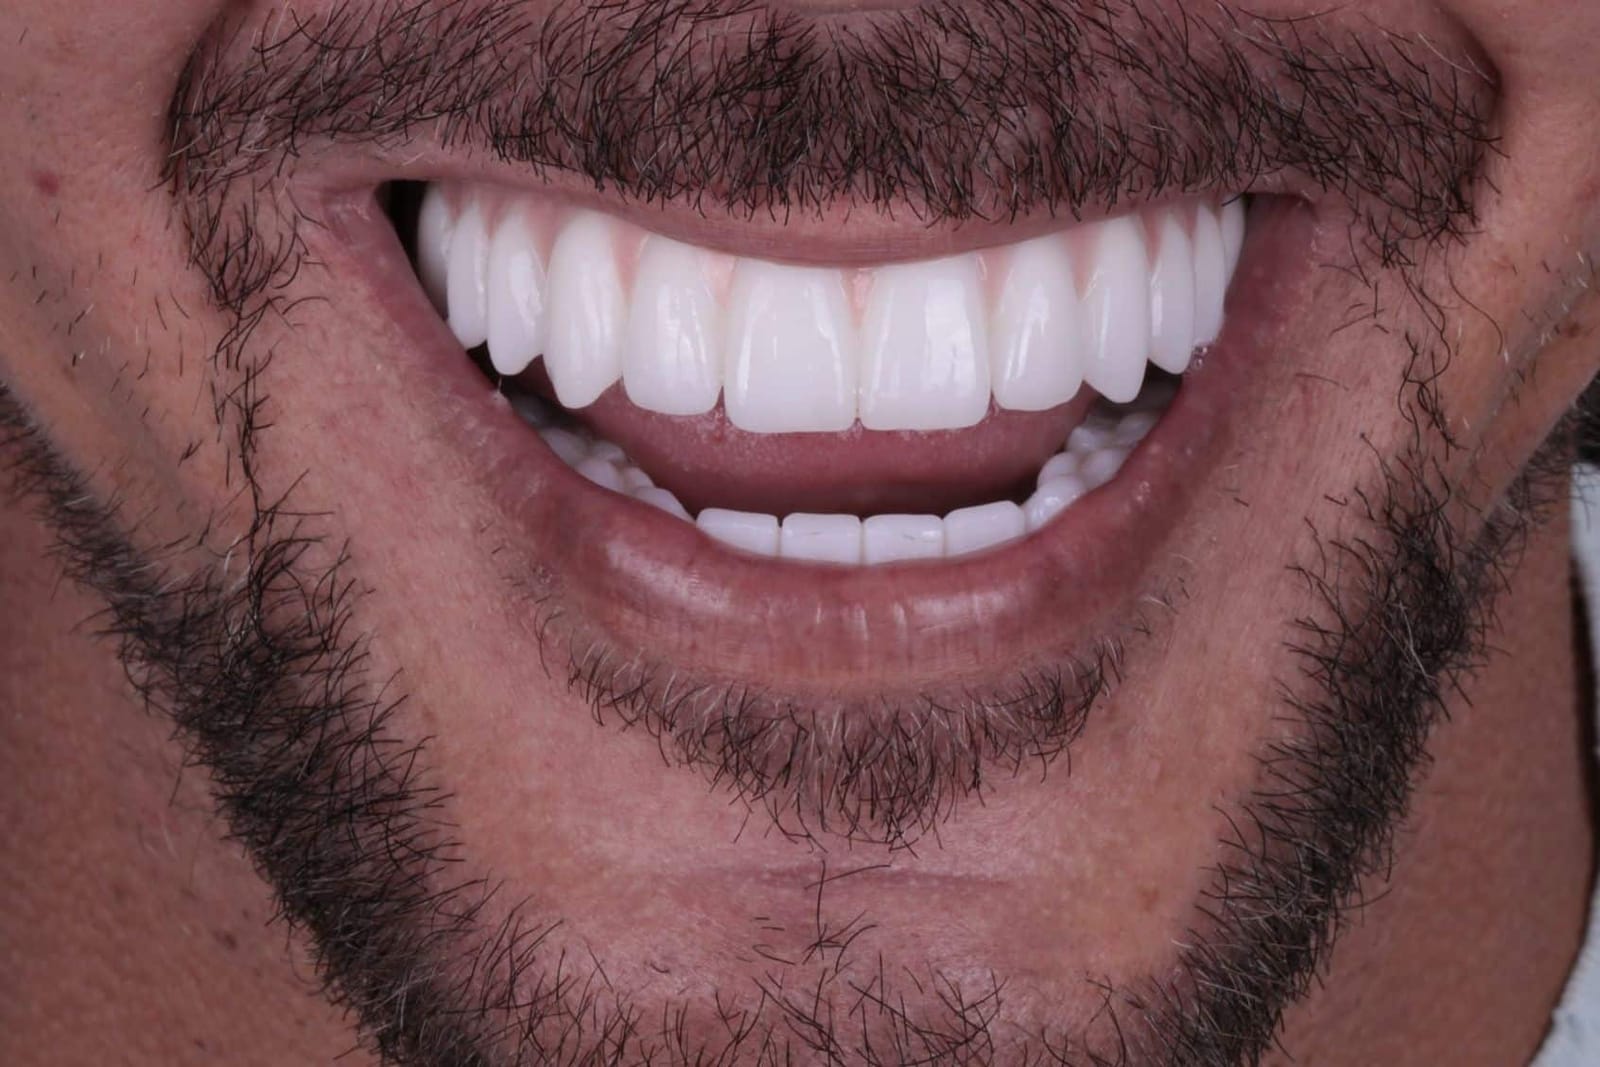
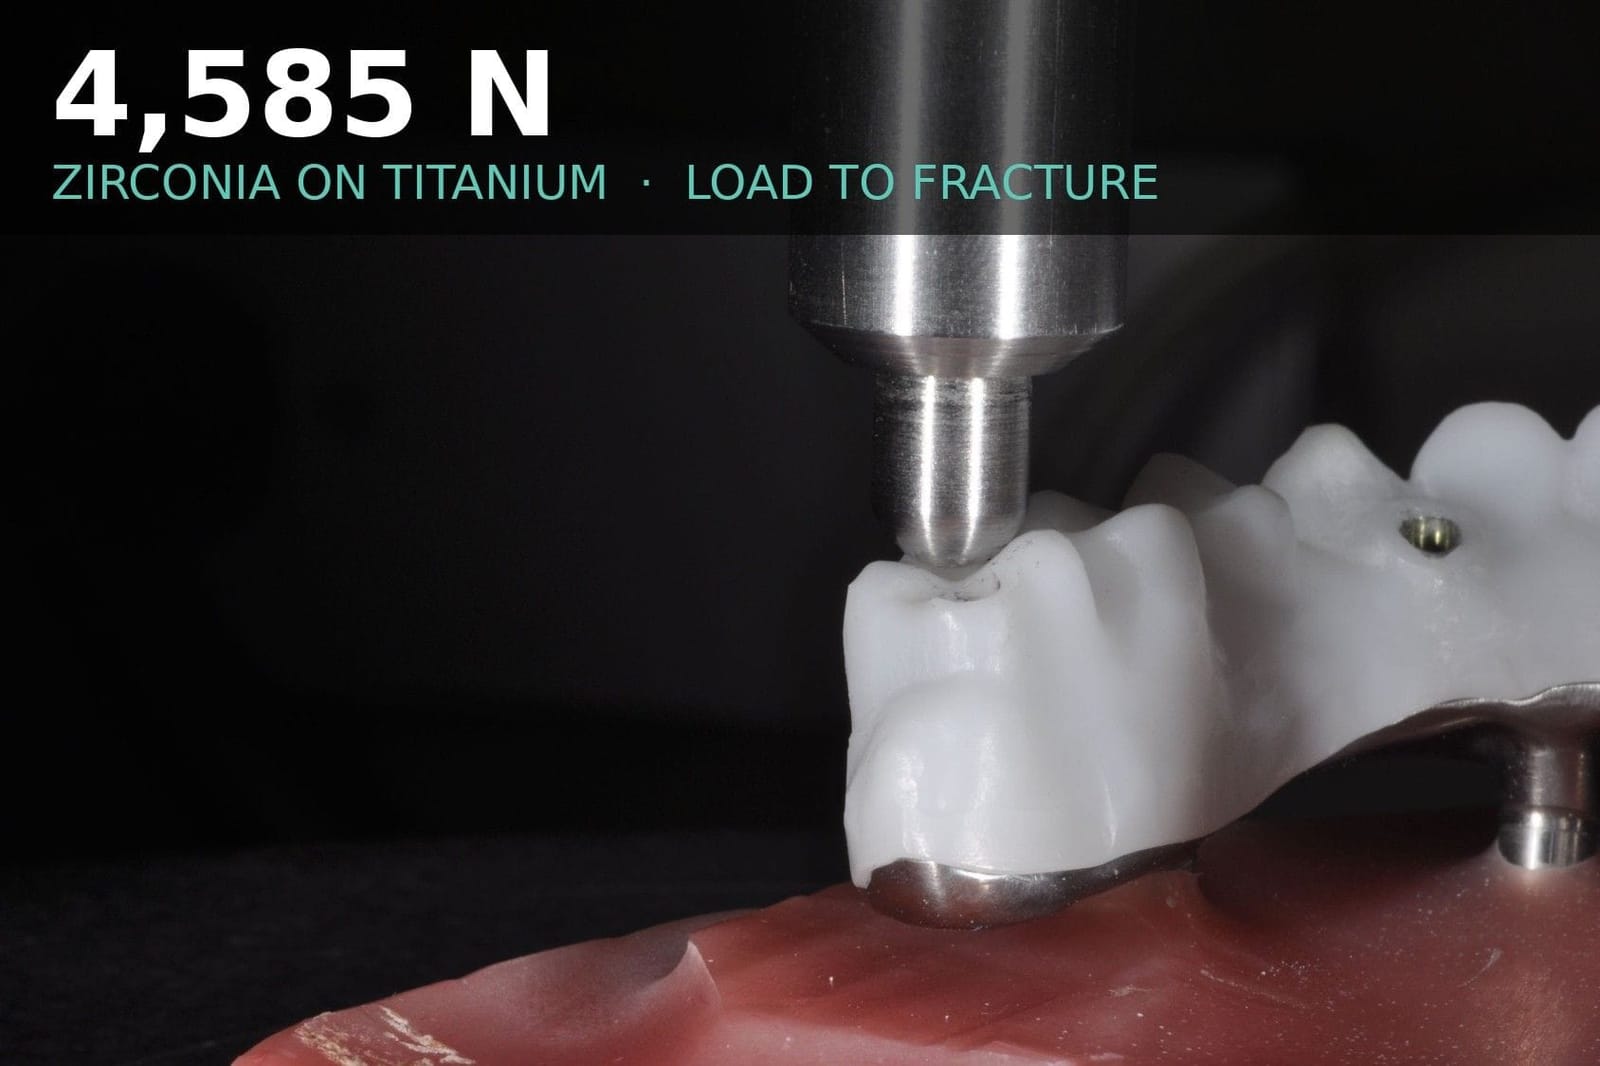
Zirconia bonded to a titanium frame
WhenAwkward screw angles. Wide arches. When the frame has to reach far back and stay strong in a thin section.
What to expectExtremely strong. It does not chip and in testing it does not break: twice the load of zirconia alone before fracture (4,585 N against 2,260 N in Dr. Reshad's own laboratory work), because the titanium carries the thin sections at the back. The research so far, in the laboratory and in the clinic, points to a very high success rate, and this is most likely the future of full-arch frameworks. There are just over five years of clinical data, which is promising rather than proven, and the two layers must be bonded exactly right. One trade-off: zirconia against the gum gives the healthiest tissue of any material; titanium is almost as good, but not quite. Strength, arch form, implant spread, tissue health and hygiene access are all weighed before this frame is chosen.
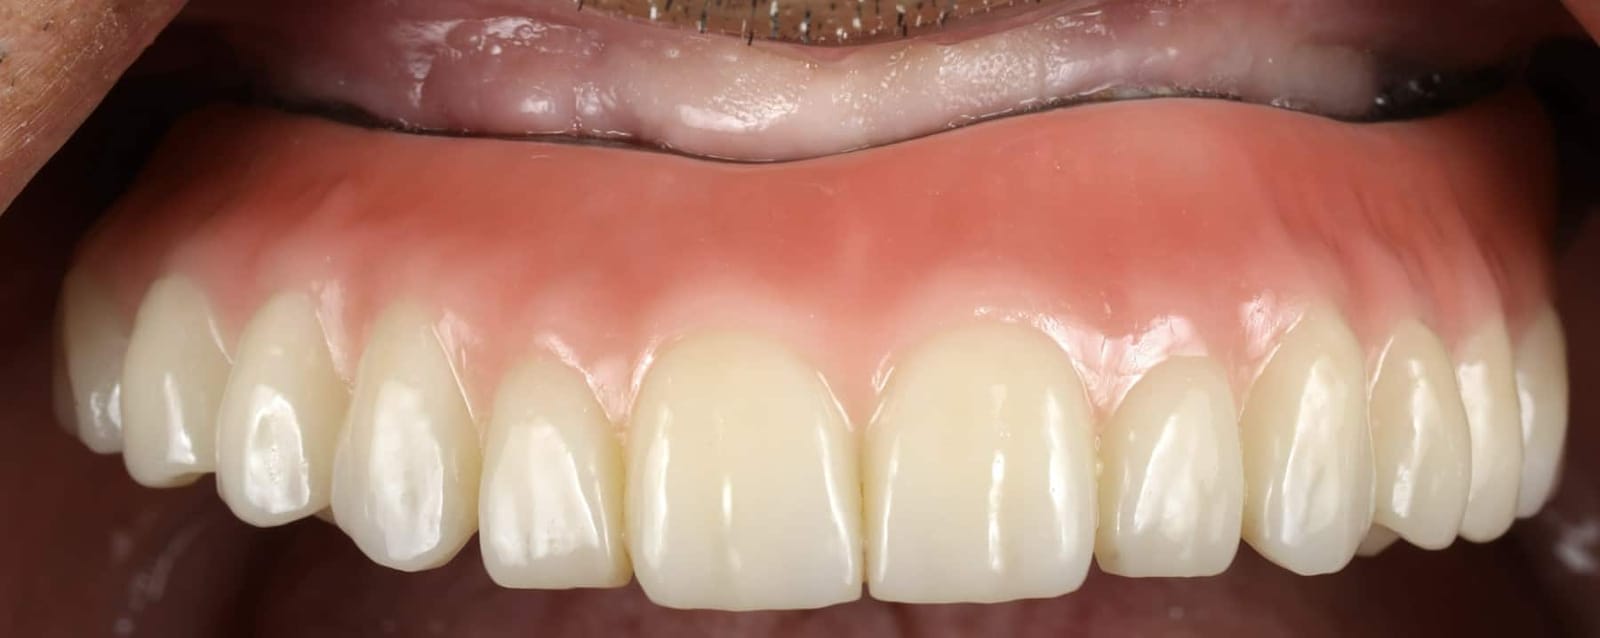
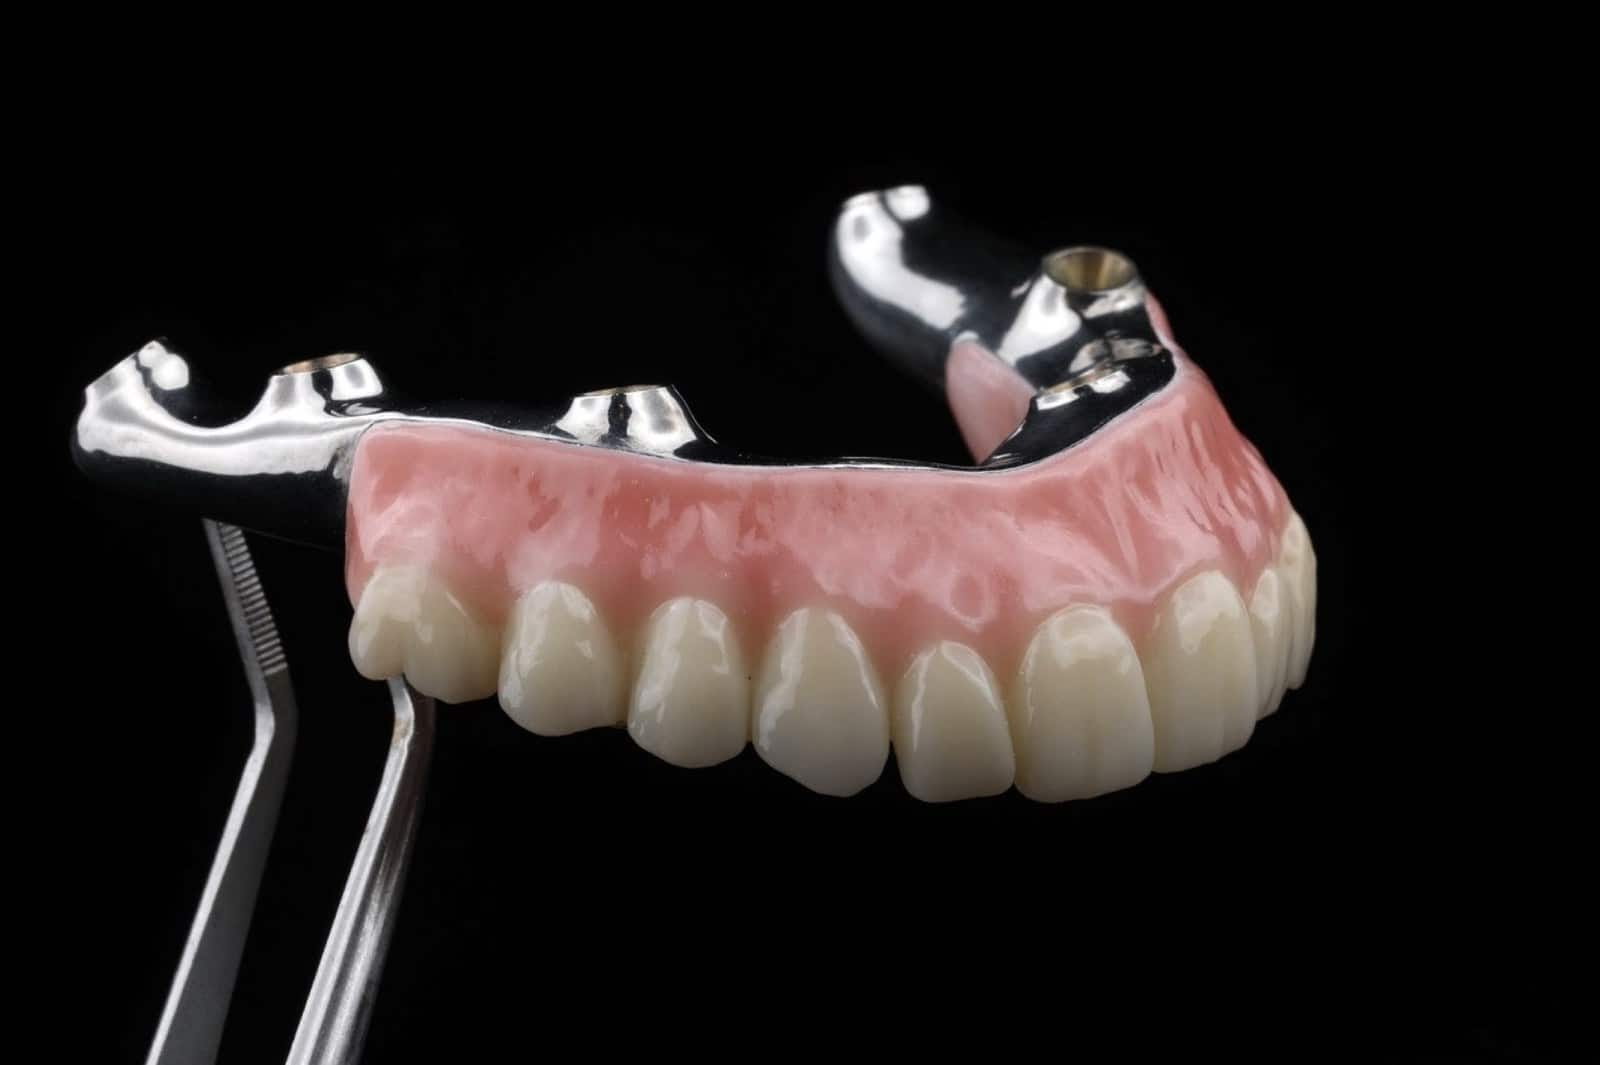
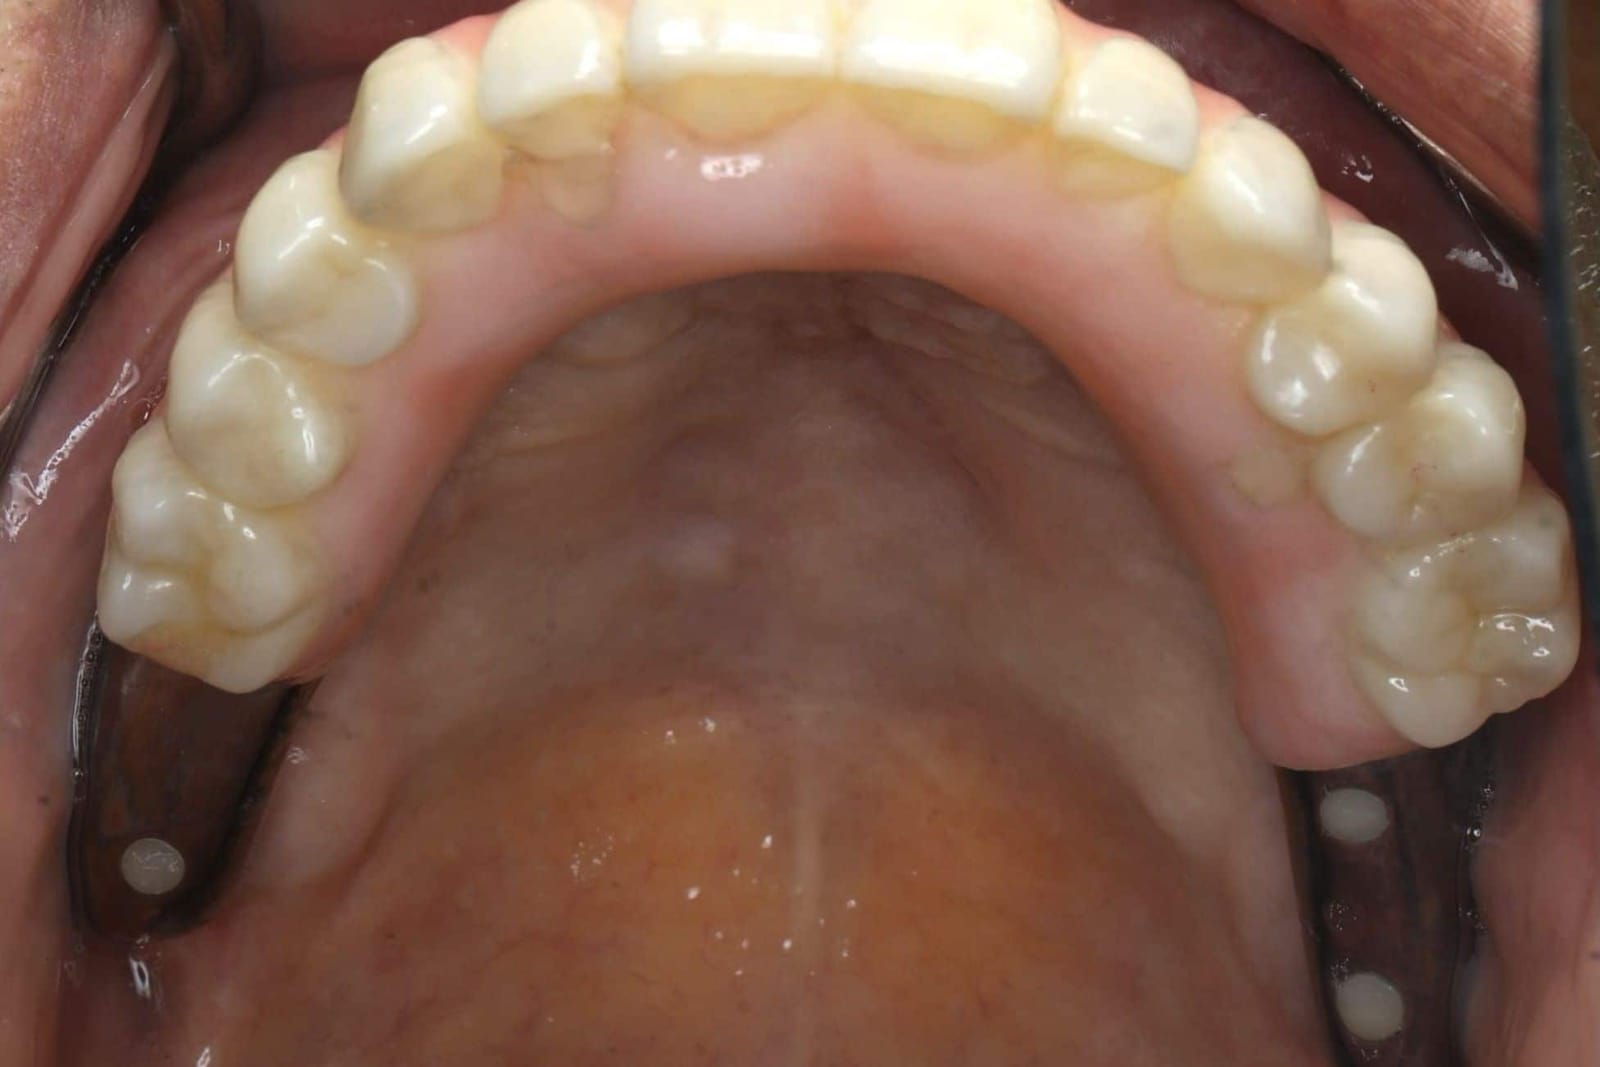
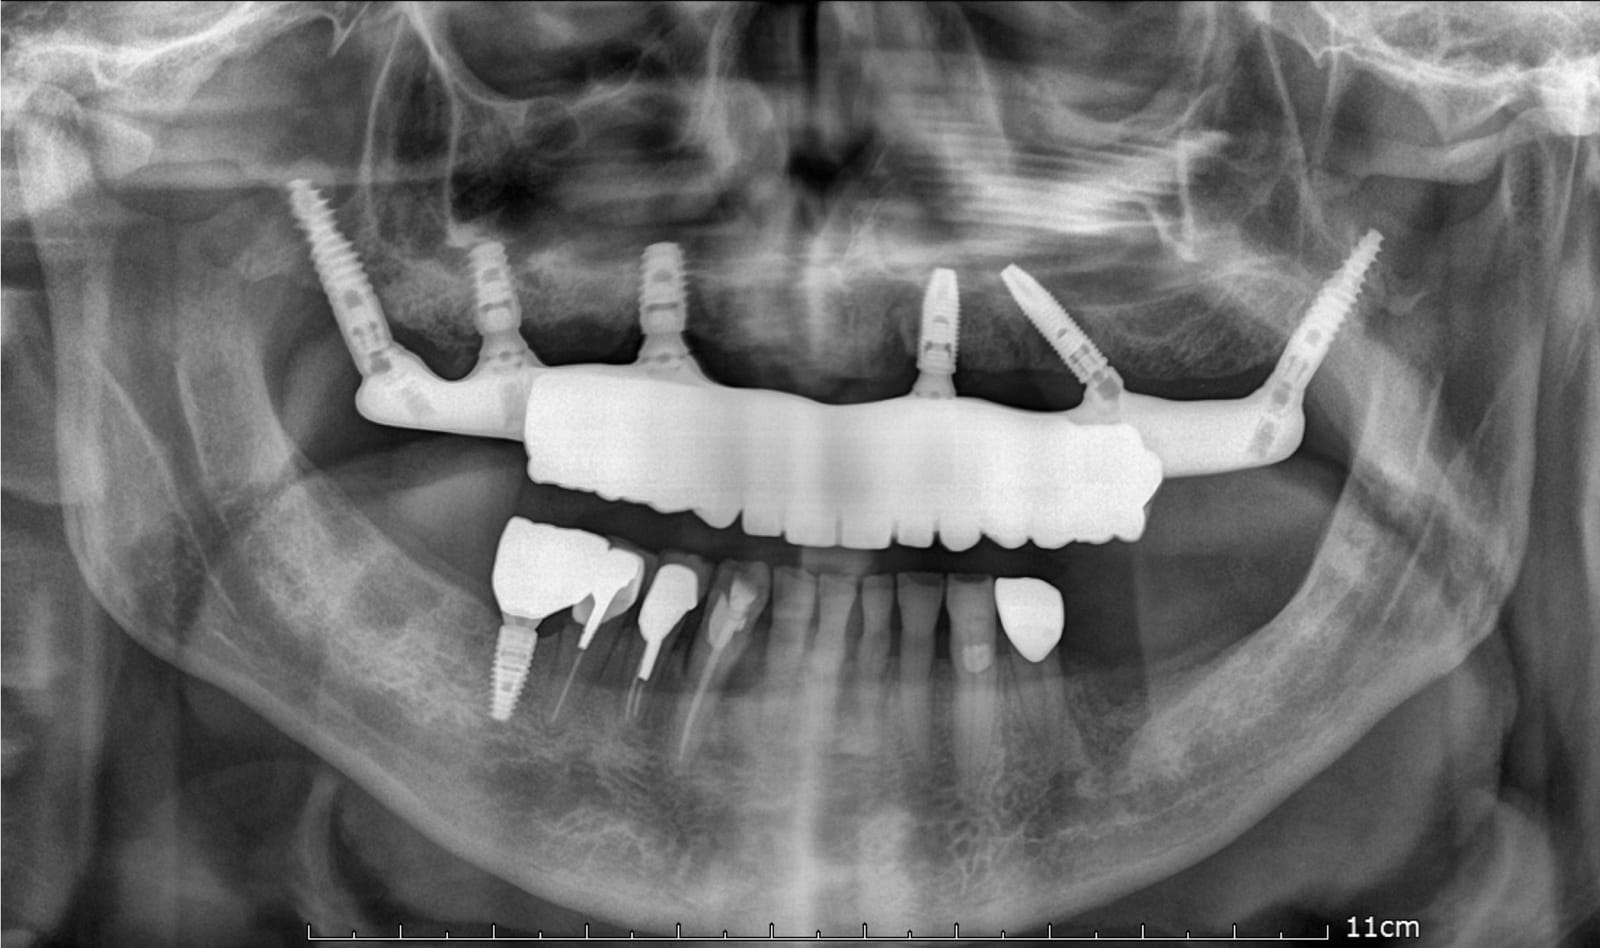
Porcelain layered over a zirconia core is deliberately not on this list. It gives the most lifelike tooth and the worst chipping record, roughly one prosthesis in three to five. Dr. Reshad uses layered porcelain only on the visible face of the front teeth, never on a biting surface, a connector or a screw channel wall.
Eight rules the laboratory follows so the zirconia does not break.
Monolithic zirconia is the material Dr. Reshad trusts most, and it is unforgiving of shortcuts. Every zirconia fracture he has examined broke one of these rules. They are set by the prosthodontist and checked before the prosthesis is accepted from the laboratory.
- 11–14 mmSpace firstEnough room from ridge to biting surface, and at least 10 mm wide, before the material is chosen.
- ≥ 2 mmAround every cylinderZirconia at least 2 mm thick around each titanium insert; the insert at least 4 mm tall with a straight channel.
- ≥ 12 mm²ConnectorsOval, rounded connectors between teeth. Nine square millimetres is borderline; less is a fracture waiting to happen.
- ShortCantilever on a leashThe bridge behind the last implant is kept short and its bite kept light. Cantilever length and connector size are judged together.
- 3Y-TZPAlways the frameThe tough grade of zirconia for every connector, cantilever and channel wall. The translucent grades are for the visible face only.
- No grindingAfter sinteringAdjusting fired zirconia with a bur starts cracks. Fine diamond, water, re-polish if it cannot be avoided.
- PolishDo not glazePolished zirconia is kinder to the opposing teeth and stronger than glazed. Only the cylinder seats are blasted, gently.
- 1-screw testVerify fit, then bondThe frame must seat passively on one screw before the titanium is bonded in, on a verified cast, under pressure. Then a night guard.
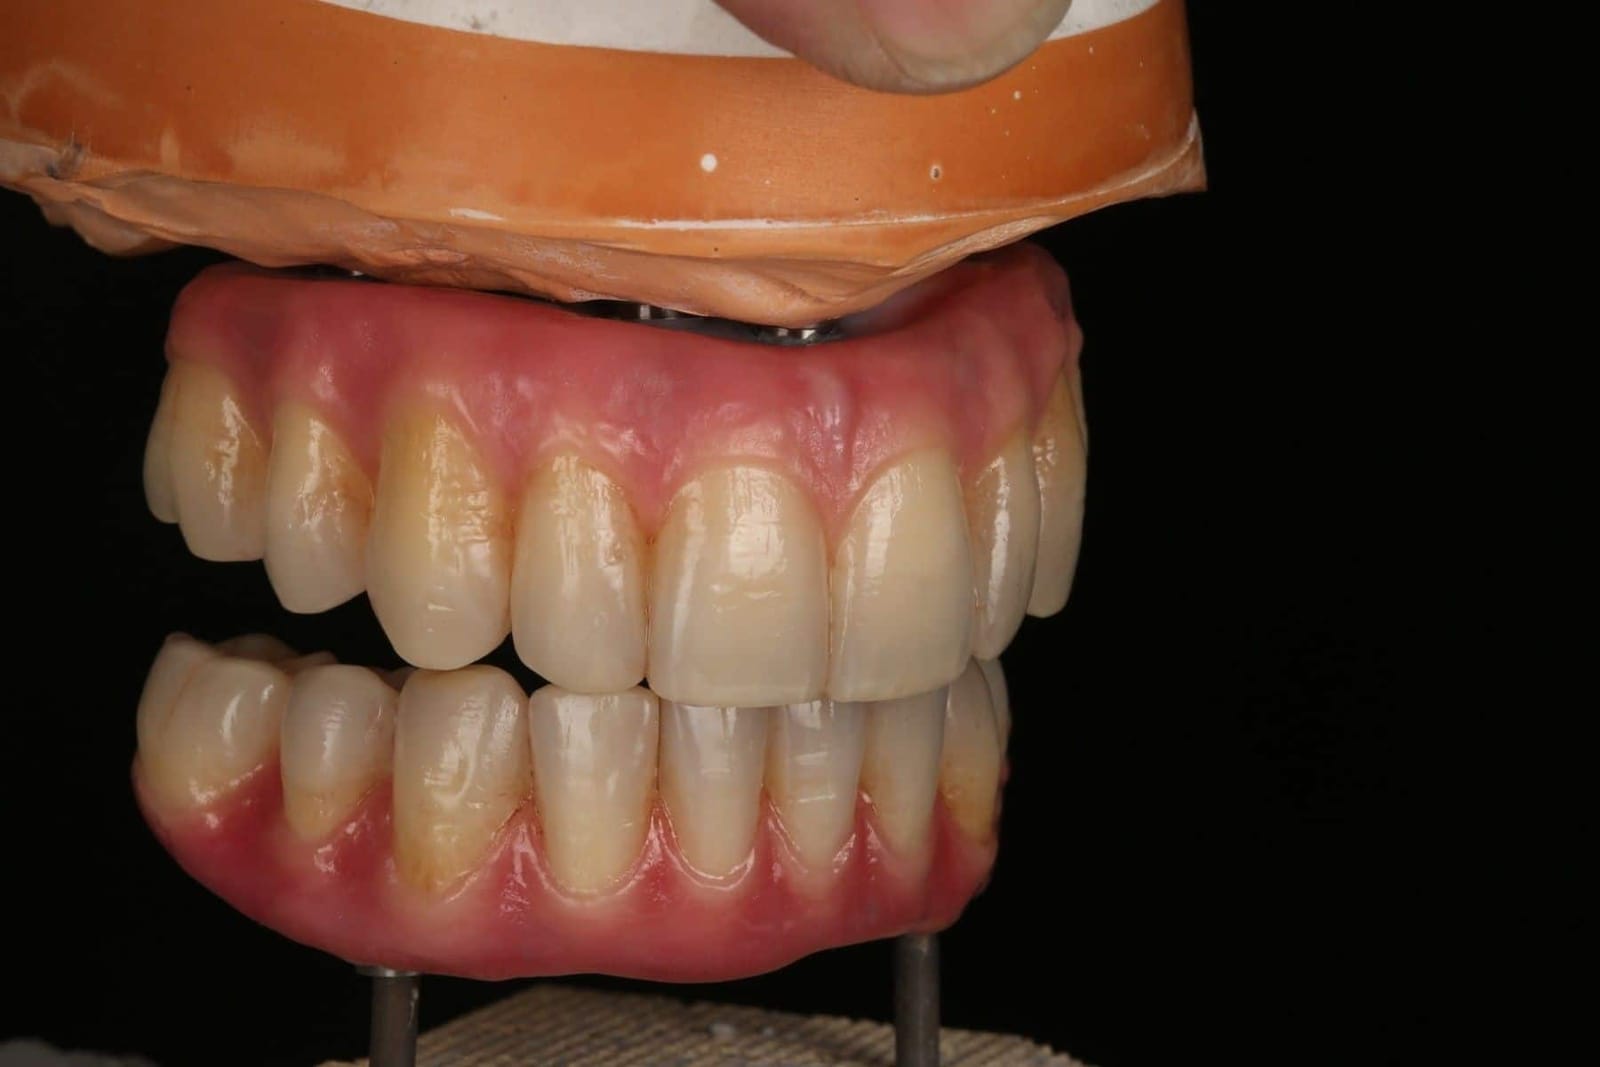
Design first. Then the surgery is made to fit the design, not the other way round.
The frame can only be right if the teeth are in the right place first. In every full mouth reconstruction Dr. Reshad does, the finished prosthesis is designed on the articulator before the first incision: tooth position, bite height, lip support and restorative space are decided there. The implants are then placed to serve that design, and a fixed provisional, a copy of it, is delivered the same day. The final prosthesis copies what has already been proven in the mouth.
- 01The designFull-contour set-up on the articulator: tooth position, vertical dimension, lip support and restorative space decided here, with the patient's approval.
- 02The same-day provisionalA fixed, screw-retained provisional delivered on the day of surgery, a copy of the design. Speech, bite and lip support are tested in daily life for months.
- 03The final, a copyBefore anything definitive is milled, the provisional is measured against the rules: space, connectors, screw channels, cantilevers. Only then is the material confirmed, and the final copies what has already been proven in the mouth.
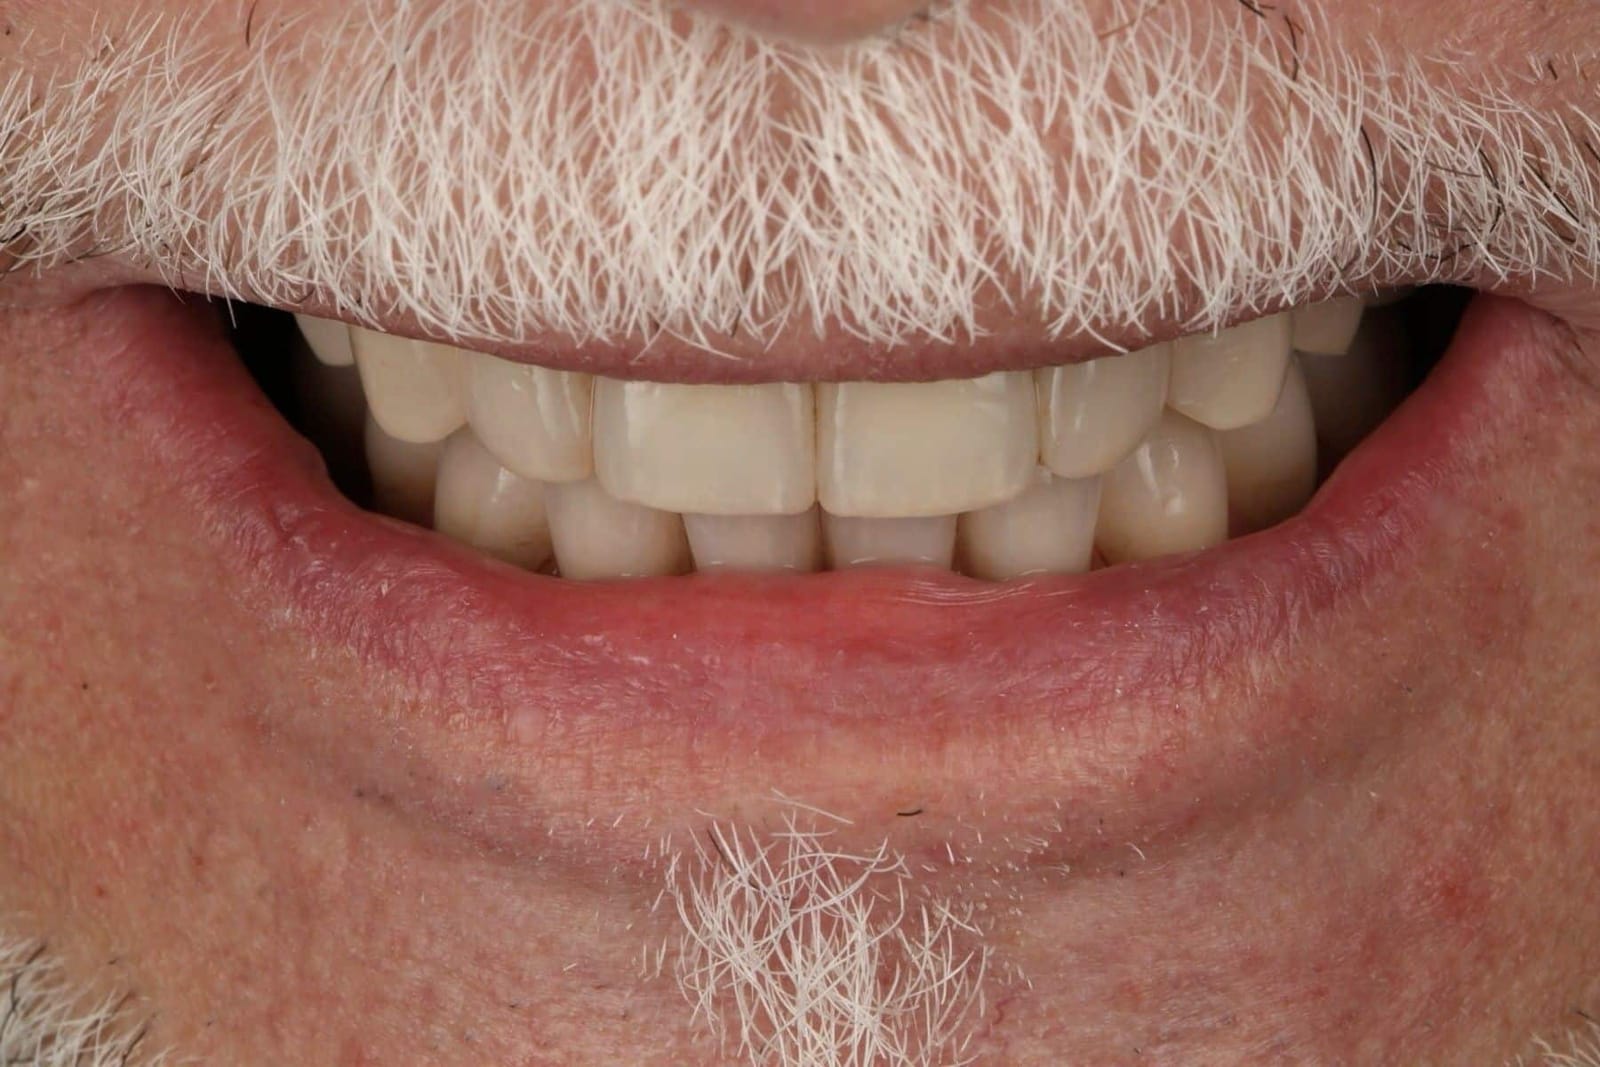
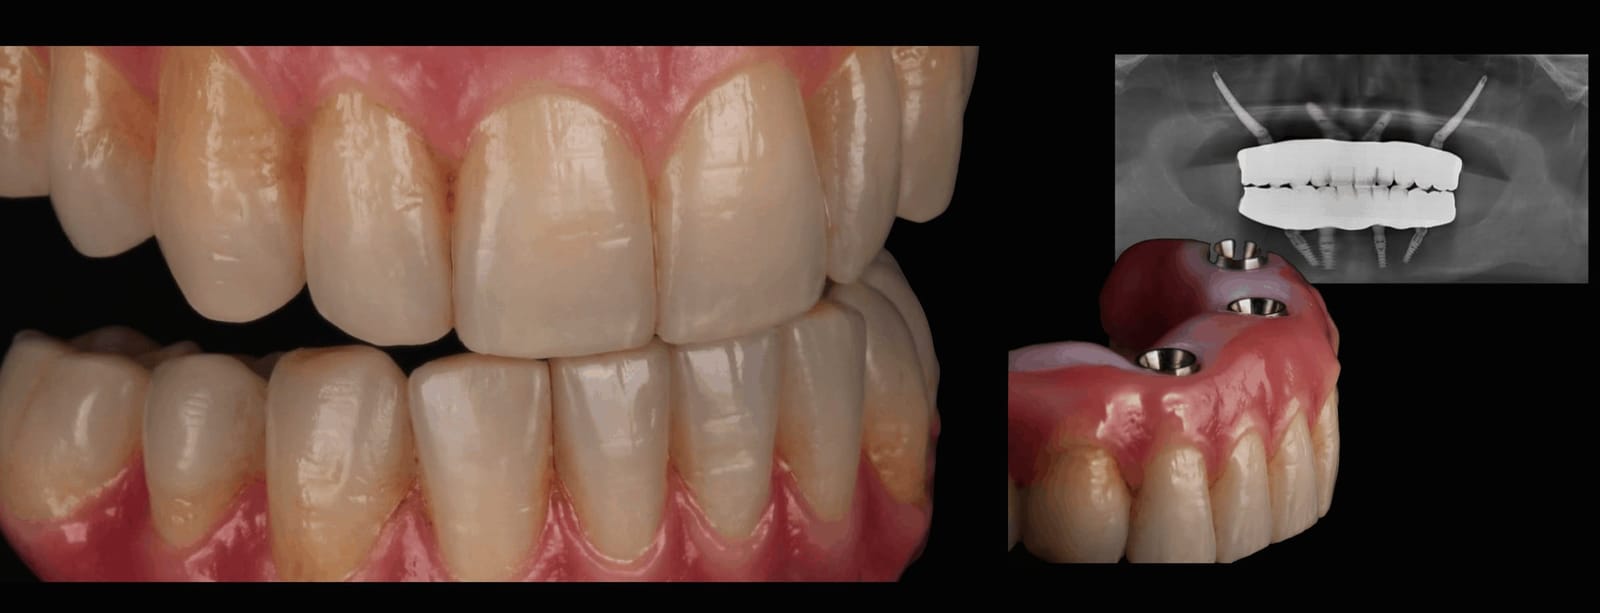
She was too scared to smile with her new implants. This is the precision that rebuilt it.
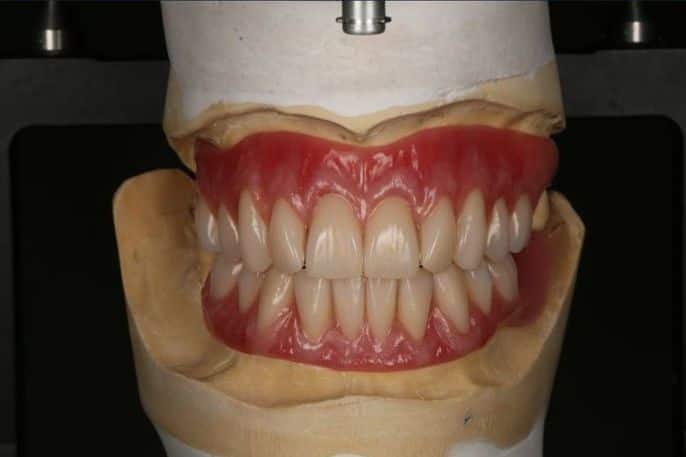
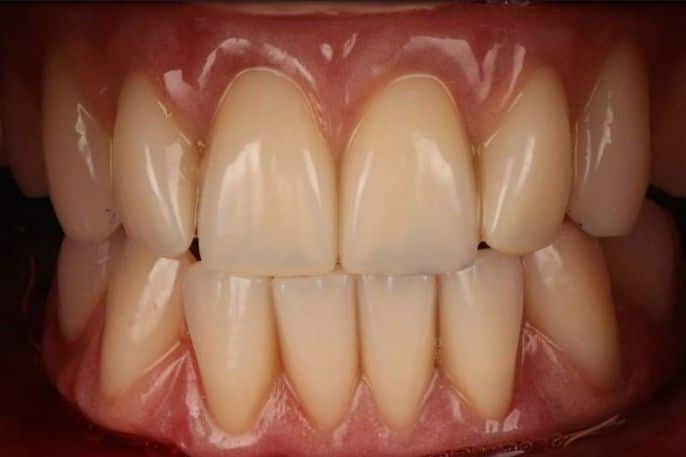
Her upper implant teeth had been declared finished. At rest they looked acceptable; the moment she smiled, the join between the prosthesis and her own gum was on show. The implants were sound. The design was not. The rebuild followed the order in this chapter: the smile line and tooth position settled on prototypes first, worn and tested in daily life, then copied into a final made to the framework rules. Every step is checked before the next begins.
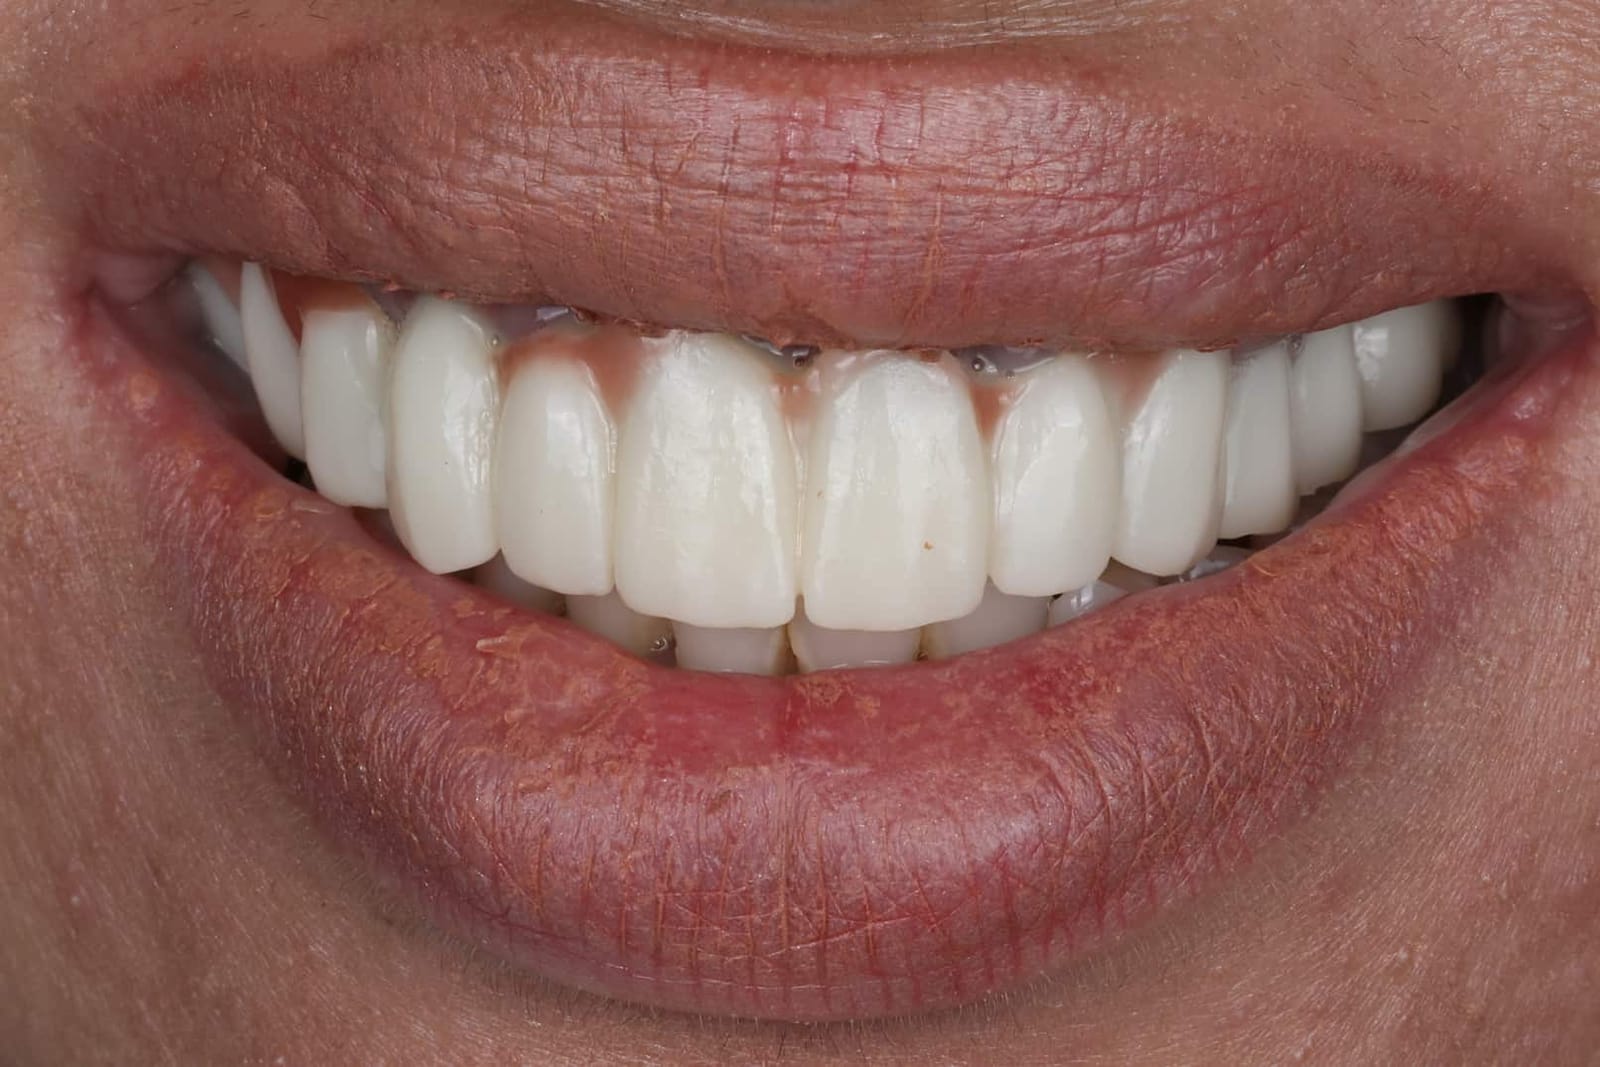
The gold standard today, and why you should choose the doctor before the material.
Everything in this chapter comes down to one position. Monolithic zirconia, and monolithic zirconia bonded to a titanium frame, are the gold standard for full-arch implant teeth today, provided they are handled properly: the space measured, the connectors respected, the zirconia polished, the titanium bonded, the fit verified. Handled carelessly, the same materials break, and the breakages are blamed on the zirconia rather than on the design. The material is only as good as the hands that plan it.
You may be told something different. Acrylic teeth on a bar are still recommended, often, and the reasons sound sensible: the plastic is softer, so it is said to be kinder to the implants; it is lighter; it is easy to adjust at the chair. The evidence does not support the first claim, and the others cut both ways. Acrylic is porous, so it holds bacteria and stain against the gum and around the implants, where it matters most. It wears, so the bite that was set on the day drifts within a few years. And what is easy to adjust is easy to wear and easy to break, which is why acrylic hybrids need the most repairs of any design in the published record. It is cheaper to make. That is not the same as better for the patient. Where it still has a place, in a lower jaw against a denture or where budget decides, it should be chosen with that understood and its replacement planned from the start.
This is Dr. Reshad's philosophy today, and it is still evolving, because the materials are. He has been involved in the development and design of full-arch frameworks for more than thirty years, has followed his own cases for decades, and has studied each generation of material as it arrived, with the evidence, long clinical follow-up and a master technical team behind every decision. The frame he designs is there to protect your implants as much as to let you chew. None of this is new or fashionable. It is the long run: doing things properly, and making them last. Choose the right doctor, and the right material follows.
DDS, MSc (Distinction), FICD, MICOI. Three further years of specialist residency after dental school in occlusion, implants, materials and the planning that ties them together; framework design is one chapter of it.
Fixed and Operative Dentistry. Published author on implant framework design; inventor of the component prosthesis (J Prosthet Dent 2009), cited in textbooks and still in use worldwide.
This page is the framework design chapter of his full-arch lecture, given internationally, written for patients.
“Measure the space, respect the connector, polish the zirconia, bond the titanium properly. Then let the patient's mouth, not the brochure, choose the frame.”
Teeth that last are designed, not promised.
In one visit you will know which construction suits your mouth, which of the six questions decide it, and how it will be built so that it protects your implants and stands the test of time.
Sources. Reshad M, Cascione D, Aalam AA. The component prosthesis. J Prosthet Dent 2009. · Reshad M et al. The influence of posterior occlusion when restoring anterior teeth. J Calif Dent Assoc 2008;36:567-574. · Kwon T, Bain PA, Levin L. Systematic review of short- and long-term survival of full-arch fixed dental hybrid prostheses. J Dent 2014. · Heydecke G et al. Clin Oral Implants Res 2012. · Papaspyridakos P et al. Clin Implant Dent Relat Res 2014; J Prosthodont 2024. · Davis DM, Packer ME, Watson RM. Int J Prosthodont 2003;16:521-523. · Barootchi S et al. Int J Oral Maxillofac Implants 2020. · Svanborg P et al. Int J Prosthodont 2013;26:343-349. · Heller H et al. J Funct Biomater 2023. · Gallucci GO et al. 2023 meta-analysis. · Bidra AS, Tischler M, Patch C. J Prosthet Dent 2018. · Abdulmajeed AA et al. J Prosthet Dent (systematic review of monolithic zirconia). · Alshahrani FA et al. J Prosthodont 2026. · Chong KH et al. J Prosthet Dent 2014. · Mijiritsky E et al. J Dent 2023. · Laboratory fracture testing of monolithic and titanium-reinforced zirconia frameworks: Cascione D, Moshaverinia A, Park J, Reshad M (pilot data). · 2013 evidence panel: Bozini 2011, Papaspyridakos 2012, Heydecke 2012. Images. Clinical photographs, frameworks and radiographs are of Dr. Reshad's own patients, shared with consent, with no faces shown and identifiers removed; the failed prostheses shown were made elsewhere and came to the practice for a second opinion. Laboratory work by Domenico Cascione, CDT. Figures are from Dr. Reshad's 2026 framework lecture; the opening video is the lecture's title sequence.
If something is not right, ask.
Dentistry is always challenging, and most dentists do the best they can. Some things are part of settling in and are fixed with small tweaks. If something is worryingly off, if you want reassurance that you are on the right path, or if you want to change provider, Dr. Reshad is here for that.
See a prosthodontist. Contact us to get your second opinion.
- FP-3 Case 15Ten years on four implants, rebuiltSee the case
- FP-3 Case 9When the first reconstruction failedSee the case
- FP-3 Case 14Fixed teeth from the cheekbonesSee the case
- Revision Case 10A full-arch revisionSee the case
- Revision Case 1The seam in the smile, correctedSee the case
- FP-3 Case 2Planned before anything was touchedSee the case
- Revision Case 8Rebuilt from the neutral zone outwardSee the case
- FP-1 Case 8A smile that could not hide anythingSee the case
- FP-1 Case 9A failing bridge, replaced by a whole archSee the case
- Revision Case 11An implant bridge placed badly, made rightSee the case
- Single Front Tooth Implant Case 4One front-tooth implantSee the case
Frequently Asked Questions
Sometimes. It depends on why it is failing: infection, position, bone loss or the crown on top. A full examination with a CT scan shows whether the implant can be kept and the gum and bone rebuilt around it, or whether it should be removed and replaced properly.
Temporary teeth are made from softer material than the final ones, and they can chip or crack while you heal. That does not mean anything is wrong. Repeated breakage of the final teeth is different and is worth a second opinion, because it usually points to the forces on the bite.
It is common, but it is not acceptable. It almost always means a concave or flat undersurface, a gap that has opened as the gum remodelled, or a ledge at an implant. All three are shape problems and all three can usually be corrected.
Speech adapts to a new prosthesis within weeks if the shape allows it. A lisp that persists at a year is a shape that does not allow it: usually bulk behind the front teeth, front teeth set too far back, or an air leak under the edge. Thinning and reshaping the palate is often enough.
Not necessarily. Bleeding tissue under a prosthesis is most often inflammation from plaque the shape will not let you remove. The first step is to look at the underside and the exits, then clean, then reshape. Bone loss around the implant is checked on a radiograph, and treated if present.
Often. Palatal bulk can be thinned, concave undersurfaces reshaped and polished, and tissue reconditioned under a modified provisional. What cannot be fixed by reshaping is an implant exiting outside the tooth; that needs a new design, and sometimes a different implant position.
A pontic is a tooth on a bridge with no implant under it. Ovate means egg-shaped: its underside is convex and sits into a shallow, shaped site in the gum, so the tooth appears to emerge from the tissue and floss can pass beneath it. It is the design with the best evidence for healthy gum underneath.
It may be, but often it is not the whole picture. Many assessments only look at the bone where the teeth used to be. The cheekbone and the dense bone at the back of the upper jaw are usually still there, even after years of bone loss. A 3D scan shows what is really available.
Implants can fail for many reasons, and every full-mouth reconstruction is challenging. What changes the odds is the plan: where the implants go, how many, how far back they reach, and how the teeth on top are designed and maintained. The first step is understanding why things went the way they did, before suggesting anything new.
In most cases, no. Fixed provisional teeth are usually attached on the day of surgery or within a day, and you wear them while the implants heal.
No. You leave your consultation with a clear explanation and, if you want one, a written plan with fees. Nothing begins until you have agreed that plan in writing.
The surgery is done under sedation or general anaesthesia. Swelling and bruising around the cheeks are common for a week or two, and some patients have temporary numbness of the cheek or lip while the tissues settle.
Often, yes. When the implants are stable enough, a fixed provisional bridge is attached within a day or so. The final teeth are made a few months later, once the implants and gums have settled.
Long-term studies report about 96% of zygomatic implants still in place after six years. Like any implant, they need good cleaning at home and regular maintenance visits.
No. Zygomatic implants anchor in the cheekbone and can replace a whole upper jaw's worth of support. Pterygoid implants anchor behind the upper jaw and are mainly used to support the back teeth. Some plans use both.
Grafting is often the right answer, especially for younger patients. But if you have doubts, or a graft has already failed, it is worth seeing every option before committing.
It depends on the number and type of implants and the design of the teeth. You receive a written plan with fees after your consultation and scan.
Usually not. Implants survive at over 95 percent for ten years. Repeated chipping, loose screws and broken segments are mechanical, and they point to overload: a bite that was never stabilised, lost posterior support, long cantilevers or grinding. Finding which is the point of the second opinion.
It is the position your jaw joints return to on their own when the muscles are relaxed. It can be found again, visit after visit. The bite you have learned to hold cannot. New teeth built to a repeatable position stay stable; teeth built to a habit drift with it.
Because worn or collapsed teeth let the jaw close too far. If the new teeth are made at that closed height there is no room at the back for proper teeth and a frame, and the thin parts break. Restoring the lost height is what gives the back of the mouth its space again.
Sometimes. If the implants are sound and the problem is the bite or missing support, the prosthesis can occasionally be adjusted or remade on the same implants. If the tripod cannot be re-established on what is there, Dr. Reshad will say so, and say what has to change first.
One visit. Radiographs, a deprogrammed bite record, measurement of the space at the back, and a straight explanation of where the load went and what it would take to stop it.
Usually because they are taking a sideways load they were not designed for: a deep overlap, a steep ramp, or a bite that locks the jaw in. Repairing the chip without changing the angle means it will chip again. Flattening the guidance is the fix.
From the front, usually not at all. The change is on the inside of the upper teeth and the edges of the lowers. Where the bite has to be opened slightly to reduce the overlap, the front teeth are often made a little longer, which most people find looks younger.
Yes. Grinders need a flatter, smoother ramp, a wider range of free movement, and a provisional that is worn long enough to show exactly where the grinding goes. The design is adjusted to those marks before the final is made, and a night guard protects it afterwards.
How far the upper front teeth hang down over the lower ones when you bite together. Dr. Reshad keeps it to about 15 to 20 percent of the lower incisor's height. Much more than that and the front teeth become a wall the jaw has to climb.
Because the only reliable test of a guidance is living with it. Chewing, speaking and sleeping on it show things no articulator can. Weeks on a provisional that can be adjusted is what makes the final predictable.
The rebuilding of all the teeth in one or both jaws so that they look, bite and feel right together, usually on dental implants when the natural teeth cannot be saved. The teeth are the visible part. Underneath them is a framework, the construction that carries every bite for the life of the prosthesis.
All-on-4 describes a way of placing implants: four per jaw, the back ones tilted. It says nothing about what is built on top. The same four implants can carry an acrylic hybrid, a cobalt-chromium frame, a zirconia bridge or zirconia on titanium, and those four will age very differently. The implants are rarely what fails.
The honest answer depends on what is counted. Most designs “survive” ten years in the sense that something is still screwed to the implants. Counted by repairs, remakes and chips, the acrylic hybrid and layered porcelain designs have almost all needed work by ten years, and monolithic zirconia made to the rules has not. Beyond ten years nobody has good data for the newer materials, and Dr. Reshad will tell you that rather than quote a number.
Monolithic zirconia, alone or on a titanium frame, whenever the space and the screw angles allow it. Acrylic on a bar is reserved for a lower jaw against a denture, or where budget decides, with its tooth replacement planned from the start. Layered porcelain on a biting surface, in either material, is the one thing he will not offer.
Usually not. The frame or the teeth have failed, not the implants, and in most cases a new prosthesis designed to the six questions can be built on the implants you have. Where an implant sits so far outside the design that no frame can be made strong around it, he will say so and plan around it.
Any dentist can order a full-arch bridge; the laboratory will make whatever is asked for, in whatever material it prefers. What the prosthodontist adds is the measuring, the design rules, the testing in the mouth and the decades of knowing what lasts. Dr. Reshad's practice in Beverly Hills is built around exactly this work.
One visit. Bring any radiographs and, if you already have one, the prosthesis and its history. Dr. Reshad measures the space, looks at the implant positions, the screw angles, the connectors and the cantilevers, watches you bite and speak, and tells you which construction suits your mouth, why, and what it will take to make it last.
Explore More Services
Medically reviewed by Dr. Mamaly Reshad, BDS (Lond), MSc (Lond), Cert Pros (USC), Prosthodontist — Last reviewed July 2026
Ready to Transform Your Smile?
Schedule a private consultation with Dr. Reshad to discuss your goals and explore your options.