All-on-4 Dental Implants
Most full-mouth implant failures I am asked to repair were not caused by a bad implant or a bad crown. They were caused by a bite that was never engineered: back teeth that could not carry the load, front teeth that were asked to do too much, and a prosthesis that looked perfect on the day it was fitted and began breaking two years later. This page explains how I think about the bite, and why it is decided before the first implant is placed.
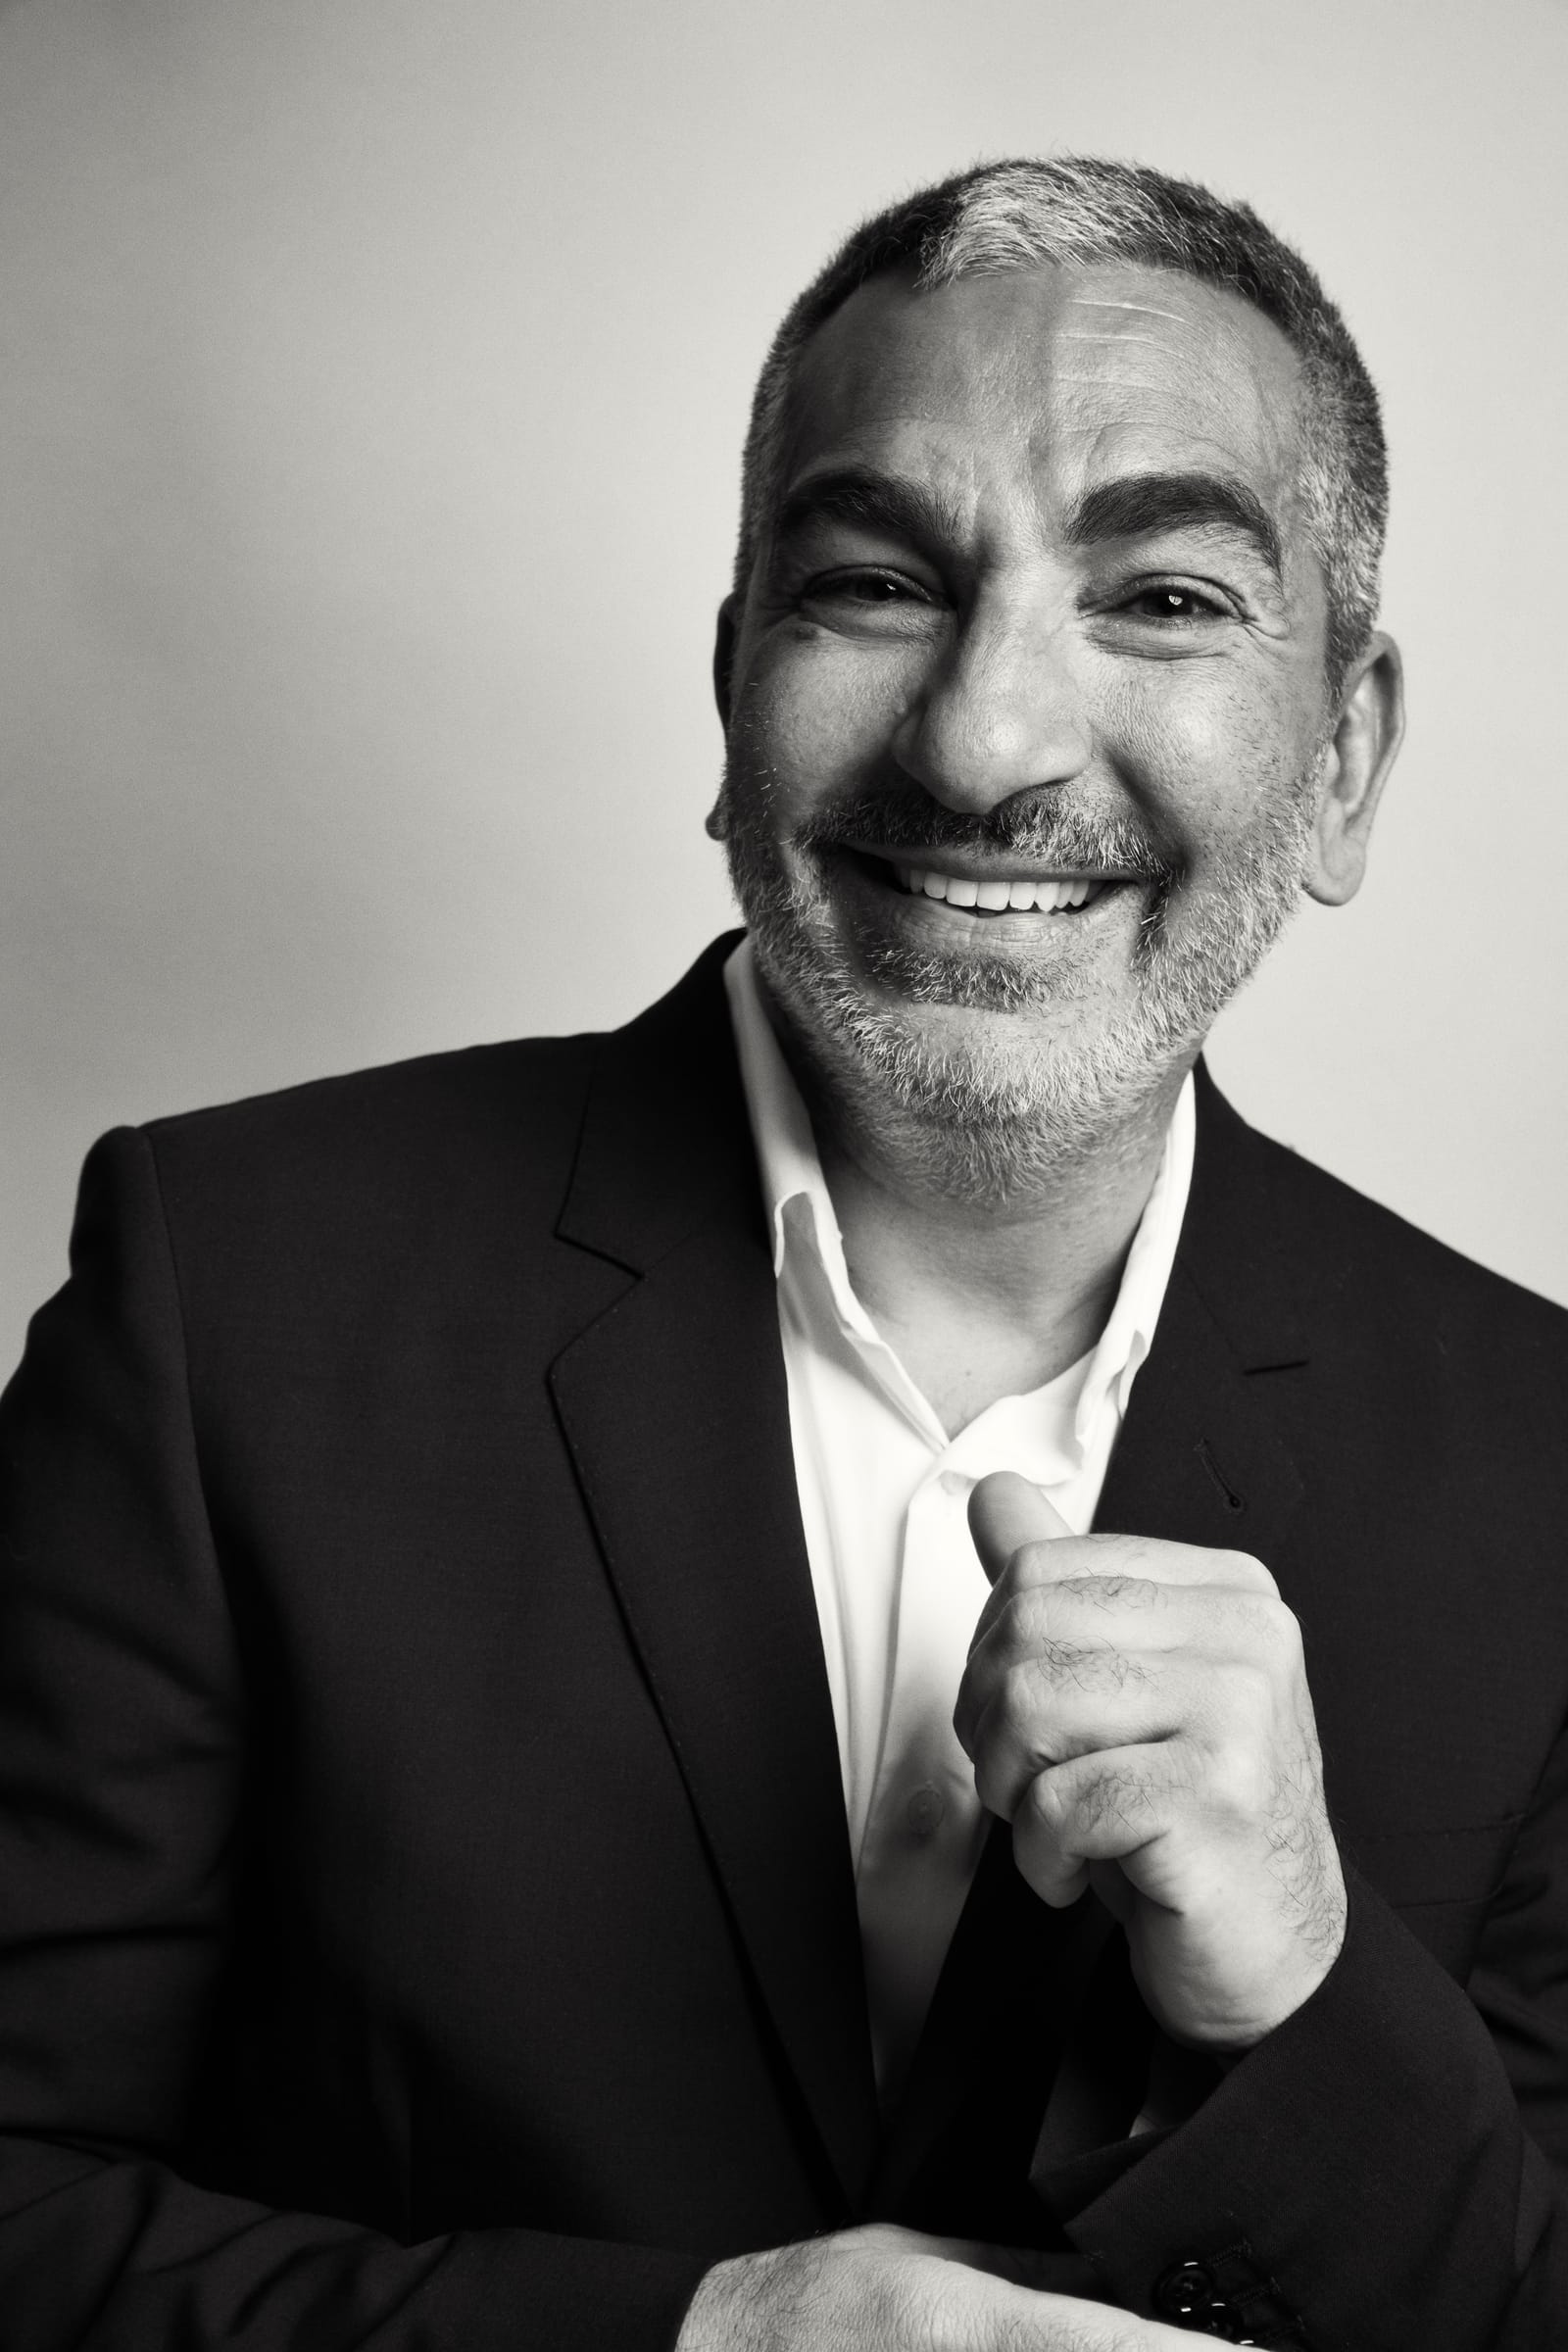
Smile Transformations
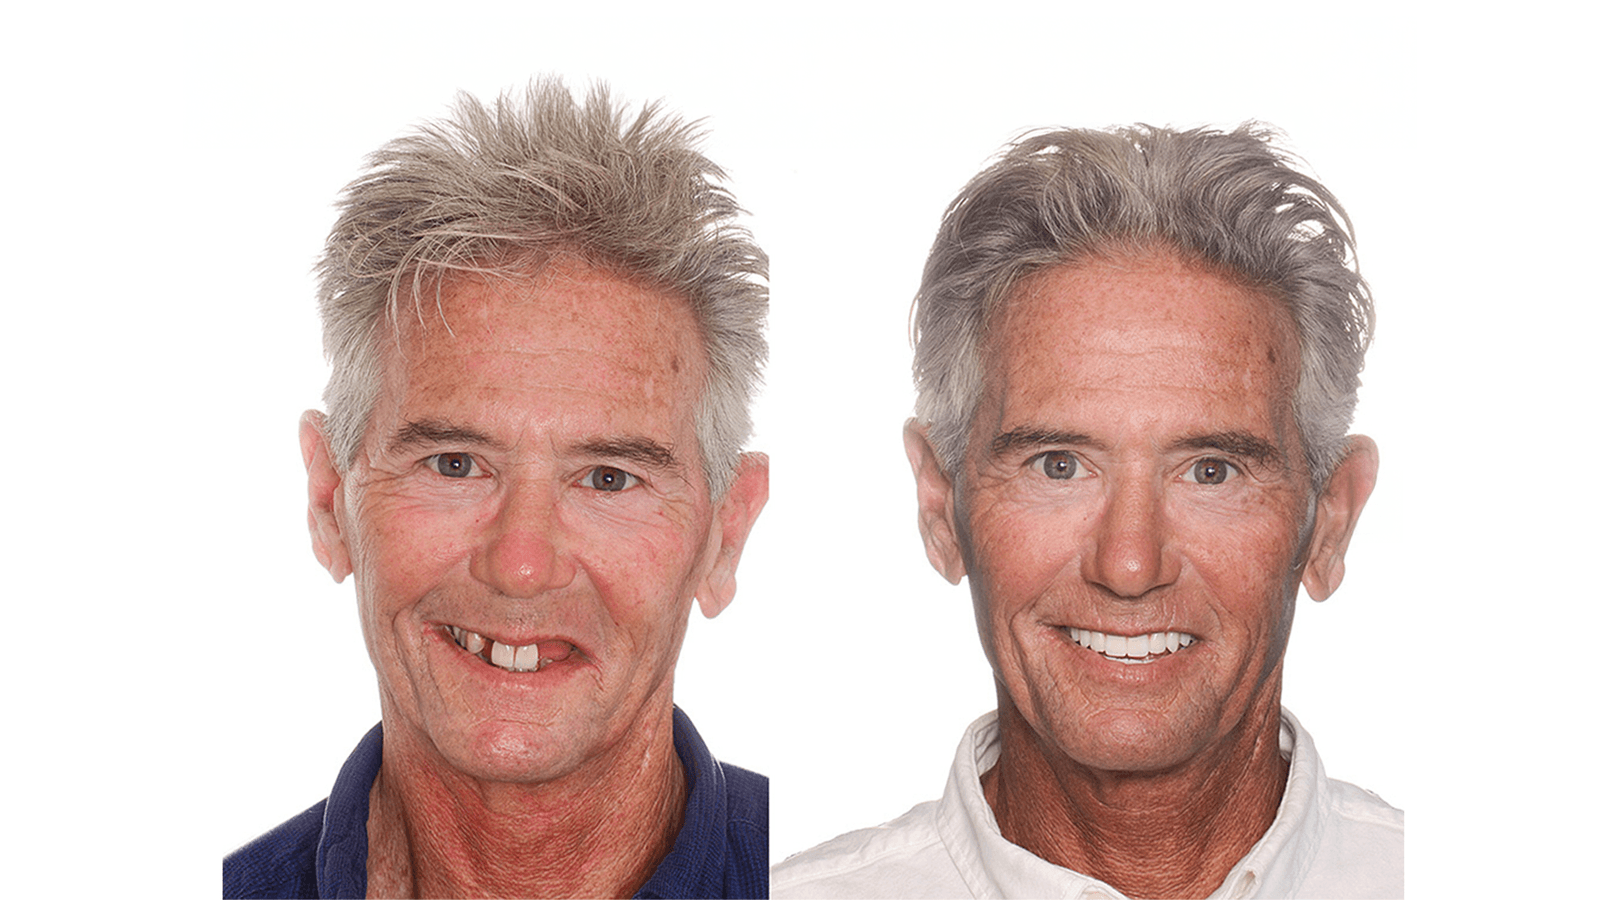
All-on-4, before and after
Fixed Rehabilitation of the
Edentulous Maxilla
A comprehensive approach to full-arch fixed prosthetics — from treatment planning through definitive restoration.
Maxillary Implant Reconstruction
A detailed overview of the complete treatment sequence — from diagnostic planning through definitive restoration.
Sagittal Plane Analysis & Bone Reduction Planning
In addition to the normal evaluations, we always perform sagittal plane evaluation in order to achieve ideal contour, emergence, and tissue contact prior to implant placement. A bone reduction guide is made based on the final restoration.
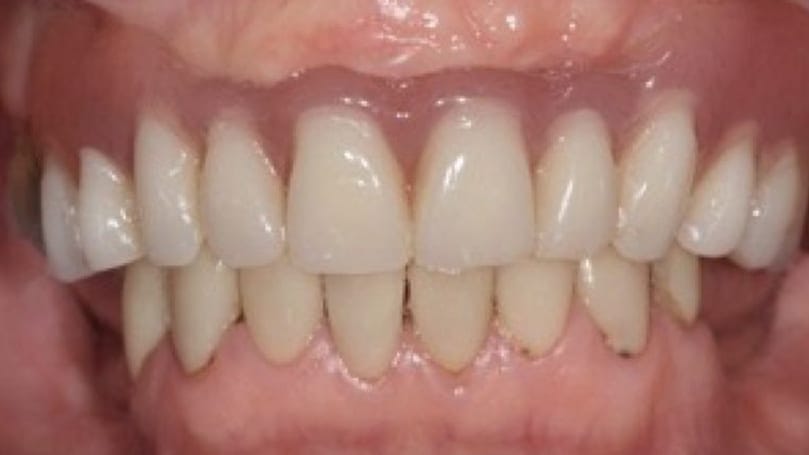
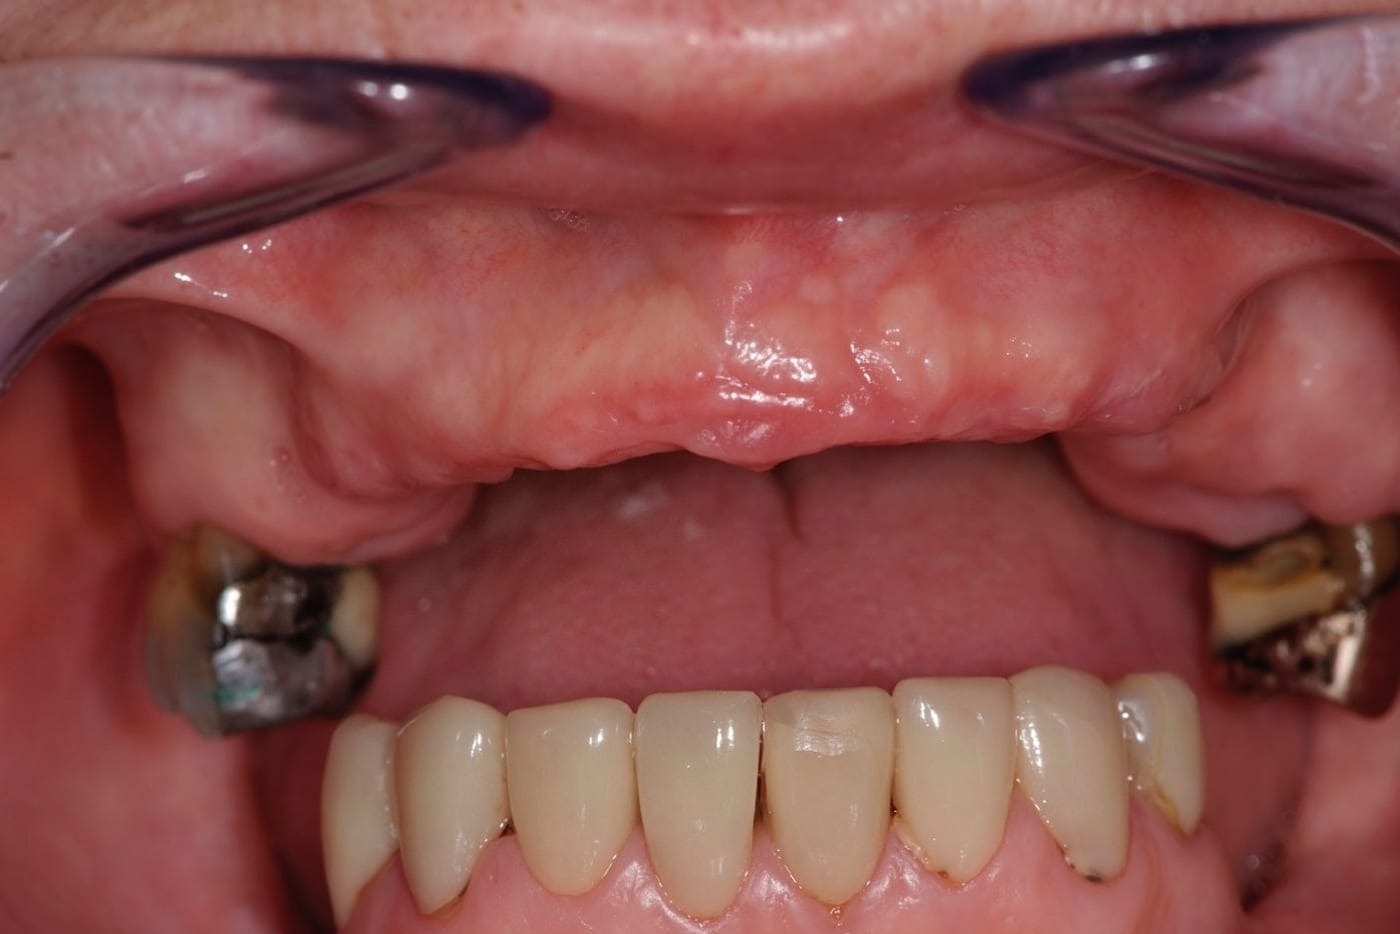
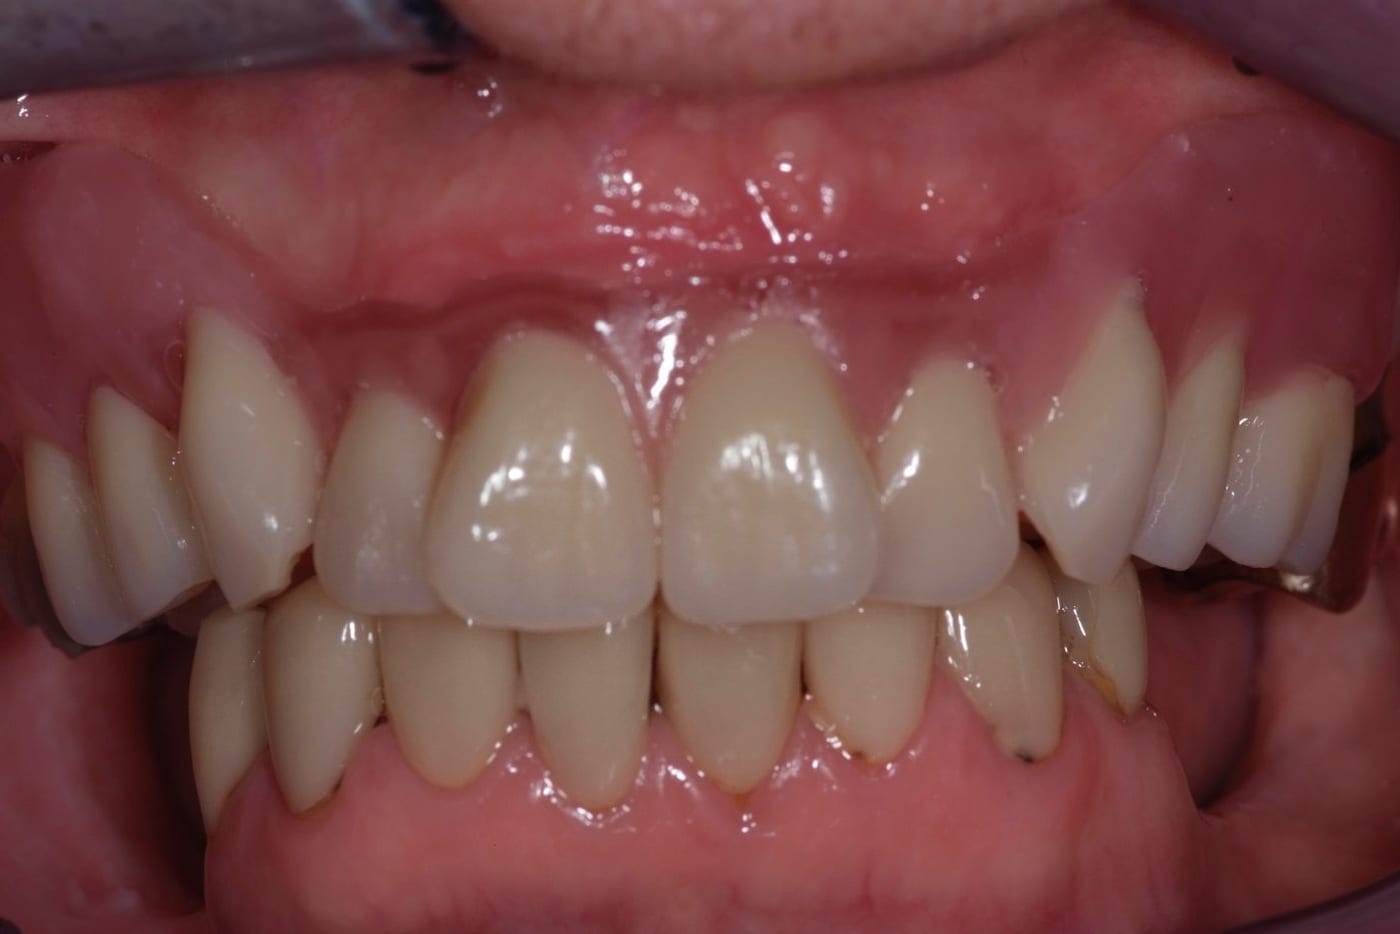
Complete evaluation of existing conditions, tissue health, and prosthetic requirements.
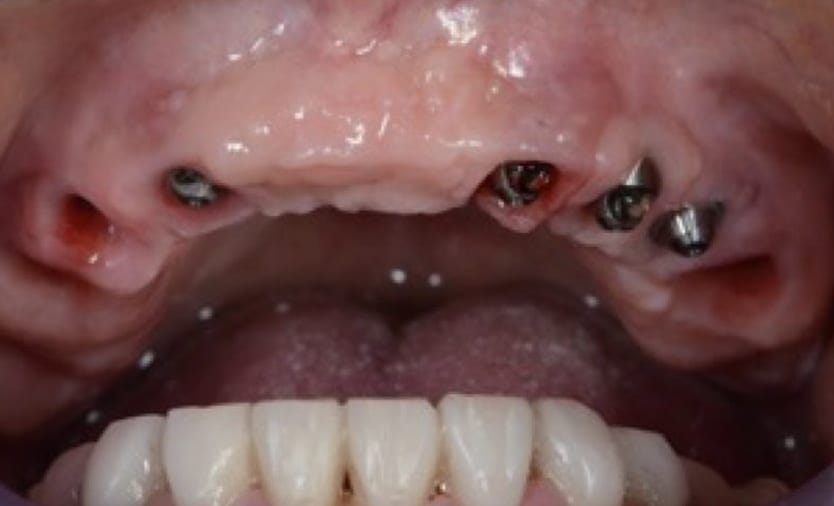
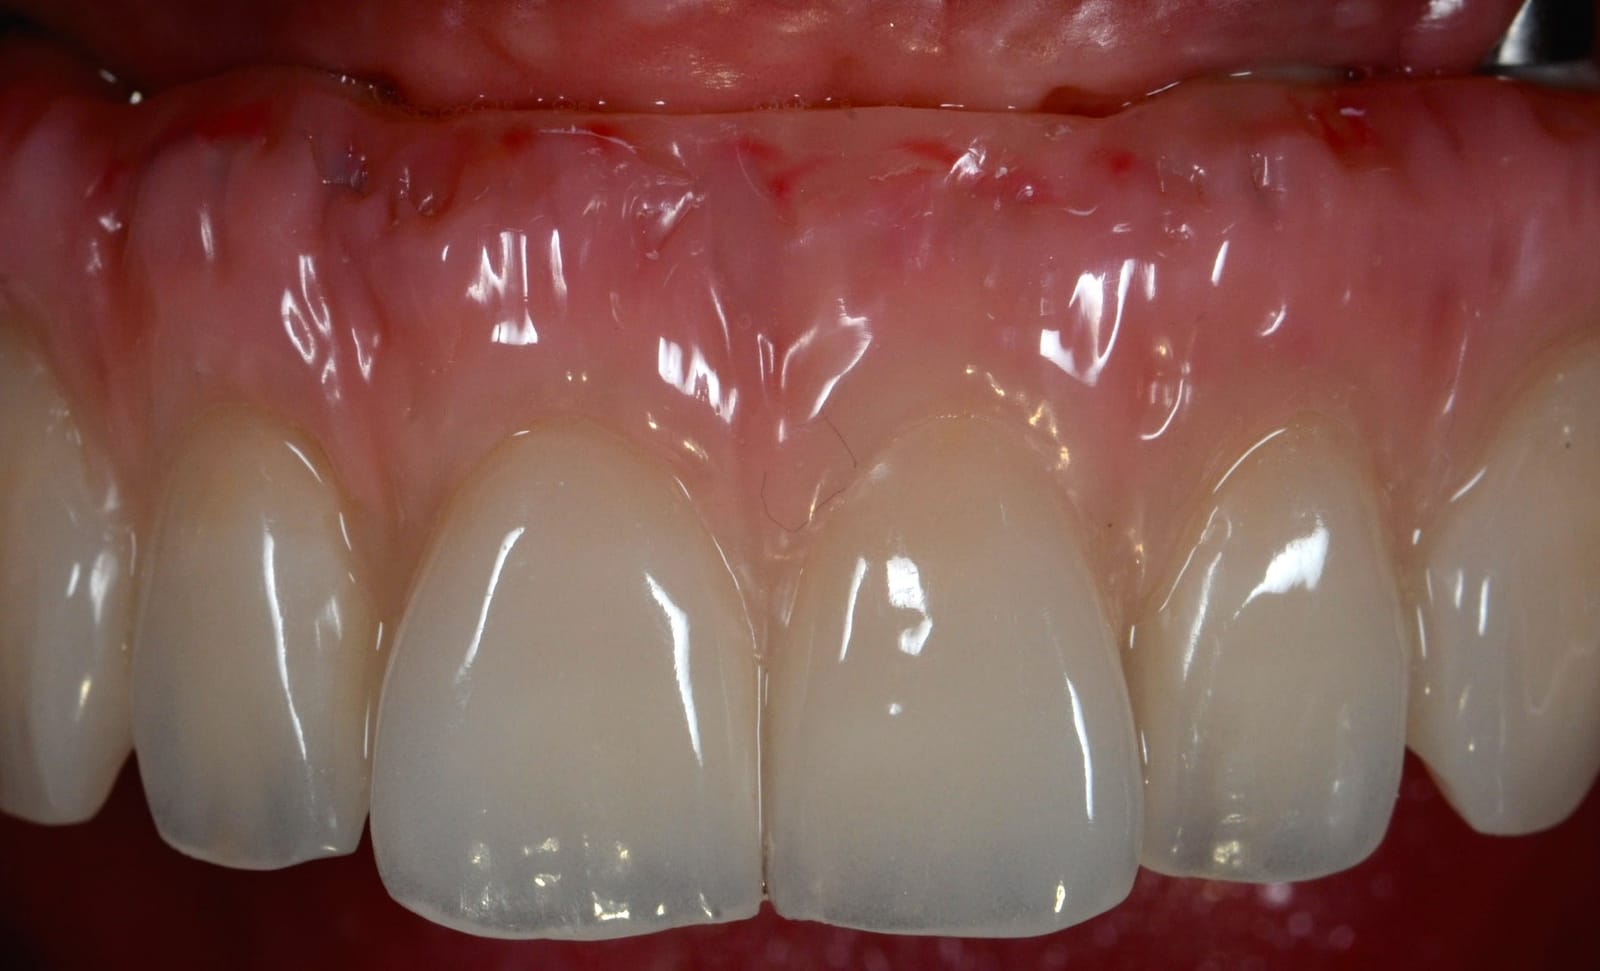
Provisionals establish tissue contours, verify occlusion, and confirm esthetic parameters.
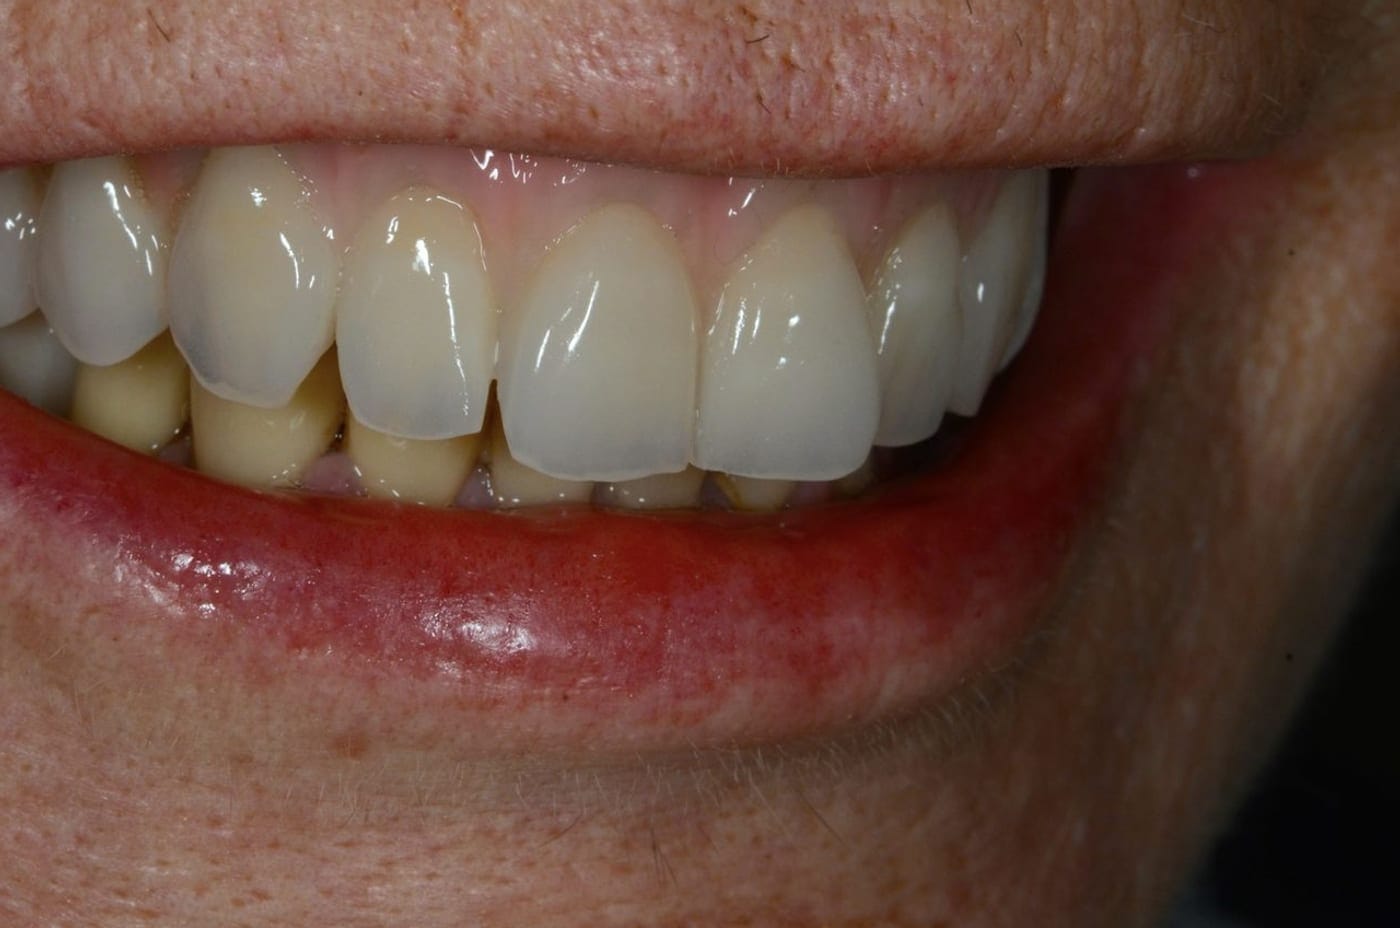
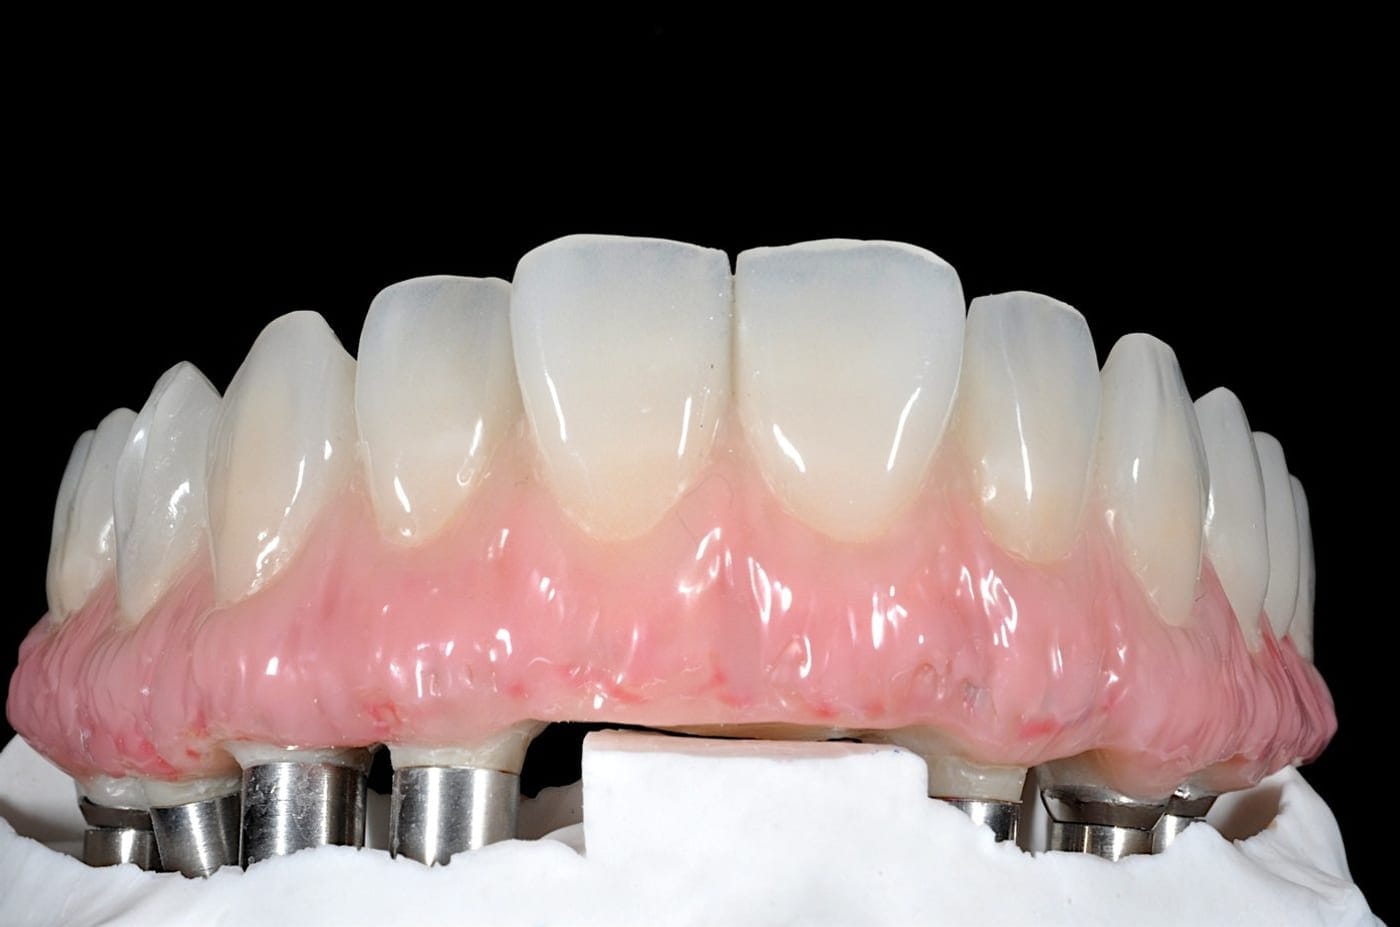
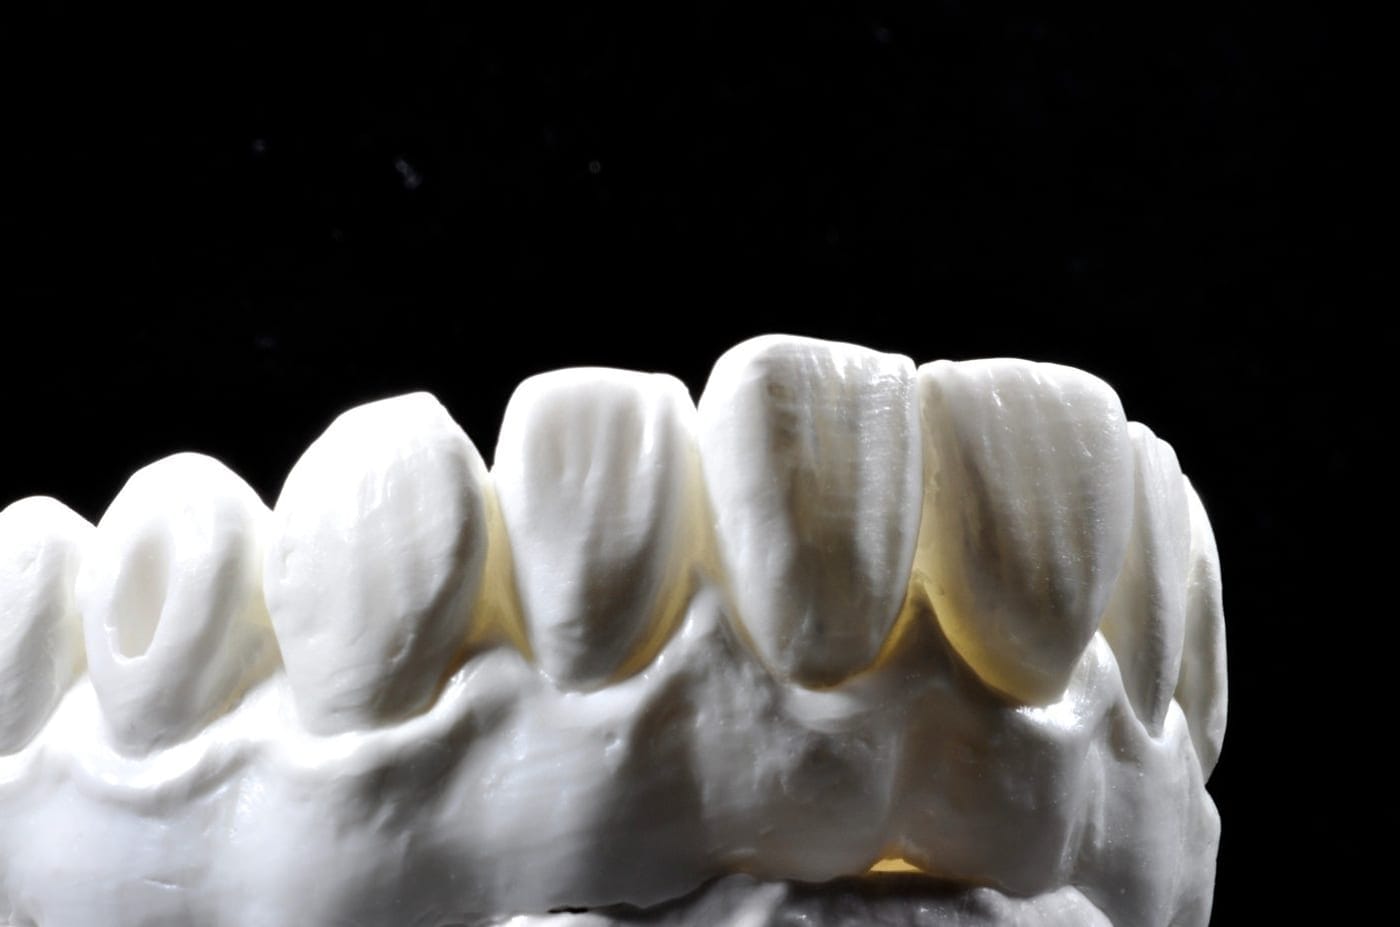
Complete diagnostic wax-up determines ideal tooth position, contours, and emergence profile.
Final ceramics by master ceramist Domenico Cascione. Precision-crafted for ideal esthetics and function.
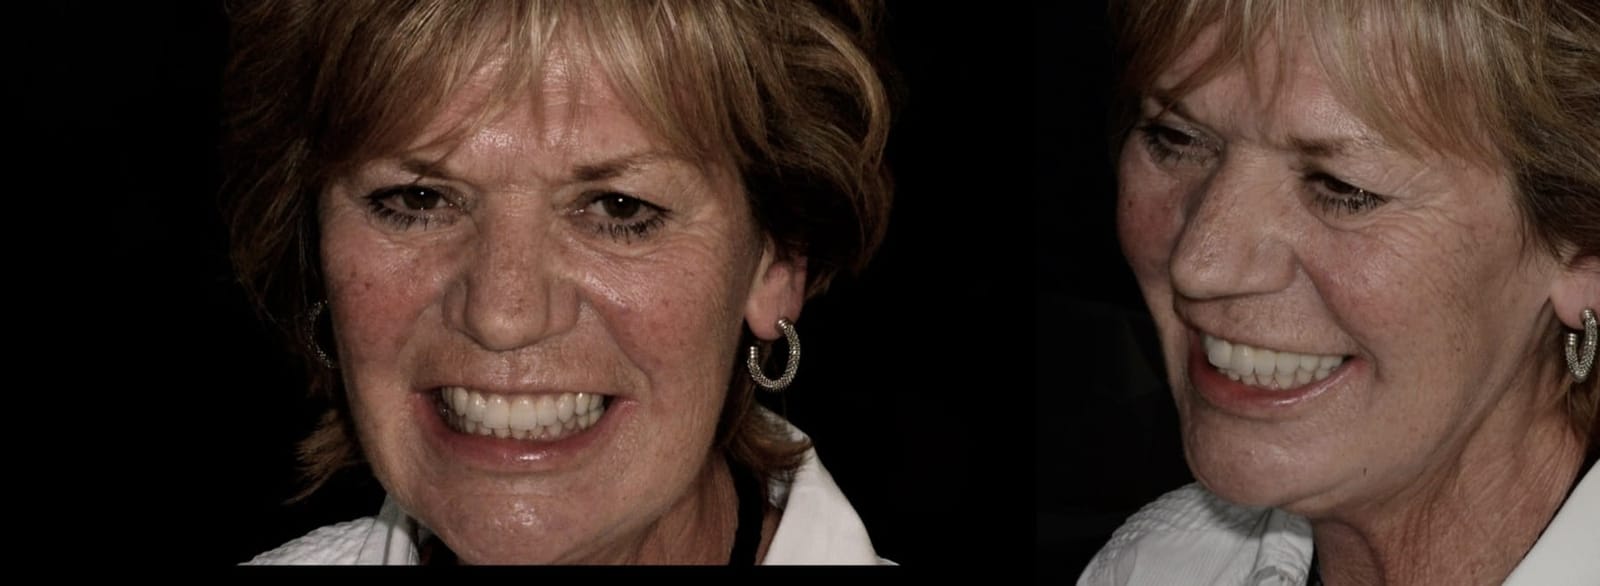
All-on-X Patient Cases
Each of these is a full written case: what the patient arrived with, what was done, and how it held up.
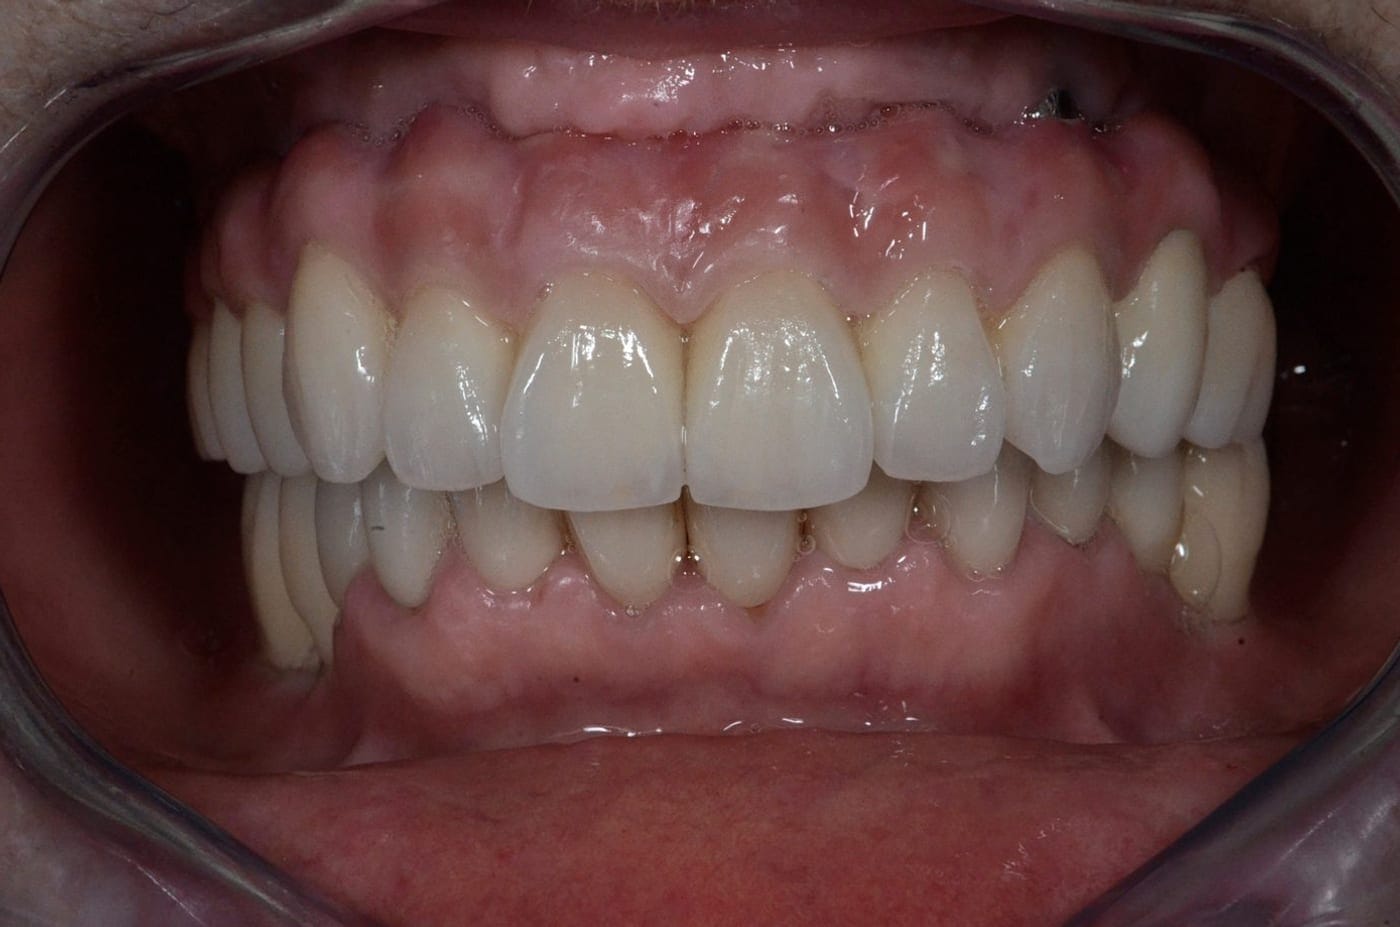
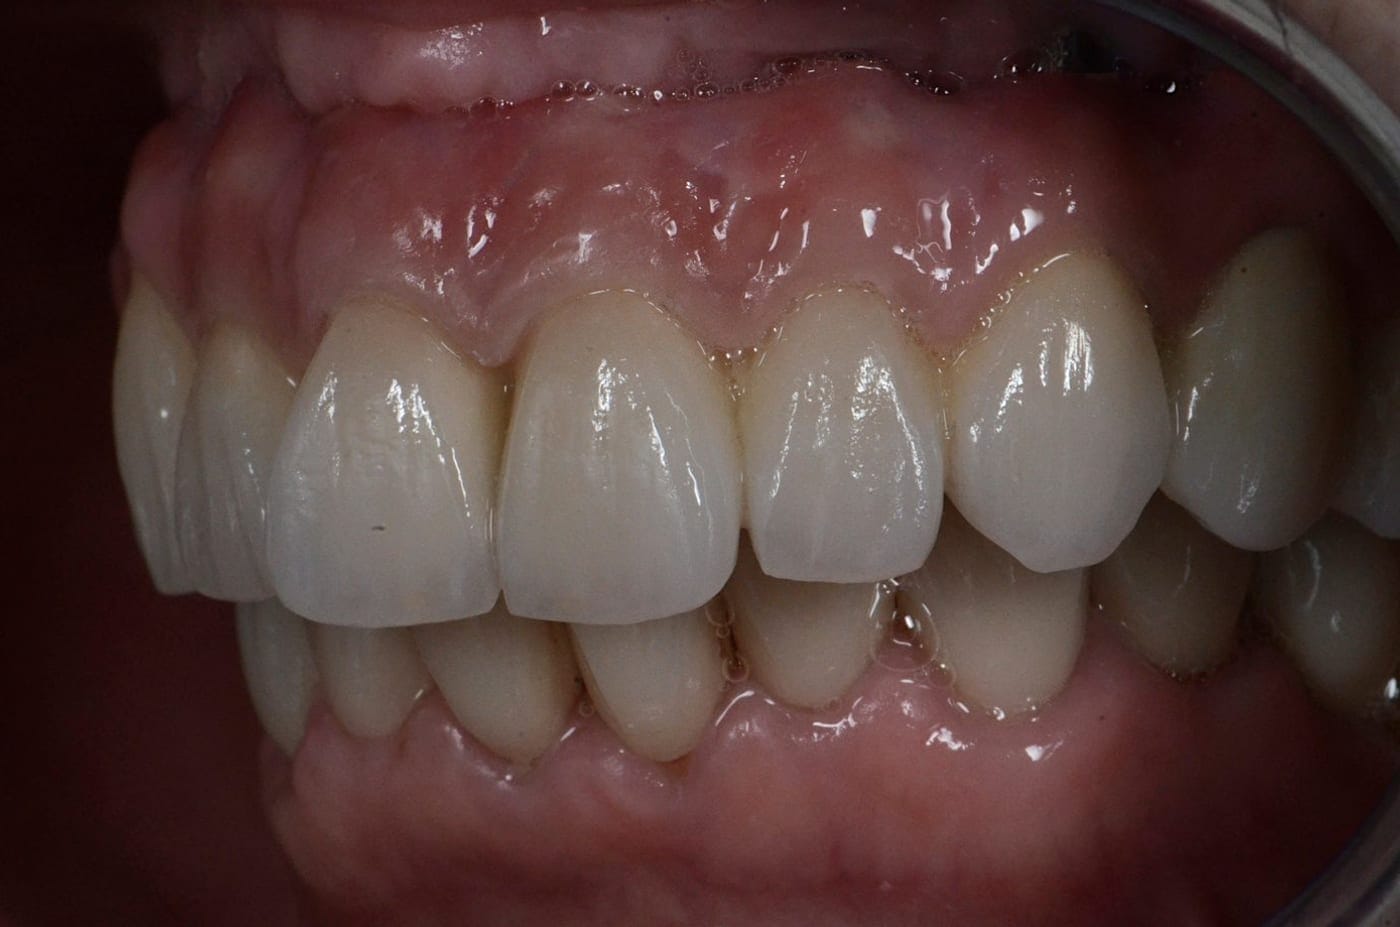
Fixed Teeth, Seen in Ordinary Light
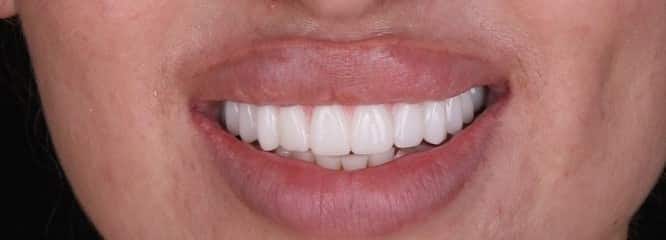
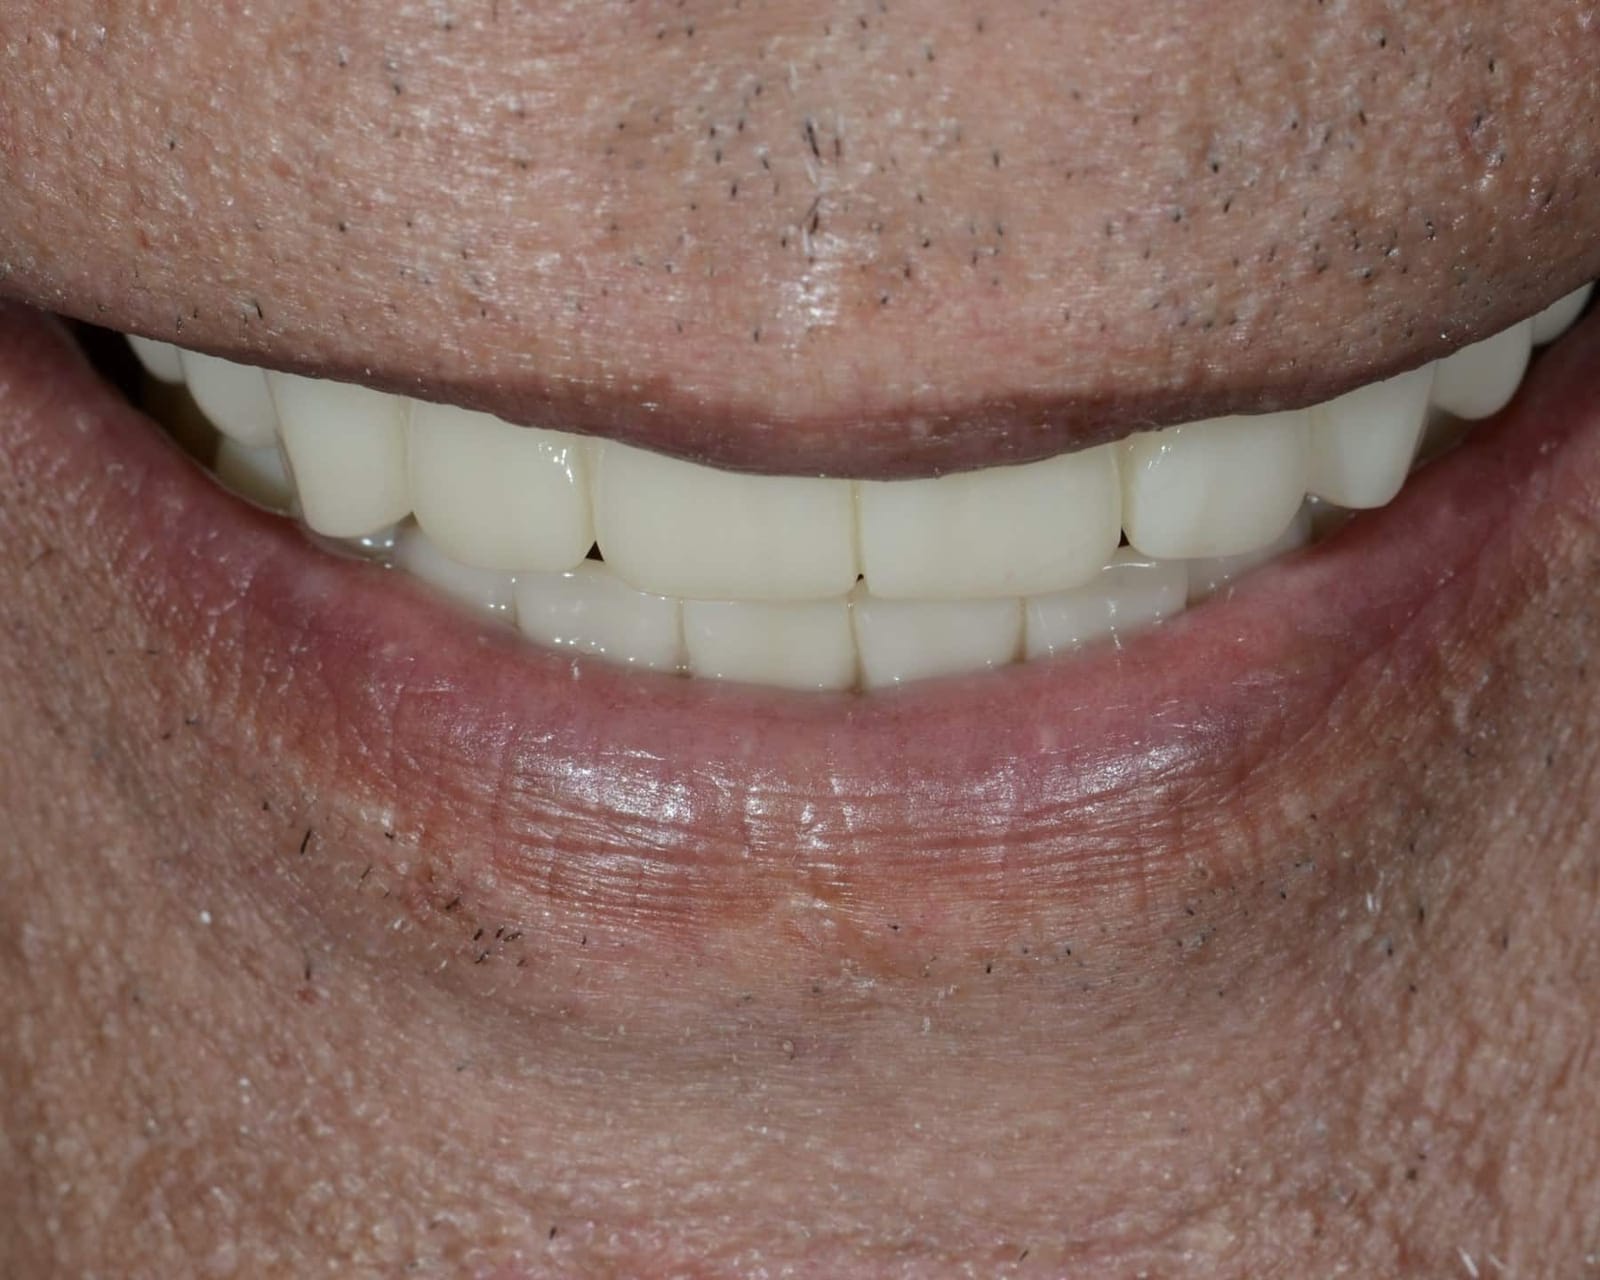
A full arch of fixed teeth is finished when it disappears into the way someone talks and smiles. This is the result the way everyone else sees it: unposed, in ordinary light.
Every case is planned around one person's anatomy. Individual results vary.
Smile Transformations
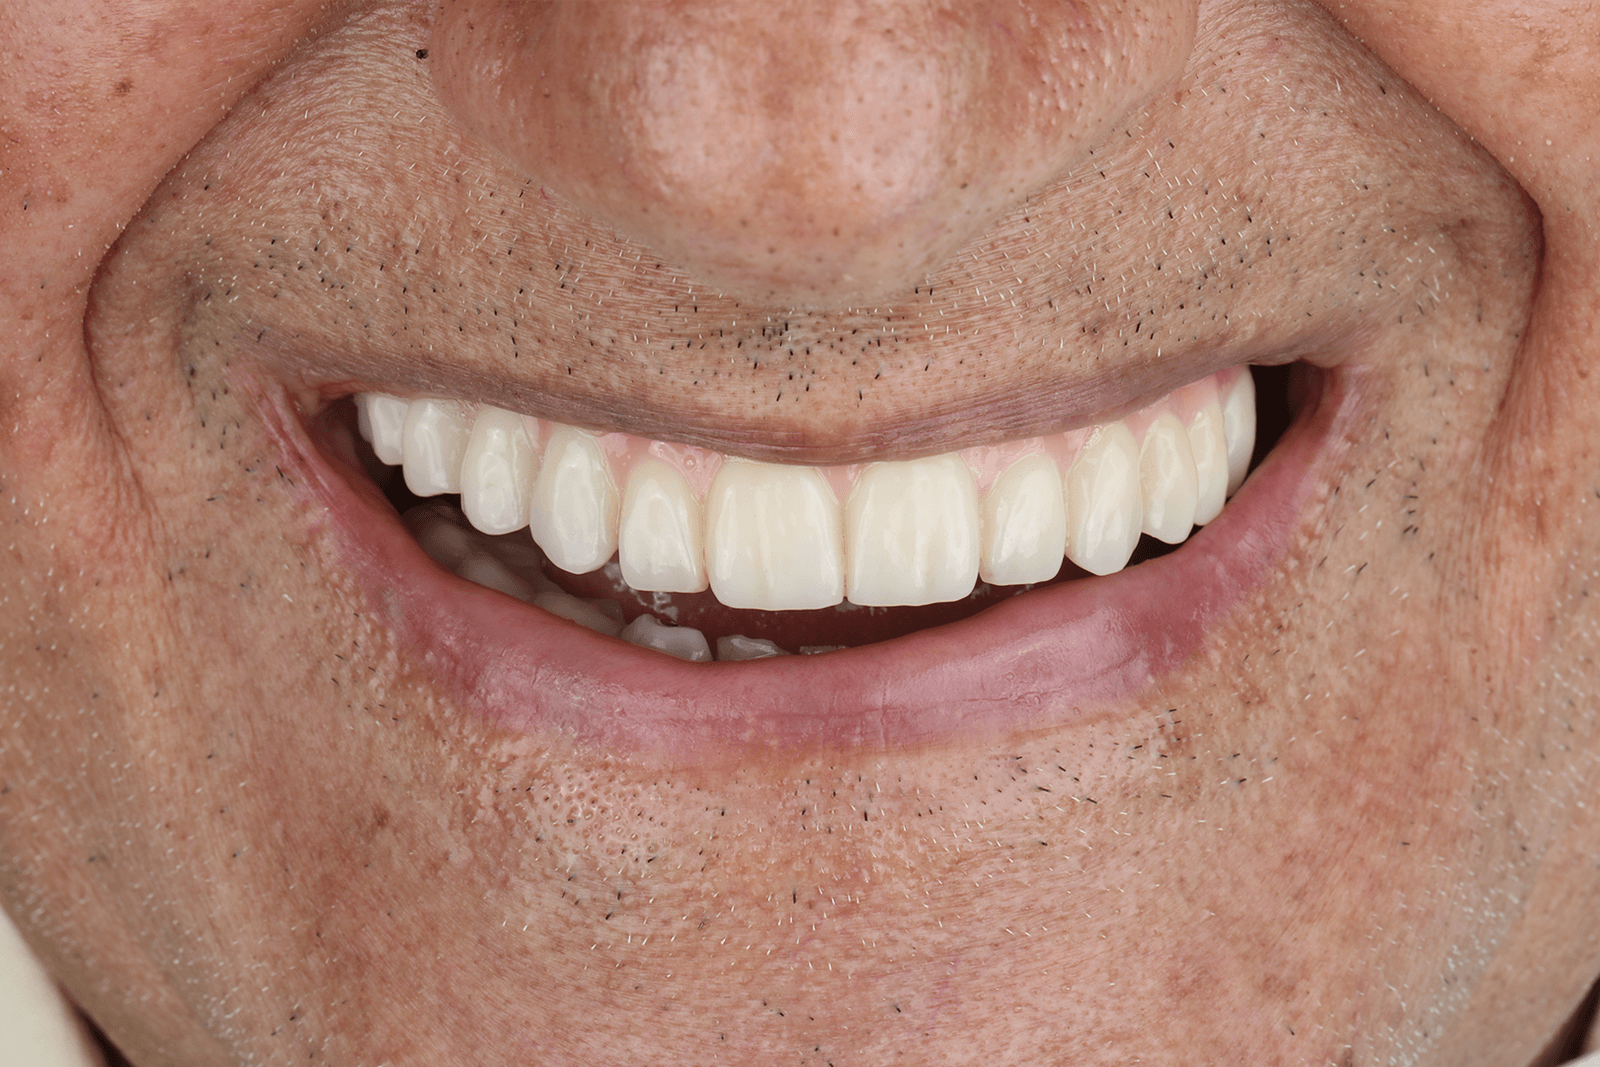
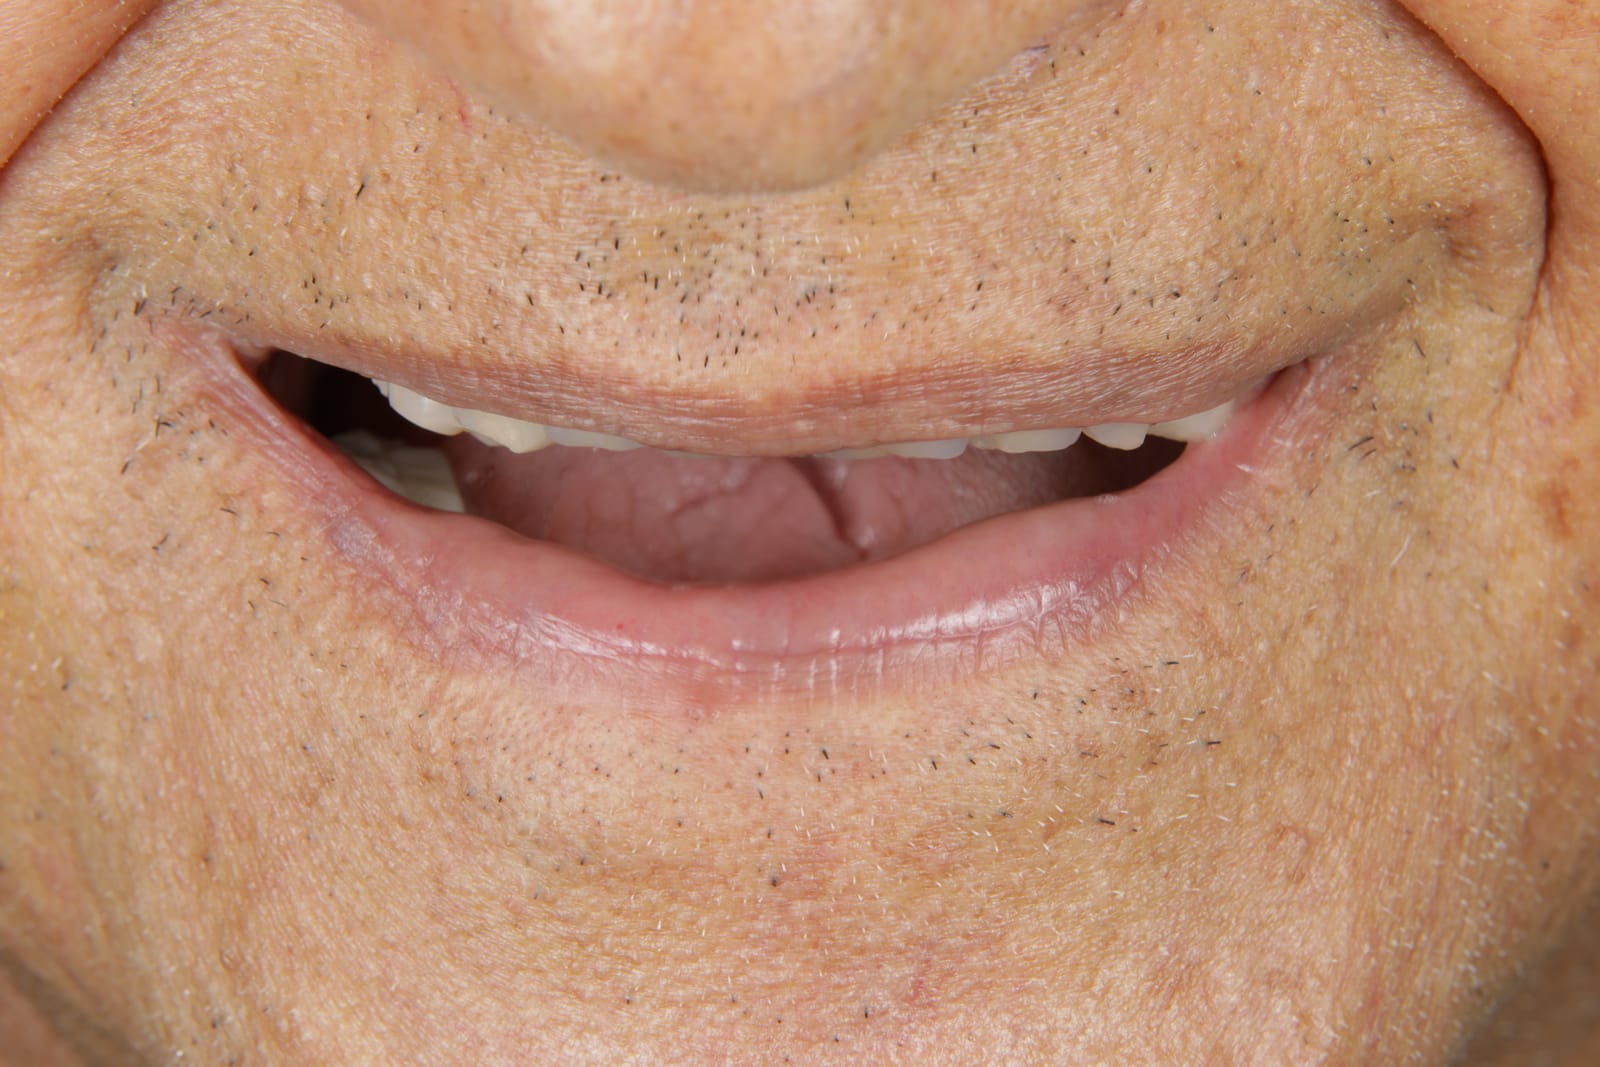
All-on-X
Complete All-on-X transformation restoring a full smile with implant-supported prosthetics.
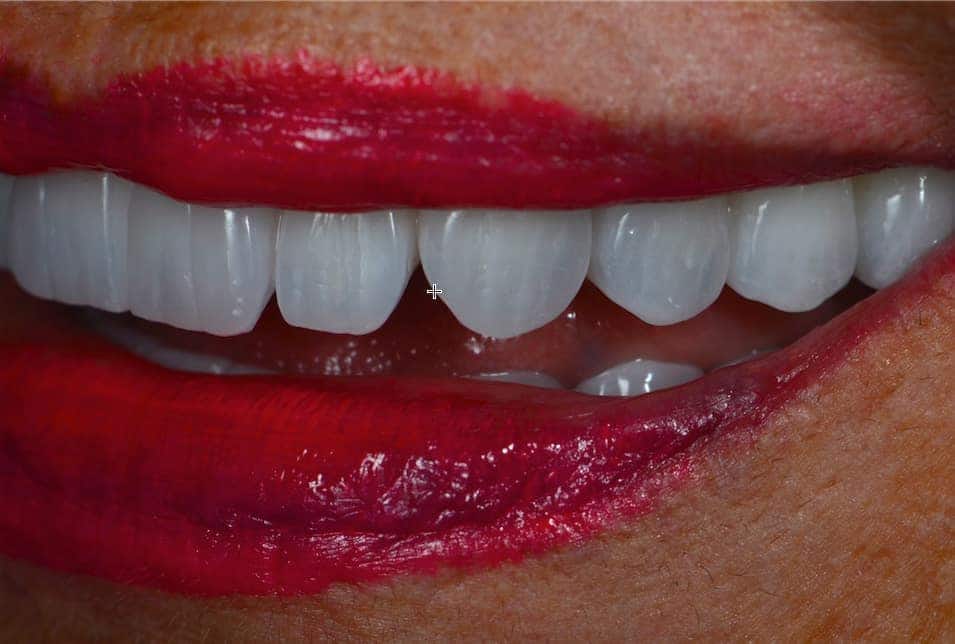
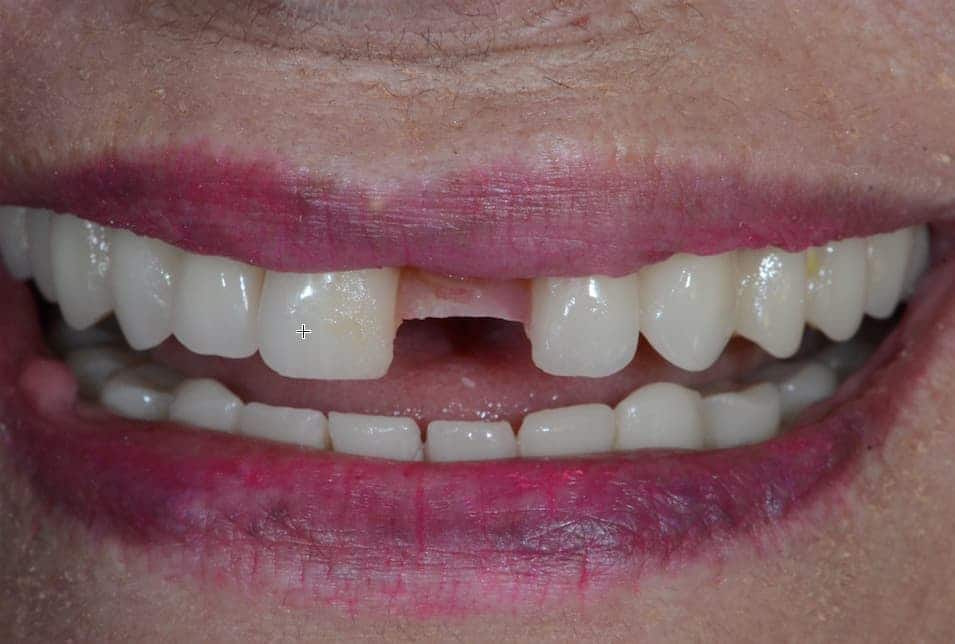
All-on-4 Revision
A complex revision case taking nearly a year to correct failing All-on-4 implants from a previous dentist.
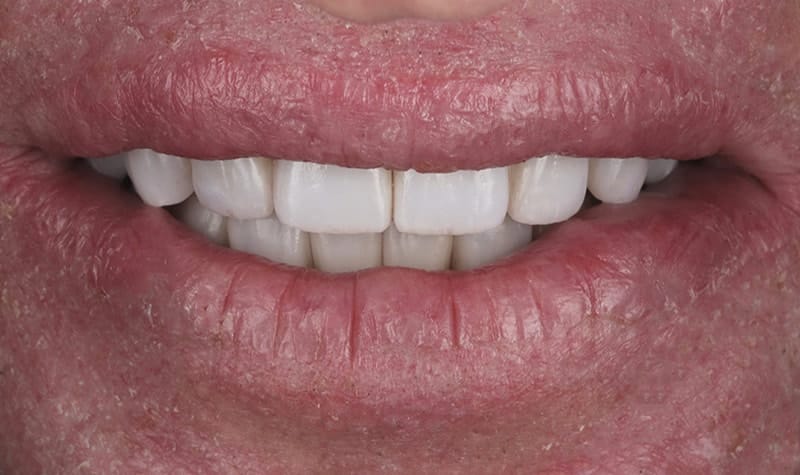
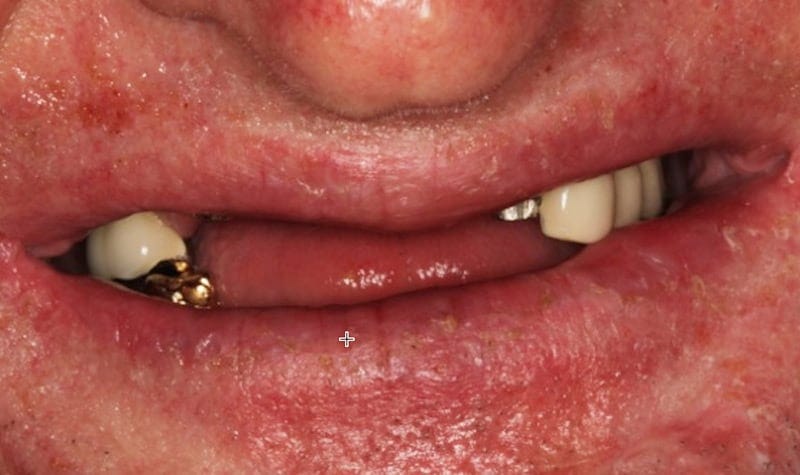
All-on-4
Severe bone damage from failing implants requiring a custom treatment plan for full rehabilitation.
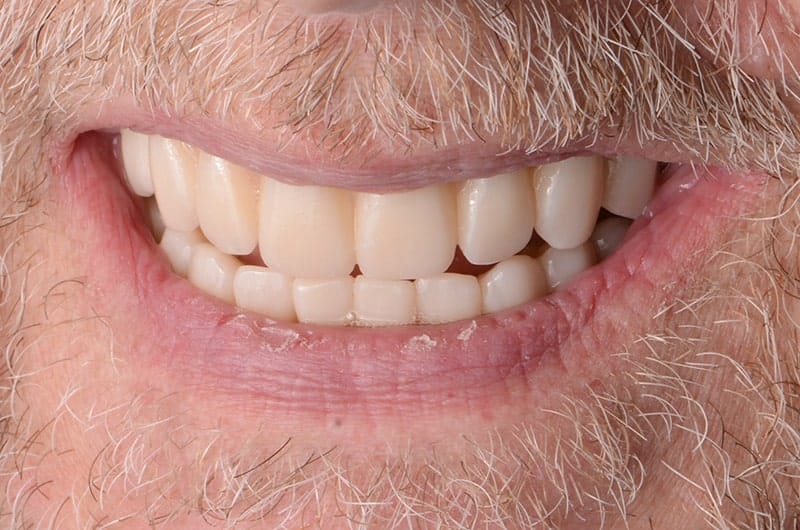
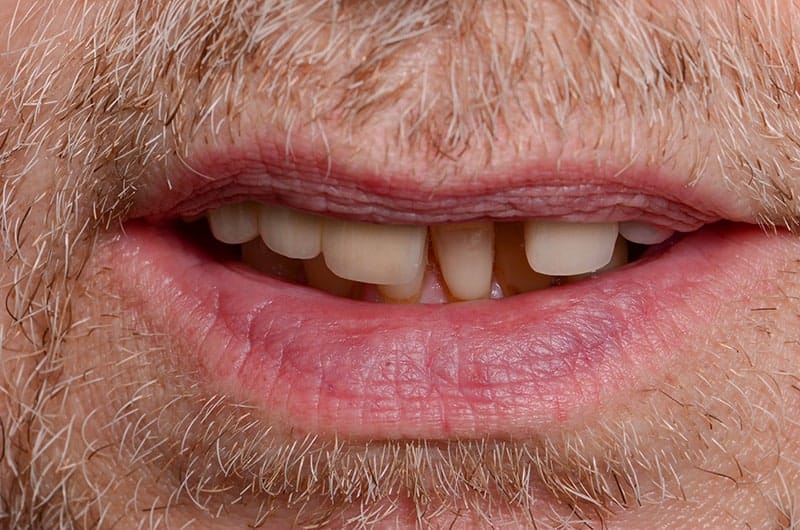
All-on-4
Longstanding problems with aging bridges and infections resolved with full-arch implant-supported restorations.
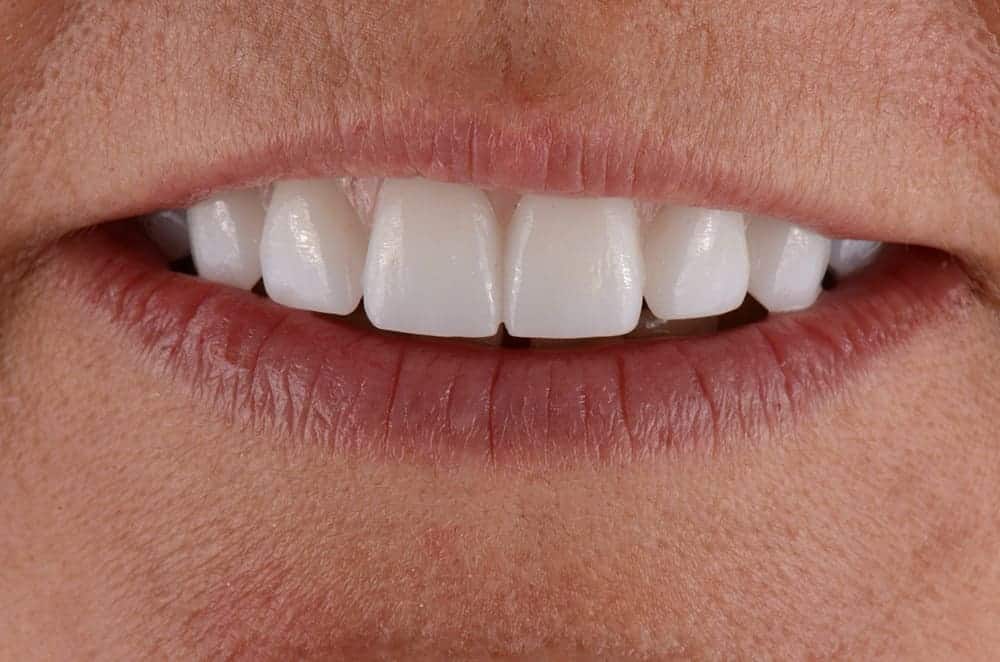
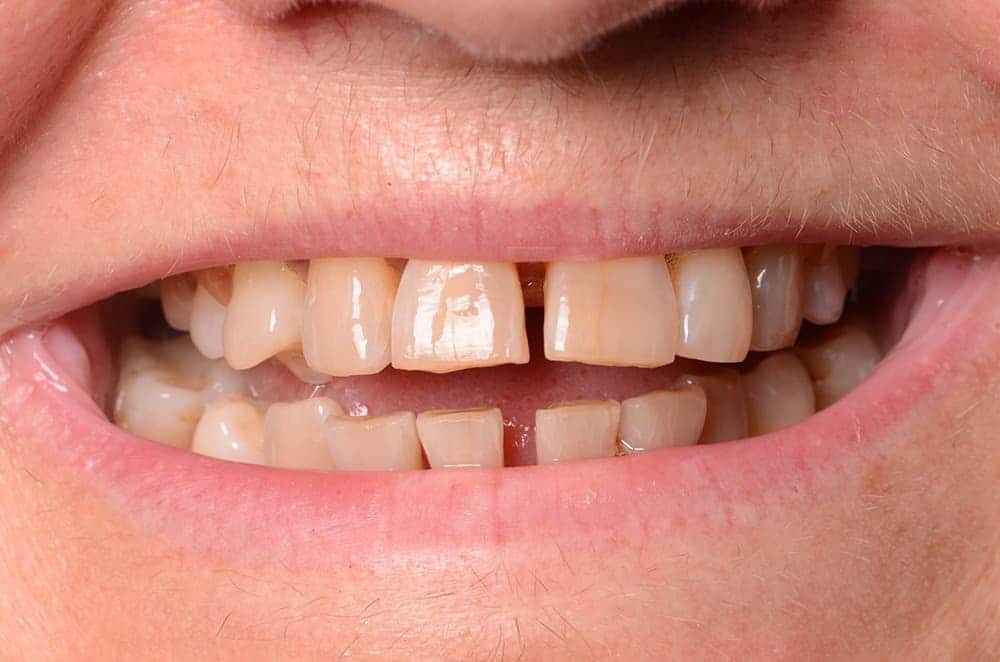
All-on-4 Upper Jaw
All upper teeth required extraction and were replaced with a fixed implant-supported prosthesis.
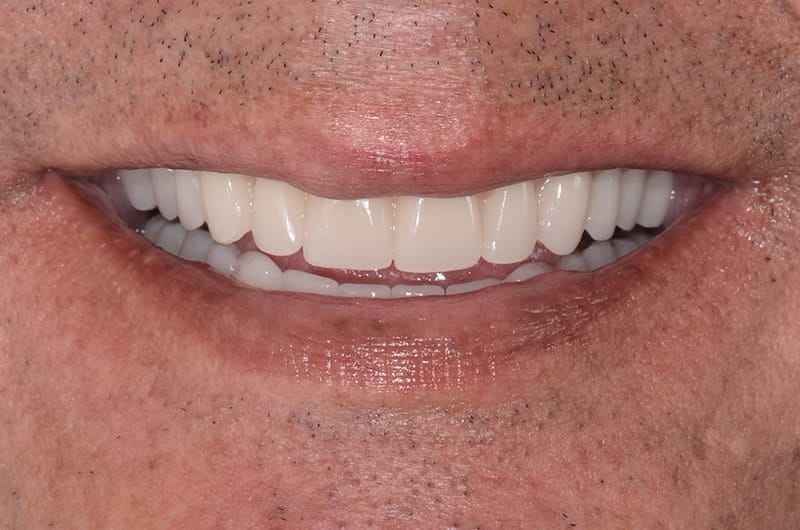
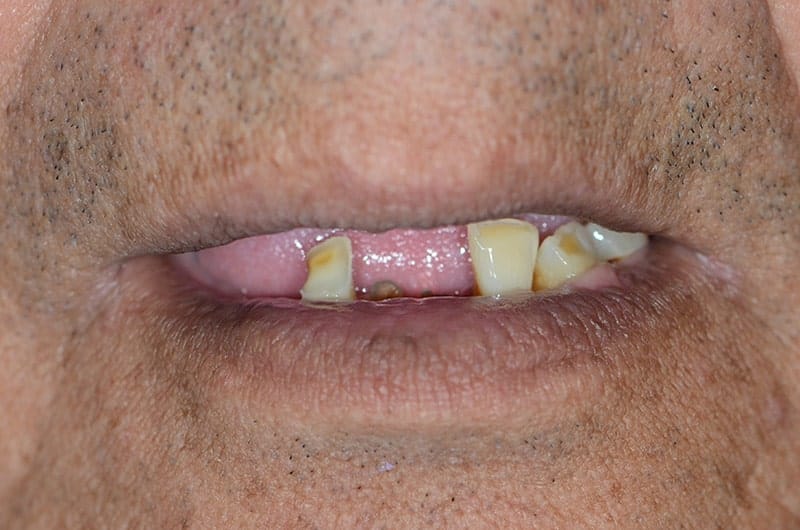
All-on-4
Comprehensive dental rehabilitation using All-on-4 implants for a complete smile transformation.
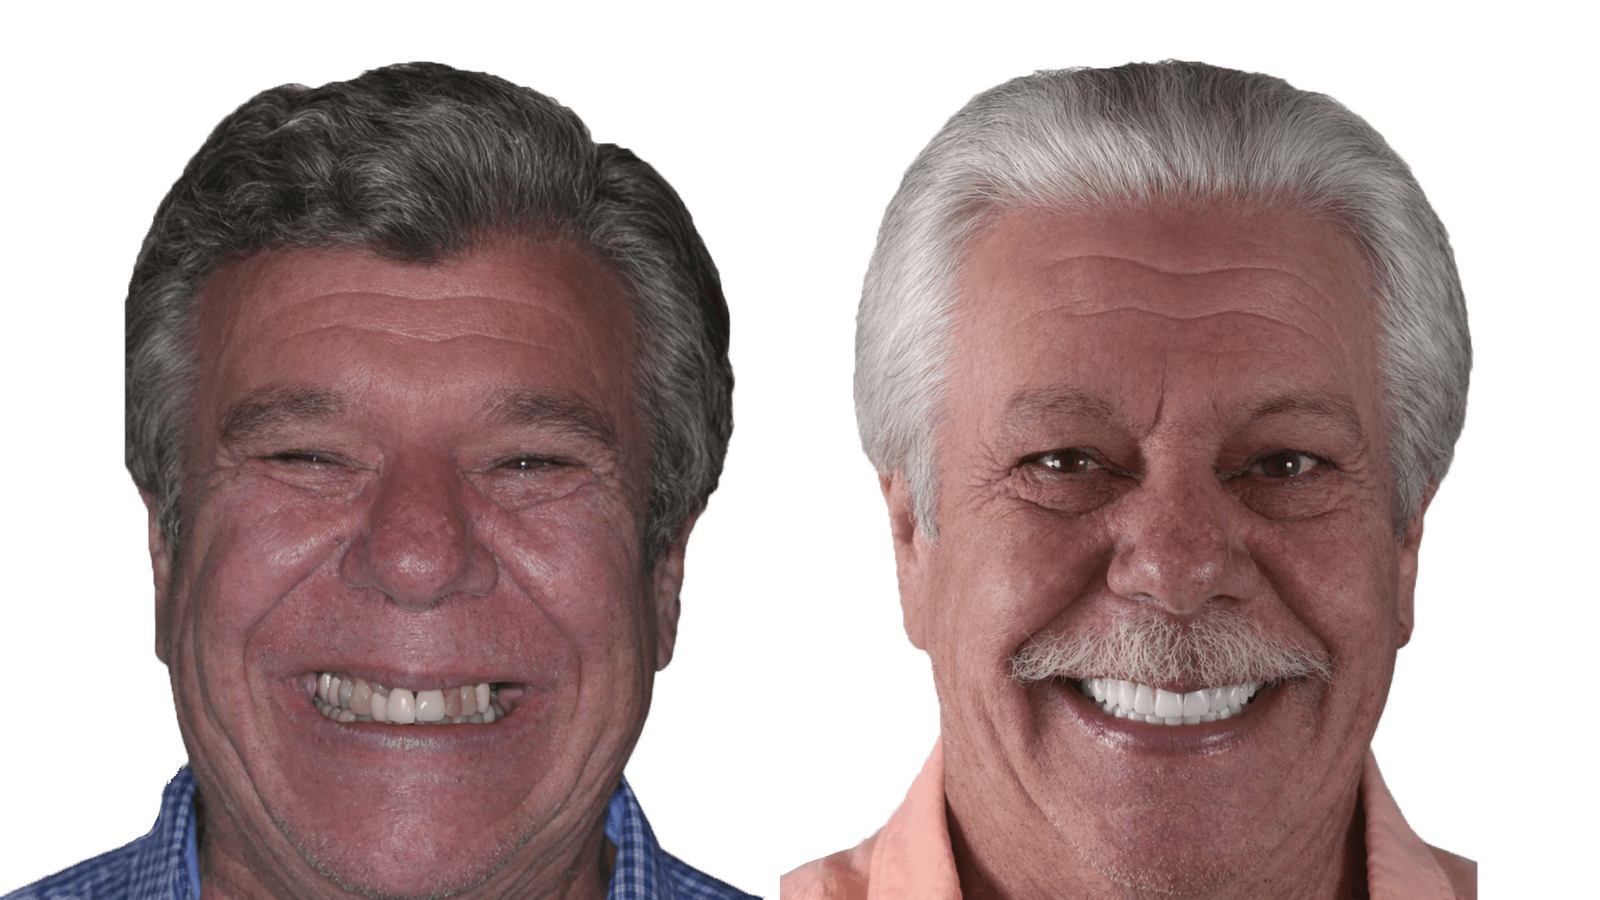
All-on-4, before and after: a second patient
Beautiful Teeth Are Not Enough. They Have to Work Together.
The bite is a force-management system. I design it in this order. Every full-arch case I treat follows the same sequence. The order matters more than any single step, because each one protects the next.
Natural teeth have a shock absorber and a sense of touch. Implants have neither.
The back teeth carry the load. Without them, the front teeth break.
Stabilise the lower jaw early, spread the implants, no overhangs.
Shallow, smooth guidance so the back teeth separate when you move.
Your jaw should always know where home is.
Nothing is made permanent until you have lived with it.
Six ideas, one principle: control the forces, and the restoration lasts.
Front teeth shaped to guide, not to collide.
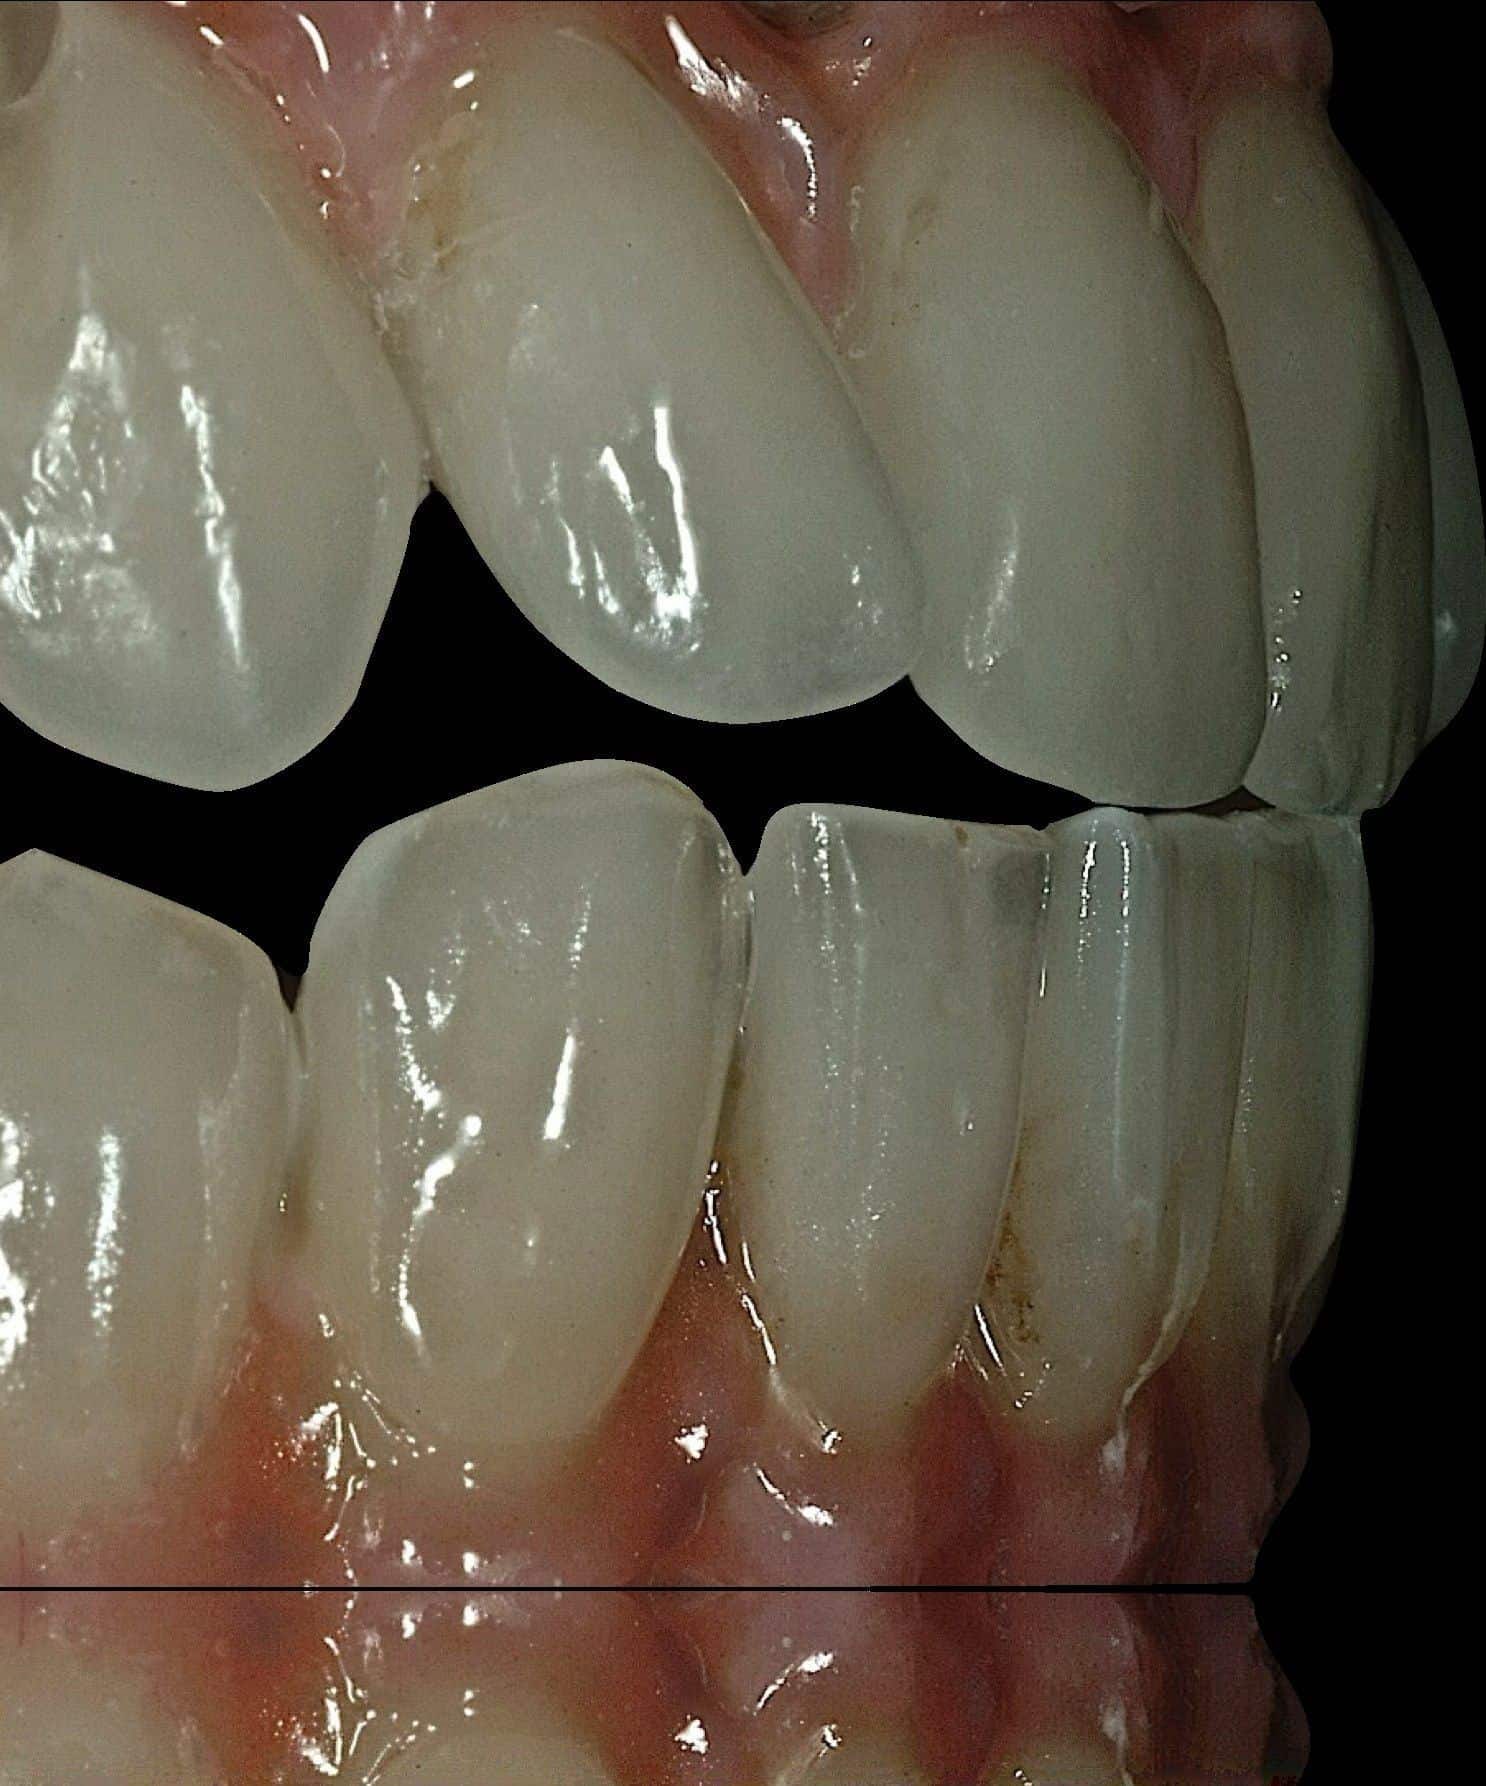
A natural tooth can feel. An implant cannot.
A natural tooth sits in a tiny ligament that acts as a shock absorber and a nerve ending at the same time. It lets the tooth give a fraction of a millimetre under load, and it tells your brain, instantly, when you bite on something hard.
An implant is fused directly to the bone. It does not move, and it does not feel. Every force that lands on it goes straight through to the bone and the screws and the ceramic. That is why a bite that a natural mouth would shrug off can, on implants, quietly loosen screws, chip porcelain, fatigue the framework or remodel the bone around the implant, often without you noticing anything until something breaks.
What the ligament does for a natural tooth, and what an implant has to do without. This is the whole reason the bite on implants has to be engineered rather than left to settle.
A natural tooth gives 50 to 200 microns. An implant moves 3 to 5. The cushion is gone, so force arrives at the bone undiluted.
Present in a tooth, absent in an implant. The job of absorbing force moves from your biology to the design of the prosthesis.
High in a tooth, greatly reduced in an implant. Overload on implants is often silent until a screw loosens or a tooth chips.
A tooth can drift and remodel to accommodate a small error in the bite. An implant cannot. The error stays, and it is paid for in fatigue.
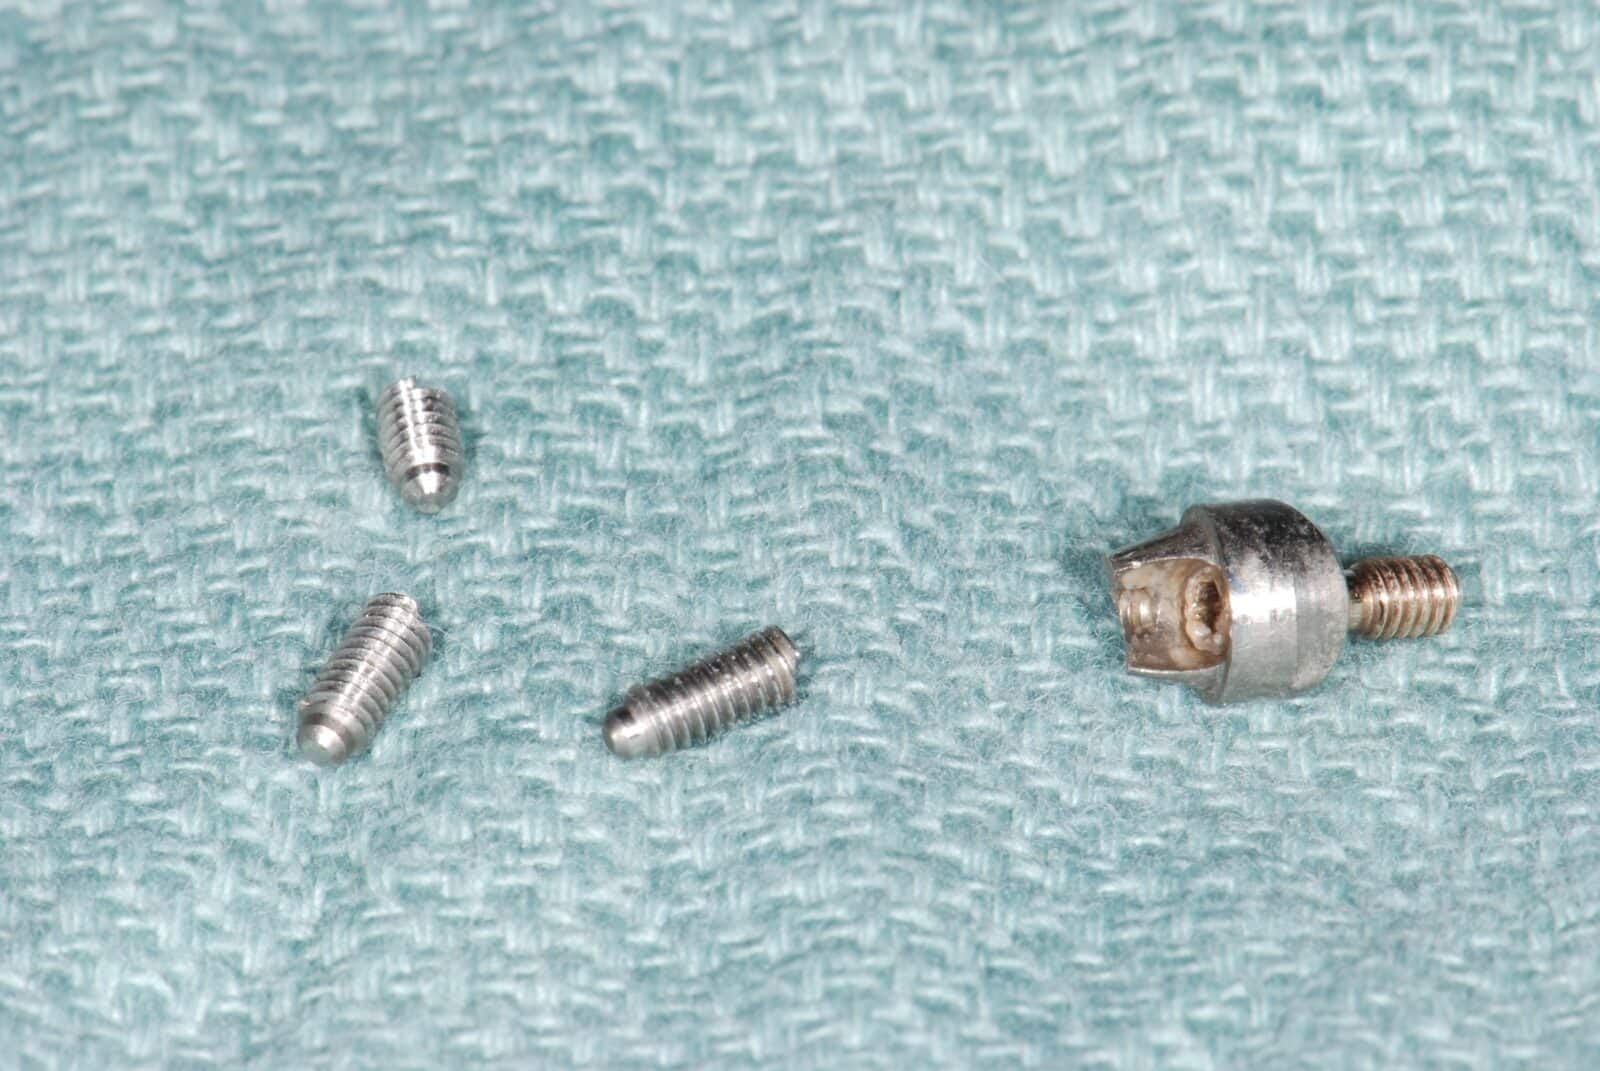
The screws tell the story. Fractured and loosened screws recovered from a full-arch restoration. Research on long-term implant cases is consistent: a large share of the late failures, loose screws, chipped ceramic, cracked frameworks and bone change, trace back to cumulative force, not to a single accident. These did not break on one bad bite. They were fatigued over hundreds of thousands of them.
RuleBecause an implant cannot warn you, I err on the side of caution with every full-mouth case. The biological, emotional and financial stakes are too high to let the bite look after itself.
Our Beverly Hills office at 414 N. Camden Dr., Suite 750 opens in January 2027. Until then, call (310) 444-5217 and we'll arrange your consultation.
The back teeth protect the front teeth
Your mouth has a division of labour. When you close, the back teeth take the load, straight down their long axis, where they are strongest. When you slide your jaw forward or sideways, the front teeth take over and steer, and the back teeth separate so they are not dragged across each other. Each half protects the other.
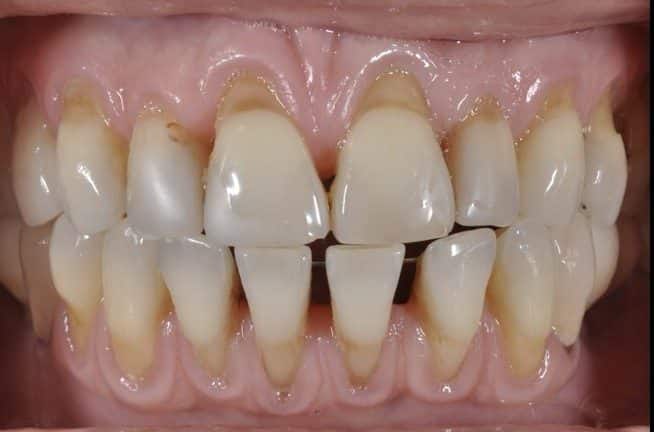
Gaps opening between the front teeth, year on year. The patient came in asking about the spaces. The spaces were not the problem; they were the symptom.
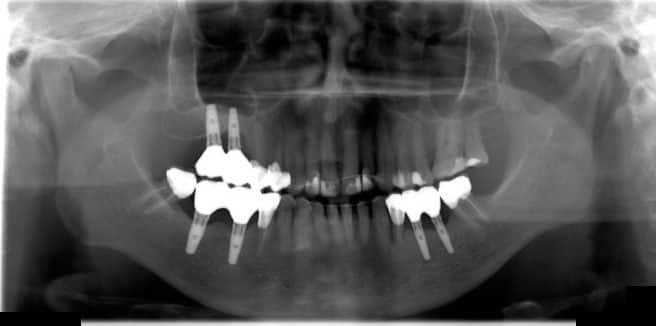
Posterior implants placed elsewhere, restored so that the back teeth never properly met. With nothing to stop the bite at the back, every closure landed on the natural front teeth, and over time they were pushed forward and apart. The implants were sound. The bite was not.
When the back teeth are lost, worn down, weakened by gum disease, or restored so that they do not actually meet, the front teeth are left to do a job they were never built for. The damage shows up in four recognisable ways, and I look for all of them at the first visit. Two or more together tell me the back support has failed, whatever the tooth count says.
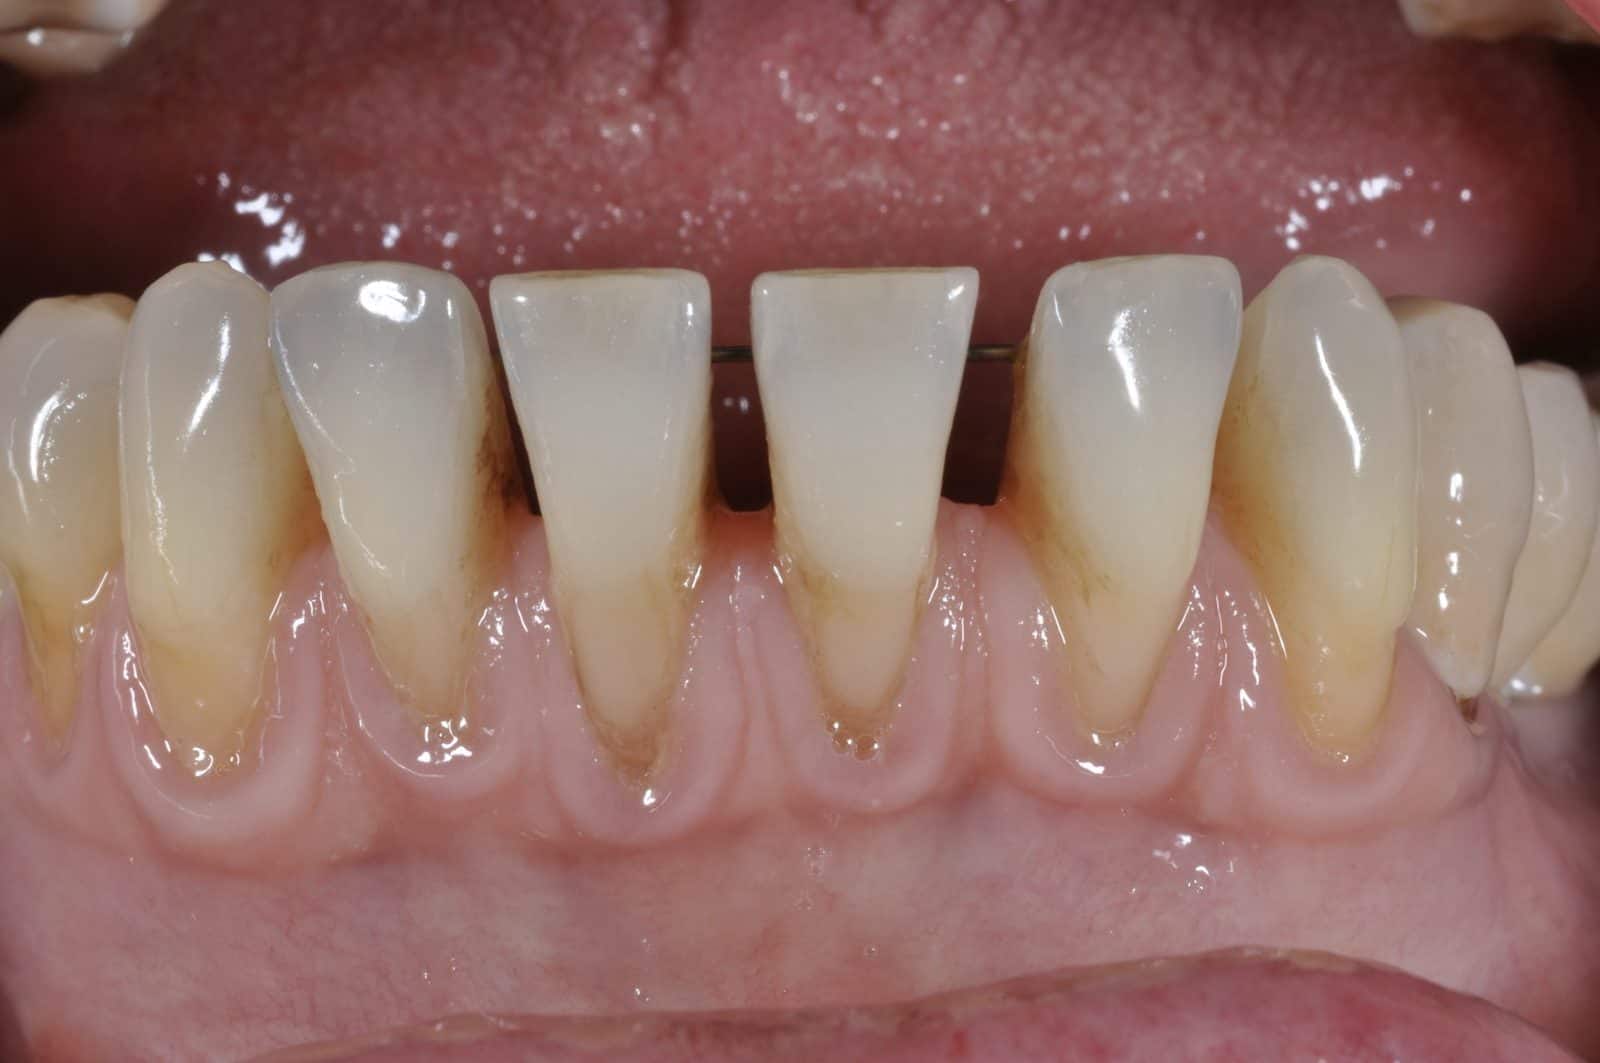
Teeth that move apart. Lower front teeth pushed forward and apart by a bite that lands on them instead of on the back teeth. Gaps that were never there before are a sign of lost support, not of ageing.
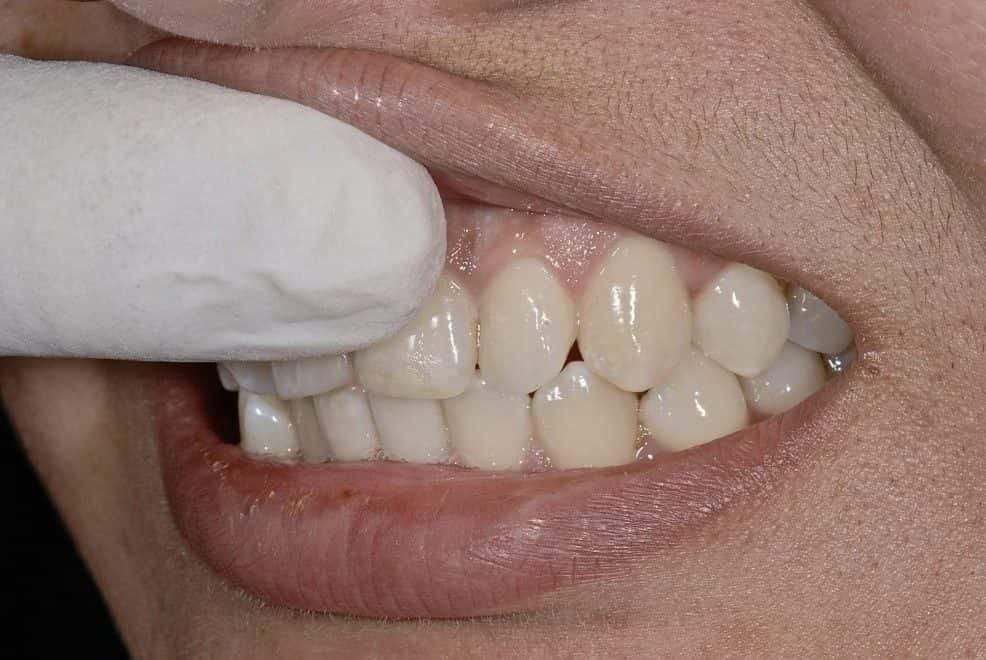
Teeth you can feel vibrate. A fingertip rests on the upper front teeth while you tap together. If the teeth buzz under the finger, they are taking an impact they were never meant to take. Simple test, and it rarely lies.
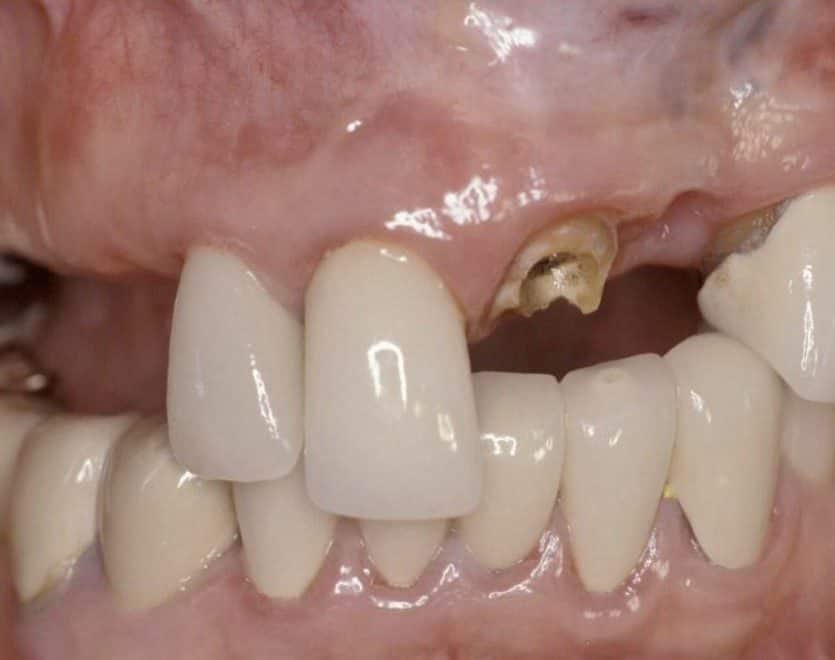
Crowns that keep breaking. A front crown sheared off its tooth. When a restoration fails in the same place more than once, the question is not what it was made of. It is what was hitting it.
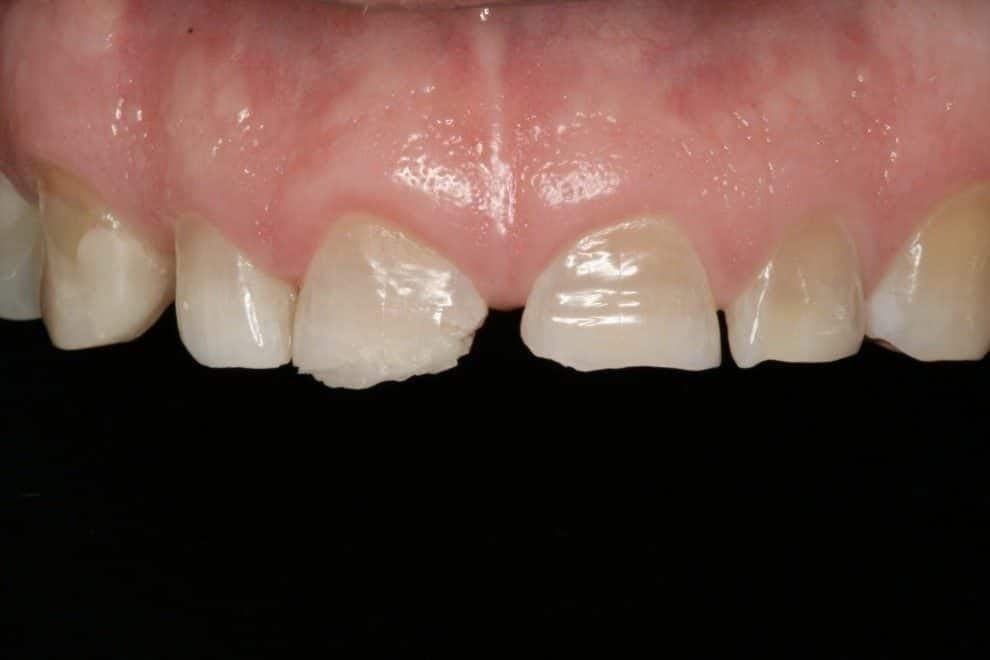
Edges that chip and wear. Chipped and shortened edges on the upper front teeth of a patient with no back support. On an X-ray the same overload shows as a widened ligament space around the root. These teeth are being used as molars.
This is why I will not finish the front of a mouth, however beautiful the plan, until the back is solid. That does not always mean rebuilding every molar. In a full-mouth implant reconstruction, a shortened arch, teeth back to the premolars or first molars rather than all the way to the wisdom teeth, can be very successful, provided the implants are well spread, every tooth sits over support with no overhang behind the last implant, and the shorter arch is not visible when you smile. What matters is that the back stops are real and the load is carried where it lands, not how many teeth are on the bridge.
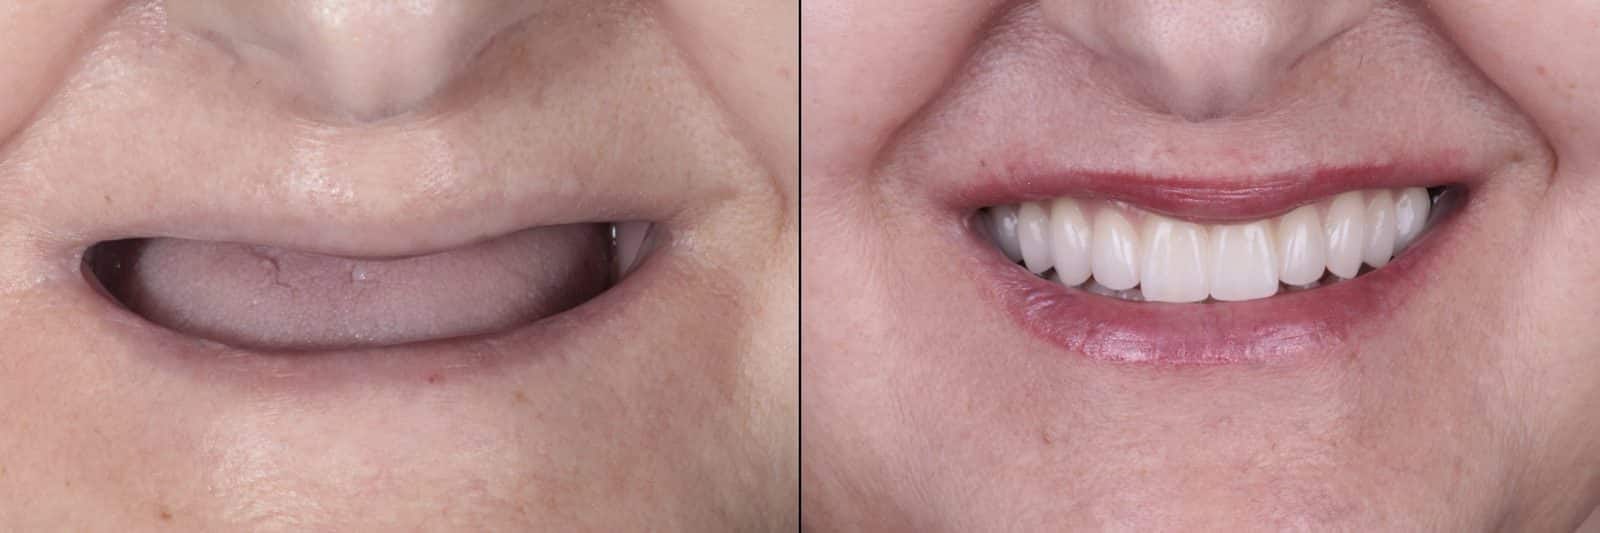
Nothing missing from the smile. Before and after, same patient. The arch stops at the first molars and no one, including the patient, can see it. What they can see is the lip support and the smile.
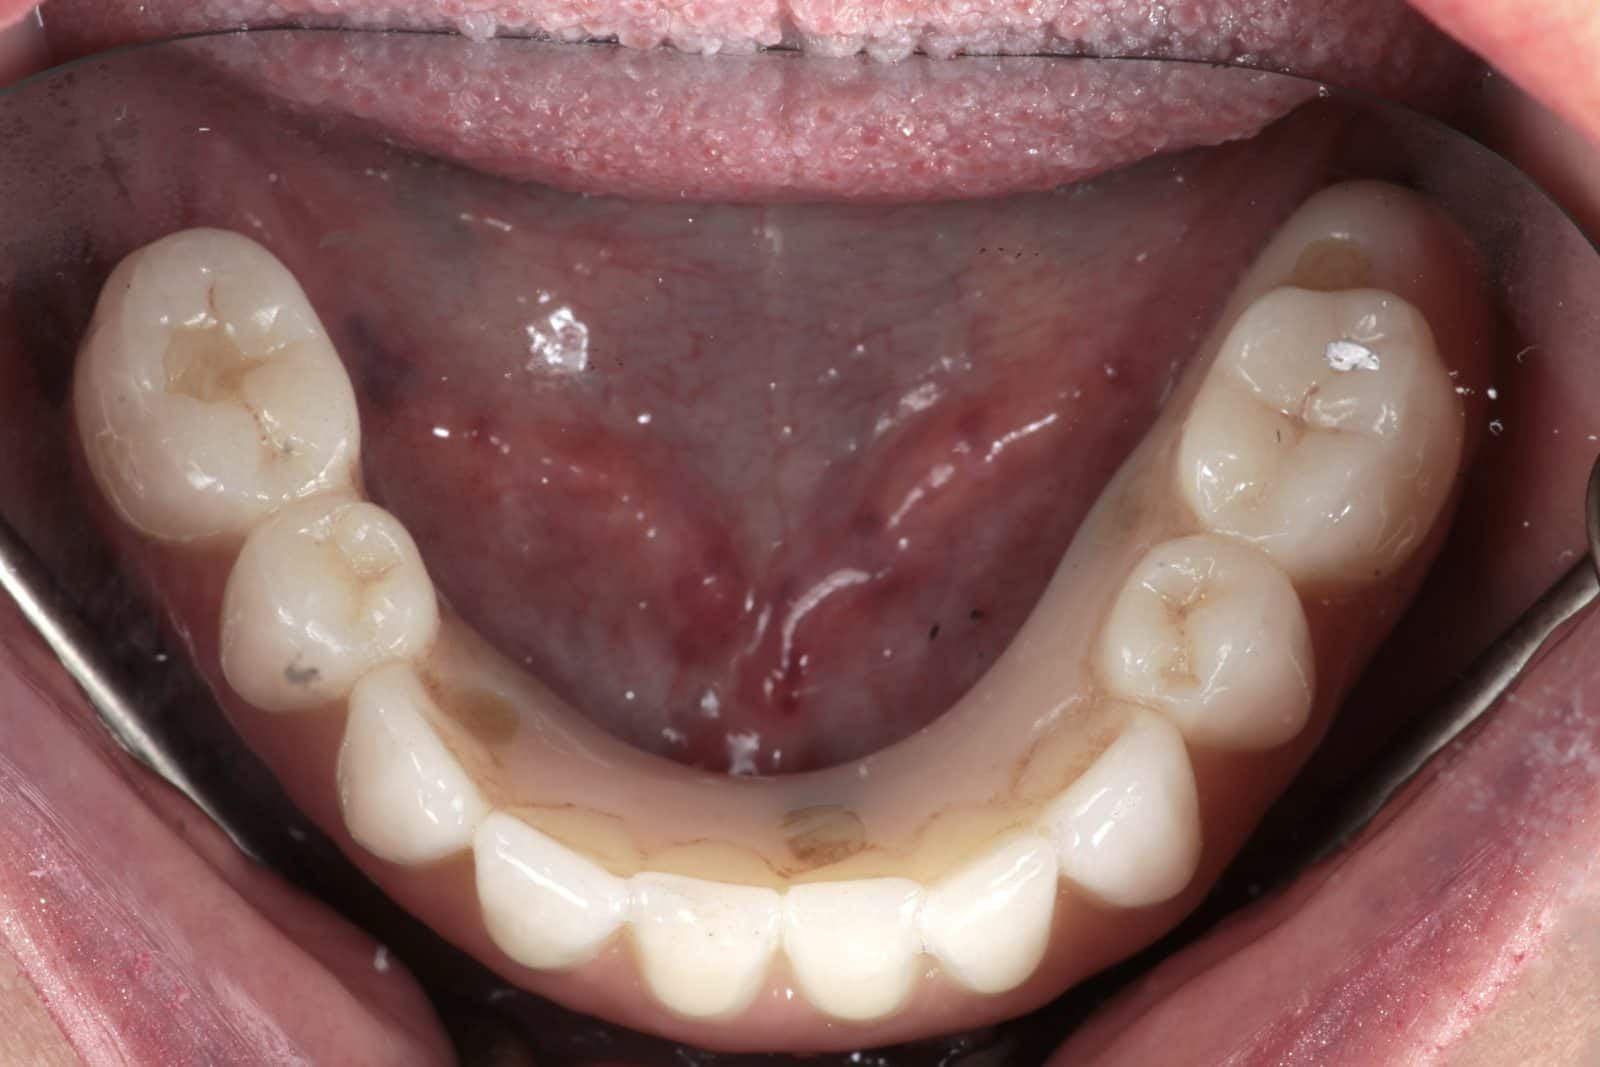
Every tooth over support. The lower arch of a full-mouth implant reconstruction, finished at the first molars. The last tooth sits directly over the last implant. Fewer teeth, better engineered, and nothing hanging in space to act as a lever.
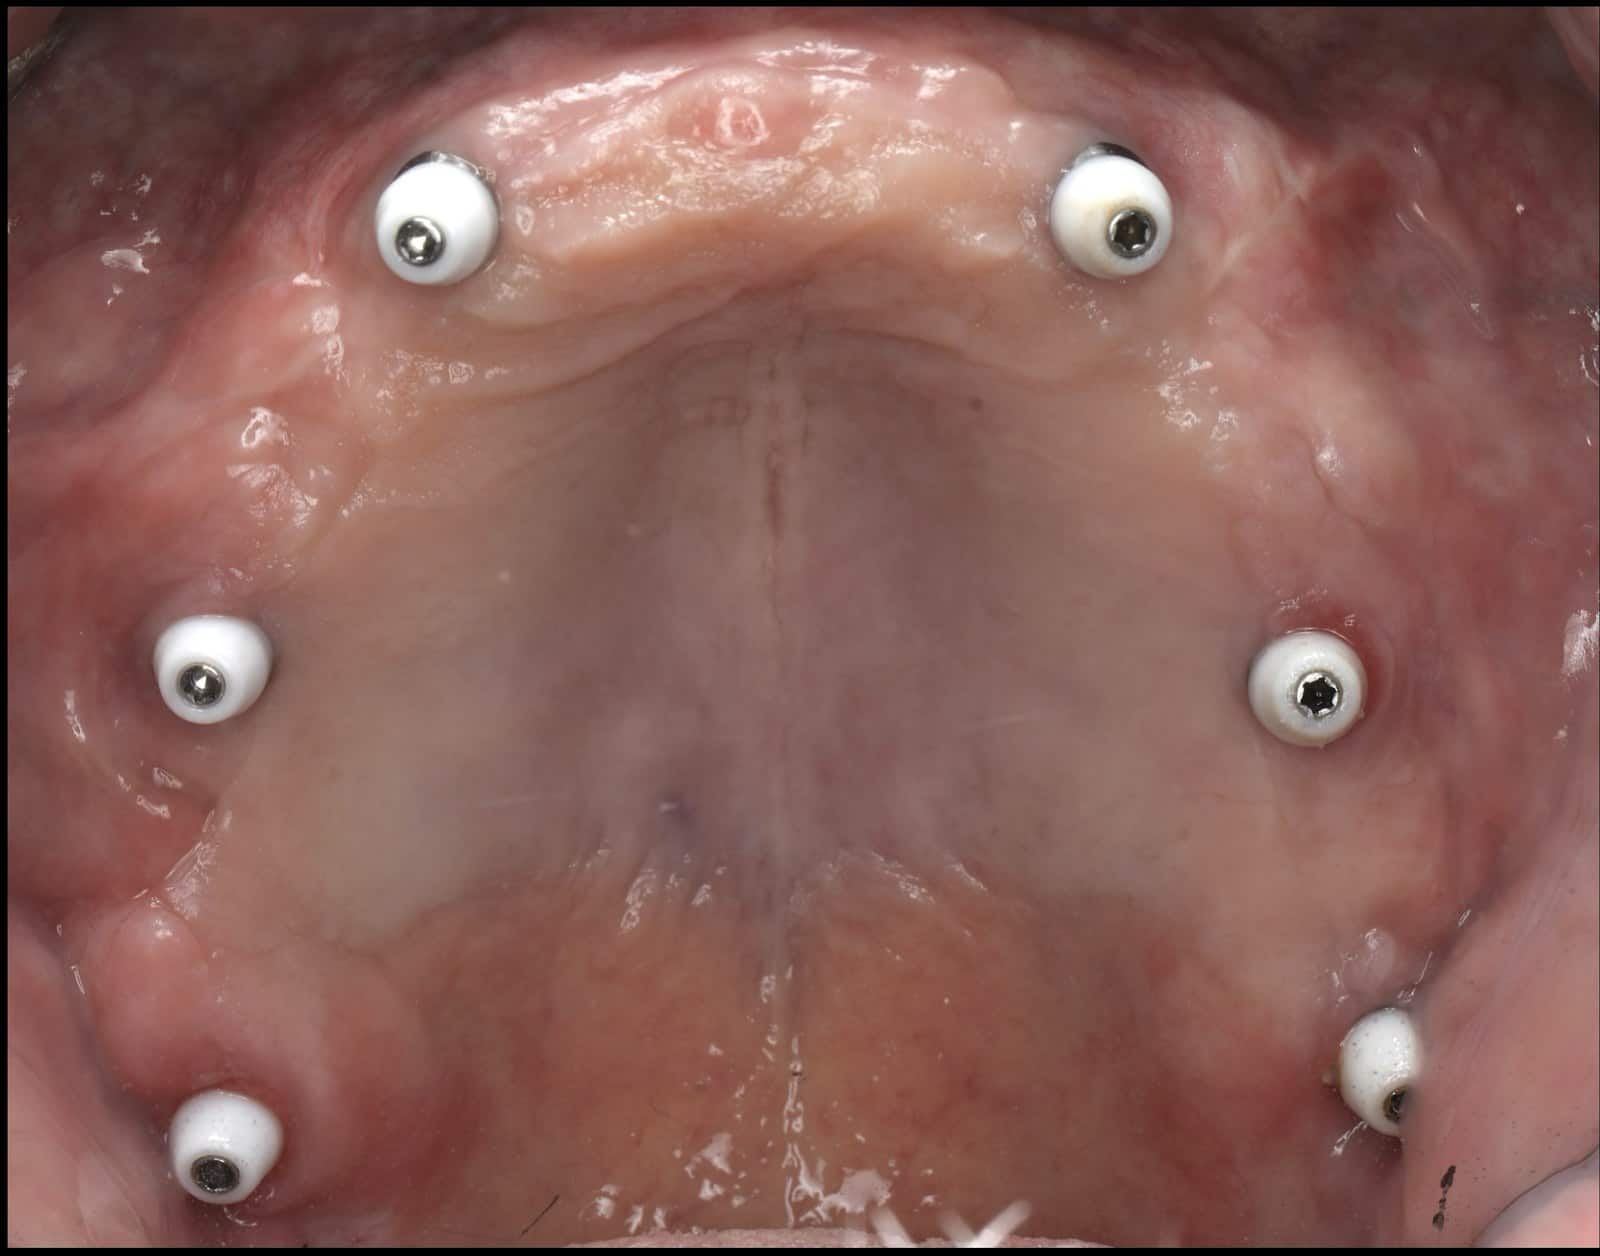
Support where the load lands. Implants spread from the front to the back of the arch, so chewing forces go straight into support. Spread matters more than number: a crowd of implants in the wrong place does not reduce the risk.
Definitive front teeth are never made on an unsupported bite. Even with ideal bone and perfectly placed implants, a reconstruction built on weak posterior support will overload, and the screws, the ceramic and eventually the implants pay for it.
Eight rules I apply to every full-arch case
These are not preferences. They follow from how force behaves on a rigid structure, and from thirty years of seeing what happens when one of them is skipped.
- 1Stabilise the lower jaw first. A lower jaw left loose during treatment drifts, overloads the front teeth and loses its vertical position. I fix it early, with teeth or implants, so there is a stable platform to build the upper against.
- 2Enough chewing units at the back. My baseline is eight posterior chewing units, both sides, balanced; a well-spread shortened arch with no overhangs meets it. Younger patients and heavy biters need more. I decide early whether that support can realistically be built; if it cannot, the plan changes.
- 3Controlled guidance at the front. The front teeth separate the back teeth as you move, with the shallowest, smoothest slope that will do the job. Steep slopes multiply force.
- 4No overhangs. A tooth hanging off the back of a bridge with nothing beneath it is a lever. Modern techniques, such as implants in the dense bone behind the upper jaw, let me place support where the load is instead of cantilevering out to it.
- 5Find the grinding and the high spots. Night-time clenching and grinding can defeat even a well-designed bite. I screen for it, treat it, and remove any contact that makes the jaw slide-and-hit.
- 6Link the implants where it helps. Joining implants into one framework shares every load across all of them, and keeps teeth from separating as the jaw continues to change shape over a lifetime. The fit must be perfectly passive, which is where digital measurement earns its keep.
- 7Spread before number. Where the implants sit decides what the prosthesis can be. Well-spread implants outperform a crowd of badly placed ones.
- 8Prove it in temporaries. Bite, speech, comfort and appearance are all tested in provisional teeth before anything is made permanent. If a tooth cannot provide reliable long-term support, this is where I find out, and where the decision to keep or remove it is made for good.
PrincipleWhen in doubt, over-engineer. Decisions about which teeth to keep are made once, decisively, with long-term support and protection of the front teeth as the priority.
Our Beverly Hills office at 414 N. Camden Dr., Suite 750 opens in January 2027. Until then, call (310) 444-5217 and we'll arrange your consultation.
The slope of your front teeth decides how hard you bite
The single most important decision in the whole reconstruction, for both how it looks and how long it lasts, is the angle at which your lower front teeth slide against the backs of your upper front teeth.
When that slope is shallow and smooth, the back teeth separate the moment you move your jaw, the muscles relax, the joints are unloaded and very little force reaches the front teeth or the implants. When the slope is steep, as it is in many people with a deep bite, every sideways and forward movement rams the lower teeth into the uppers. The muscles work harder, the joints load more, and the result over time is chipped ceramic, loose screws and worn or fractured front teeth. There is a third pattern I see often, the “fenced” bite, where the upper front teeth overlap the lowers deeply but with almost no gap in front of them. The lower jaw is literally fenced in; it cannot move without hitting something.
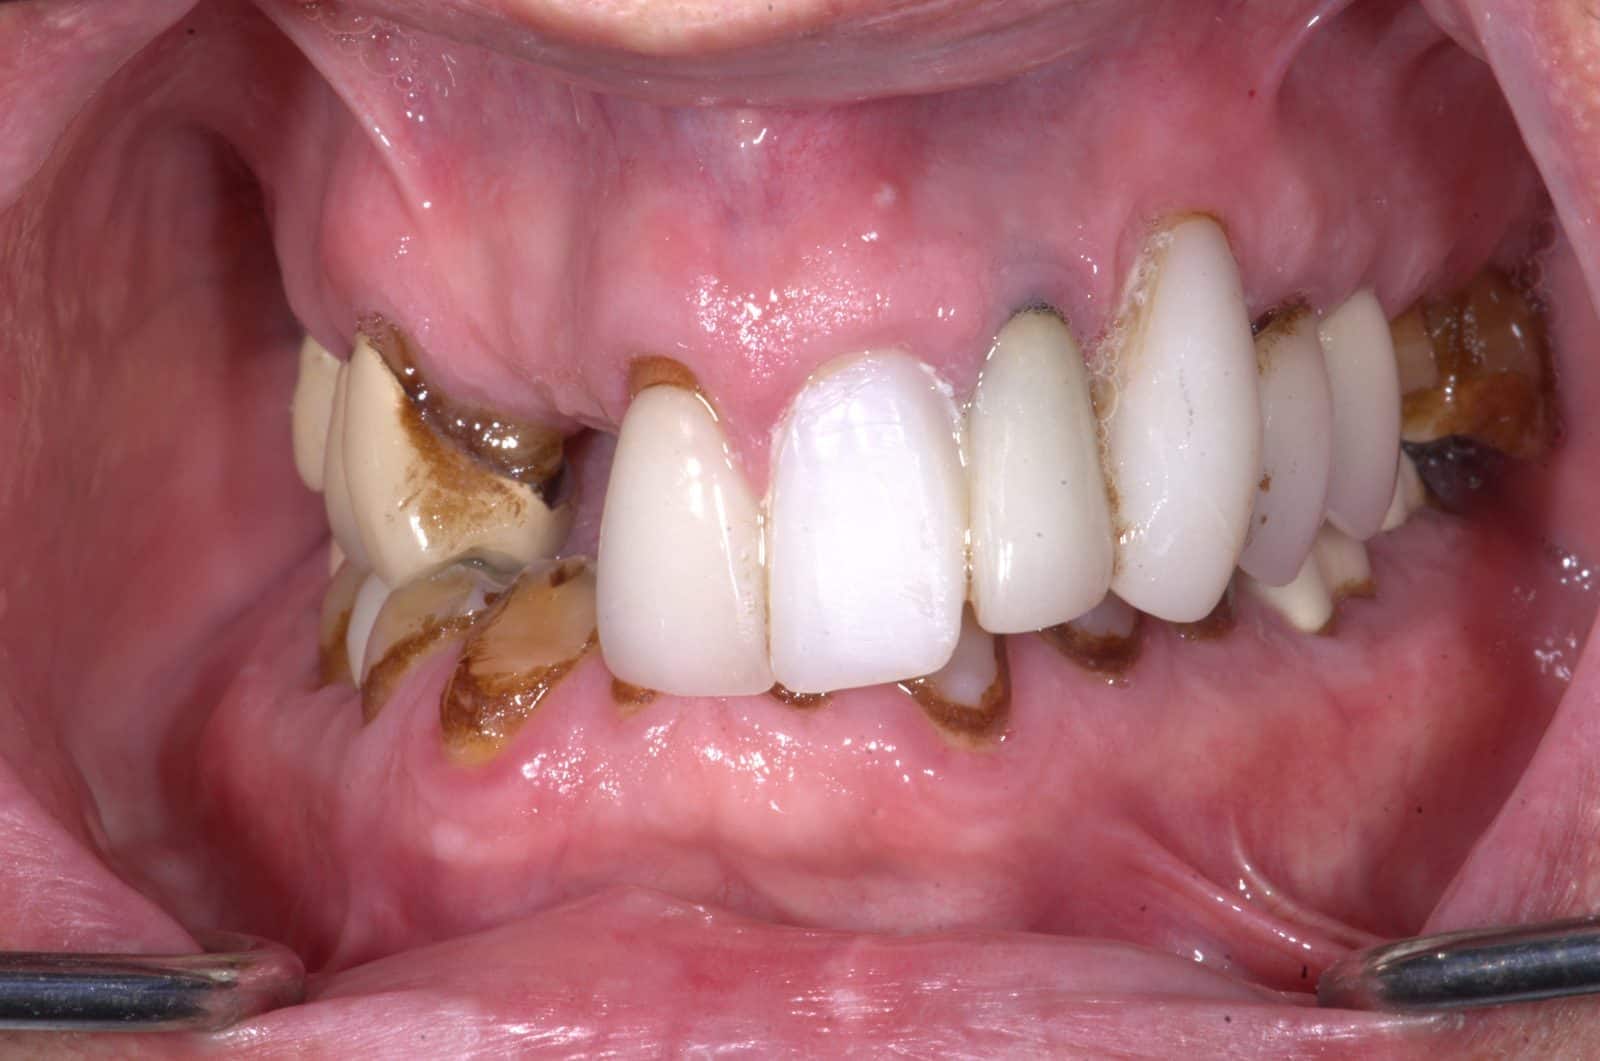
The back teeth have worn away and the bite has closed down, so the upper front teeth drop almost entirely over the lowers. Every movement of the jaw drives the lower teeth up the near-vertical backs of the uppers. On implants, this is how screws loosen and porcelain chips.
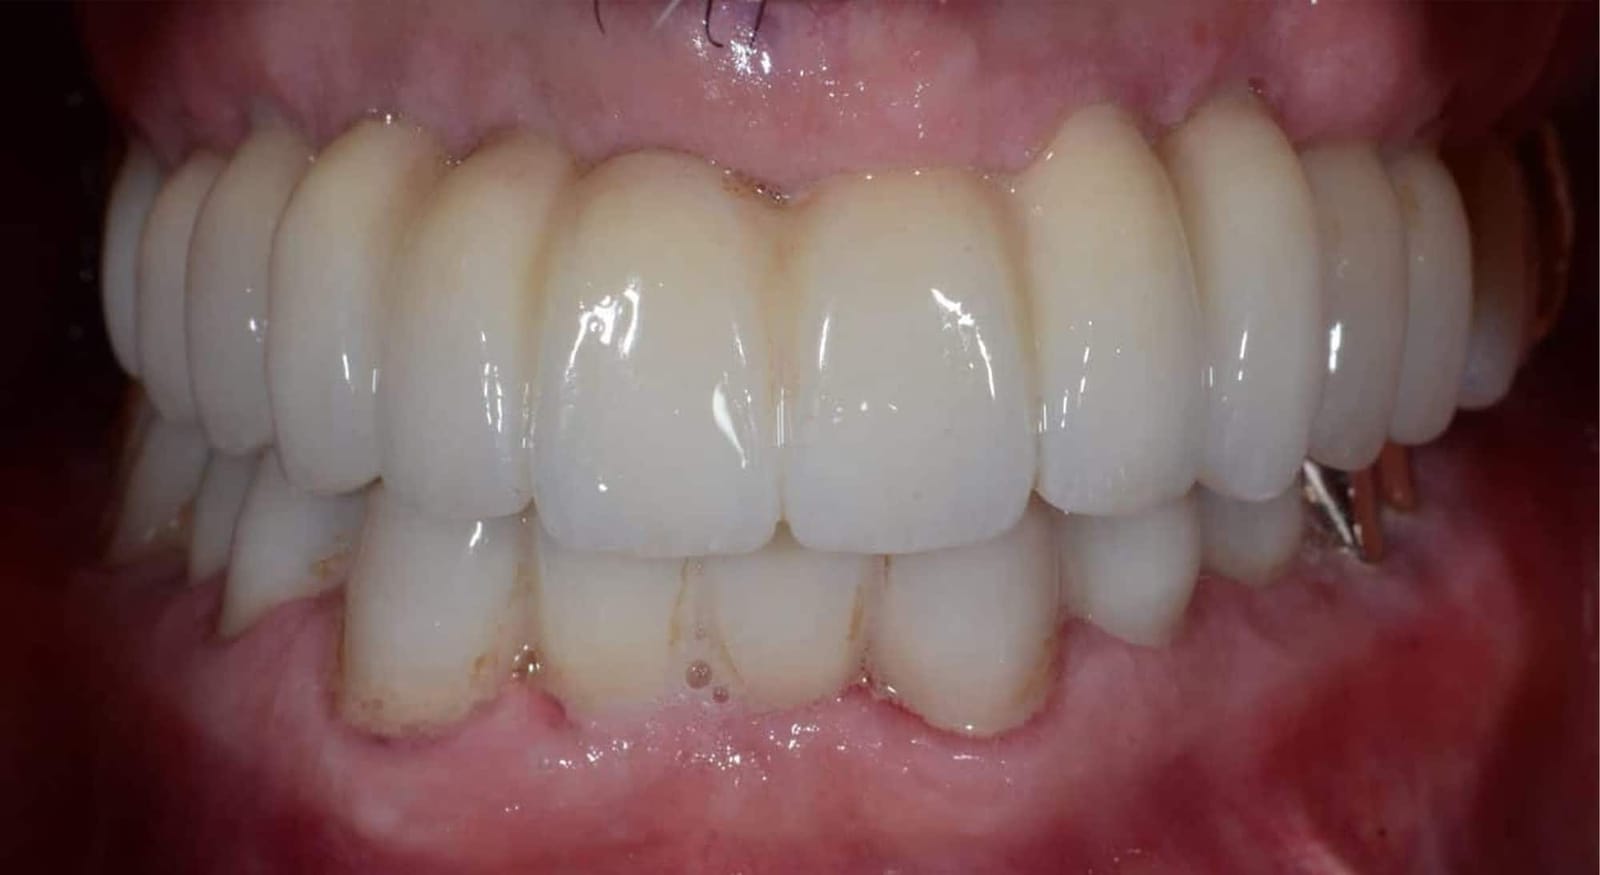
The same patient, rebuilt. The bite height is restored, the overlap is about a fifth of the lower front tooth, and the slope is gentle. The back teeth separate the moment the jaw moves. Muscle activity drops, and so does the load on everything.
Opening the fence. Flattening the inside slope of the upper front teeth and giving the lower jaw a little room in front turns a fenced bite into a free one. Even a modest change in the angle produces a disproportionate drop in force. With a full-arch reconstruction I can usually build this into the design, because I am choosing where every tooth goes.
The targets I work to are specific: a vertical overlap of roughly 15 to 20 percent of the lower front tooth's height, just enough horizontal room to keep the slope gentle, lower front teeth with a crisp leading edge rather than a rounded one, and upper and lower sliding surfaces as parallel as possible so they glide instead of catching. The upper side teeth are deliberately made slightly shorter than the central ones, so that when the jaw swings wide and returns, it does not clip them.
Most importantly, the intended guidance decides where the implants go, not the other way round. If the front teeth need to be in a different position or at a different angle to make the bite safe, that is settled before surgery, so the implants are placed to support the teeth you will actually have.
Your jaw should always know where home is
Think of your lower jaw as a tripod standing on three points: the two jaw joints at the back and the front teeth, the idea Peter Dawson built his approach to occlusion around. All three have to be stable in the jaw's natural, relaxed, seated position, at the right height. If the front stop is weak or a back tooth is in the way, the tripod tips, and force concentrates where it should not.
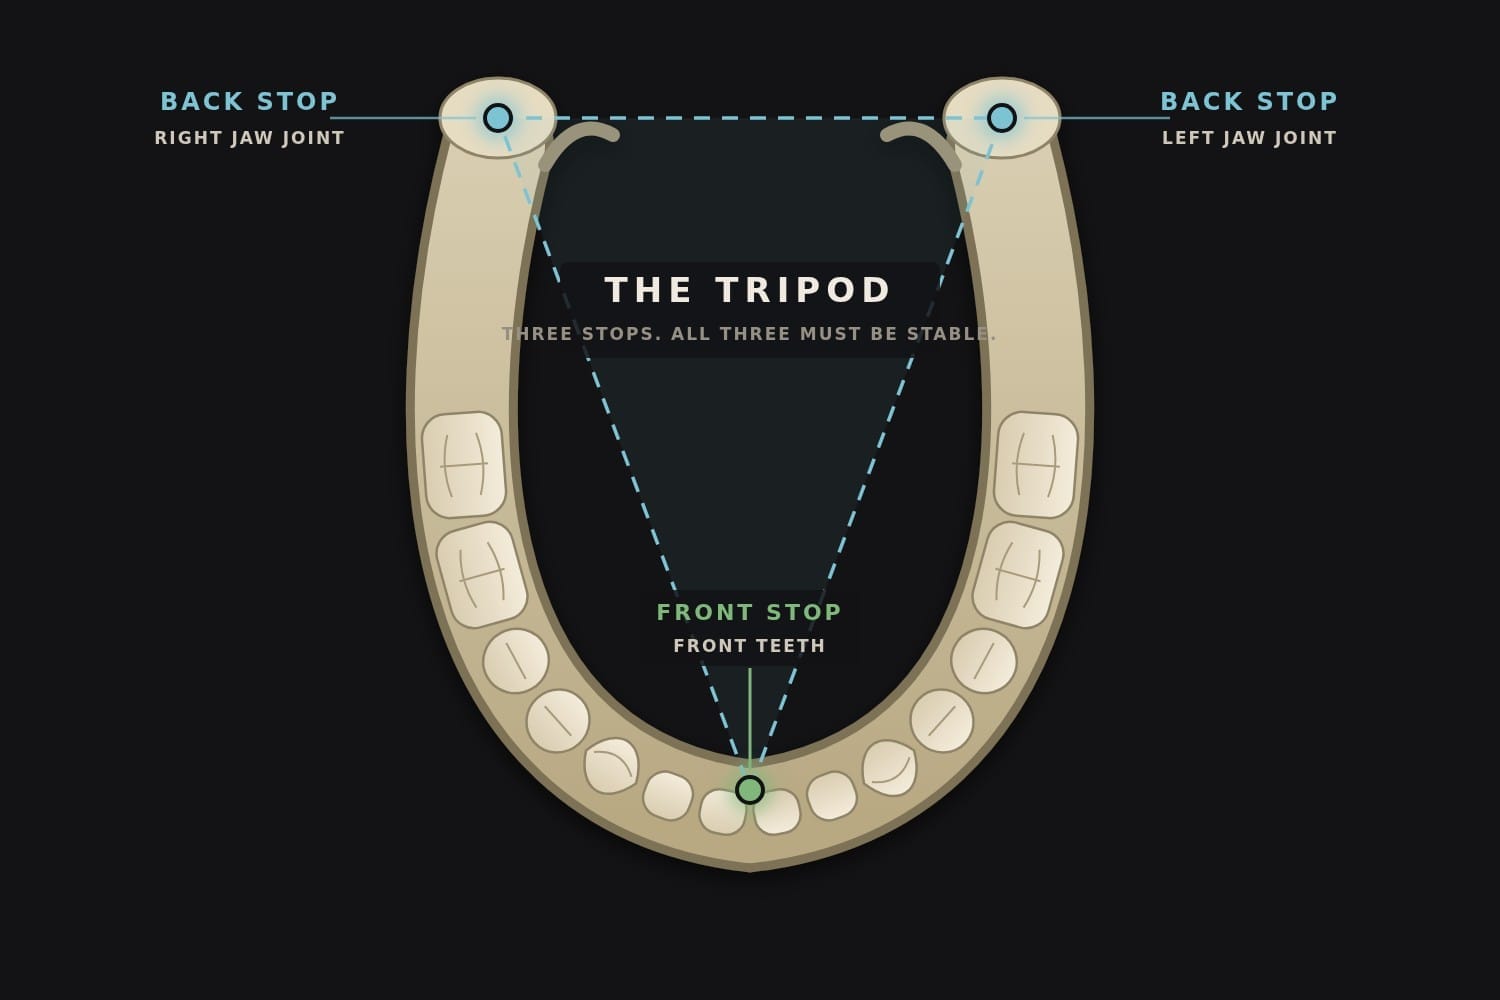
The two jaw joints are the back stops; the front teeth are the front stop. Each lower front tooth rests against a defined ledge on the inside of an upper tooth, and that is where the vertical height of the whole bite is held. Rounded or vague contacts there let the tripod tip.
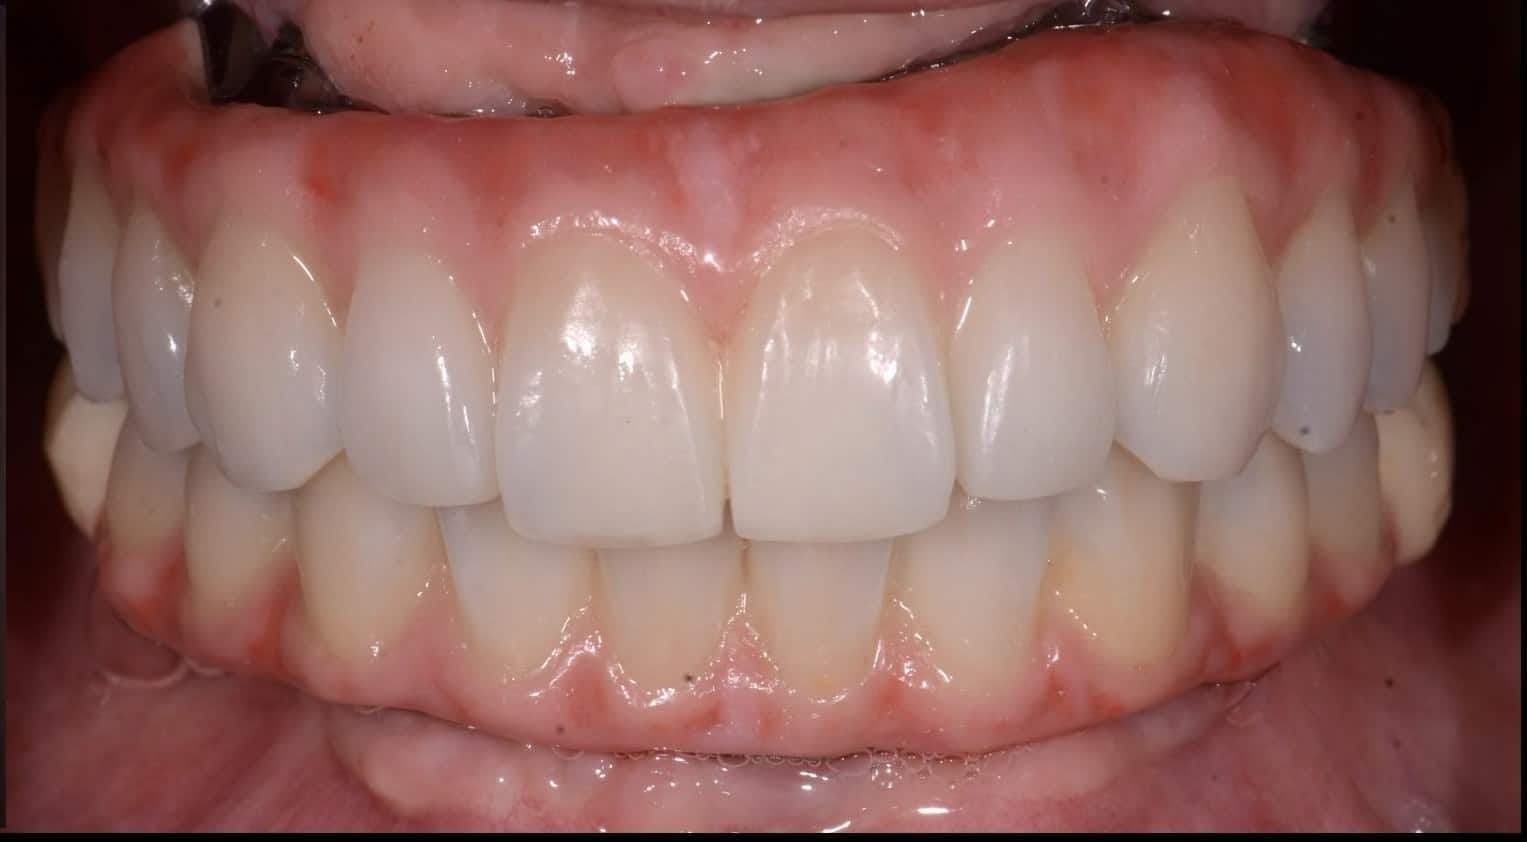
Once the final teeth are in, every back tooth meets its partner at the same moment, and the front teeth touch just slightly more lightly, enough to grip a thin strip of foil. You always know where to bite, without the front teeth being overloaded.

Even contact all the way round. The same bite from the right, the front and the left. Both sides land together, the back teeth carry the load, and the front teeth guide. This is what the tripod looks like when it is built into the teeth.
Some schools of thought give the jaw a broad, flat area to close into, so it can land anywhere. I do not use this on implants. Patients tell me they feel unsure where to bite, and an implant mouth has no ligament to resolve the uncertainty. I would rather give you one definite home and make the front teeth very slightly lighter than the back, which gives the comfort of freedom without the cost.
A detail that patients rarely hear about: the distance between your upper and lower canines, held by those front stops, also controls how much room there is at the back for the molars. Lose a little at the front and you can lose a surprising amount of space at the back, enough to leave the last molar unrestorable. Every millimetre at the front is guarded for that reason.
Our Beverly Hills office at 414 N. Camden Dr., Suite 750 opens in January 2027. Until then, call (310) 444-5217 and we'll arrange your consultation.
You live with it before I finalise it
No amount of planning on a model or a screen can tell me how your lips, tongue and muscles will respond. So nothing in the bite is made permanent until you have lived with it in a set of carefully made provisional teeth, for at least four weeks.
What the temporaries test
- The height of your bite and whether your muscles are comfortable at it
- The slope of the front teeth: if a screw loosens or a provisional comes off, the guidance is too steep and we adjust it
- Speech: F and V sounds set the length of the upper teeth, S sounds set the space between them, T and D sounds set their inside shape
- Lip closure and the neutral zone, the place where your tongue, lips and cheeks let the teeth live
- How it looks, in your face, in daylight, for weeks
How the final teeth inherit it
- Once the bite is stable and comfortable, the provisional is scanned
- Every contour and contact that passed the test is copied digitally into the final restoration
- The framework is checked for a completely passive fit before it is finished
- The final teeth reproduce a bite that has already proven itself, rather than one we hope will work
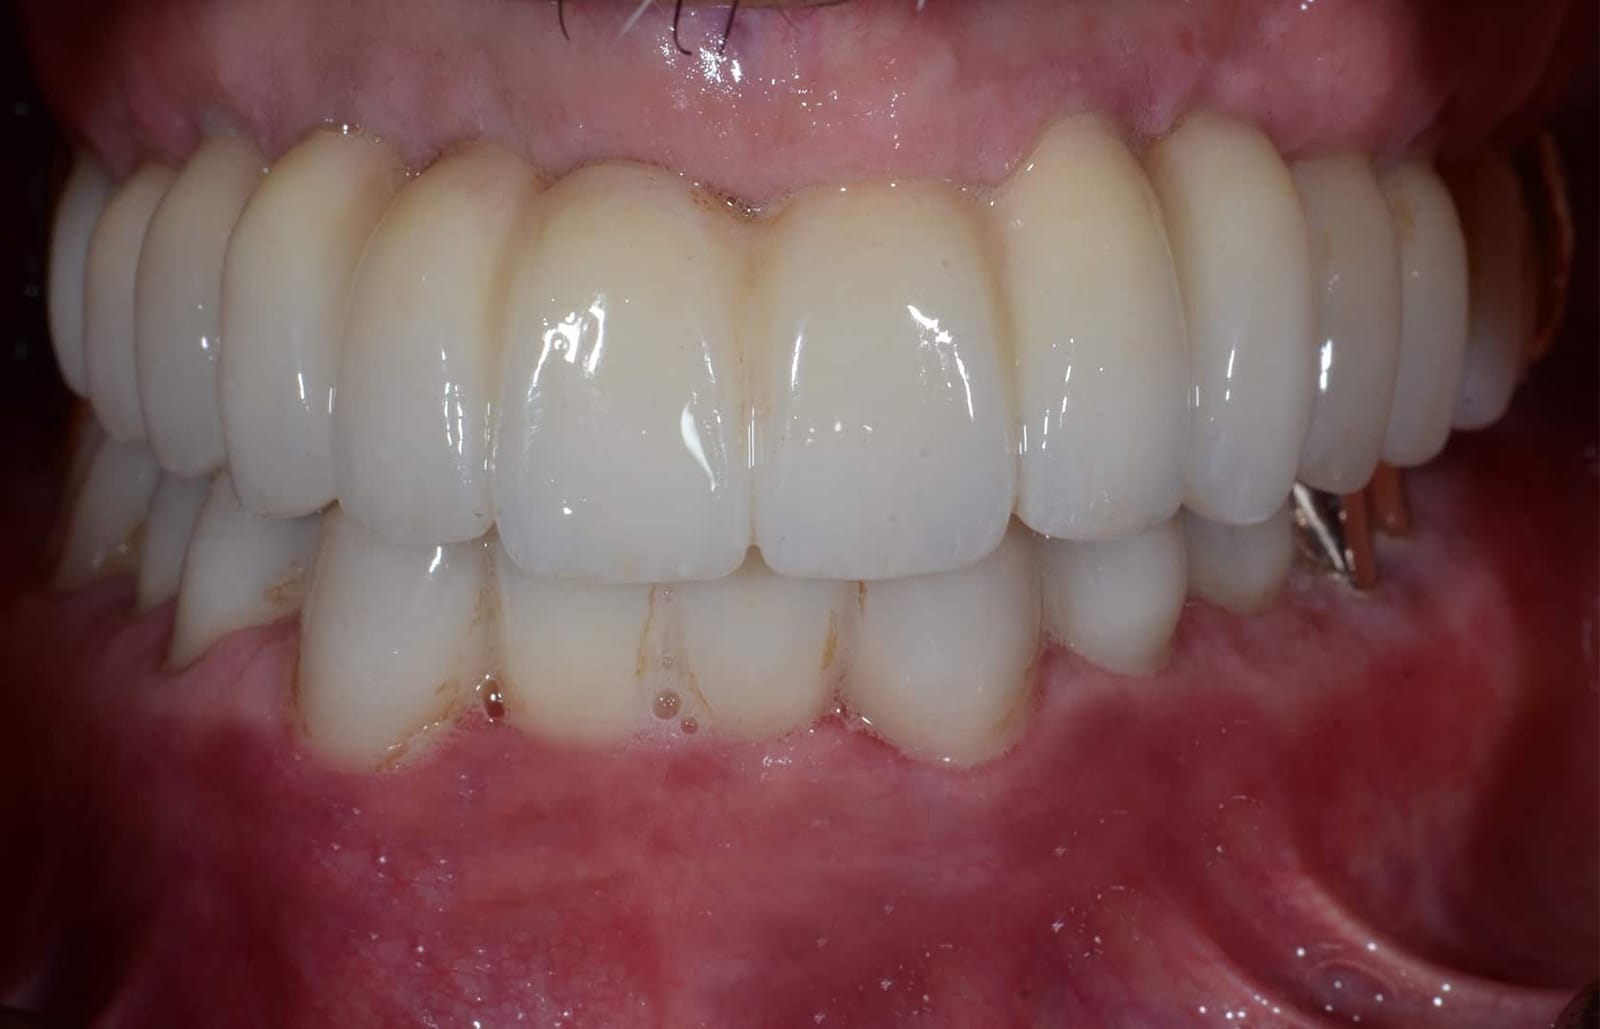
A bite that was tested first. Every contact you see here was first worn, spoken with and chewed on in provisional teeth, then copied.
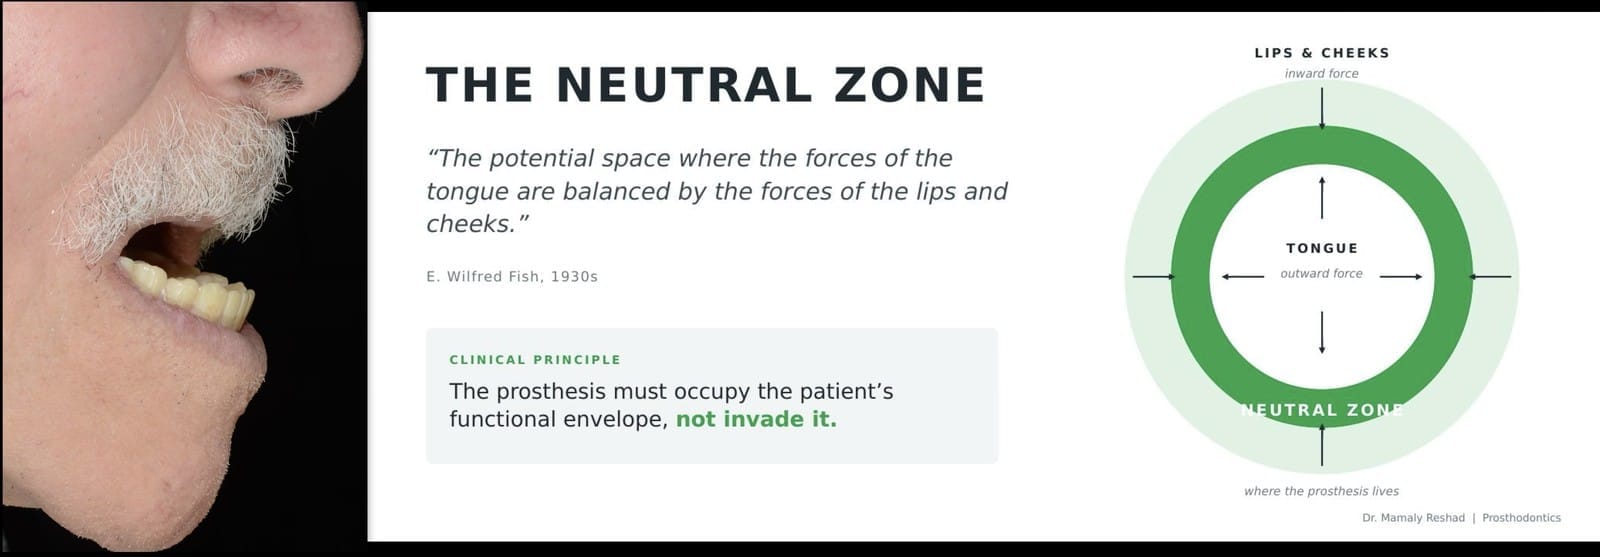
The space your mouth allows. Teeth that sit where the tongue pushes out and the lips push in equally are comfortable, stable and easy to speak with. Teeth placed outside that zone fight the muscles every day.
After delivery, the bite is checked at every maintenance visit, because wear and small movements introduce new high spots over the years. Patients who grind are given a night guard, as a matter of course, to protect the investment.
Understanding the plan before the surgery.
Implant surgery has become very good. Guided placement, immediate teeth, same-day smiles. What has not kept pace is the thinking before it: where the lip goes, where the seam will sit, whether the lip will still be supported, whether there is room for the materials chosen. Those are prosthodontic questions. They are decided by the person who designs the teeth, and they have to be decided first, because once the bone is shaped and the implants are in, the answers are fixed.
A prosthodontist is a dentist with specialist training in exactly this: planning the end result first and working backwards to the surgery. Fewer than two percent of dentists are prosthodontists. Dr. Reshad has been one for more than thirty years, in London and Beverly Hills. The classification on this page is his own work, published in the textbook surgeons train from, and he teaches it to clinicians in the United States, Europe, China and Australia. When you sit in his chair, the person who wrote the method is the person applying it to you.
The person who designs your teeth should plan your surgery.
- First visitDenture out. Video of the lip at maximum: exaggerated smile, the E sound. Highest lip line marked.
- ClassificationClass I to V assigned. Lip support tested with and without a flange. Restorative space measured.
- Design before surgeryDigital preview of the planned teeth in your own smile. Seam placed 2 to 3 mm above the lip line, or designed out. Class IV converted. Class V told the truth.
- Then, and only then, surgeryThe surgeon works to a plan that already knows what the lip will reveal.
Our Beverly Hills office at 414 N. Camden Dr., Suite 750 opens in January 2027. Until then, call (310) 444-5217 and we'll arrange your consultation.
New teeth, big smile, and a line across it.
The regret patients most often bring to Dr. Reshad after full-arch implants elsewhere is not pain or cost. It is a line across the smile, where pink ceramic meets their own gum, on show every time they laugh. Whether that happens to you is decided at the very first visit, by how far your lip lifts. Dr. Mamaly Reshad, a specialist prosthodontist in Beverly Hills, wrote the classification that surgeons use to read it. Here is what it means for you.
Full-arch implant teeth usually replace gum as well as teeth. The pink part is ceramic. Your own gum is above it. Where the two meet there is a seam, and no ceramist on earth can make living tissue and ceramic look like one thing. The seam cannot be masked. It can only be hidden under the lip.
So everything depends on one question that has to be answered before surgery: when you smile as hard as you can, where does your lip stop? If the seam ends up below that line, you will see it every time you laugh, and so will everyone else. By then the bone has been shaped, the implants are in, and the only ways out are a second operation or living with it.
Dr. Reshad regularly sees patients who arrive in exactly that position. That is why, in his practice, your lip is read before anything else is planned.
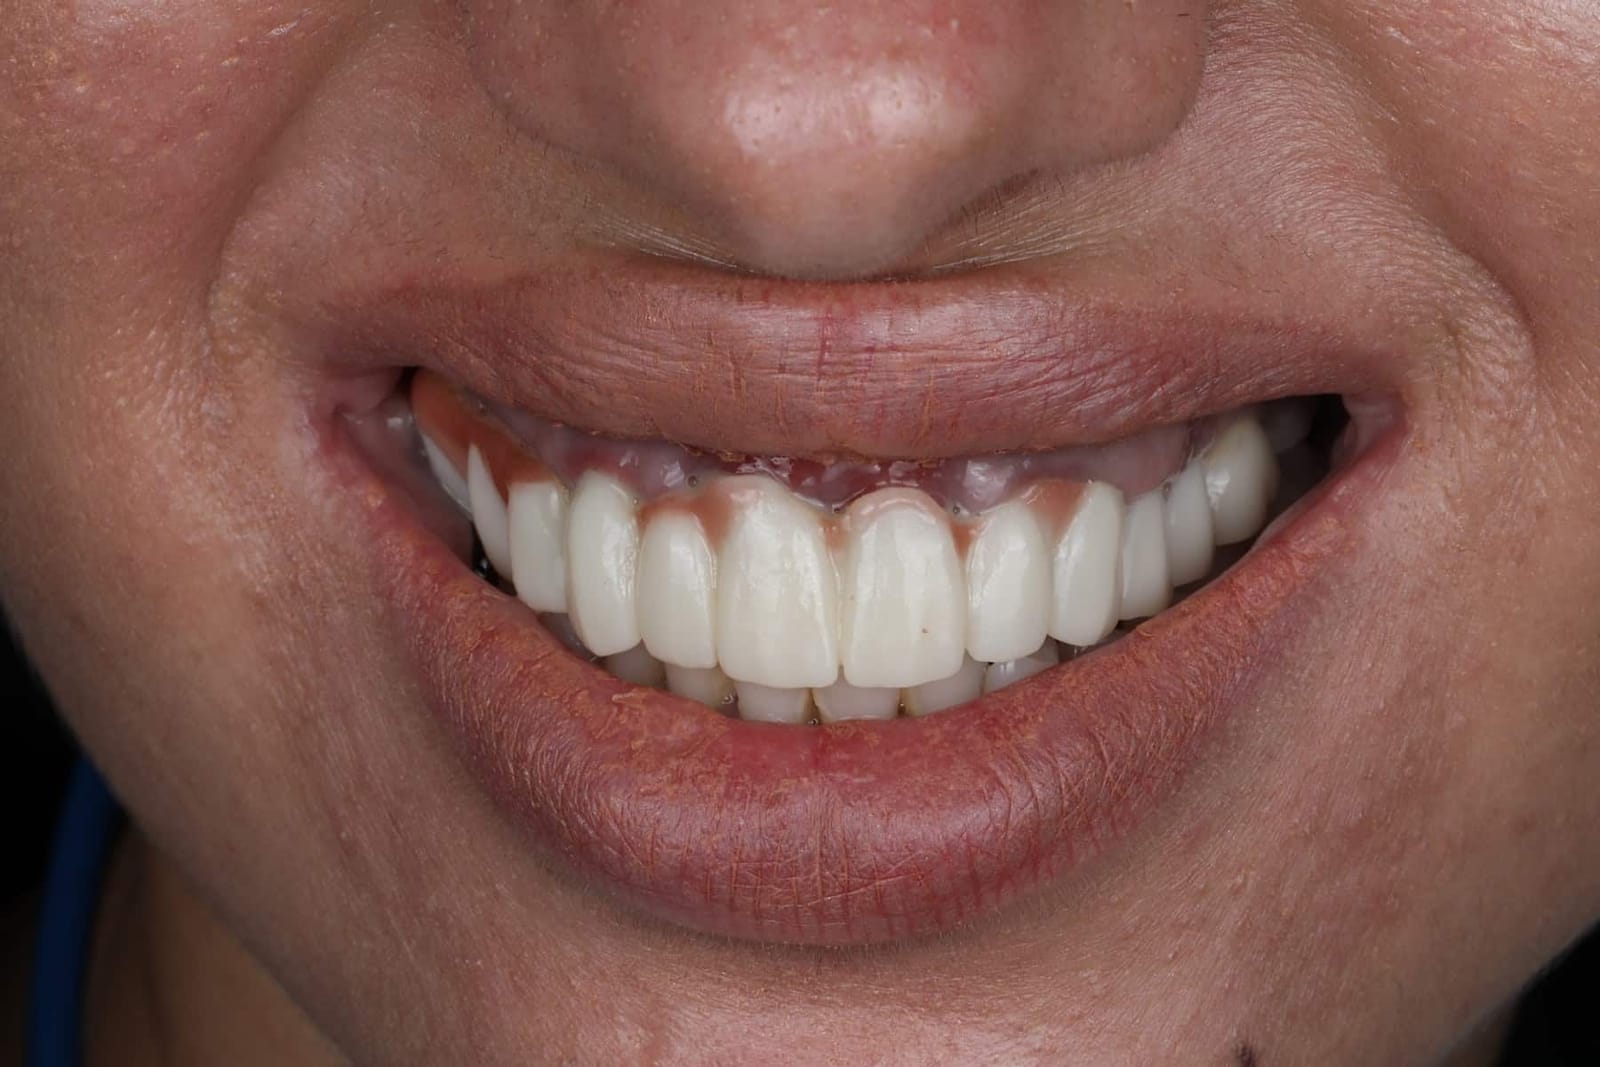
“Take the denture out. Say E, and smile with your eyes as hard as you can.”
Everyone's lip lifts differently, and most people's lip rises further when they laugh with friends than when they pose for a photo. So your lip is not judged from a polite smile. That is the whole examination, and it is the one most patients never get. Without the denture, the lip shows where it really goes. If the gum ridge is visible at that moment, the seam of a fixed prosthesis will be visible too, because the seam sits on the ridge.
Dr. Reshad films it. The lip line used for planning is the highest position the lip reaches anywhere in that video, exaggerated smile and the E sound included. The design is then built so that the seam sits 2 to 3 millimetres above that line. Not at it. Above it, with a safety margin, because lips move more when people laugh with friends than when they sit in a dental chair.
2 to 3 mmabove the highest lip line, at maximum mobility
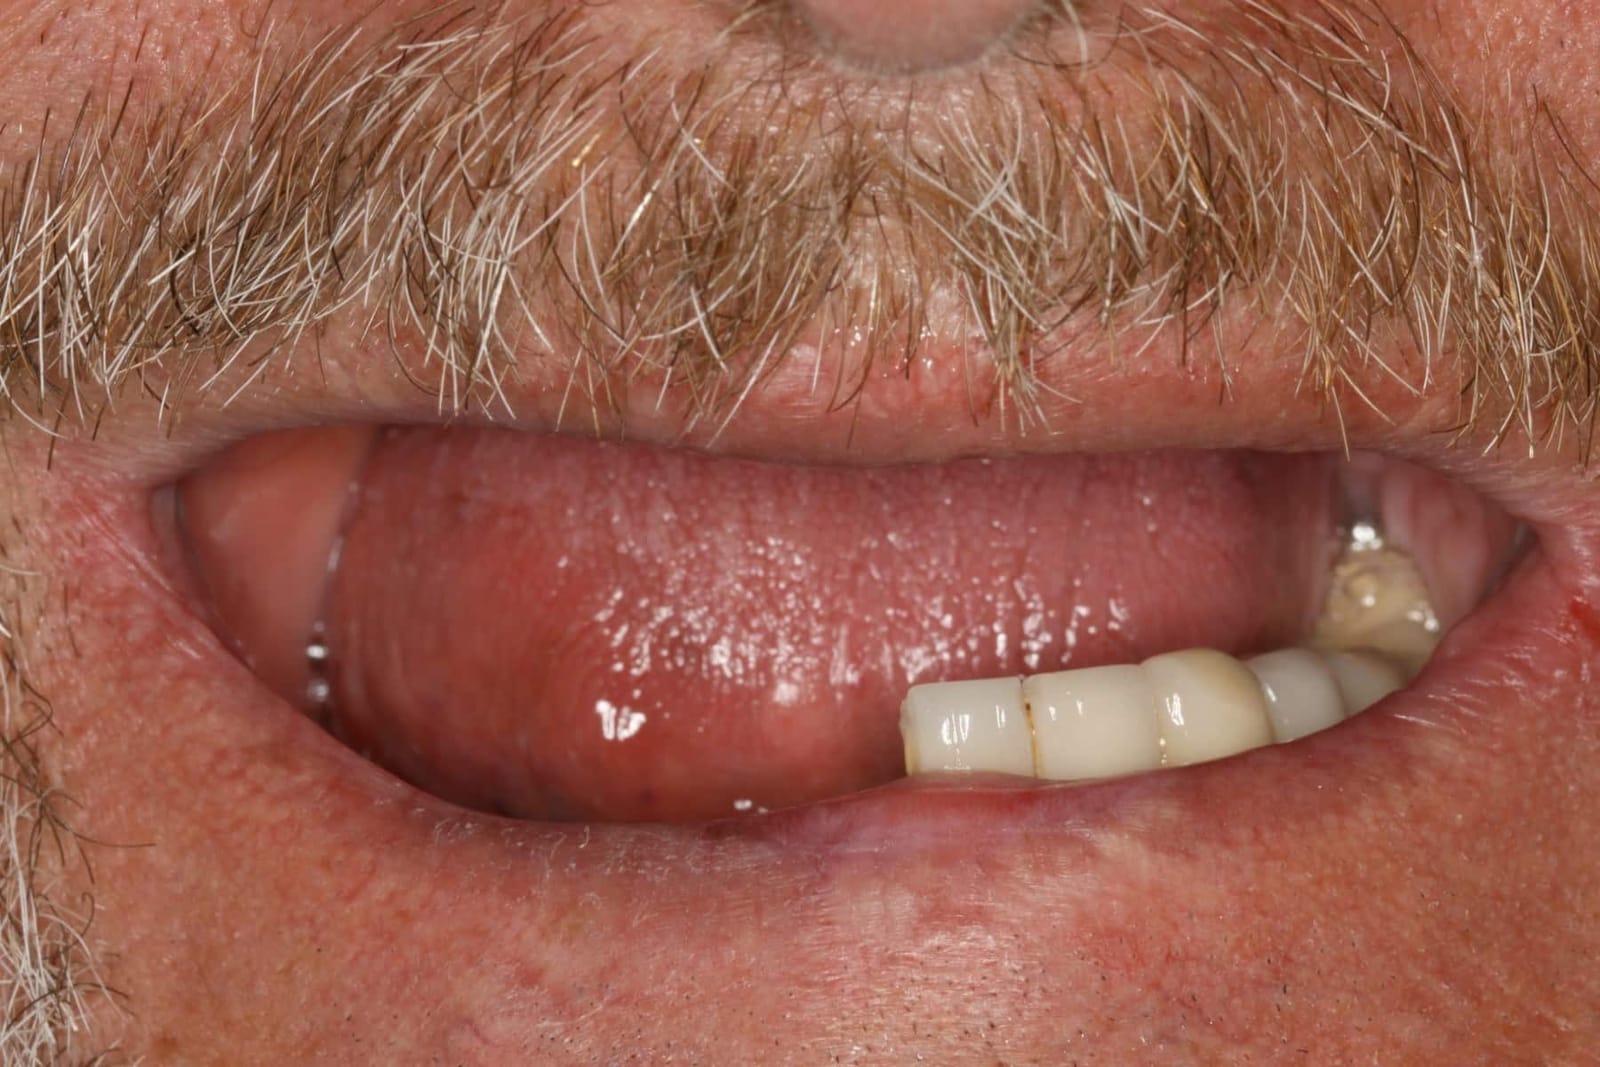
Smile without the denture. The ridge shows below the lip. Whatever is built here will show its seam.
Ridge hidden by the lip. The seam can be placed out of sight.
Ridge below the lip. The seam will show unless the plan changes.
Our Beverly Hills office at 414 N. Camden Dr., Suite 750 opens in January 2027. Until then, call (310) 444-5217 and we'll arrange your consultation.
Five classes. One of them is yours, and it decides everything that follows.
Dr. Reshad first published his classification of the toothless upper jaw in the surgical textbook used to train oral and maxillofacial surgeons. In 2026 he rewrote it as the Lip-Line Classification: five classes, from the smile where a seam is easiest to hide, to the one where fixed teeth should not be promised at all. Every patient fits one. Knowing yours before surgery is what makes the result predictable.
| Class | What shows when you smile | What is built | Before surgery |
|---|---|---|---|
| I | Teeth only. Your own gum shows, and it is healthy enough to keep. | Natural-looking teeth emerging from your own gum. No pink. | Protect the bone and gum you have. |
| II | Teeth only. Your gum line stays under the lip, even at a full smile. | Teeth only, slightly longer. No pink. | Confirm your lip line on video. |
| III | Teeth and gum. The seam sits under your lip, even laughing. | Teeth and gum in one piece, seam hidden. | Place the seam 2 to 3 mm above your highest lip line. |
| IV | Teeth and gum. The seam would show in your smile. | Nothing yet. Converted to Class III or Class I first. | Reshape the ridge or change the design, previewed digitally. |
| V | Your upper lip sinks without denture-style support behind it. | Fixed teeth not advised. Removable or take-out teeth that support the lip. | Tested on trial teeth before anything is promised. |
The rule behind every class: the seam between ceramic and gum sits 2 to 3 mm above the highest point your lip ever reaches, measured on video, before surgery.
Tap through the five for what each one means for you.
Your gum is good enough to keep. The teeth are built to meet it.
When you smile, the whole tooth and your gum are in view, and your gum is healthy enough to keep. No pink ceramic at all. The implants are placed through the centre of each planned tooth, so the new teeth grow out of your own gum like natural ones. It is the hardest class to do well, and the most natural when it is.
- You see
- Teeth growing from your own gum. No seam, because there is no pink.
- Built
- Individual-looking teeth on a strong frame. Your gum is kept.
- Before surgery
- Protect the bone and the little points of gum between the teeth that make it look natural.
Take the teeth away and watch what the lip does.
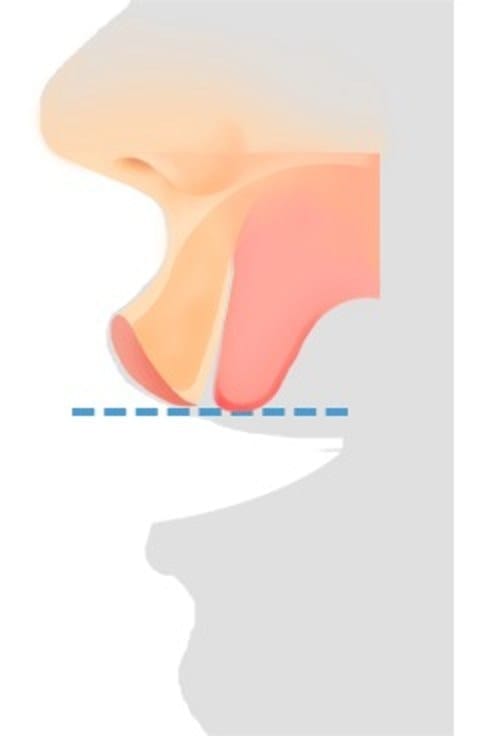
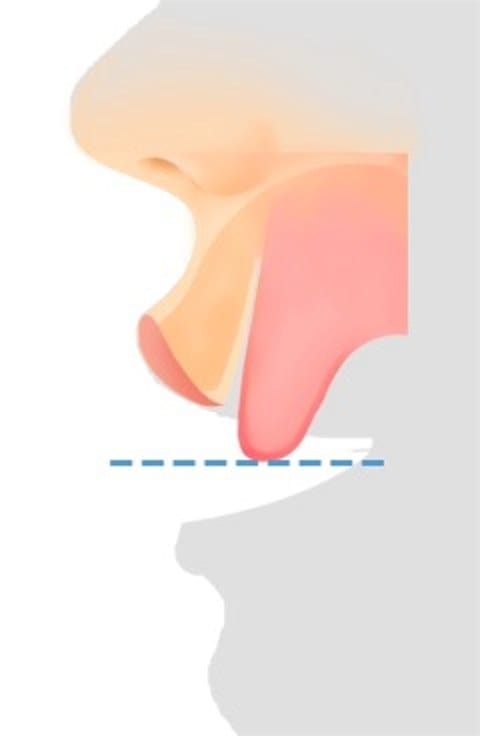
Two thirds of the upper lip rests on the front teeth. Remove them and the lip has nothing behind it: it drops back, the profile flattens, and the face reads older. A denture props it up again with a flange, the thick pink rim under the lip. Fixed implant teeth have no flange, so before anyone promises you a fixed bridge, one question has to be answered: can the teeth alone hold the lip? Dr. Reshad answers it on your profile, with the teeth in and out, before surgery. For this patient, the answer was yes.
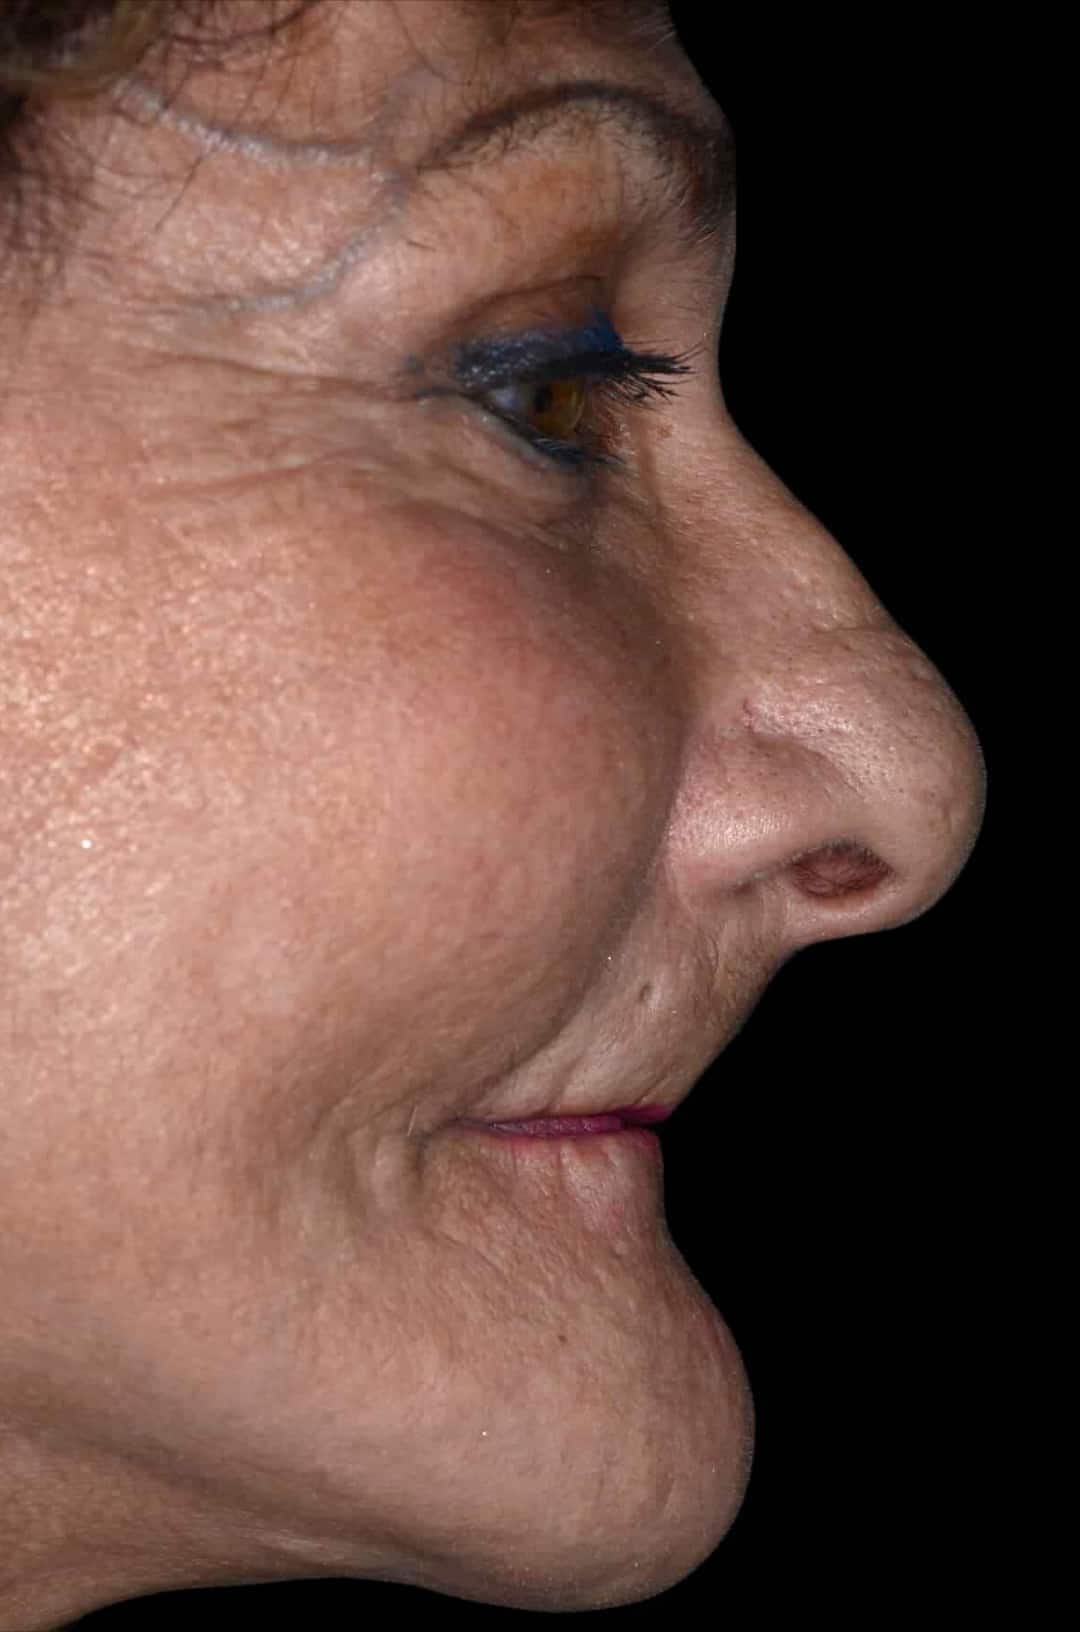
The upper lip falls back and the profile collapses. This is what any fixed design has to rebuild from.
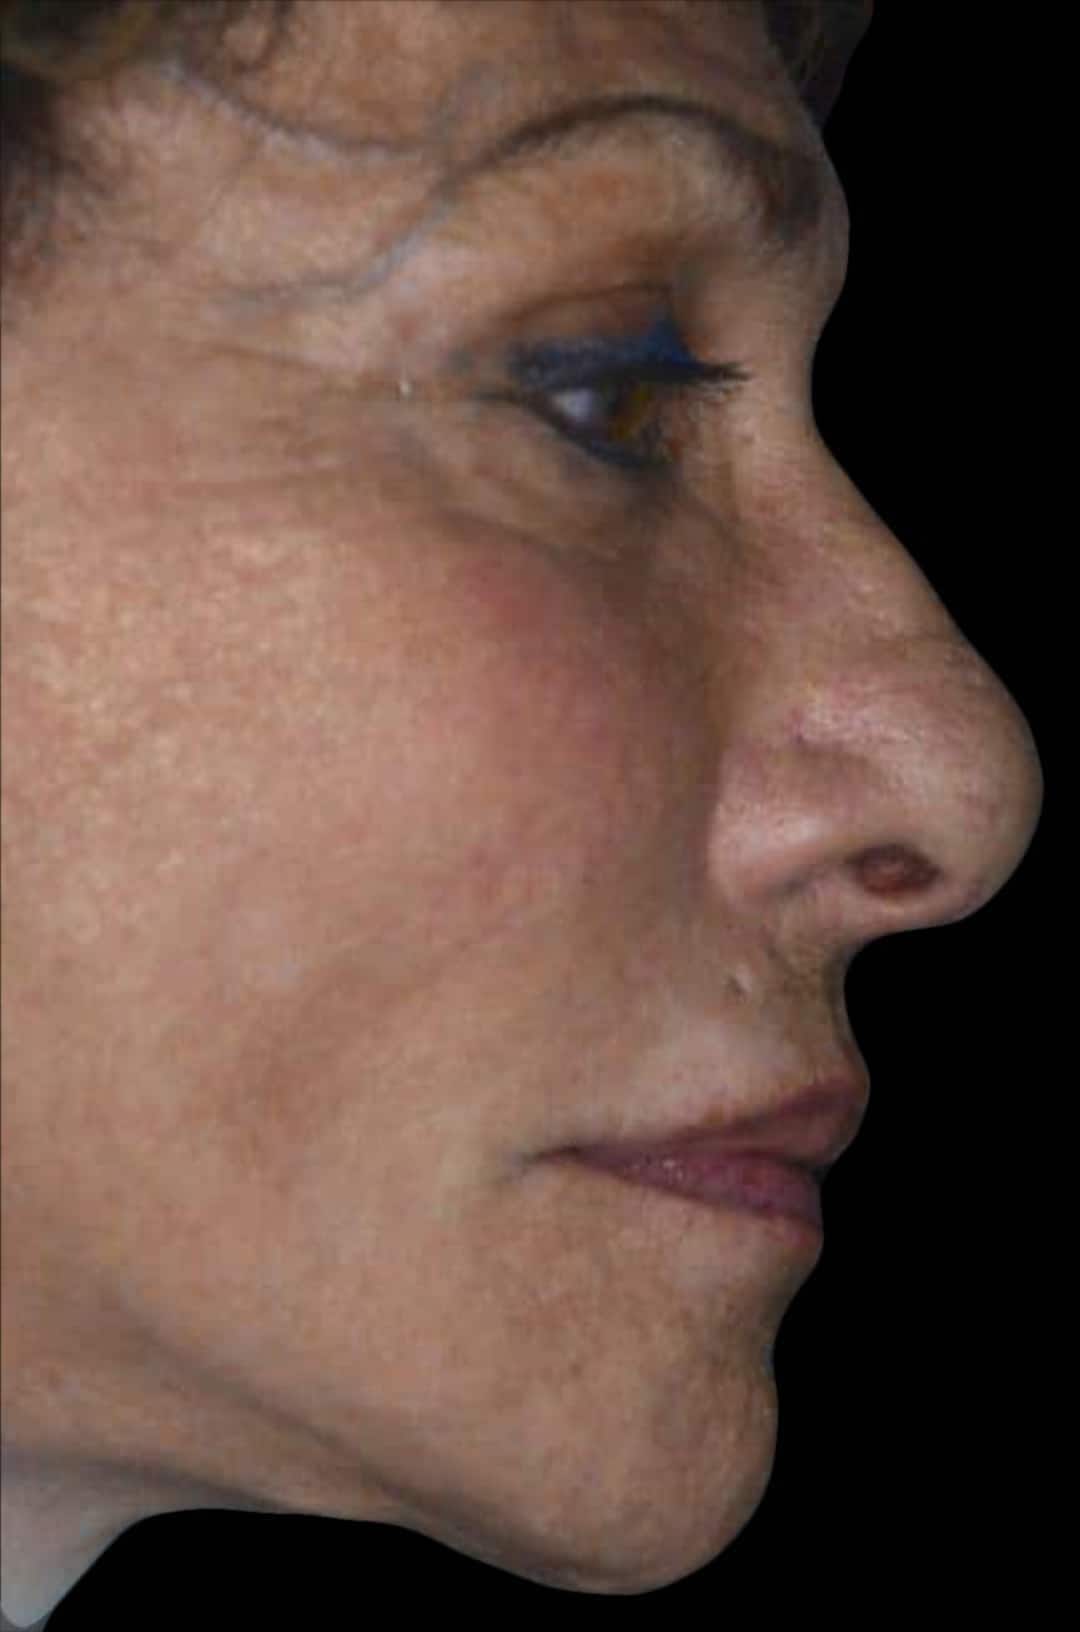
The same profile with the teeth in place. No flange. The teeth alone carry the lip.
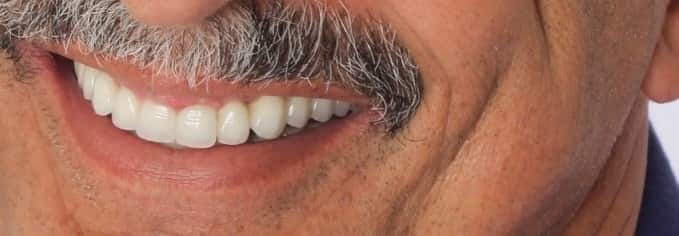
The result: a full, natural smile on fixed teeth, with the lip supported by tooth position alone. No flange was needed, because the profile test said so before surgery.

Why the test comes first
The position and inclination of the front teeth decide the lip, not just the edge. Get them right on the trial teeth and a fixed bridge supports the lip as well as any denture did. Get them wrong, or skip the test, and the patient trades a flange for a sunken lip.
When the lip falls even with the teeth in the right place, that is Class V, and no fixed bridge will fix it. Dr. Reshad would rather tell you that at the first visit than after the implants are in.
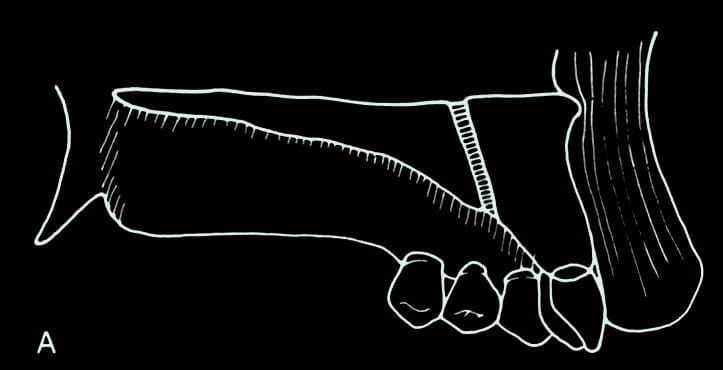
With a flange: teeth and flange hold the lip.
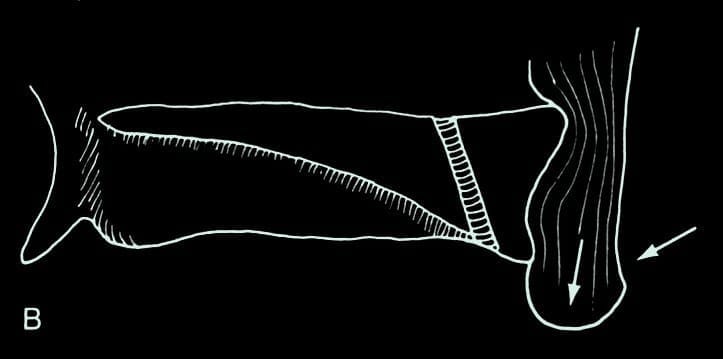
Without it: only the teeth can. In Class V they cannot.
Our Beverly Hills office at 414 N. Camden Dr., Suite 750 opens in January 2027. Until then, call (310) 444-5217 and we'll arrange your consultation.
Two patients, and the plan that made the difference.
She was one appointment away from a seam she would have seen for the rest of her life.
She came in with worn, failing upper teeth and a high smile. On the surface a routine full-arch case: remove the teeth, place implants, deliver teeth and gum in one piece. That is what many offices would have done, and the result would have looked good for about as long as it took her to laugh.
Saying E and smiling as hard as she could, her ridge sat well below her lip line. Dr. Reshad marked where the seam of a standard prosthesis would land: squarely in the smile. Class IV. Reshaping enough bone to lift the seam above such a high lip line would have been too destructive. So the plan changed before anything was cut: teeth only, Class I, with the implants placed through the centre of each planned tooth so no pink would ever be needed.
A digital preview of the planned teeth confirmed it on screen before surgery. That preview, and the ten minutes of examination behind it, are the difference between the two patients on this page.
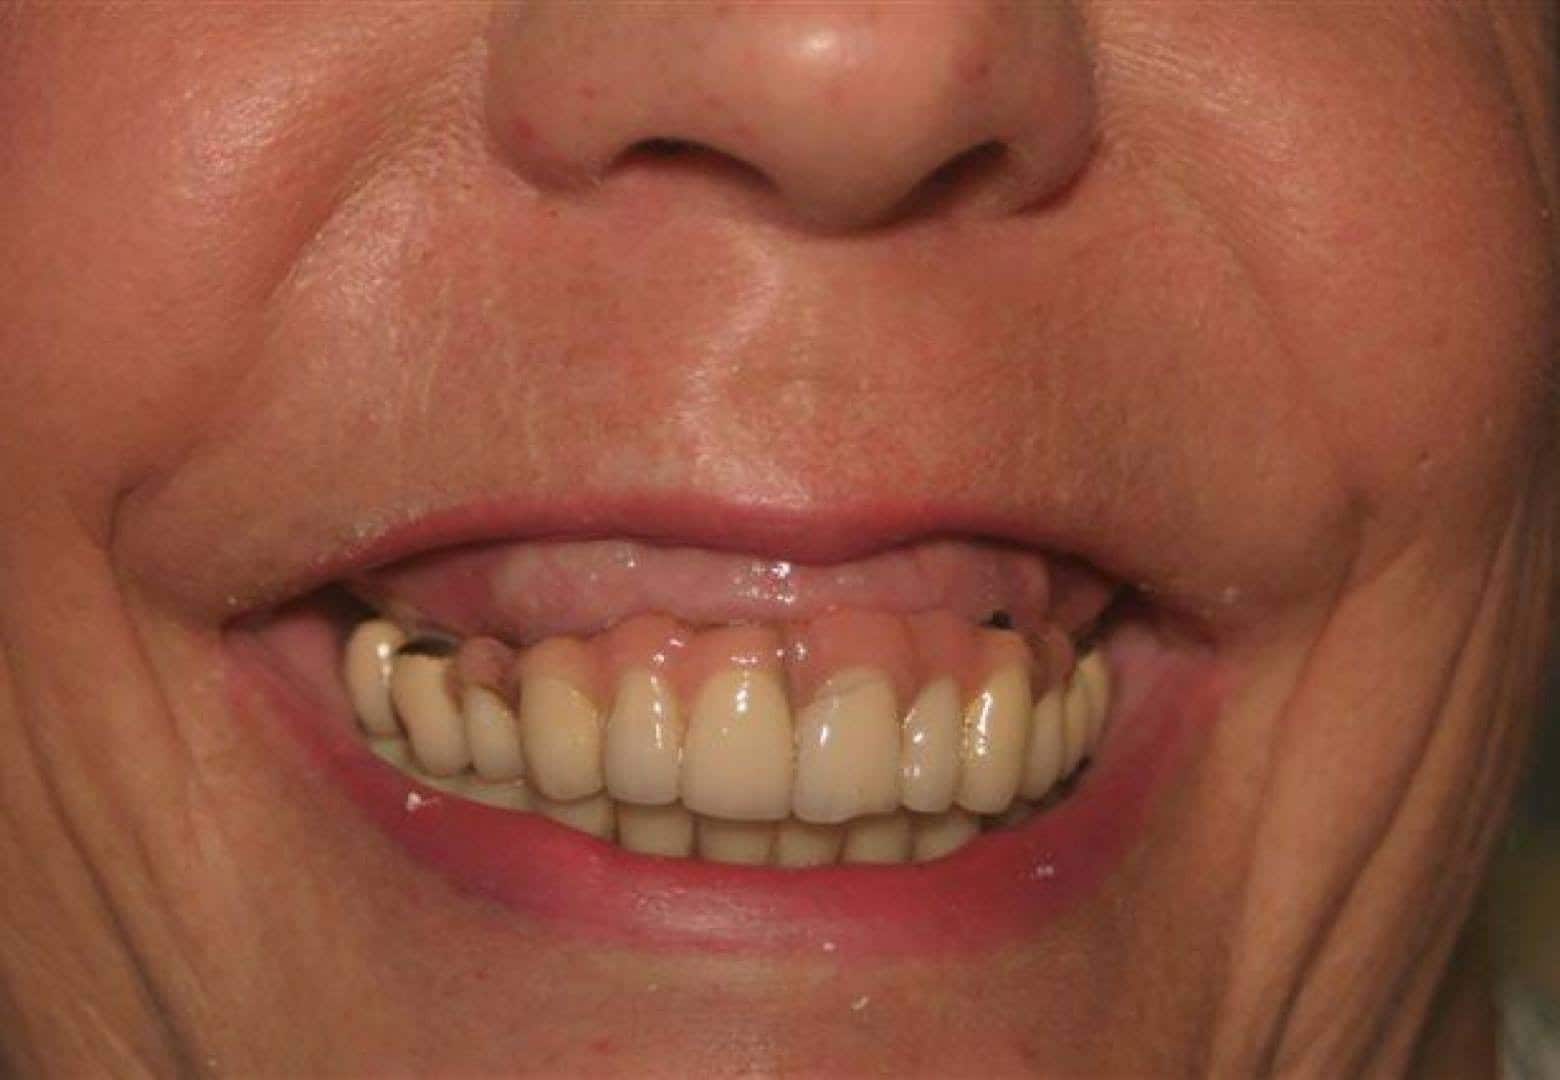
Before. A high lip line on a full smile.
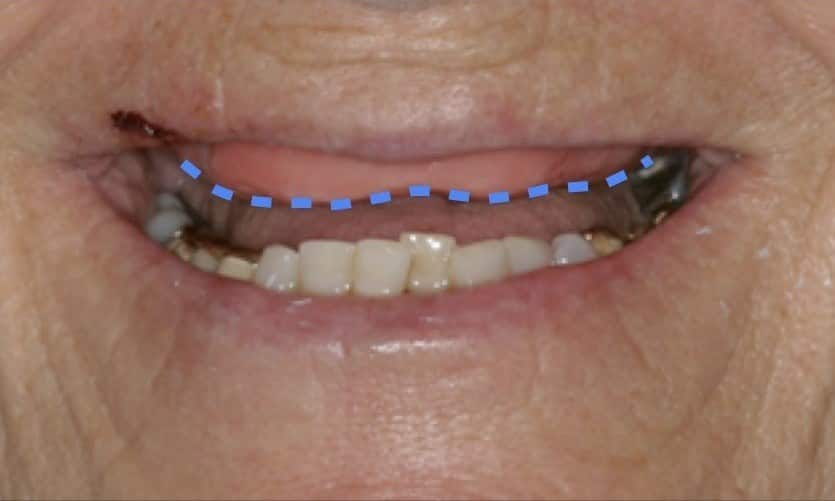
Lip at maximum. Blue marks where the seam of a teeth-and-gum prosthesis would sit: in full view.
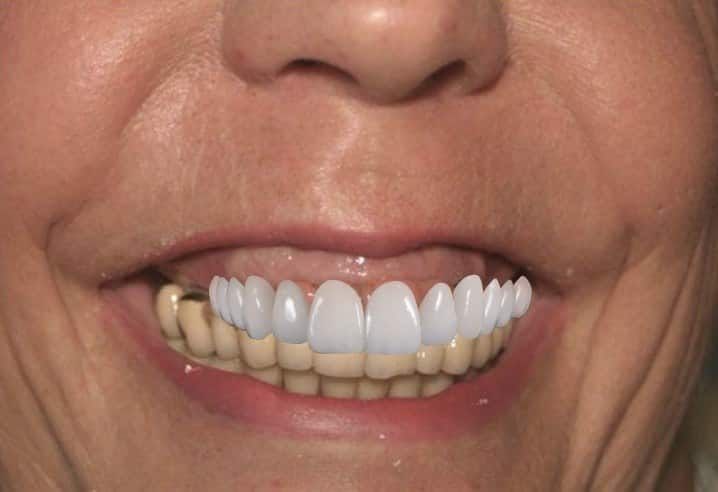
The planned teeth previewed in her smile before surgery. See the seam before you cut, or in this case, design it out.
When the seam already shows, this is how it is put right.
Not every Class IV can be designed out. Some arrive with the implants already in and the seam already in the smile. The correction is the same principle applied late: bring the ridge up until the seam sits 2 to 3 mm above the highest lip line, make sure there is room for strong, lasting materials, and rebuild. This patient came to Dr. Reshad with a full upper arch whose seam showed on every smile. Below, the whole correction from the first photograph to the final teeth.
Full smile. The seam between ceramic and her own gum, in plain view. Class IV.
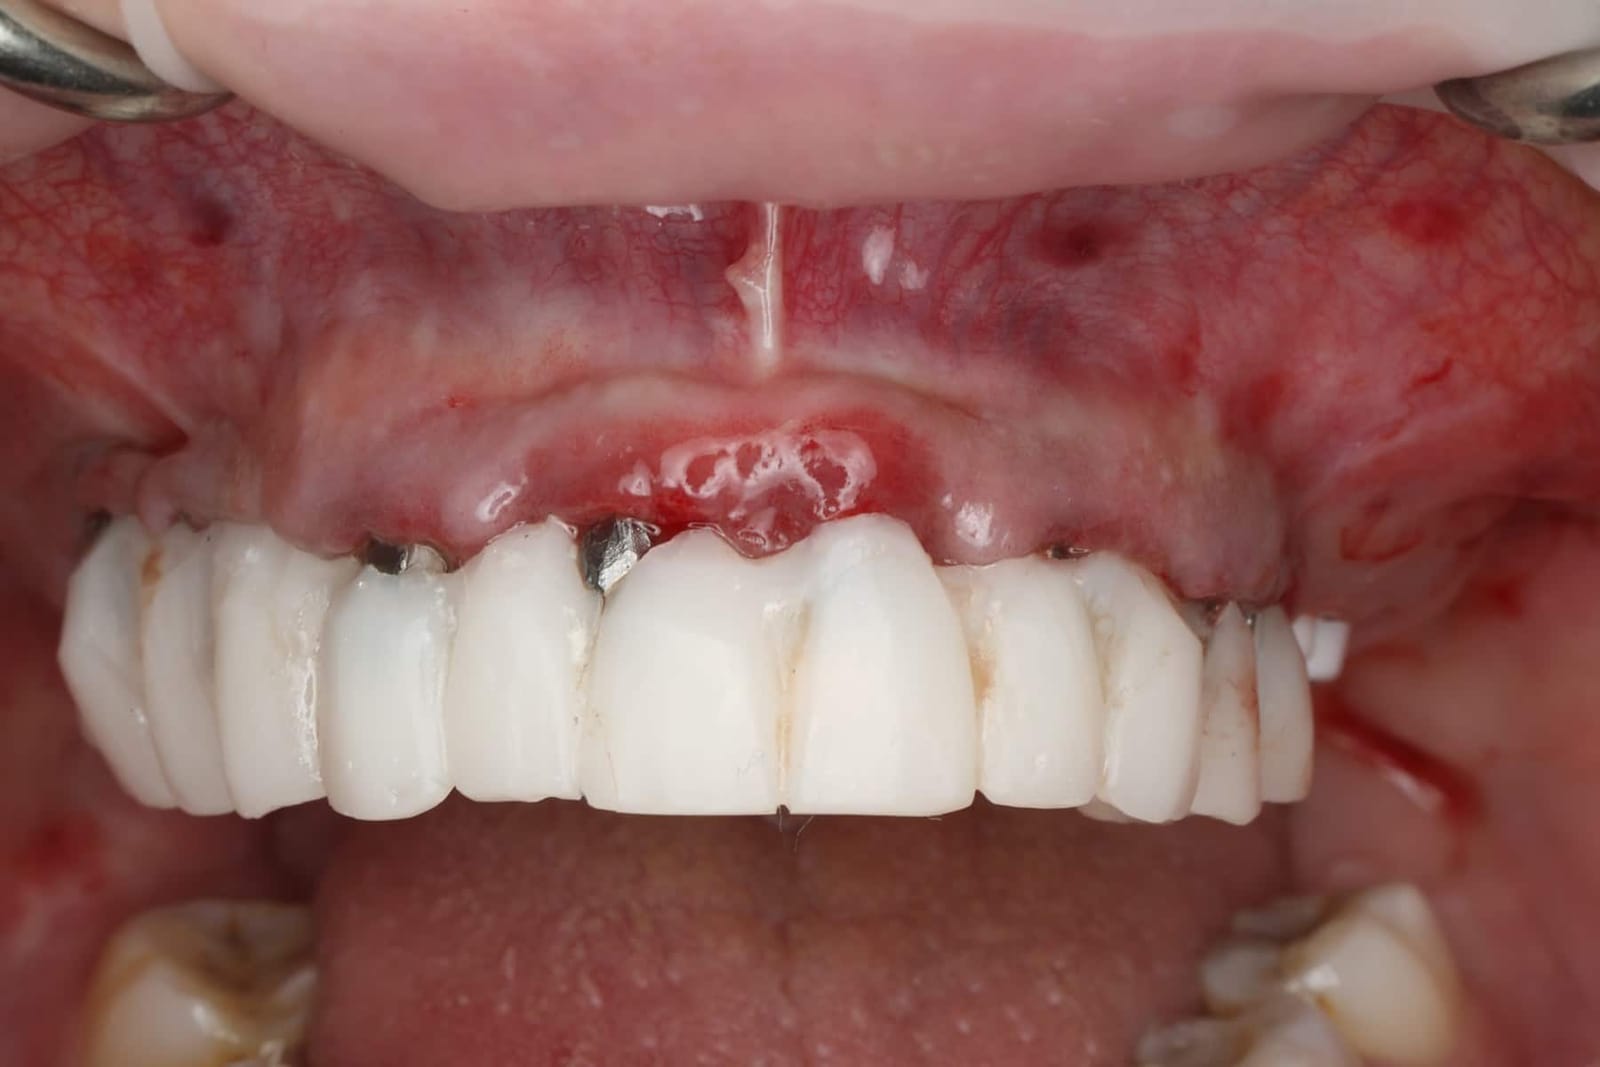
Retracted. The transition line sits well below where the lip reaches.
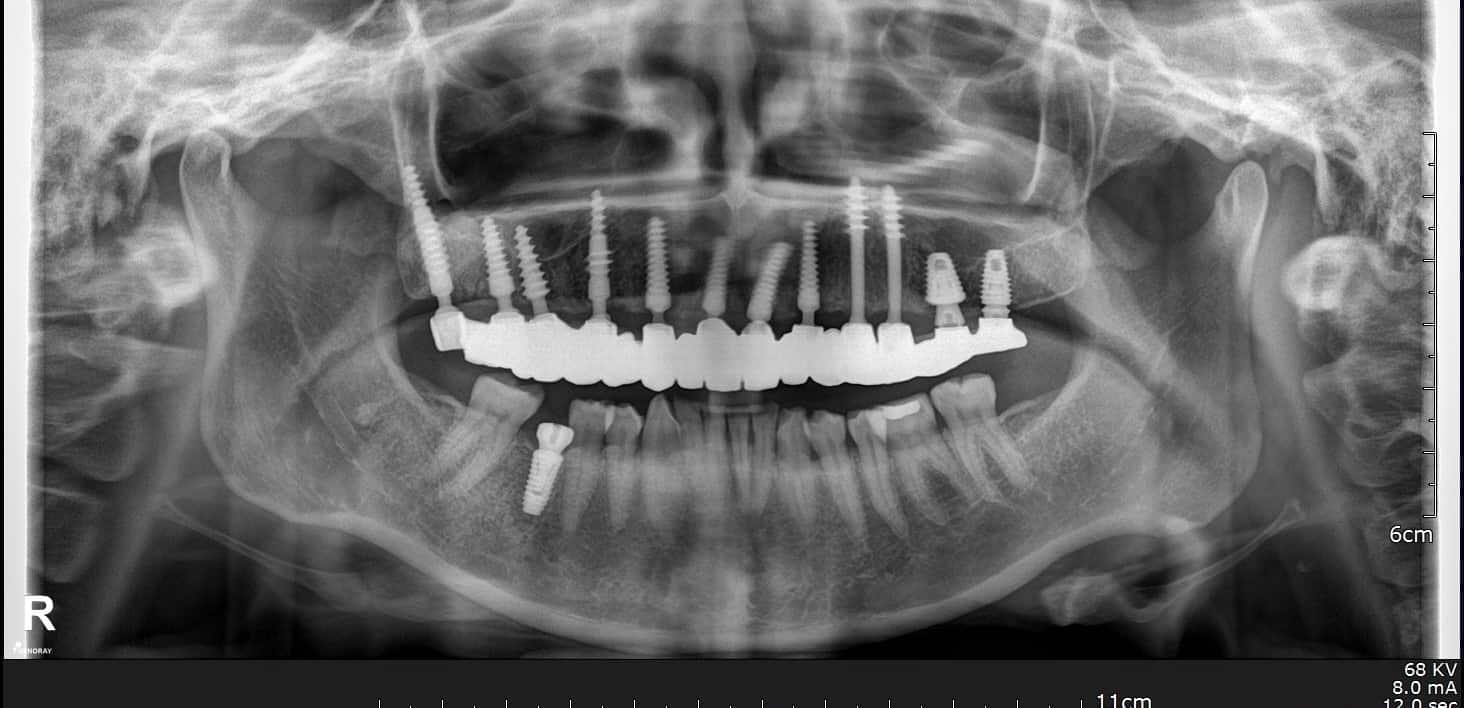
Sound implants, wrong prosthesis. The implants were kept.
What changed, step by step.
- 01Diagnose it as Class IV. Lip filmed at its highest. The seam sat in the smile, where it showed, instead of above it.
- 02Reshape the ridge. Bone gently reduced so the new seam would sit above her highest lip line. Her existing implants were kept.
- 03Teeth the same day. Fixed temporary teeth, with the seam in its new position, worn while she healed.
- 04The final teeth A milled titanium frame with tooth- and gum-coloured ceramic. Seam hidden at a full laugh.
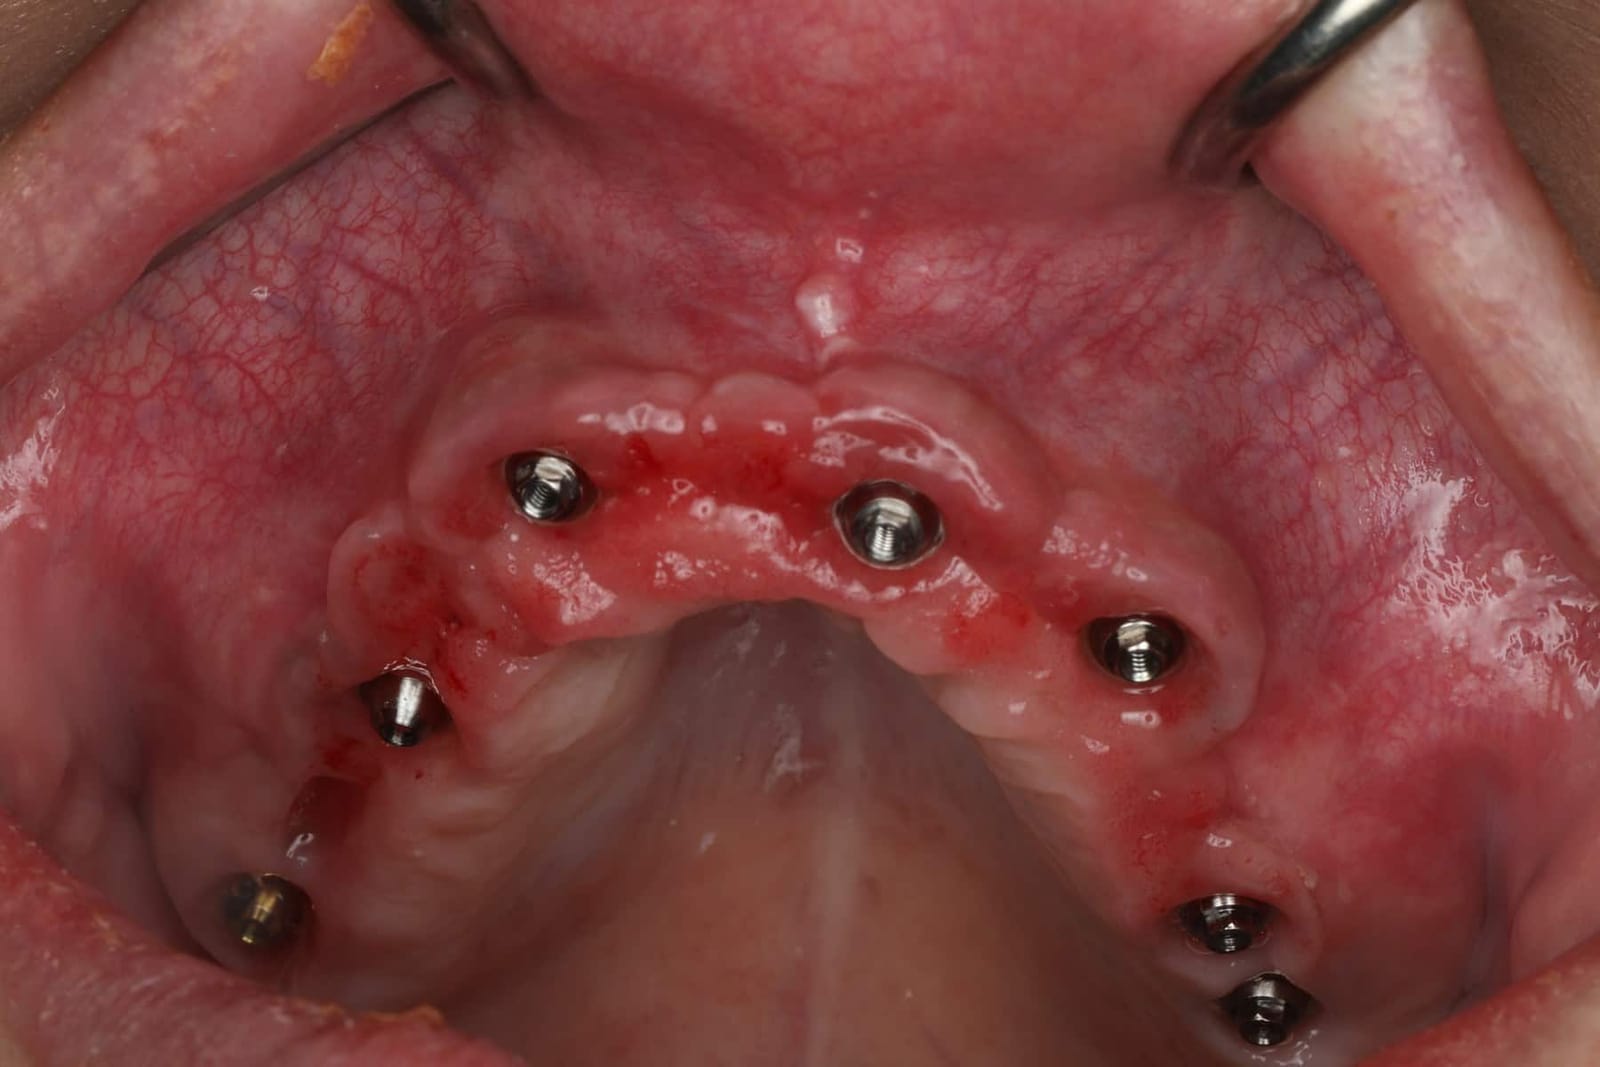
The reshaped ridge, healed around the implants. The seam now has somewhere to hide.
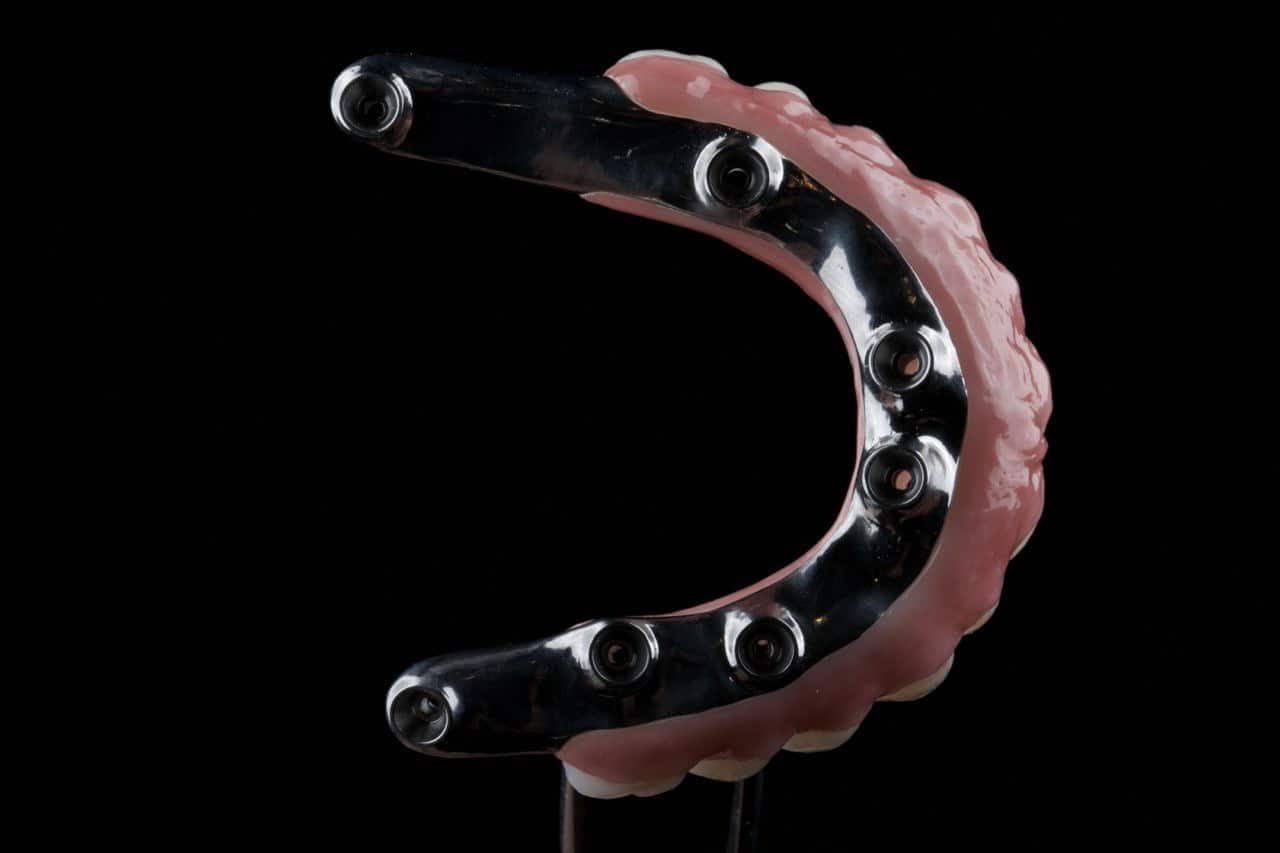
Milled titanium under the ceramic. The strength is in the metal; the lip only ever sees the ceramic.
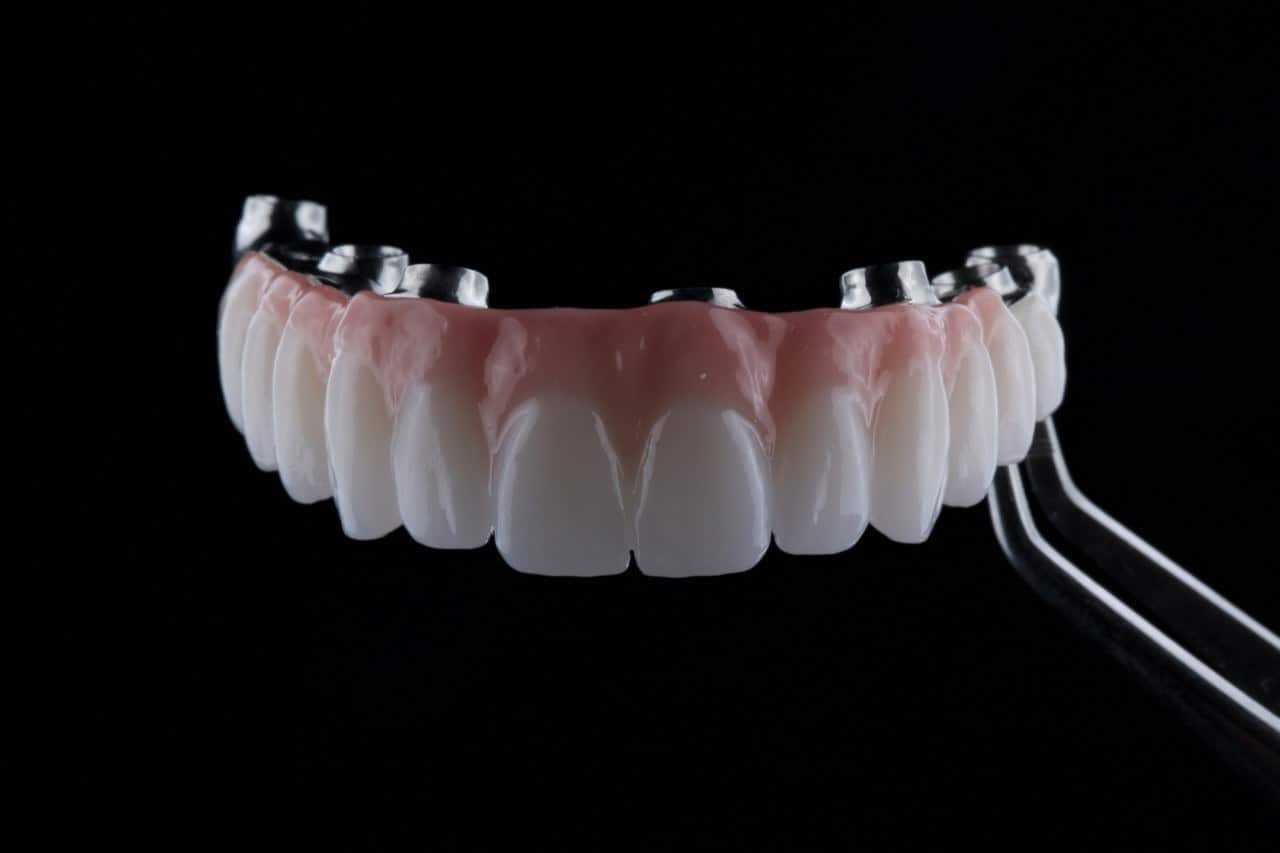
Teeth and gum in one piece, made to the lip line measured on day one.
Photographs of a polite smile prove nothing; the seam hides in a polite smile. This is the patient on video, lips moving the way they move in real life, and the seam stays under the lip throughout. That is the only test that counts, and it is the one the classification is built around.
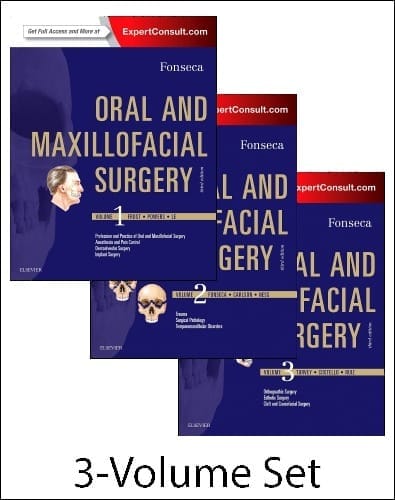
The classification on this page is in the textbook oral surgeons train from.
Fonseca's Oral and Maxillofacial Surgery is widely regarded as the gold-standard reference for oral and maxillofacial surgery teaching worldwide. Dr. Reshad's classification of the edentulous maxilla, the system that became the Lip-Line Classification, was published in its third edition, in the pages surgeons use to learn how to plan a full-arch case.
That matters to you for a simple reason. The surgeon placing your implants was very likely taught from this book. The prosthodontist who wrote the chapter on reading the lip is the one you can see in Beverly Hills.
“The transition line can never be masked. It can only be hidden. Place it 2 to 3 millimetres above the highest lip line, at maximum mobility, and decide that before surgery.”
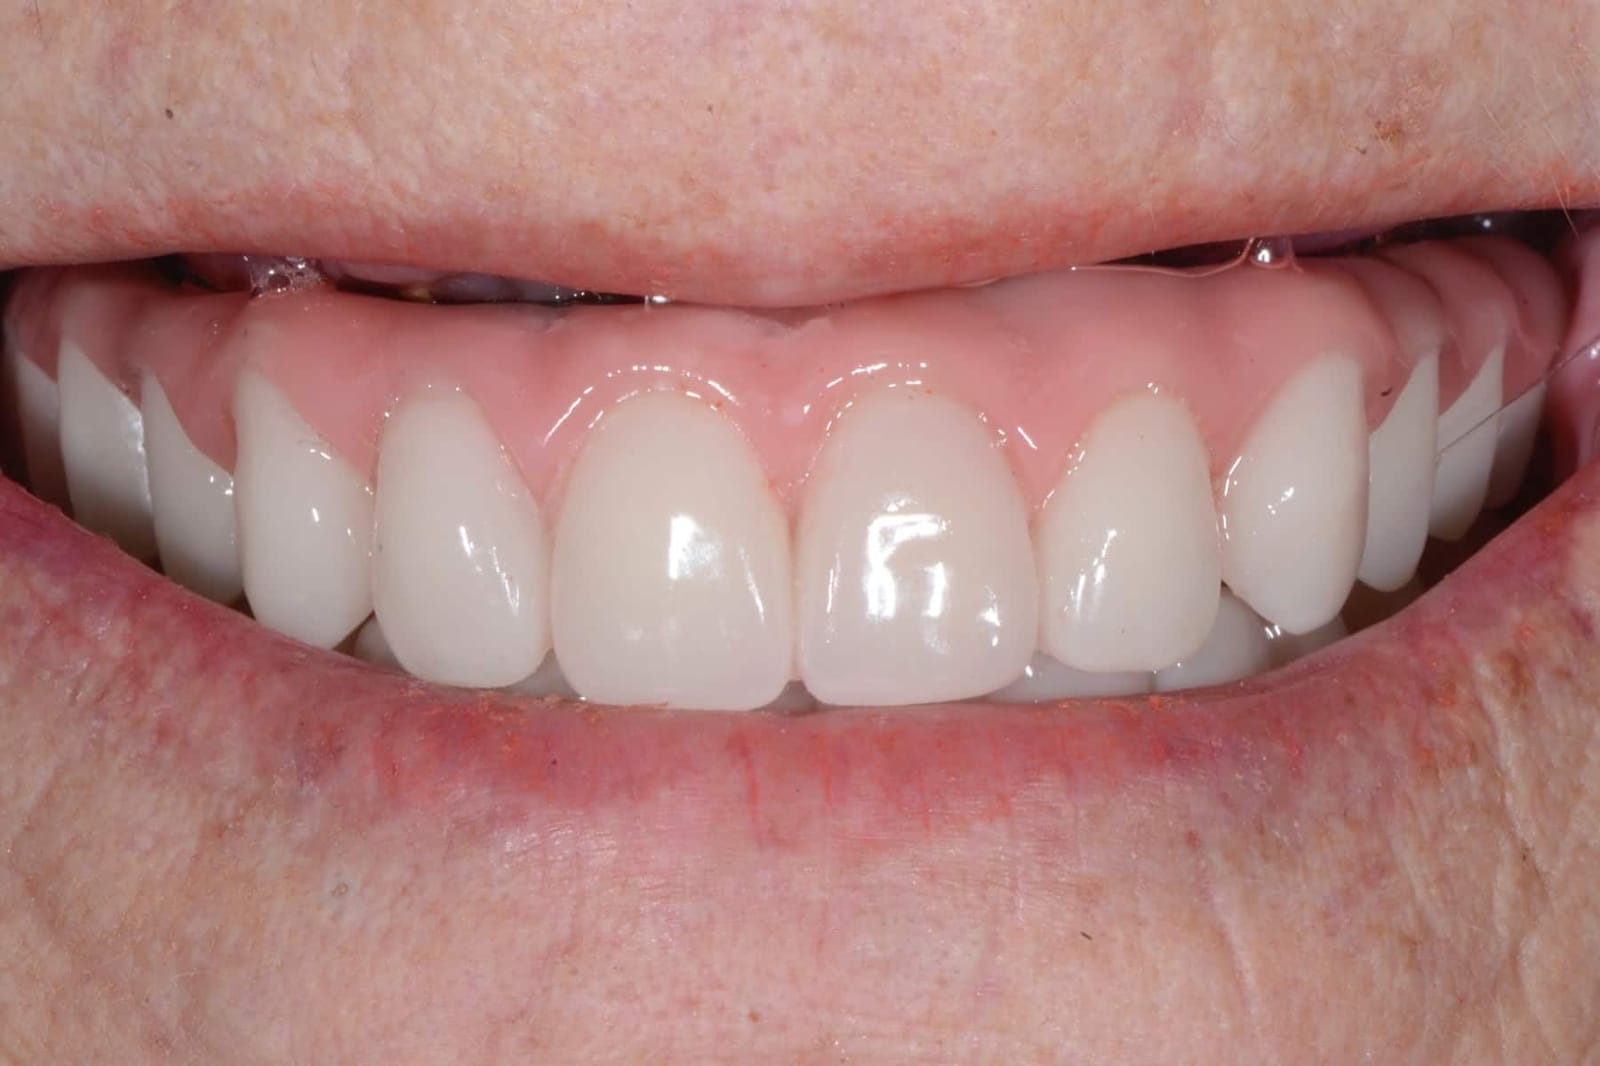
From the textbook chapter: the visible horizontal transition line. The problem this classification was written to prevent.
DDS, MSc (Distinction), FICD, MICOI.
Fixed and Operative Dentistry. Published author.
Lectures on full-arch planning in the US, Europe, China and Australia.
Our Beverly Hills office at 414 N. Camden Dr., Suite 750 opens in January 2027. Until then, call (310) 444-5217 and we'll arrange your consultation.
Find out your class before anyone finds out the hard way.
One visit. Denture out, a short video, a trial of the lip with and without support, and a straight answer about what can be built in your mouth and what cannot. If you are planning full-arch implants, or you already have them and something shows that should not, start here.
“I can hide a seam under a lip. Nobody can hide one below it. That is why I look at the lip before I look at the bone.”
Already have implant teeth and something shows? Ask for a second opinion on existing implant teeth.
Sources. Reshad M. Classification of the edentulous maxilla. In: Fonseca RJ, ed. Oral and Maxillofacial Surgery, 3rd ed. Elsevier, 2018. Revised 2026 as the Lip-Line Classification. · Bedrossian E, Sullivan RM, Fortin Y, Malo P, Indresano T. Fixed-prosthetic implant restoration of the edentulous maxilla: a systematic pretreatment evaluation method. J Oral Maxillofac Surg 2008;66(1):112-122. · Misch CE. FP1, FP2, FP3 prosthesis classification. Images. Clinical photographs are of Dr. Reshad's own patients, shared with consent. Patients are not named. The Class IV prostheses shown are presented as examples of the problem the classification is written to prevent.
Where the teeth, the tongue and the lip meet.
You will hear the difference before you see it. A soft S on the phone. An F that will not land. The first week with a new set of teeth is often spent listening to your own voice. Dr. Mamaly Reshad teaches dentists why that happens and how to design teeth that speak. This section is that lecture, written for you.
Most patients notice it. Most adapt. All of them deserve a warning.
Your tongue, lips and teeth have spent a lifetime learning each other. Every S, F, V and T is a small, precise meeting of the three. When a whole arch of teeth is replaced, every one of those meeting points moves at once. Until the tongue relearns the map, the sounds change.
Most practices do not mention this. Dr. Reshad tells every patient before surgery, because told afterwards it sounds like an excuse, and told before it is a plan. These are the numbers he shows dentists.
of full-arch fixed implant patients make pronunciation errors after delivery.
Collaert · Bothur & Garsten · Van Lierde, via Resnik 2021Fixed upper prostheses were rated less intelligible than removable ones at two months, in a crossover study of 30 patients.
Heydecke 2004 · J Dent Resfor speech to return to its pre-surgical level after an immediate-load full arch. Most patients get there.
Molly 2008 · Clin Oral Implants ResOur Beverly Hills office at 414 N. Camden Dr., Suite 750 opens in January 2027. Until then, call (310) 444-5217 and we'll arrange your consultation.
There is no ruler for a front tooth. There is your lip, your tongue and your voice.
In the lecture, Dr. Reshad shows dentists a cross-section through the front of the mouth: nose, upper lip, upper front tooth, lower lip, lower front tooth. Where that one edge sits decides three things at once: how your lip is supported, how your profile looks, and how you say F and S.
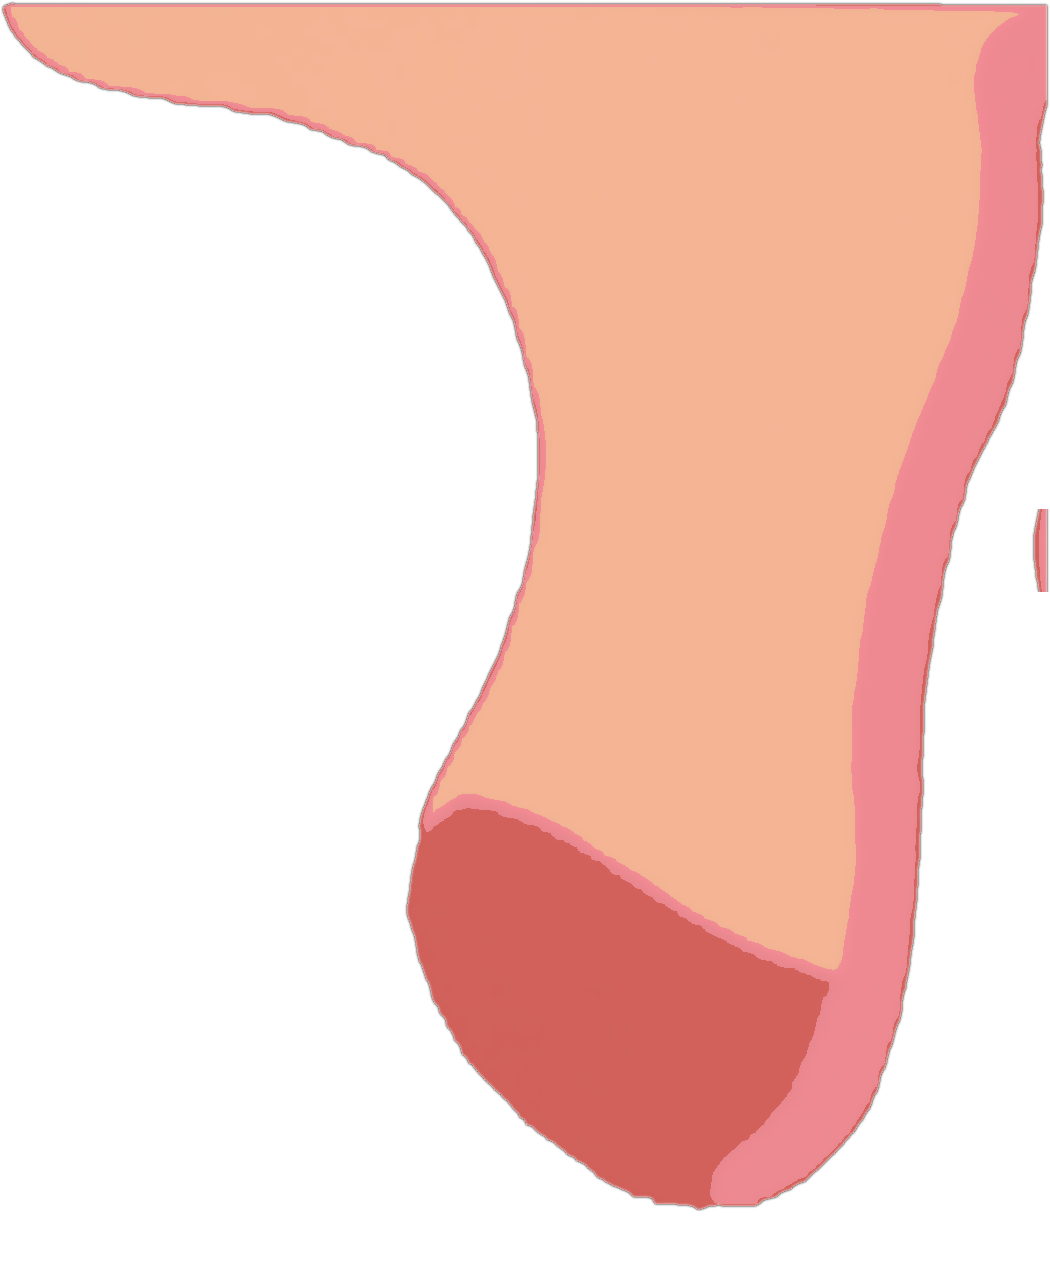
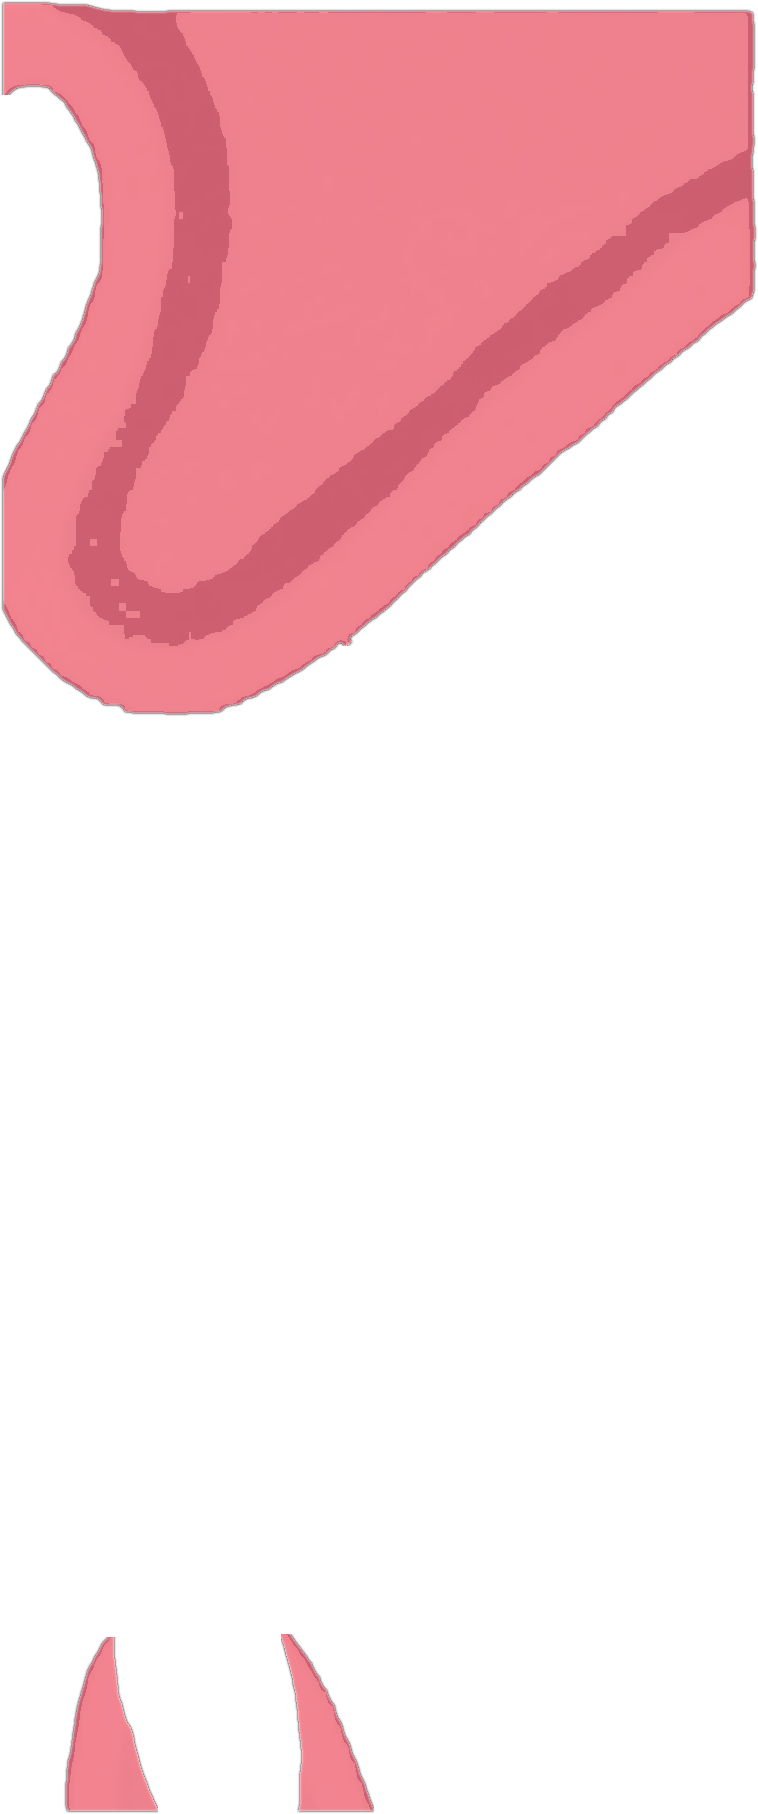
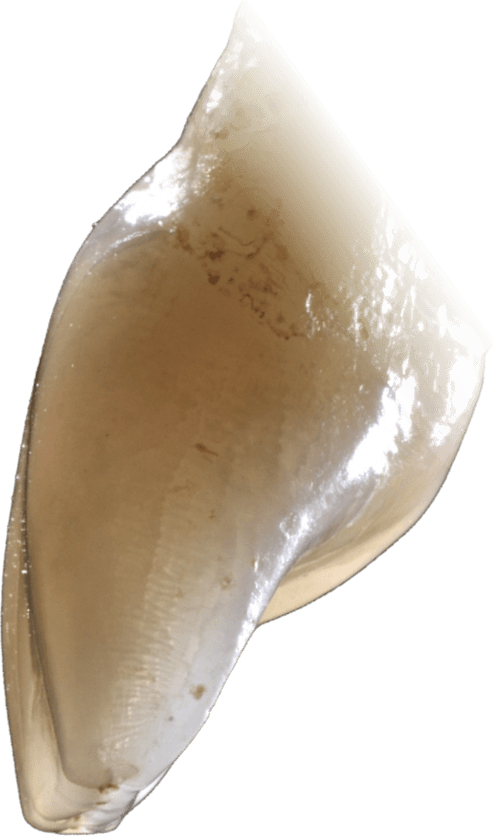
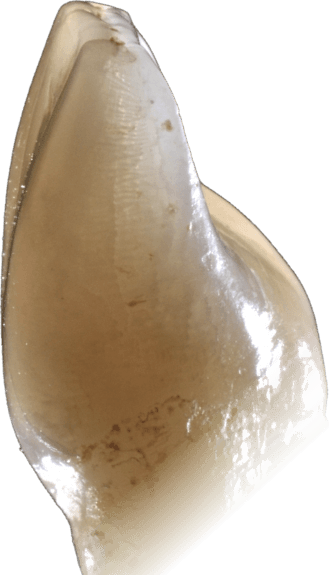
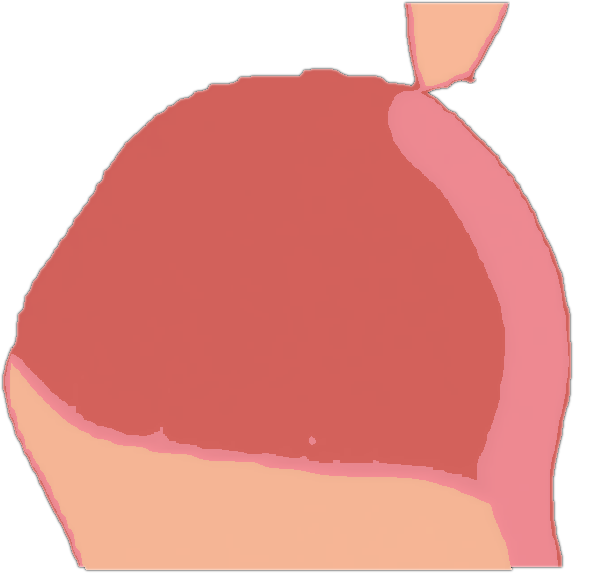
Move the tooth yourself. Watch what happens to the lip and to the sounds.
On the line. The edge sits on the wet-dry line of the lower lip. F lands, the lip is supported, the S has its narrow channel.
Targets Dr. Reshad uses: nasolabial angle about 102° (± 8°, Legan); 1 to 1.5 mm of space between the upper and lower front teeth on “sixty-six”; the upper edge on the wet-dry line on “fifty-five”.
Say “fifty-five.” The lip tells you if the angle is right.
For F and V the upper edge should land exactly where the dry part of your lower lip turns wet. If the edge sits out on the dry lip, the teeth are too flared or too long. If it slips inside the wet lip, they are too upright or too short.
This is the animation Dr. Reshad uses to teach the test to dentists. On your temporary teeth, he does it with you, out loud, before anything is made permanent.
The ffff in the photograph is the F sound, held. Where the upper edge meets the lower lip is the test.
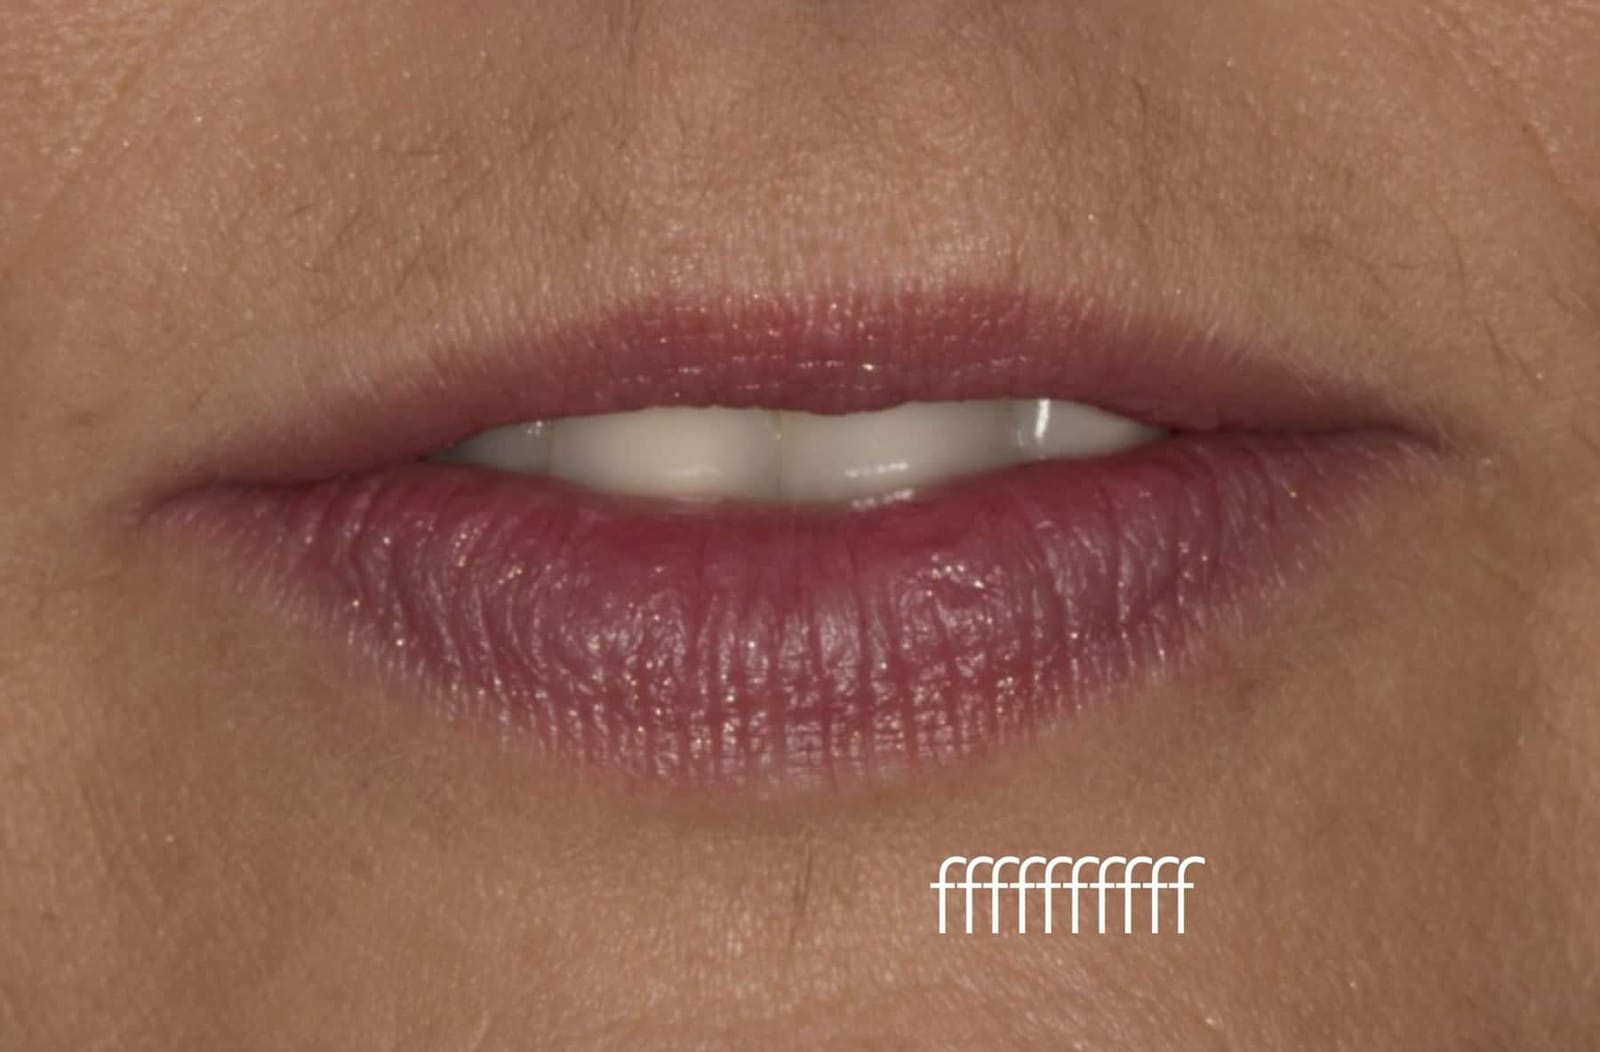
Two words set the edges. You say them, the teeth move.
“Fifty-five.”
F / V · Edge to lipThe upper edge touches the wet-dry line of the lower lip.
- Pressed into the lip
- Too long or too far forward.
- On the line
- Correct. F and V are clean.
- Misses the lip
- Too short or too far back.
“Sixty-six.”
S · Edge to edgeThe lower edge sits just below and just behind the upper, one to one and a half millimetres away. They never touch.
- Teeth touch or click
- Too tall. No room to speak.
- A narrow gap
- Correct. The S is crisp.
- A wide gap
- Too short, or the lower teeth too far back.
A narrow channel at the front. A tongue braced at the sides.
- 01A narrow channel. A small escape of air between the front teeth is what makes an S crisp and clear.
- 02The tongue braces at the sides. Its edges anchor on the inside of the upper teeth. Bulky palatal contours crowd the tongue and blur the S.
- 03Anchor the sides, control the front. With the right tooth position, angle and palatal thickness, the S becomes clear over time.
The part of your new teeth you never see, the surface against your tongue, decides the sounds everyone hears. It is shaped by hand, on your temporaries, by the person who will make the final teeth.
Our Beverly Hills office at 414 N. Camden Dr., Suite 750 opens in January 2027. Until then, call (310) 444-5217 and we'll arrange your consultation.
What you hear, what it means, and the first fix.
Speech problems after new teeth are rarely random. The sound points to the part of the prosthesis that needs changing. The numbers below match the numbers on the diagram.
| You hear | Usual cause | First fix |
|---|---|---|
| A lisp | Front teeth too far back, or a bulky front palate. | Thin the front of the palate. |
| S sounds like “sh” | Front teeth too far forward, too far from the tongue; a palate that is too flat. | Add contour behind the front teeth; reshape the palatal ridges. |
| A whistle | Air escaping through a gap between teeth or under the palate. | Find the leak with a palatogram and close it. |
| A click | Teeth too tall; no room for the jaw to speak. | Restore the 1 to 1.5 mm speaking space. |
When F went wrong. And how one millimetre fixed three problems.
He came to Dr. Reshad with a full upper arch of fixed teeth made elsewhere. The teeth were white and even. He could not say F properly, his S had turned into “sh,” and he kept biting his lower lip. He had been told he would get used to it.
The cause was visible before he said a word. With his lips at rest, the edges of his upper teeth sat on the outside of his lower lip, beyond the border where dry turns to wet. Every F landed on dry lip and slid off. There was no narrow channel for the S, so the air spread. And the lower lip, with nowhere to go, caught behind the teeth.
- 01F and V. The edge landed on the dry lip, not the wet-dry line.
- 02S became “sh.” No channel at the front; the air spread.
- 03Lip trap, lip biting. The lower lip caught behind the edges.
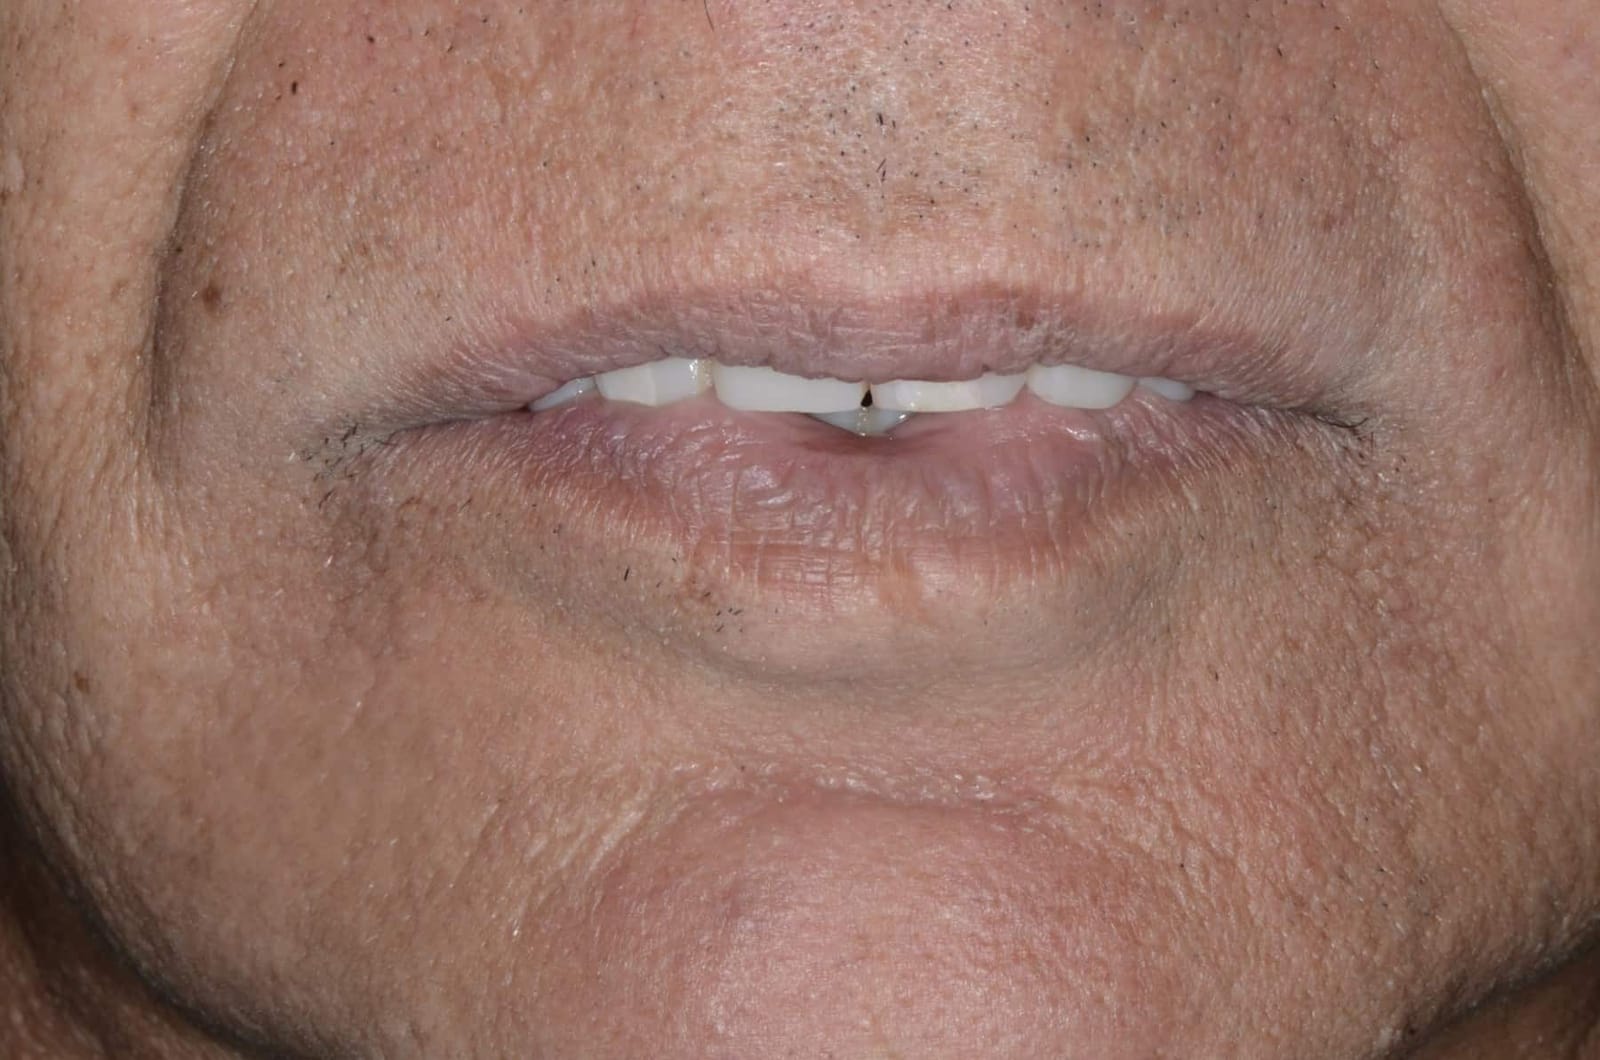
Lips at rest, before. The upper edges sit on the outside of the lower lip.
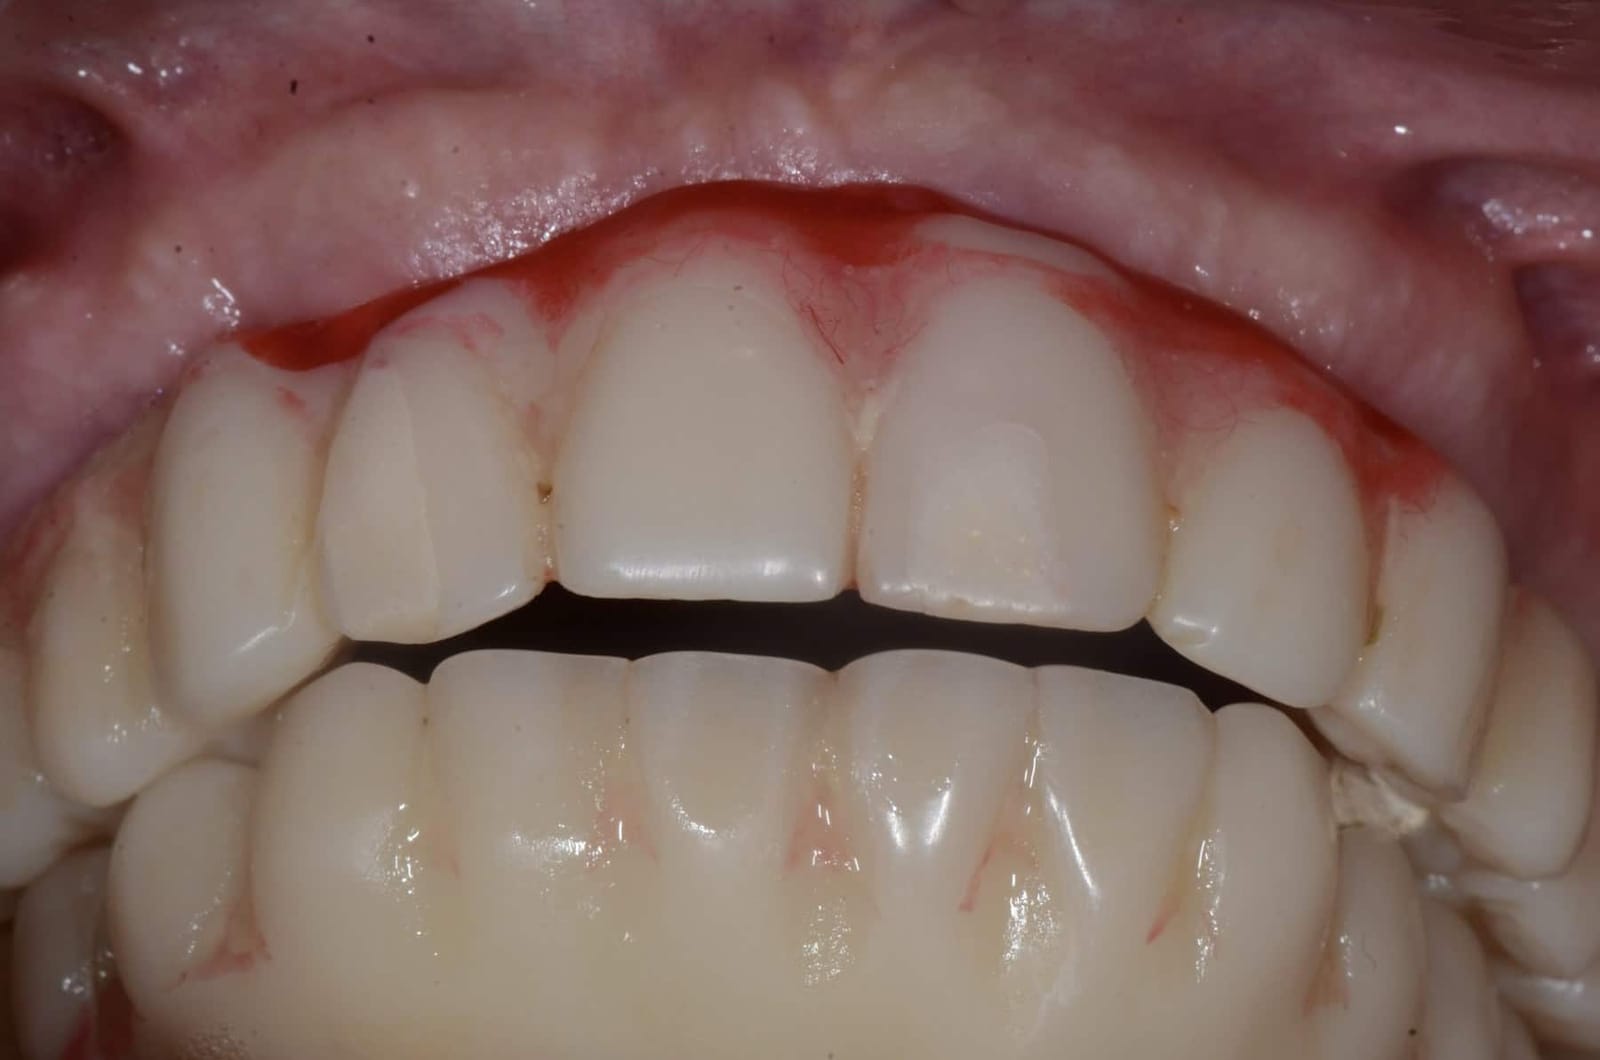
The previous prosthesis. The upper front teeth stand well in front of the lower.
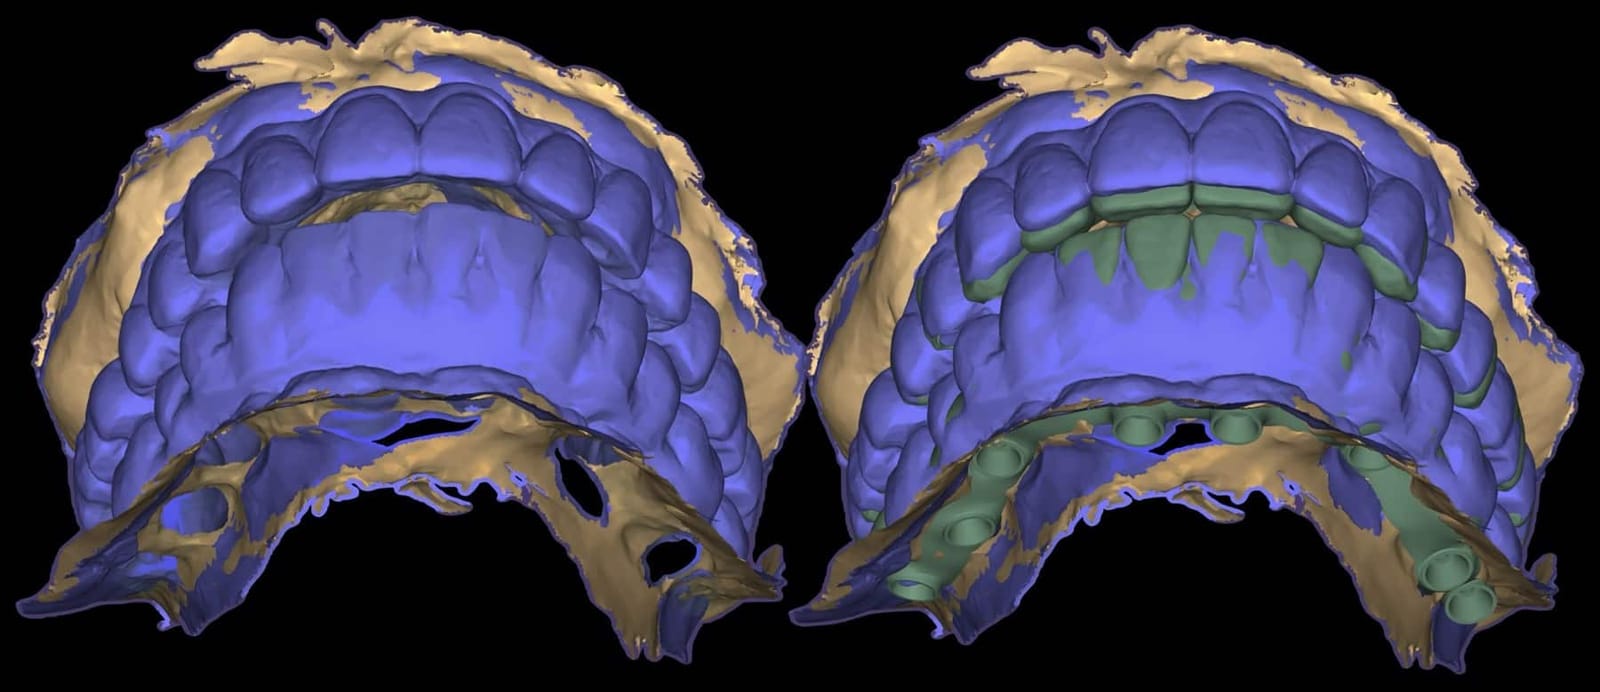
The plan. Old teeth in blue, the new design in green. The edges move back behind the lip. Nothing else is guessed.
Fix one, the rest follows.
Edge position, lip support, smile curve and speech are tied together. Move the edge back to where the lip wants it and the other three improve on their own: the F lands, the “sh” goes, the lip is free.
Then the hardest part, which is patience. The tongue and lips need weeks to adapt to any new position. Dr. Reshad does not judge the result on the day, and neither should you. The true result shows later.
After. The lower lip closes in front of the teeth, the smile follows the lip, and F and S came back.
“I do not set front teeth with a ruler. I set them with the patient talking.”
Speech is settled before anything is final.
Nothing is made permanent until you have lived with a trial set of teeth. Speech is one of the things that trial is for. These are the four rules he teaches, and applies to every full arch he makes.
- 01Set the edges with F, V and S. On the temporary teeth, out loud, with you doing the talking.
- 02No bulky material behind the front teeth. A thin palatal contour, with no air leaks under it.
- 03Warn before treatment. Speech can take one to six months to settle. You will know on day one, not month three.
- 04Wait four weeks before moving an edge. Unless the error is gross, the tongue gets the first chance to adapt. Then the edge is adjusted.
The dentist that dentists learn this from.
Fewer than two percent of dentists are prosthodontists, the specialty that plans the whole result before treatment starts and then carries it out. Dr. Reshad is one of them, and the material on this page is taken from the lectures he gives to other dentists on full-arch implant reconstruction. If your speech has not settled after new teeth, you are not imagining it, and it is usually fixable by someone who knows where to look.
DDS, MSc (Distinction), FICD, MICOI. Specialist training in replacing and rebuilding teeth, not a weekend course.
Fixed and Operative Dentistry. Published author in peer-reviewed journals and textbooks.
Teaches full-arch planning, including this speech protocol, to dentists in the United States, Europe, Asia and Australia.
Ready to talk it through? Literally. If you are planning full-arch implants, or you already have them and your speech has not settled, come in and say “fifty-five” for Dr. Reshad. It takes a second, and it tells him most of what he needs to know. Already have implant teeth that affect your speech? Ask for a second opinion on existing implant teeth.
Primary studies. Heydecke G, McFarland DH, Feine JS, Lund JP. Speech with maxillary implant prostheses: ratings of articulation. J Dent Res 2004;83(3):236-240. · Molly L, Nackaerts O, Vandewiele K, Manders E, van Steenberghe D, Jacobs R. Speech adaptation after treatment of full edentulism through immediate-loaded implant protocols. Clin Oral Implants Res 2008;19(1):86-90. · Pound E. Let /S/ be your guide. J Prosthet Dent 1977;38(5):482-489. · Gick B et al. Speaking tongues are actively braced. J Speech Lang Hear Res 2017;60(3):494-506. · Silverman MM. 1953, closest speaking space. Reviews and clinical opinion. Resnik RR. The hidden complication of full-arch implant prostheses. Dentistry Today 2021. · Spear F. Positioning maxillary central incisal edges: phonetics. · Hess LA. Determining the correct vertical and horizontal incisal edge position. · Speech sound production in denture prosthodontics. Int J Appl Dent Sci 2021;7(2):84-93. Images and video. Clinical photographs, animations and patient video are from Dr. Reshad's own lectures and patients, shared with consent. Patients are not named.
Our Beverly Hills office at 414 N. Camden Dr., Suite 750 opens in January 2027. Until then, call (310) 444-5217 and we'll arrange your consultation.
Control the forces, and the beautiful part looks after itself.
- 1Diagnose. Signs of lost back support, grinding, the jaw's seated position, the slope of the front teeth.
- 2Stabilise. Lower jaw fixed early so there is a stable platform for everything else.
- 3Back teeth. Enough chewing units, spread across the arch, no overhangs.
- 4Front teeth. Shallow, smooth guidance; one definite place to bite; the implants placed to support it.
- 5Trial. At least four weeks in provisional teeth: bite, speech, comfort, appearance.
- 6Final. The proven bite copied digitally into the definitive restoration.
- 7Maintain. Bite checked at every visit; a night guard if you grind.
If you have been told you need a full-mouth reconstruction, or you have one that keeps breaking. A first visit is an examination and a conversation. No surgery, no commitment.
Not just at the teeth. How the jaw seats, how the front teeth slide, where the back support is and whether it is real, and whether you grind. If you have an existing restoration, this is usually where its problem is found.
The position and slope of the front teeth, the number and spread of the back supports, and the height of the bite are decided first. The implants are then placed to support that plan.
Which teeth can be kept, which cannot, what the sequence will be and why. If the honest answer is a simpler design, you will hear that too.
Dr. Mamaly Reshad, DDS, MSc (Distinction), FICD, MICOI · Prosthodontist · Beverly Hills. This page is adapted for patients from Dr. Reshad's textbook chapter, “Occlusion, Posterior Support, and Occlusal Overload in Implant Dentistry”, and from Reshad M, Jivraj S. The influence of posterior occlusion when restoring anterior teeth. J Calif Dent Assoc 2008;36:567–574. The tripod concept follows Dawson PE, Functional Occlusion: From TMJ to Smile Design (Mosby, 2007); the diagram is Dr. Reshad's own. Clinical photographs are from Dr. Reshad's own archive, shared with patient permission for educational purposes. Individual results vary. This page is educational and does not replace an in-person evaluation.
"My Mom would still be covering her mouth to smile if it wasn't for Dr. Reshad!"
Frequently Asked Questions
Dr. Mamaly Reshad, a prosthodontist, plans and restores All-on-4 and All-on-X full-arch implants at ArtLab Dentistry, 414 N. Camden Dr., Suite 750, Beverly Hills. A first visit is a consultation with a 3D scan and examination; call (310) 444-5217 to arrange one.
A first visit is an examination and a conversation. No surgery, no commitment. We look at how you bite, not just at the teeth: how the jaw seats, how the front teeth slide, where the back support is and whether it is real, and whether you grind. You then get a straight answer: which teeth can be kept, which cannot, what the sequence will be and why. If the honest answer is a simpler design, you will hear that too.
The All-on-X is a procedure best suited for patients with missing teeth, already in dentures, or with significant tooth loss or decay. It is also a good solution for patients with bone loss in the jaw area that prevents them from getting traditional dental implants.
The All-on-X Dental Implants procedure typically requires the following visits: 1. Initial consultation -- This meeting will help Dr. Reshad determine the proper treatment plan. 2. The procedure visit -- This is where the actual process takes place for the placement of the All-on-X Dental Implants. 3. Follow-up appointments -- About 3 to 6 months later, after allowing time for your mouth to heal, you will receive your permanent teeth.
There are many things to consider such as the need for bone grafting or sinus lifts during the procedure, which can contribute to increased healing times, costs, and higher failure rates. All-on-X implants are placed at an angle, avoiding the sinus and engaging more bone, which provides a better opportunity for success.
With proper care and maintenance, studies have shown that dental implants can last 25 years or more.
Yes, most certainly a patient can have both arches done using the All-on-X procedure.
No, you will leave your implant appointment with a full set of functioning, attractive temporary teeth. Your gums will need time to heal from surgery, and the implants need time to fuse with the bone before the permanent teeth are placed.
Probably, at first. Most patients notice some change in S, F or V in the early weeks. With well-positioned teeth and a thin palate, nearly everyone adapts within one to six months.
Rarely. A lisp that persists usually has a mechanical cause: front teeth too far back, too much bulk behind them, or an air leak. Each can be corrected on the temporary teeth before the final set is made.
Because your voice is the most accurate instrument he has for positioning the front teeth. “Fifty-five” sets the edge against your lip. “Sixty-six” sets the gap between upper and lower. No scan replaces that.
Often, yes. The first step is to find the cause: edge position, palatal contour, tooth height or an air leak. Some corrections are adjustments; some need a new prosthesis designed from the lip and the tongue outwards. A consultation will tell you which.
That is the point of the temporaries. Once your speech is right on the trial set, the final teeth are made as a copy of the tested position, not a fresh guess.
At a consultation with Dr. Reshad. Bring any denture or implant teeth you wear, and any X-rays or scans you have. He will film your smile, test your lip with and without support, and tell you plainly which class you are and what that means for the teeth you can have.
Sometimes, and it depends on the class. If the ridge can be reshaped to lift the seam under the lip, a new prosthesis can be made as a Class III. If the lip line is very high, converting to teeth only, Class I, may be the better route. Occasionally lip repositioning or a neuromodulator, by referral, reduces how far the lip lifts. A consultation with the old prosthesis out will tell you which applies.
Because the seam has to be hidden at the lip's highest position, not at a polite smile. The video catches the extreme. Planning to anything less is planning to fail on the day you laugh.
No. Living gum and ceramic never match under all lighting and all movements. Every experienced ceramist and prosthodontist knows this. The only honest solution is to put the seam where the lip covers it.
If you have worn a denture for many years and your upper lip looks sunken without it, it is worth checking. The test is simple: a trial set of teeth without a flange, and a look at your profile. If the lip falls, a fixed bridge will not hold it, and you should be told that before surgery rather than after.
It changes what the surgery is for. Class I preserves bone. Class III may reshape it so the seam moves up. Class IV has to be converted first. Class V points away from fixed altogether. Knowing the class before surgery is what stops a second operation later.
Explore More Services
Medically reviewed by Dr. Mamaly Reshad, BDS (Lond), MSc (Lond), Cert Pros (USC), Prosthodontist — Last reviewed July 2026
Ready to Transform Your Smile?
Schedule a private consultation with Dr. Reshad to discuss your goals and explore your options.