The FP-3 Revision
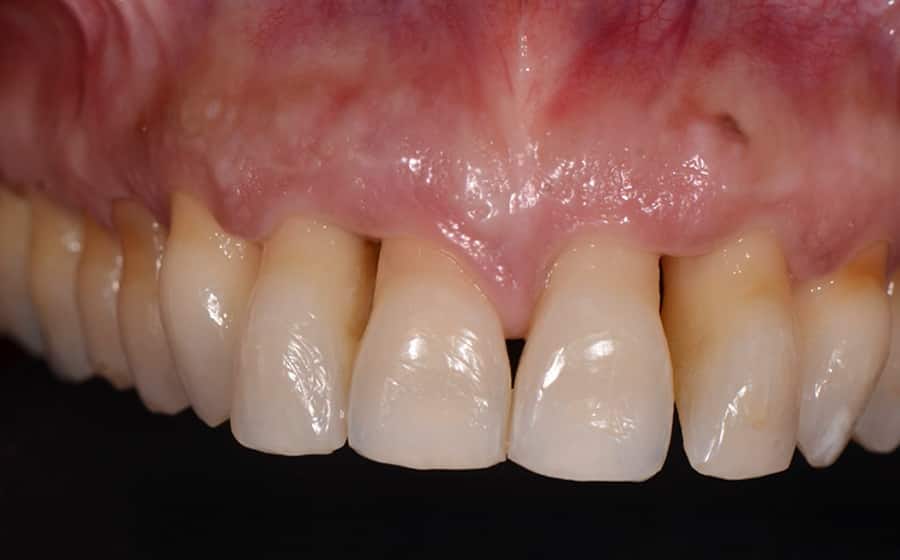
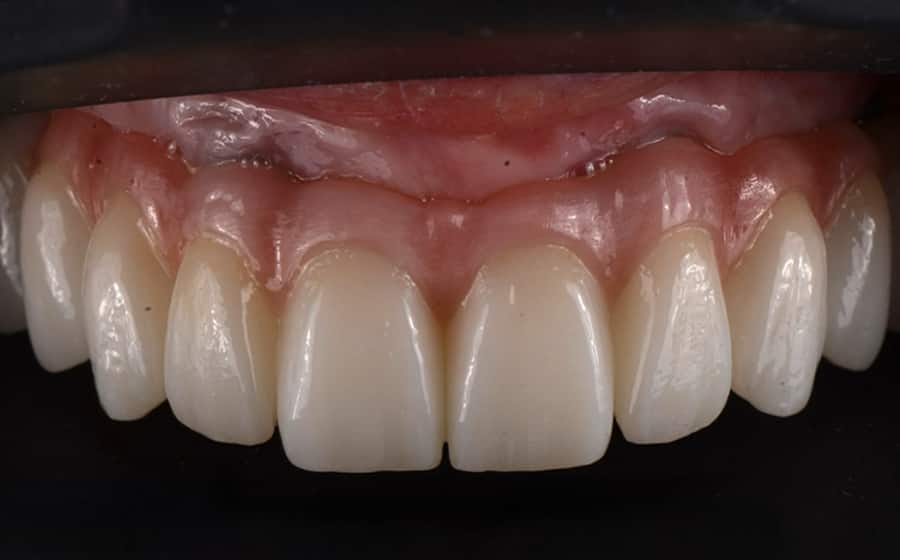
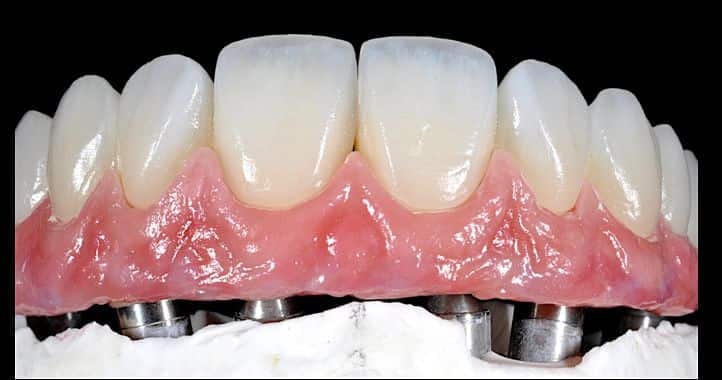
FP-3 is the class of fixed reconstruction that replaces the teeth and the lost gum with them — where a lot of pink has gone, the prosthesis carries its own gingiva in ceramic. This is that design, and the published framework technique Dr. Reshad uses when the implants underneath it point the wrong way.
Advanced Periodontal Disease, Rebuilt on Implants
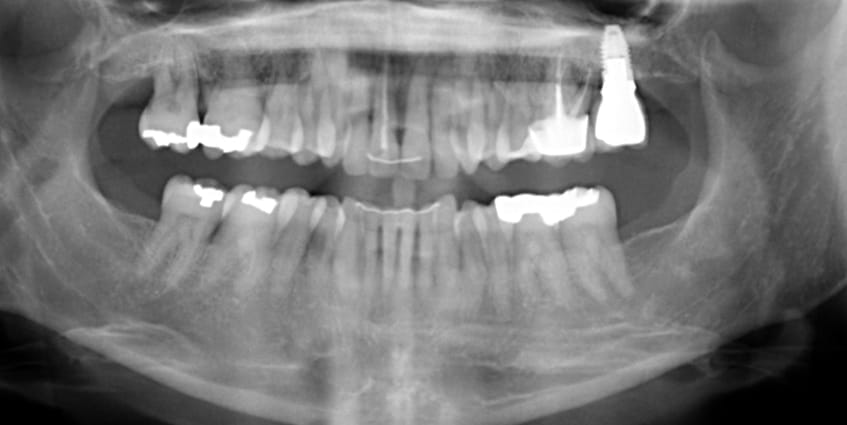
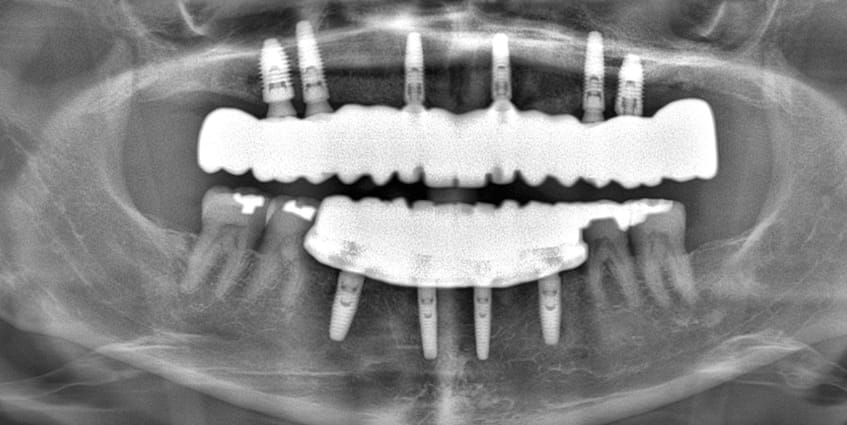
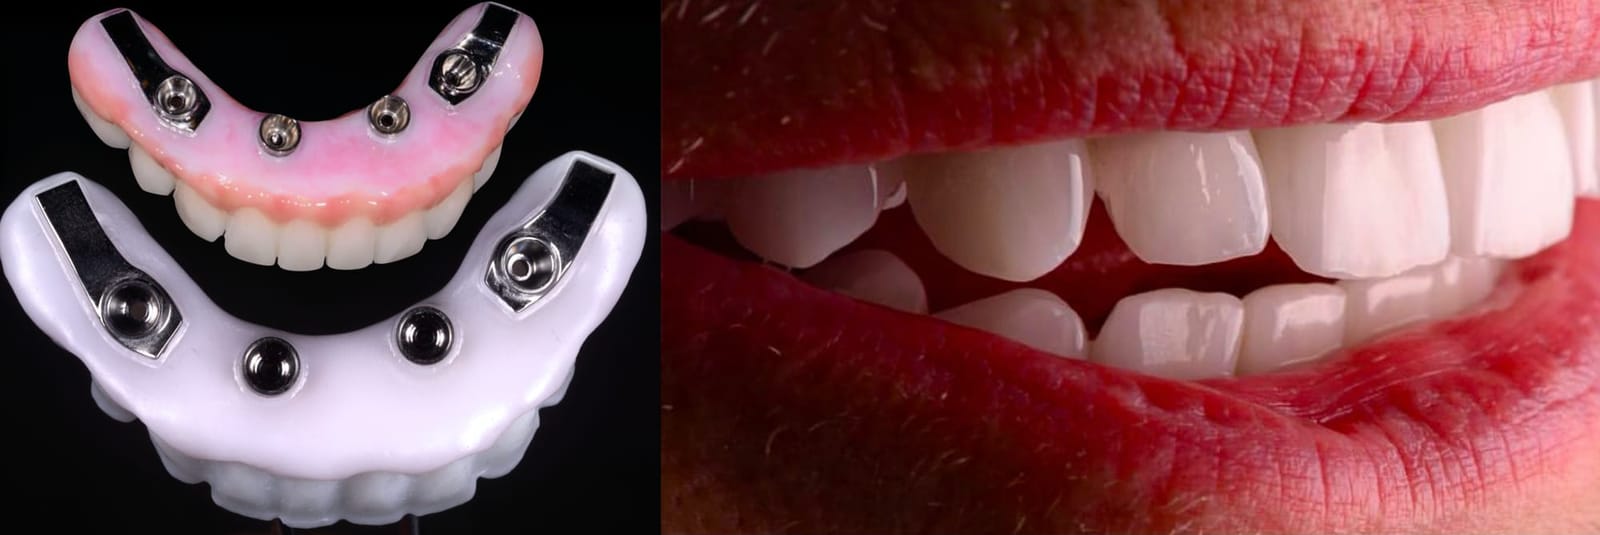
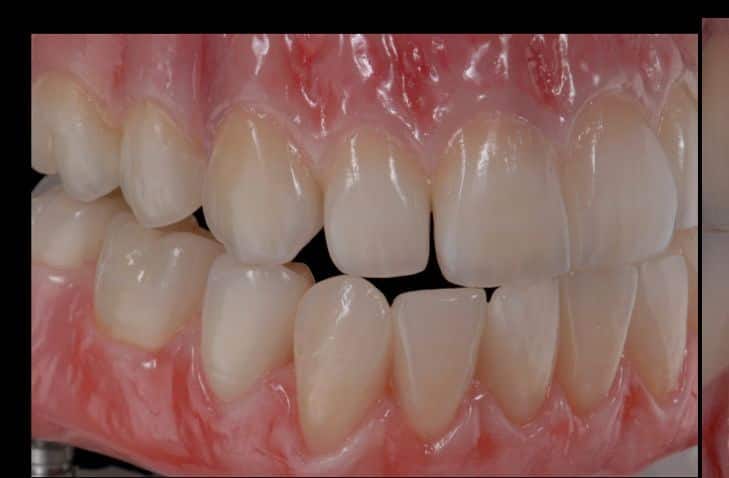
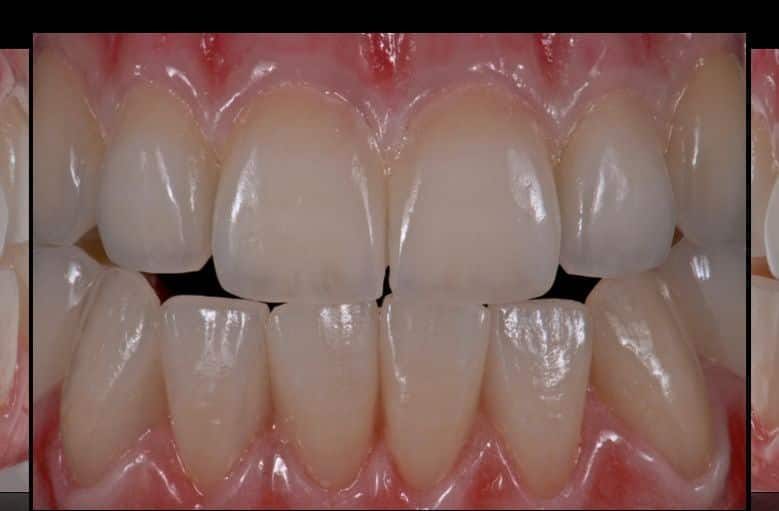
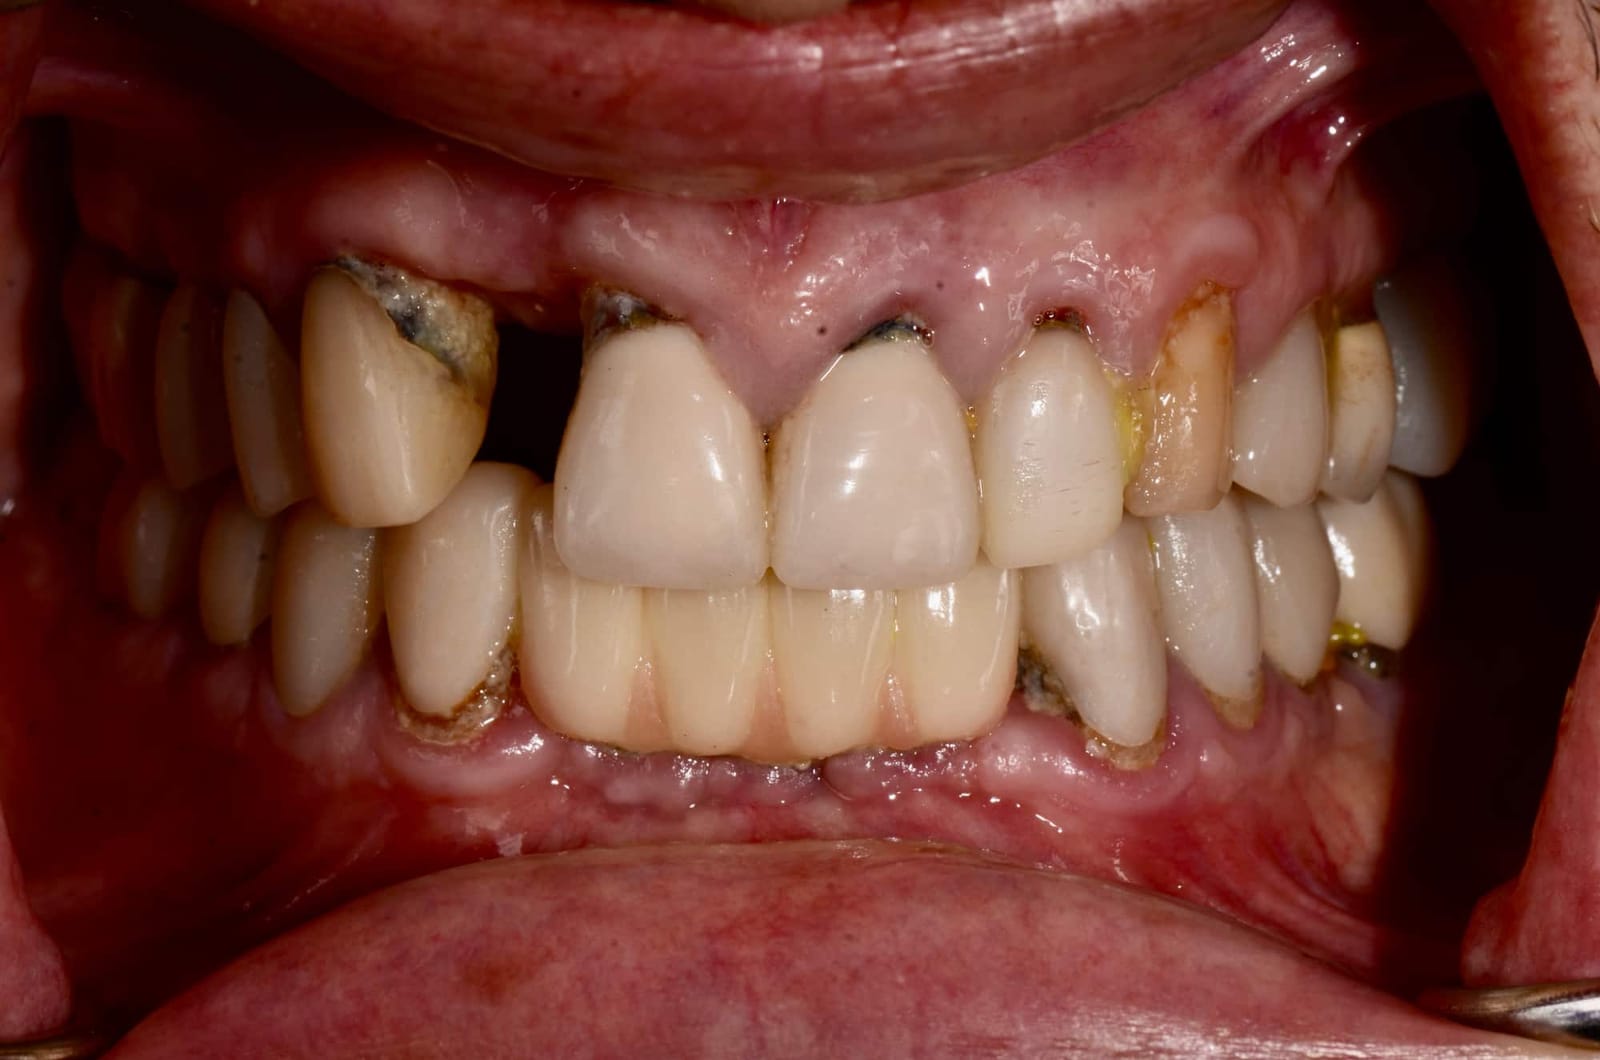
Teeth lost to advanced periodontal disease, and the fixed implant reconstruction that replaced them in both jaws — an FP-3, carrying the lost gum in ceramic, seen in the mouth and on the radiograph.
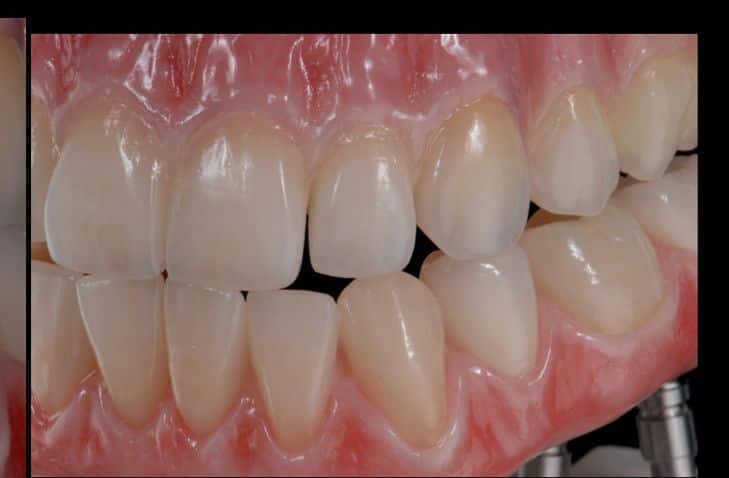
Implants That Cannot Be Restored
Some cases arrive with implants that cannot be restored.
Not damaged, not failing. Integrated perfectly, and pointing the wrong way. Severely malaligned, so that the screw access emerges through the front of the teeth rather than behind them, and conventional restoration is simply not available.
Removing them is surgery nobody wants. So the problem has to be solved above the bone rather than in it.
What Dr. Reshad Published
The answer is a technique he developed and published for exactly this situation: the correction of severely malaligned implants in an FP-3 design.
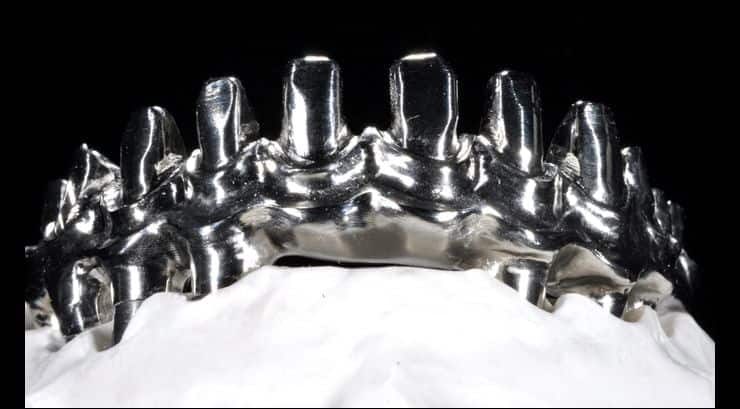
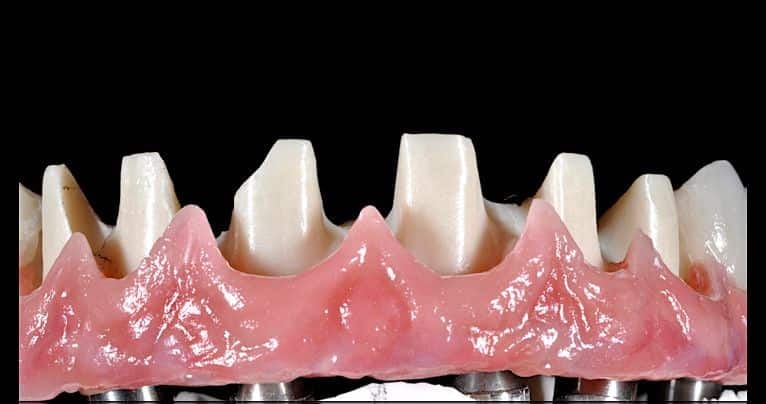
A primary framework is built first, and its job is not aesthetic. It corrects the angulation. It takes the trajectories the implants actually have and converts them into the trajectories the teeth need, so that everything above it can be made properly rather than compromised around a problem.
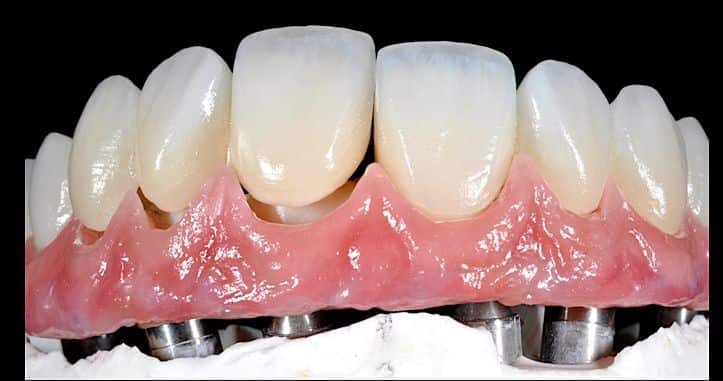
This is another framework design of Dr. Reshad's. A full-contour wax-up is made first and the whole shape of the finished teeth is designed in it. That wax-up is then cut back to make the framework, and ceramic is layered on top of what remains.
Another design, another system, to tackle the variety of implant angles, complications and revisions that arrive. Every case is unique, and every case is dealt with by a bespoke design of framework to suit that individual patient. Only a prosthodontist can do that.
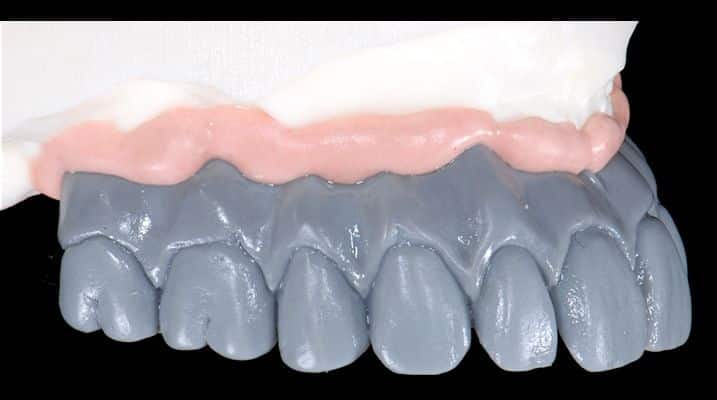
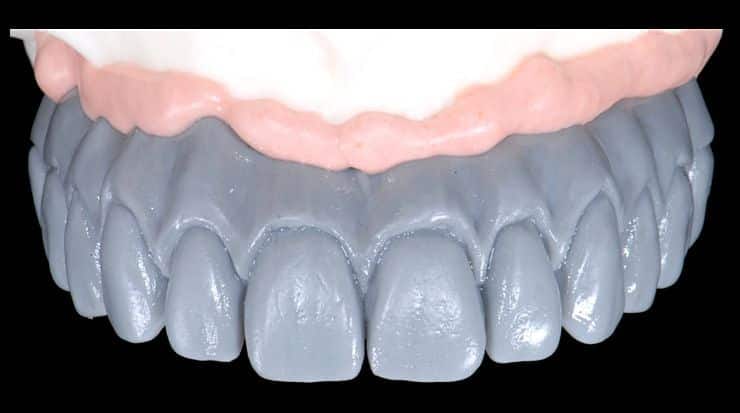
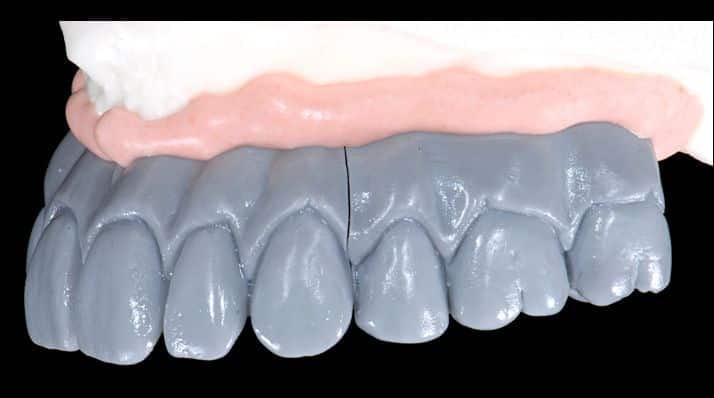
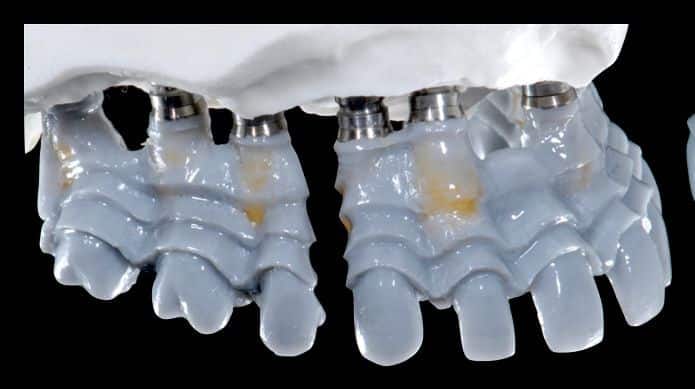
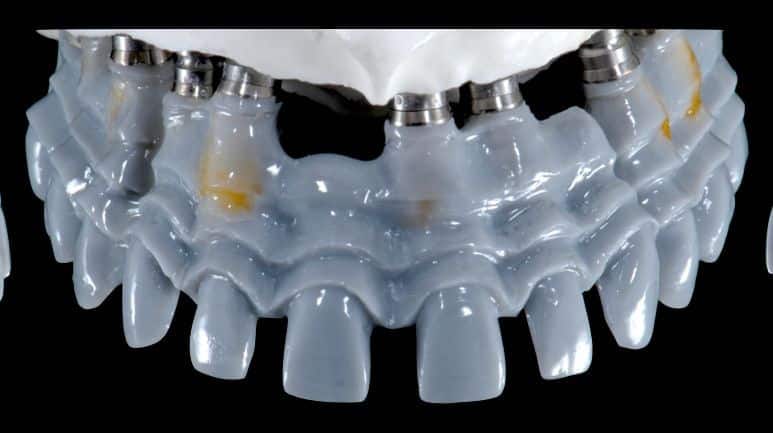
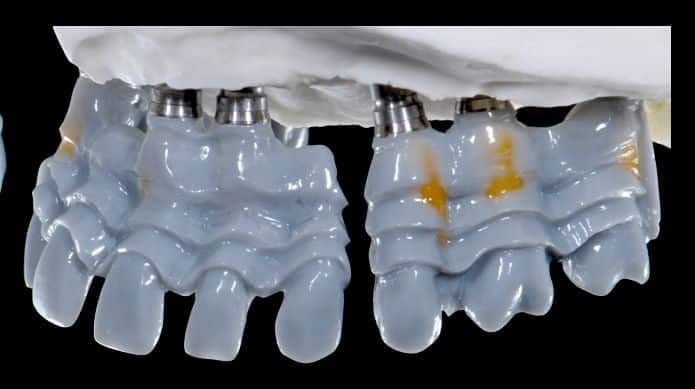
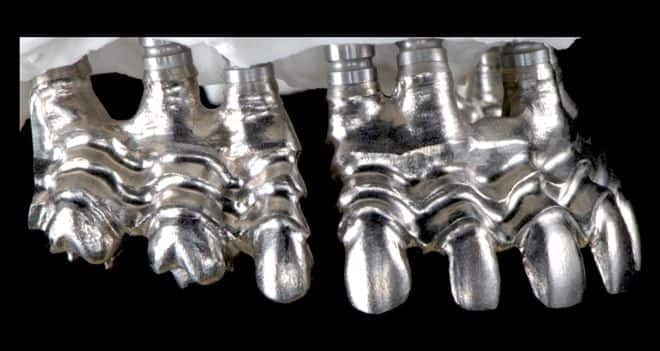
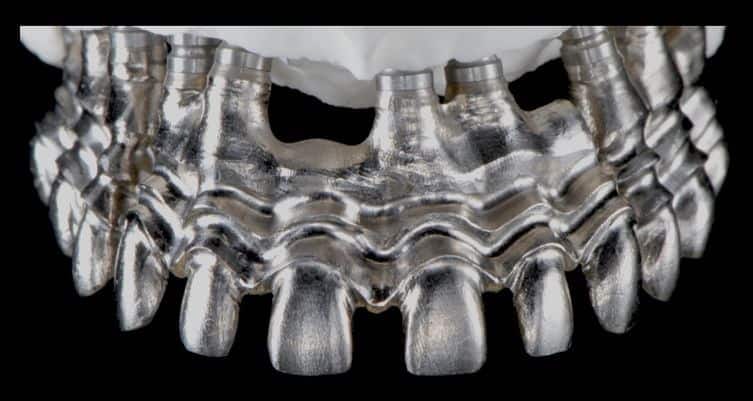
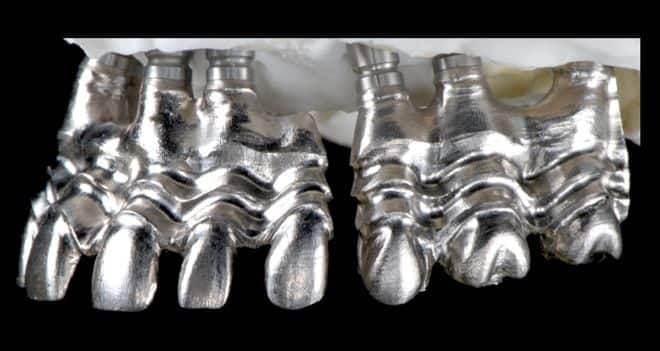
Individual bridges are then cemented onto that framework.
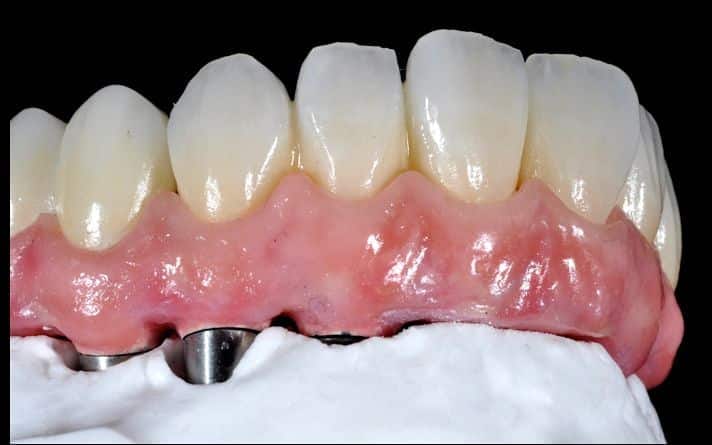
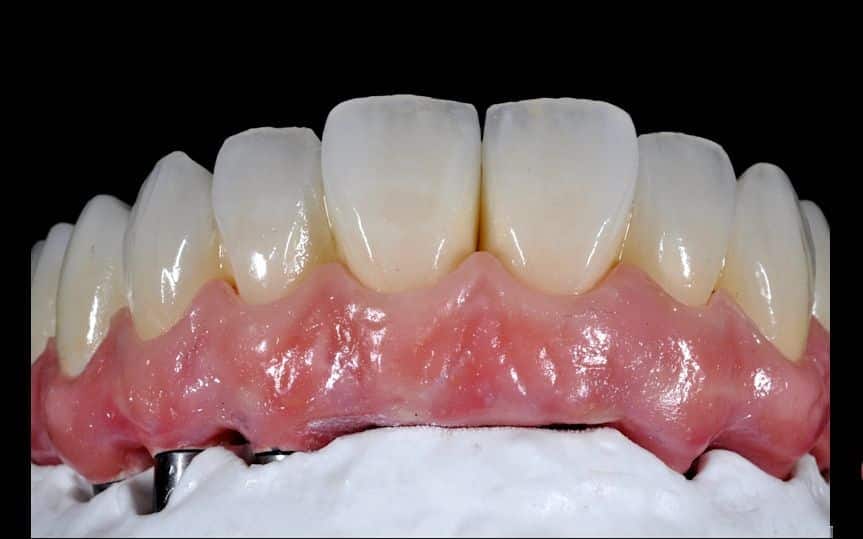
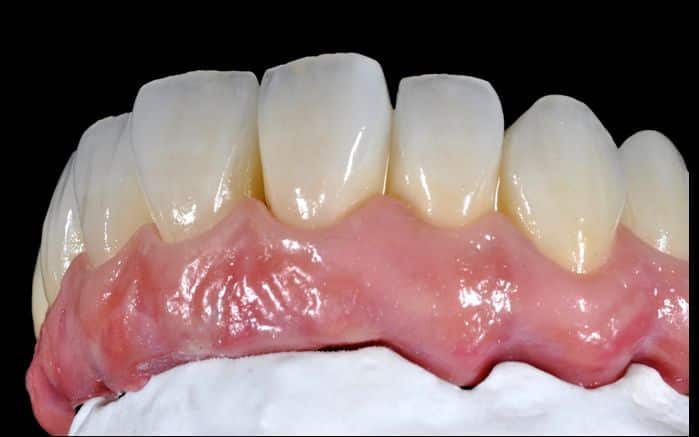
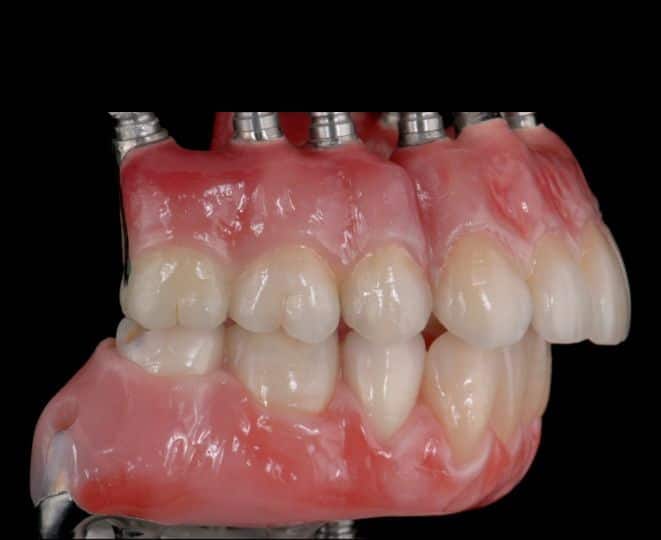
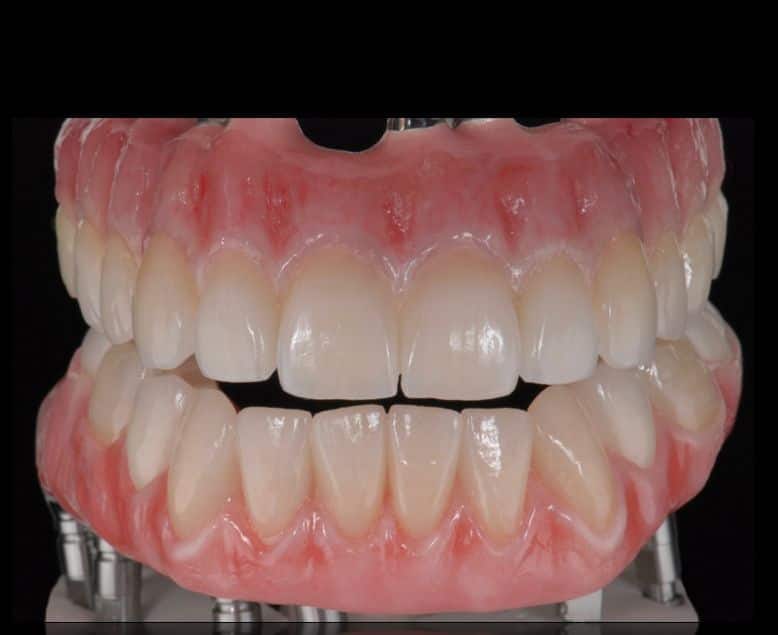
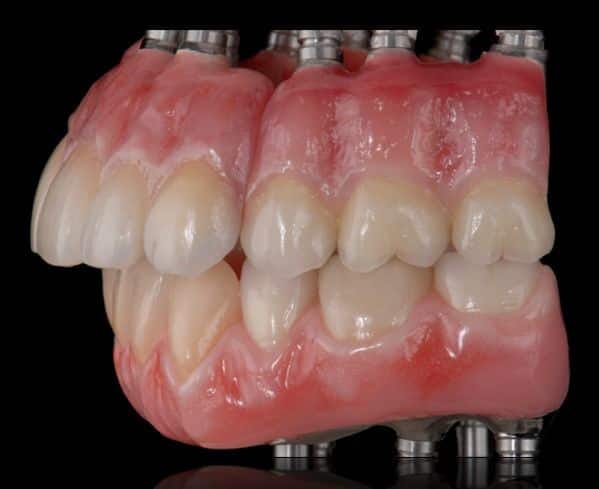
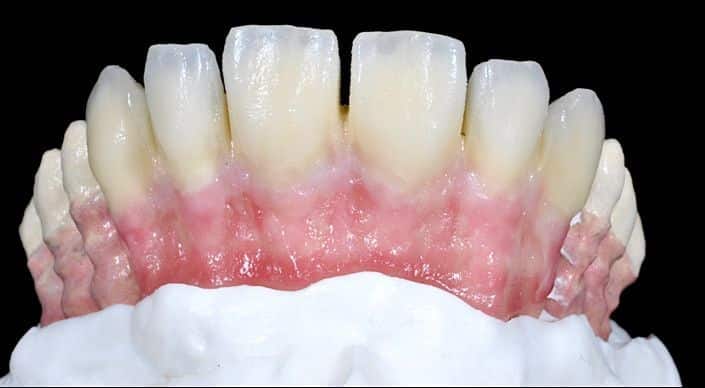
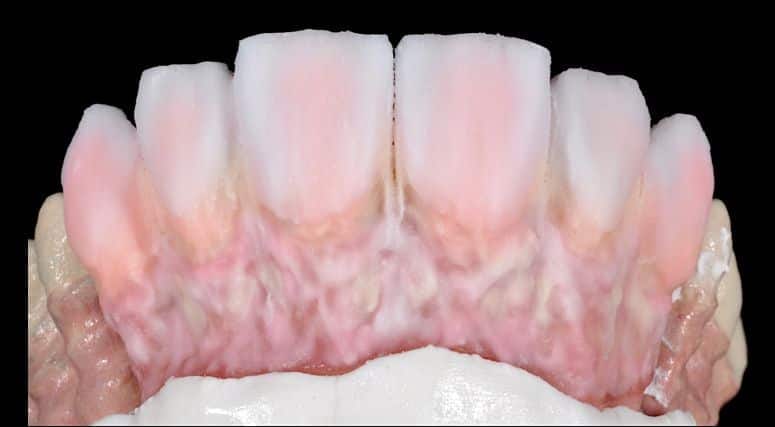
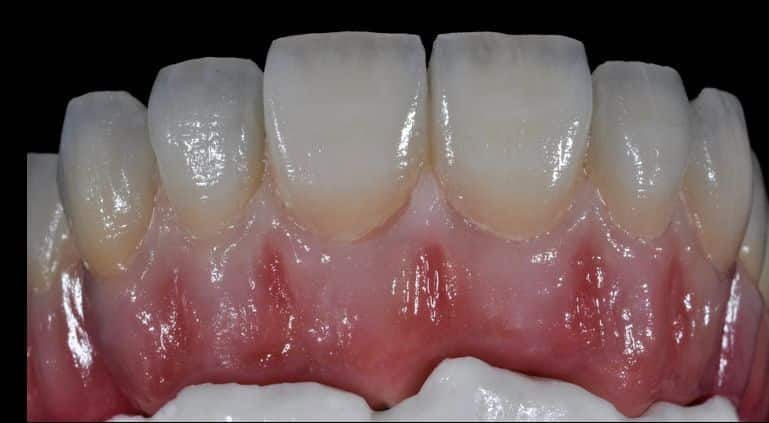
The result is a prosthesis that looks and feels natural, and a patient who functions well, on implants that nobody would have placed that way by choice.
Nearly Twenty Years of Refinement
The original version of this design was created almost twenty years ago, when there was no other answer available.
What is used now is not what was used then. The current framework is cobalt chromium, with ceramic built on top of it, still performing the same correction of the implant angulations but in materials that have moved on considerably since the technique was first published.
That is how a technique should age. The principle holds. The materials change.
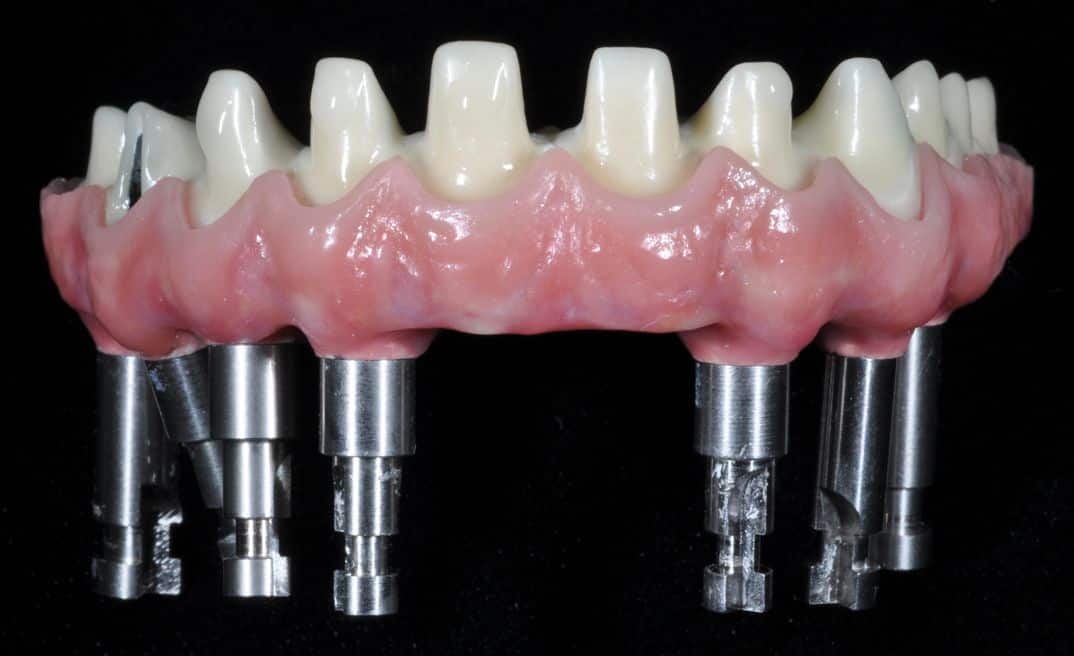
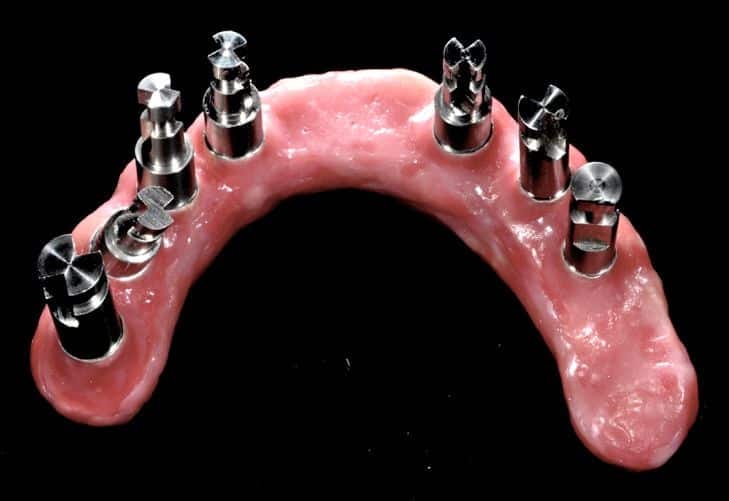
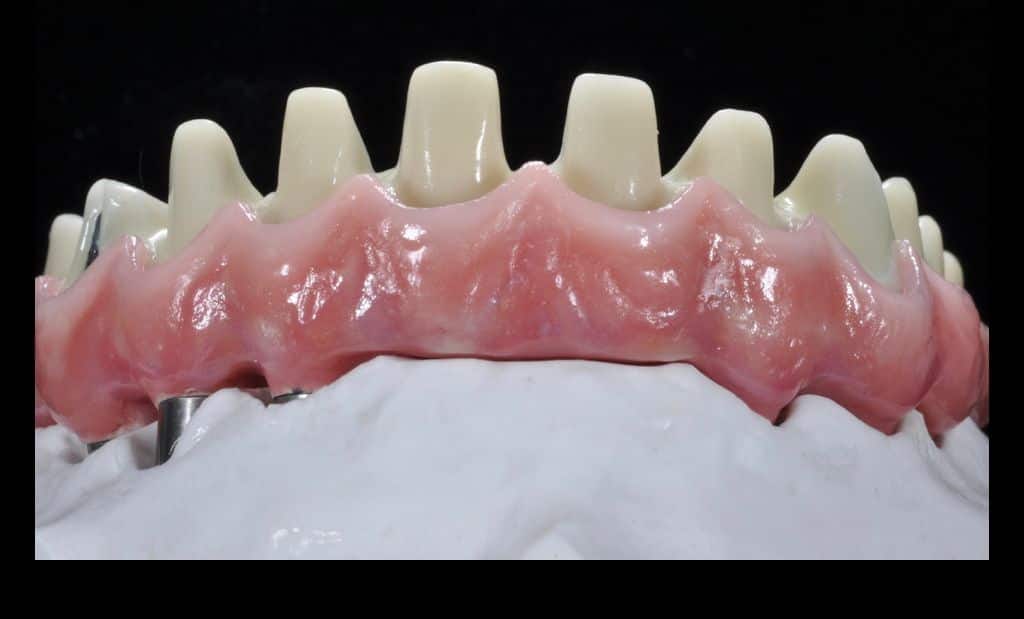
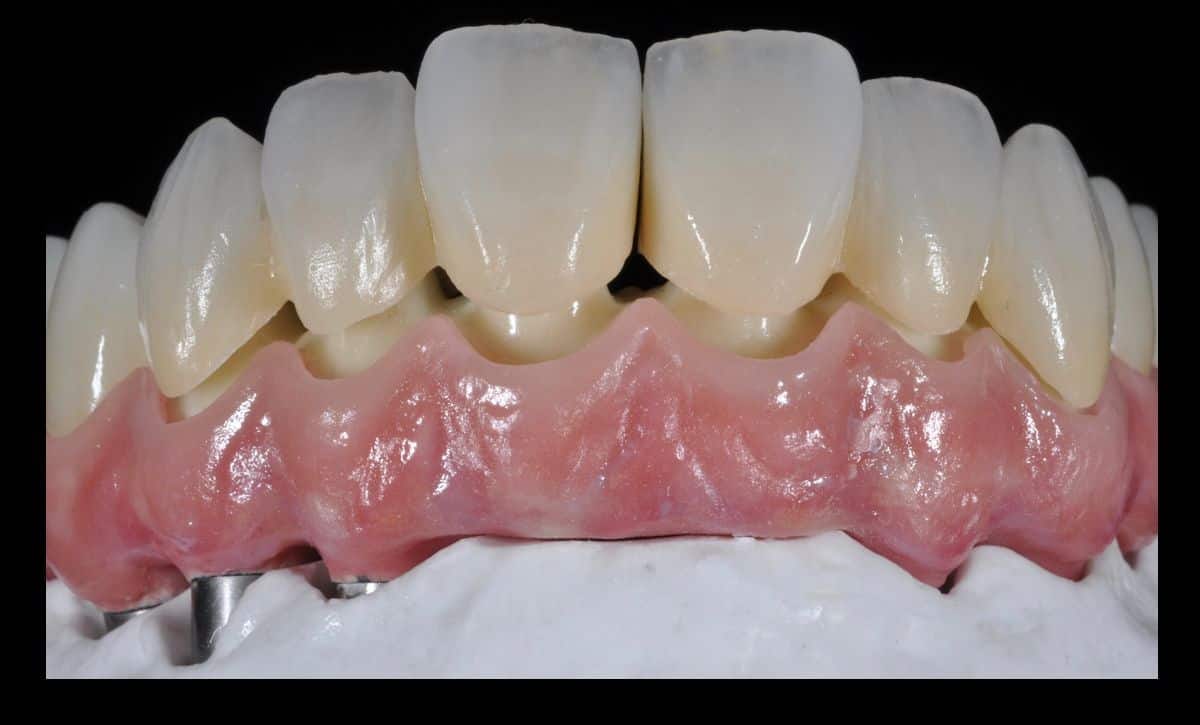
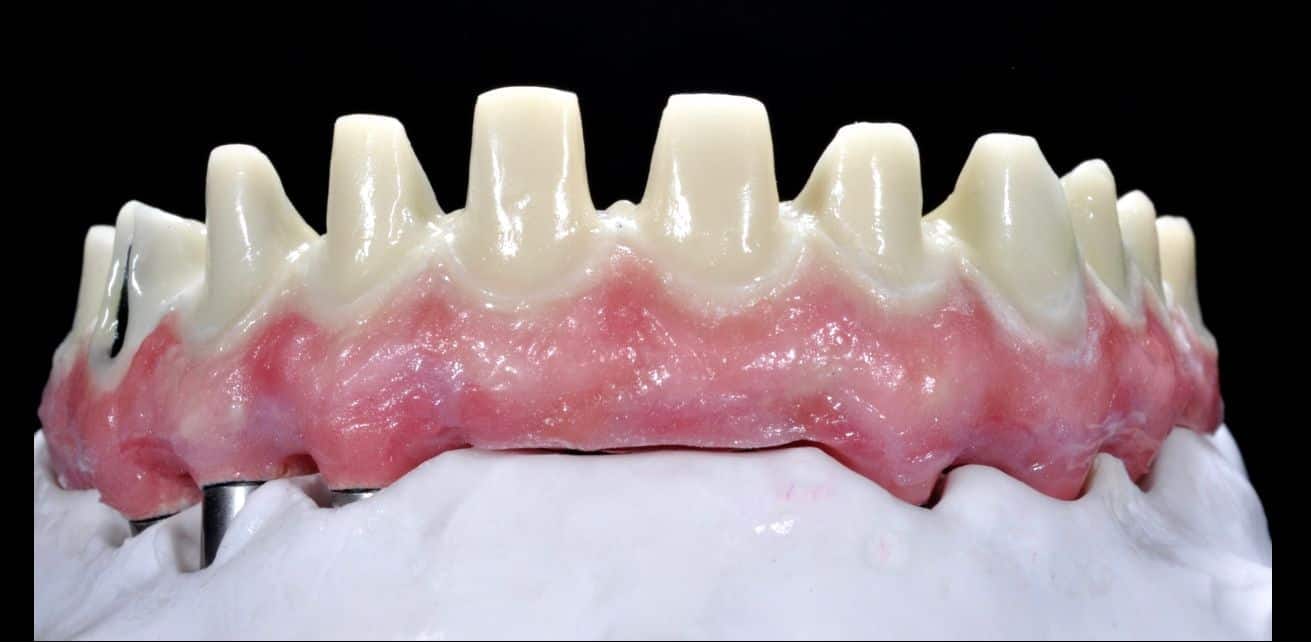
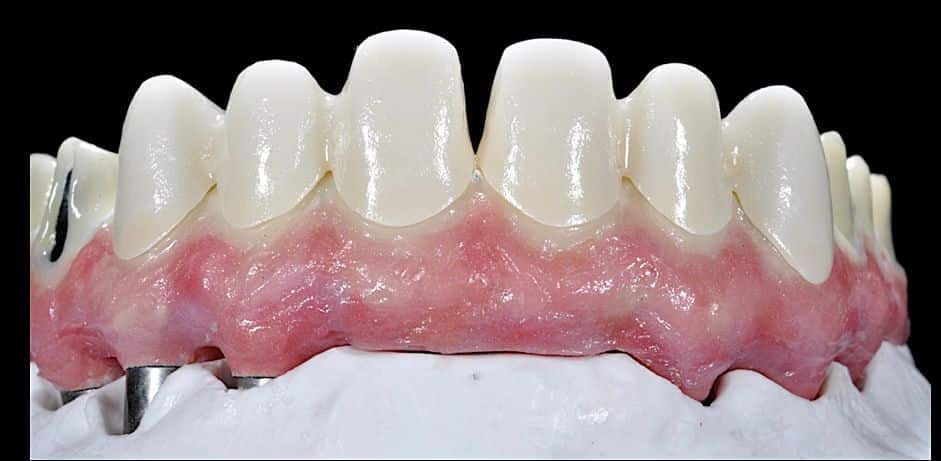
Severe Malalignment, the Classical Technique
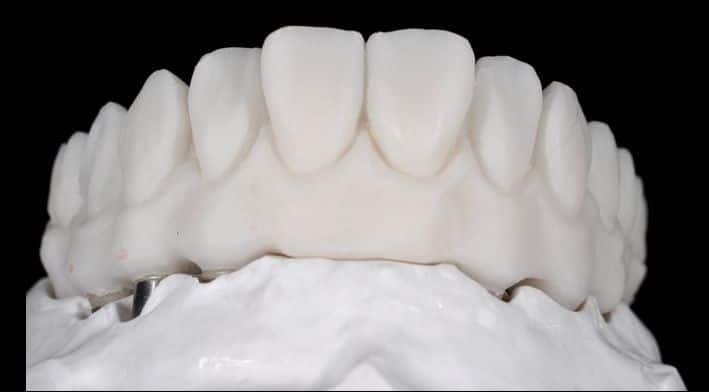
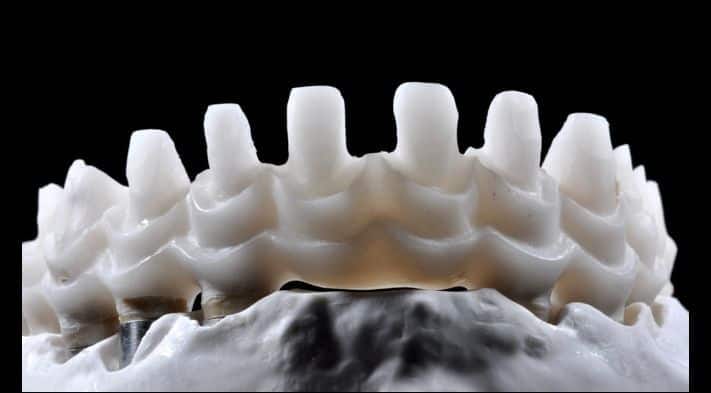
Zirconia on a Titanium Bar, Anchored at the Back
This patient's definitive restorations are zirconia carried on a titanium bar, in both jaws, placed and loaded immediately after the failing teeth came out. What sets the case apart is where the upper implants go.
He received pterygoid implants, which means they are specialized implants in the back of the mouth, in the upper jaw. They allow additional support for the system.
They allow longevity in the system, because if anything fails in front of them we will always have two implants anchored in the very strong skull base bone in the back. That will mean that even twenty years later, if we have a failure, we will still have enough implants all around to function if we need to transition to additional implants in the distant future.
Finally, having implants so far back allows the maximum chewing surface for patients, with possibly the full complement of teeth, with minimal risk.
But you need to know what you are doing, and that is what we do at Dr. Reshad's office.
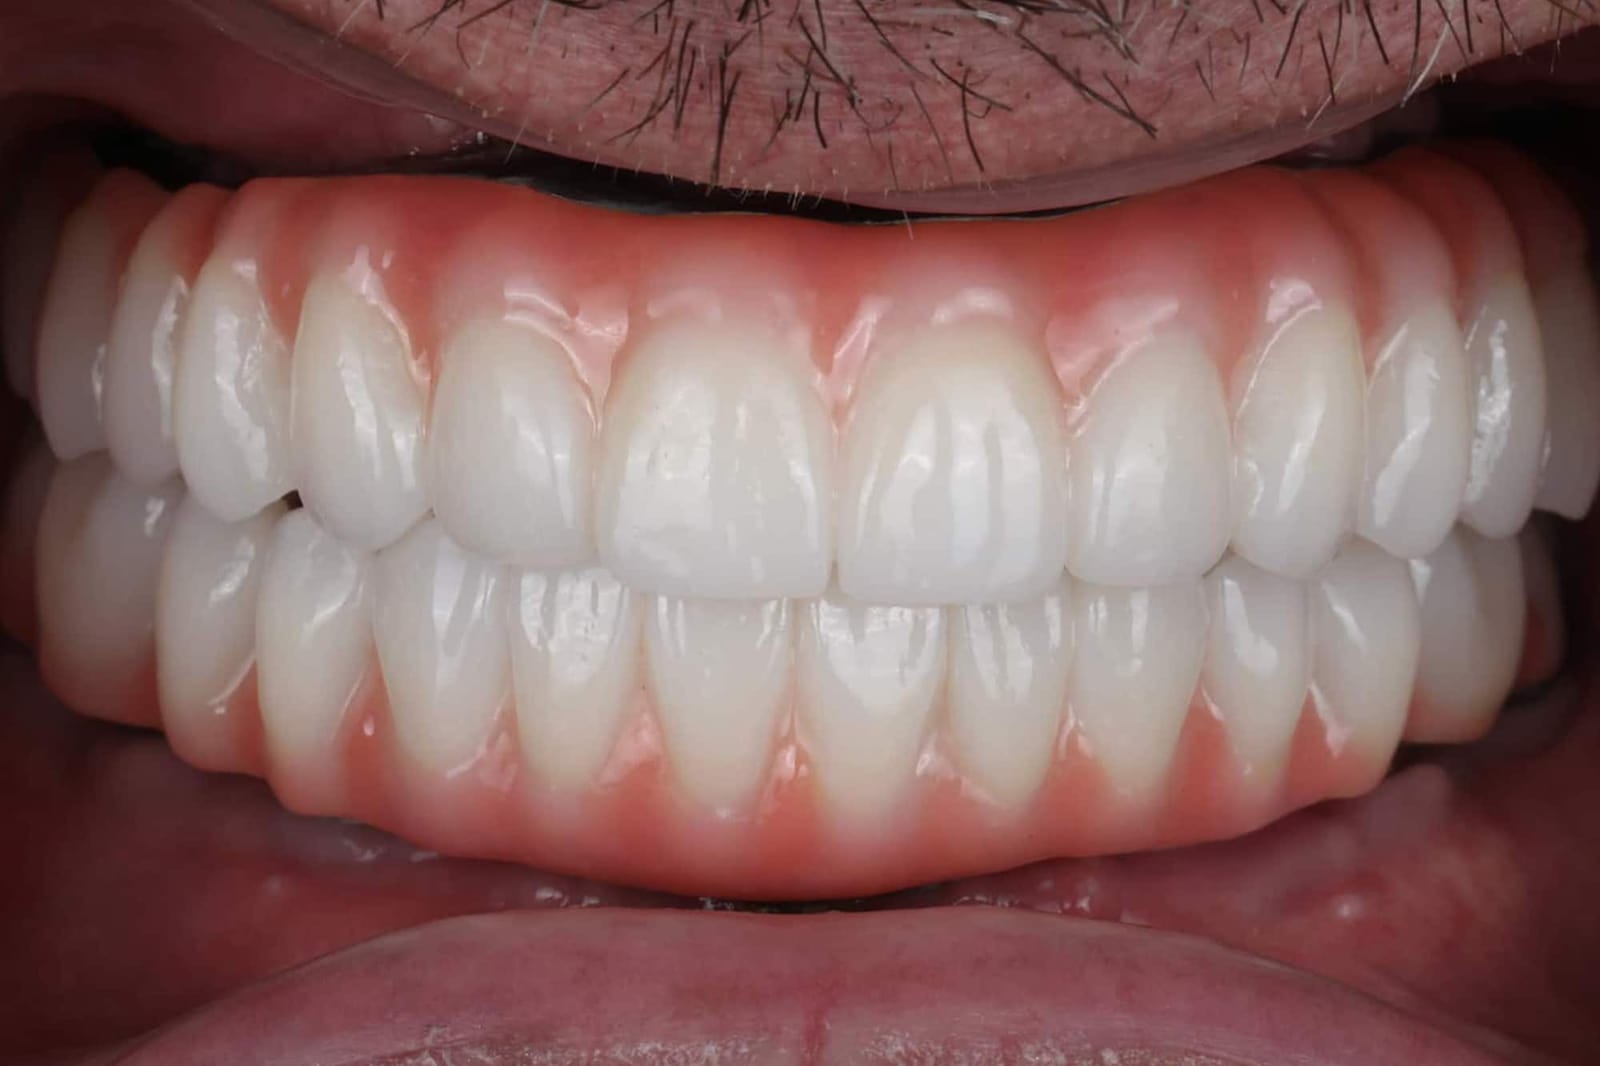
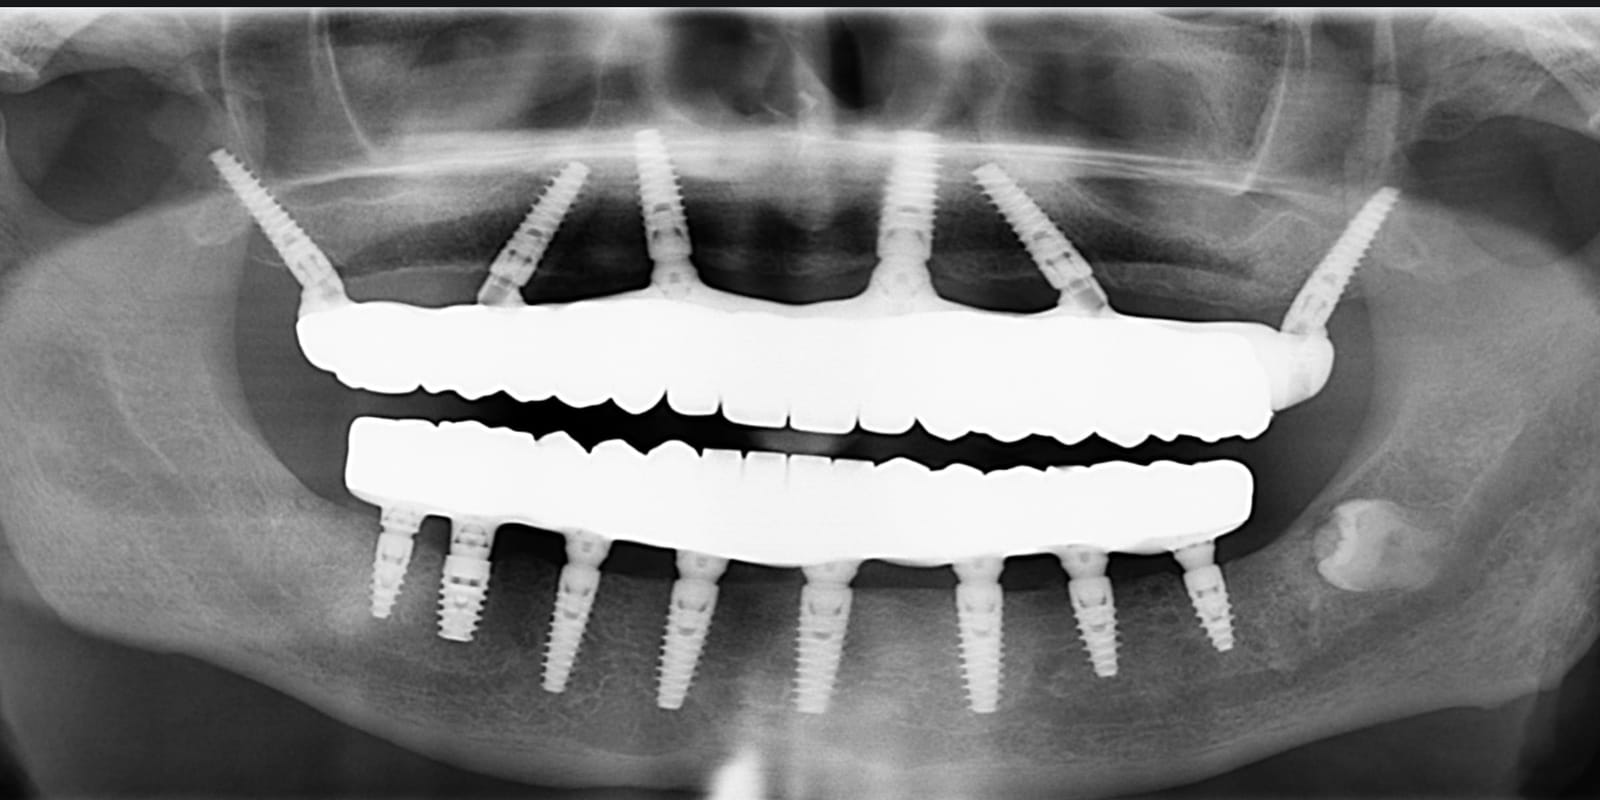
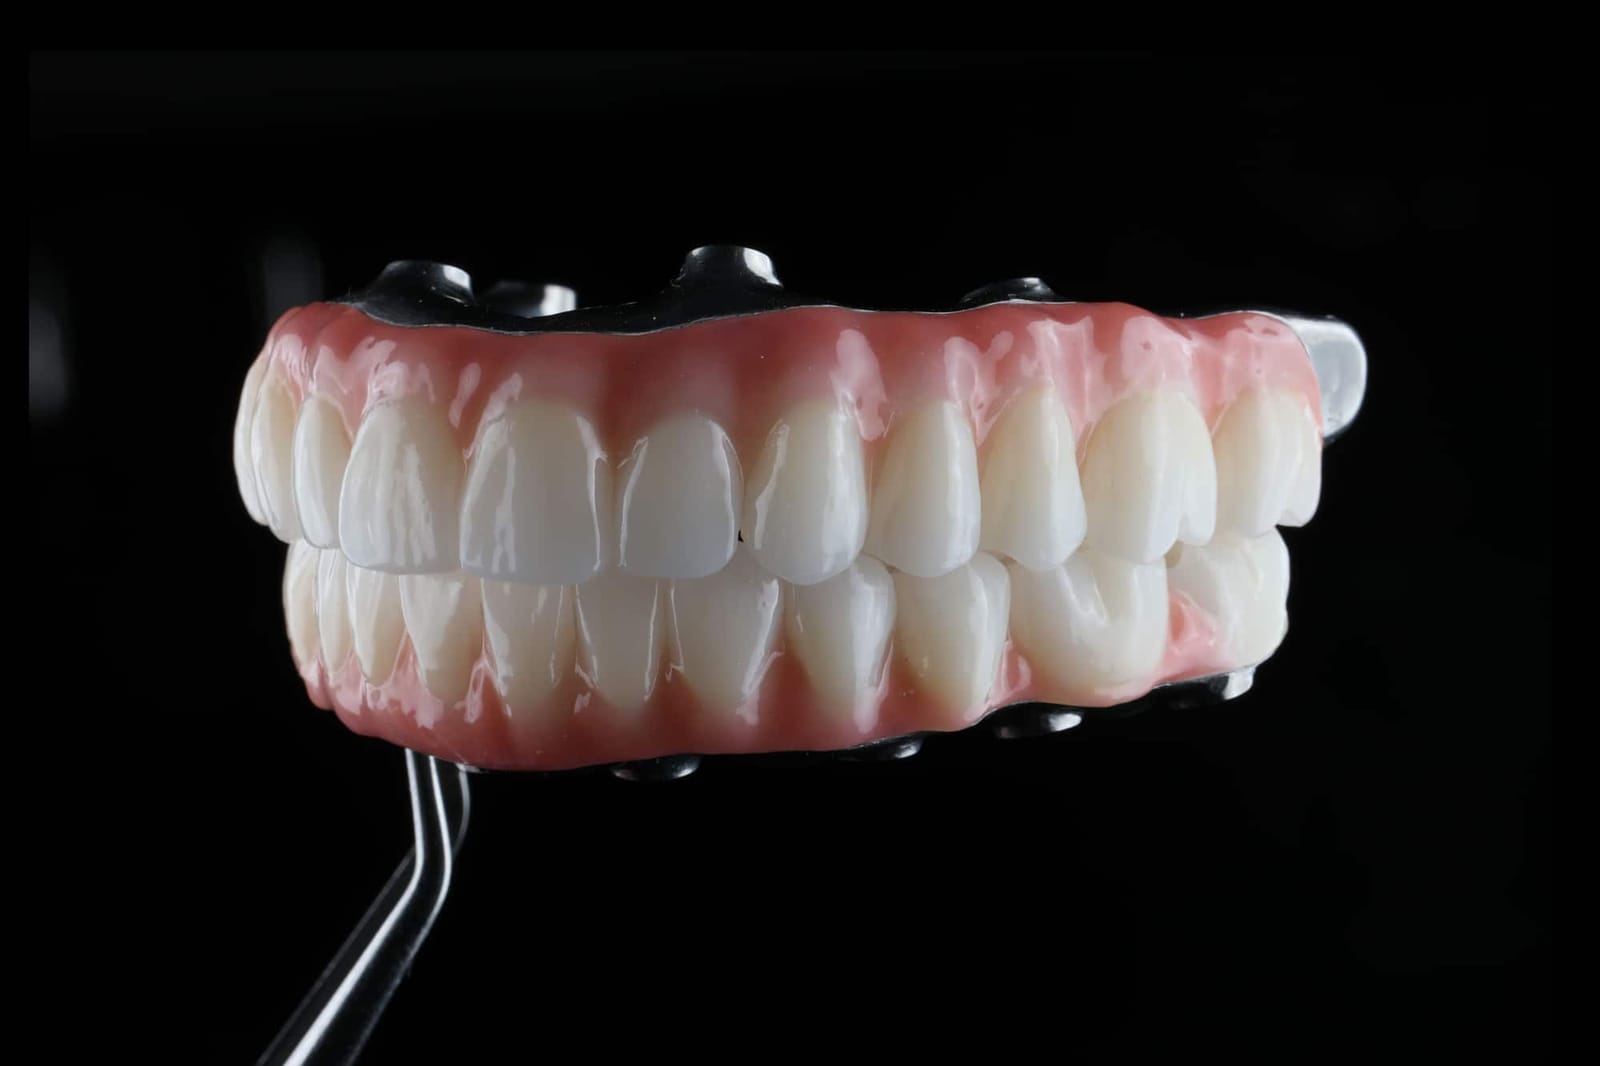
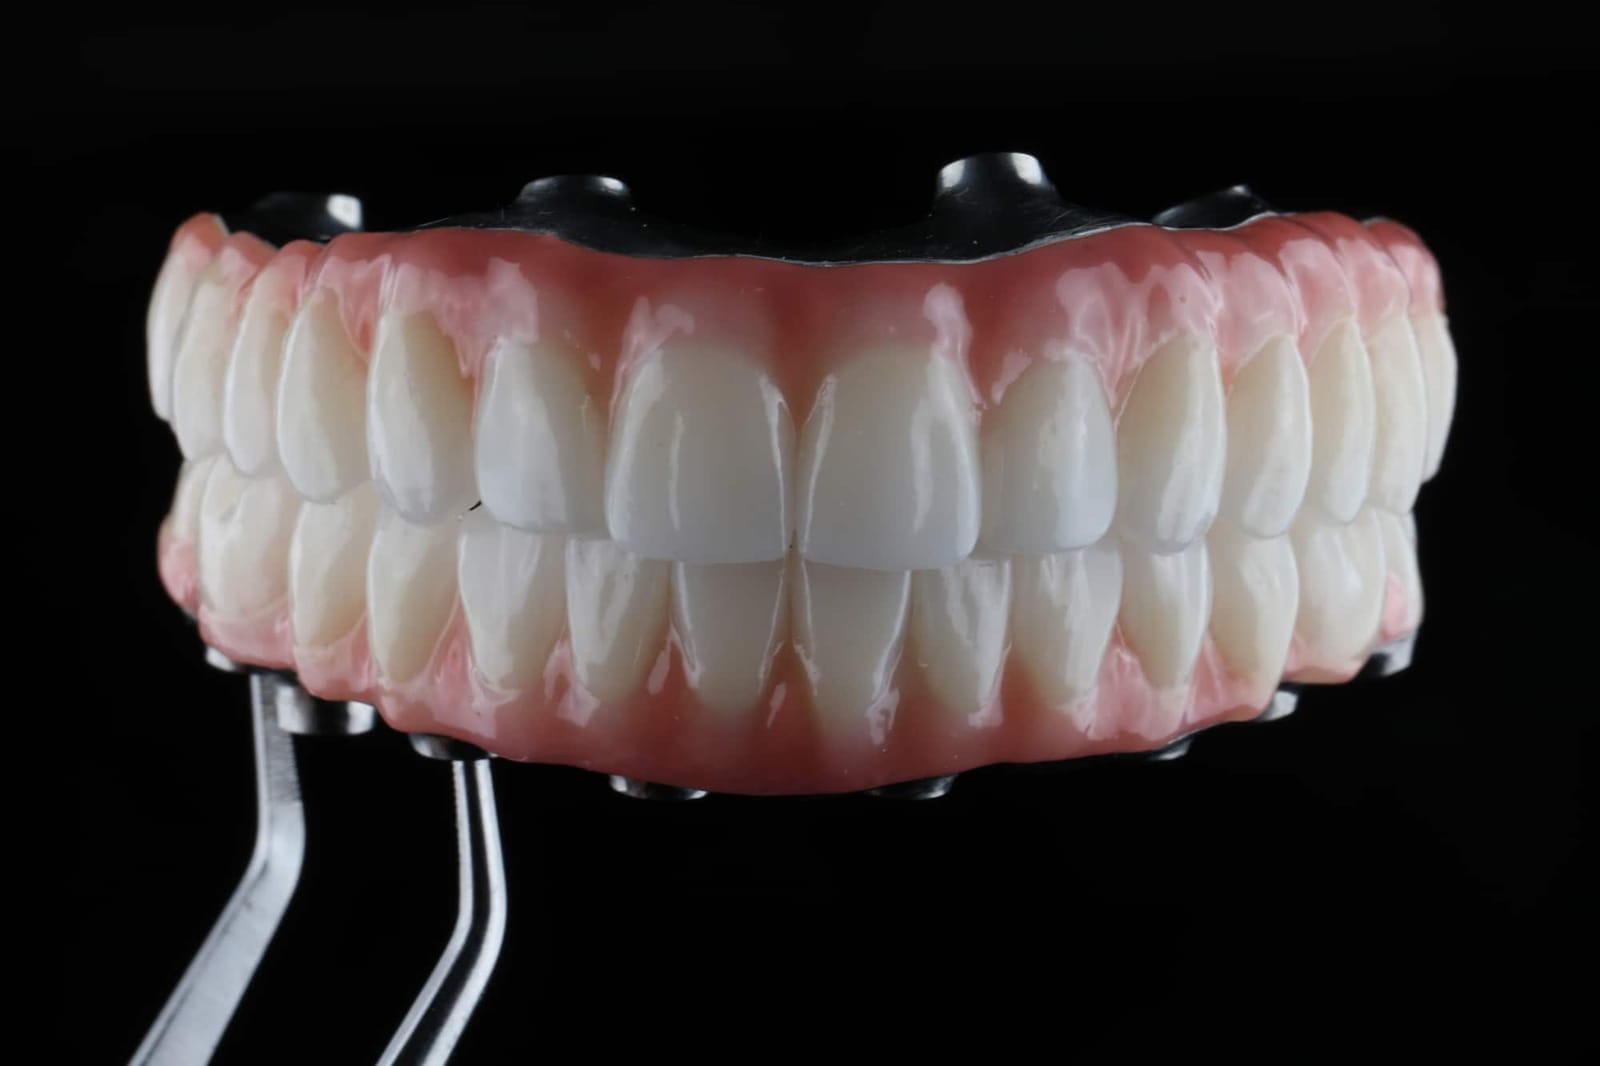
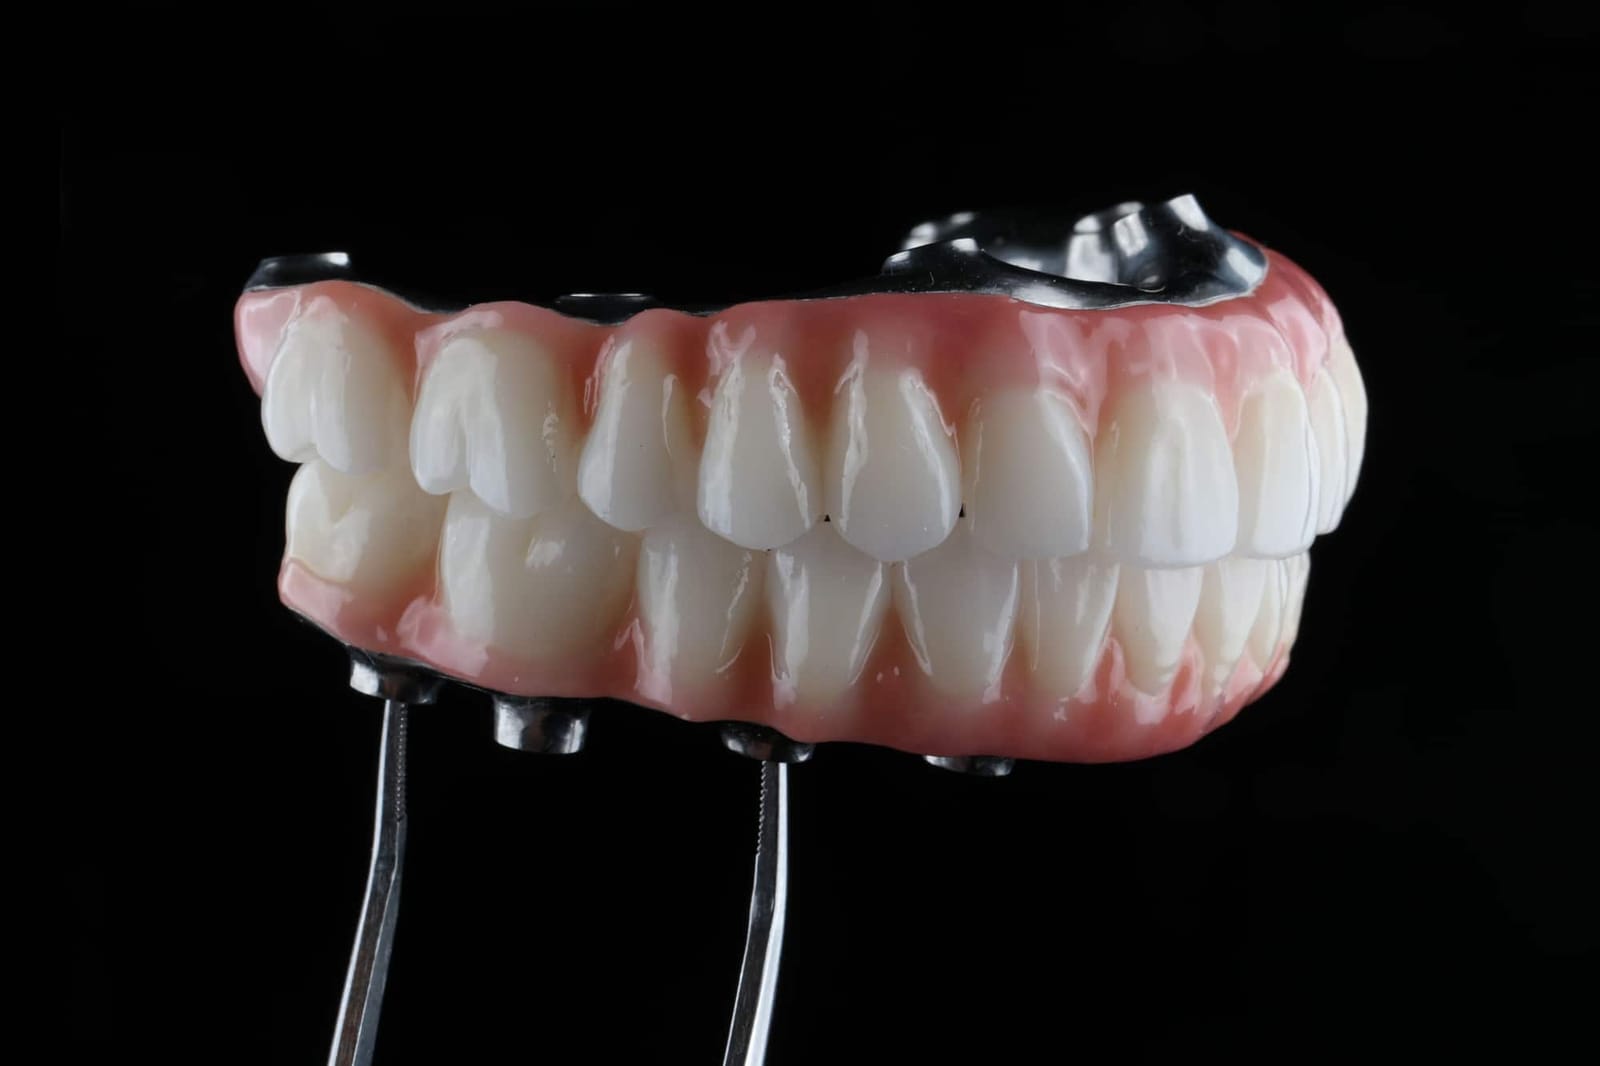
Precision and advanced dentistry for optimal function and longevity.
What Can Go Wrong — and Why Patients Come to Us
Full-arch implant dentistry can give you a smile that lasts the rest of your life — or a decade of loose screws, bad odor and remakes. The difference almost always comes down to decisions made before the first drill touches bone. After 30 years and thousands of full-arch cases, this is exactly how Dr. Reshad plans a case, what he watches for, and how he prevents the problems most patients never see coming until they're living with them.
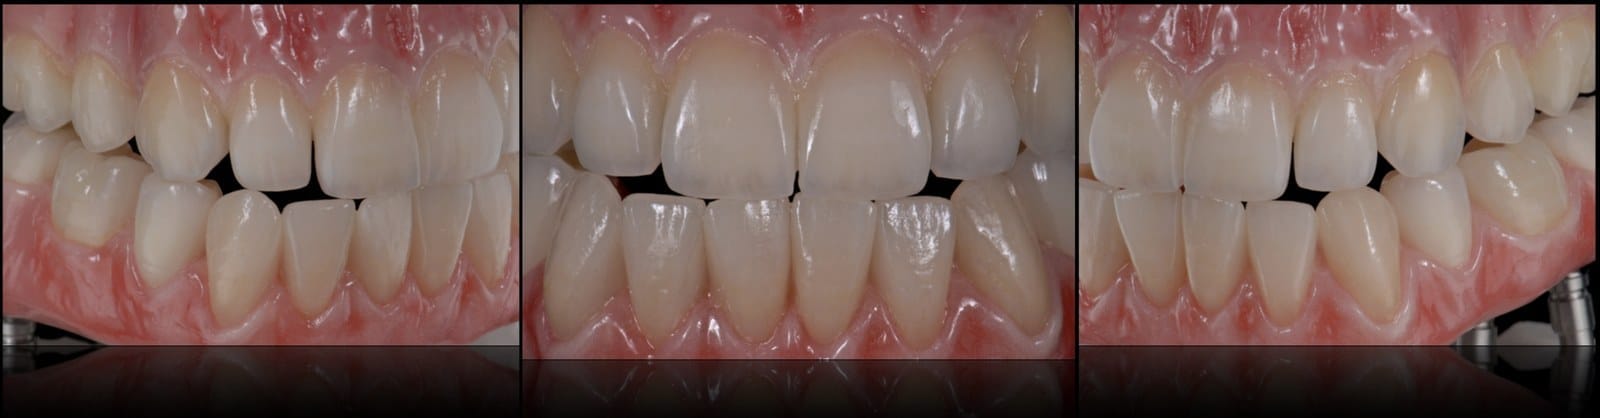
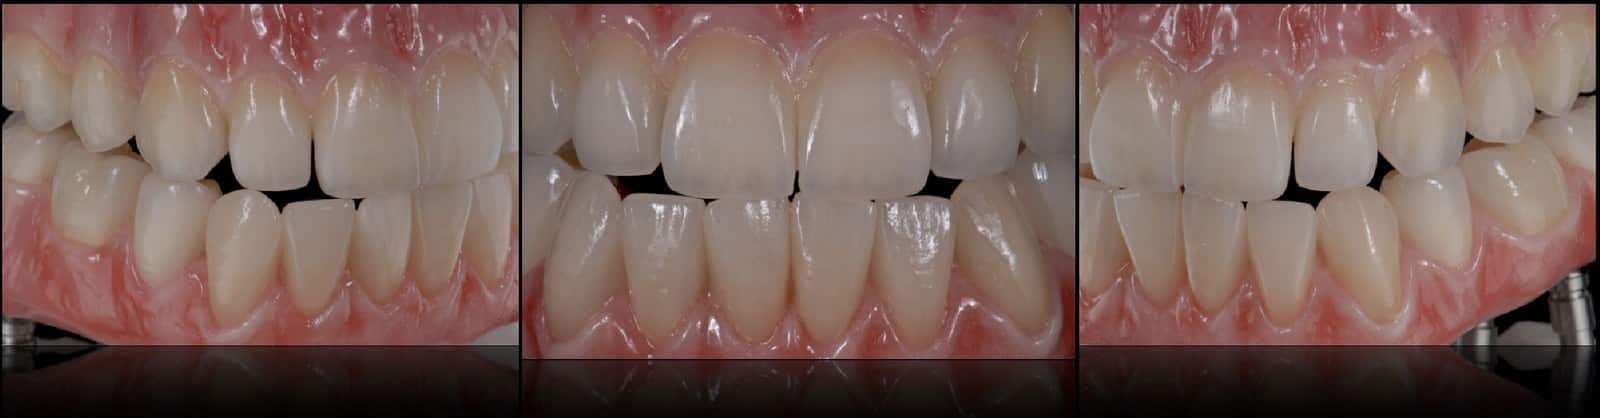
A finished full-arch restoration, from three angles — this is what "done right" looks like.
Six decisions, made before the first implant goes in
Get them right and the surgery has something worth carrying. Get even one of them wrong, and no implant system on earth will save it.
- 01
Shape, contour & emergence
Plan the tooth position first, then reduce the bone to fit it — not the other way round.
- 02
Load & cantilevers
A distal cantilever turns every bite into a bending load on the last implant.
- 03
Restorative space
Anterior space for lip support and speech; posterior space for a framework that survives.
- 04
A-P spread & distribution
Where the implants sit decides what the prosthesis can be.
- 05
Anterior occlusion
How the front teeth touch and slide decides how much force reaches the back implants.
- 06
The neutral zone
Where your tongue, lips and cheeks let the teeth live.
"Position first. Then implants, provisional and definitive, all built to serve it."
Dr. Mamaly Reshad, Prosthodontics
Every full-arch case Dr. Reshad plans sits on a three-way tension: function, biology and aesthetics. Early in his career he leaned toward aesthetics — how the case would look was what drove his decisions. Thirty years and thousands of cases later, he has moved hard toward the functional corner of that triangle, and he can tell you exactly why: without proper function, a restoration doesn't last. And without longevity, aesthetics is irrelevant, because the teeth have already fractured, loosened or been remade by the time anyone would admire them. Everything that follows comes from that one shift in priority.
Most of what follows are decisions your surgeon and restorative dentist have to make before a single implant goes into bone — not adjustments made afterward. Get them right and a full-arch restoration can genuinely last the rest of your life. Get even one of them wrong, and you can end up exactly where the patient below did.
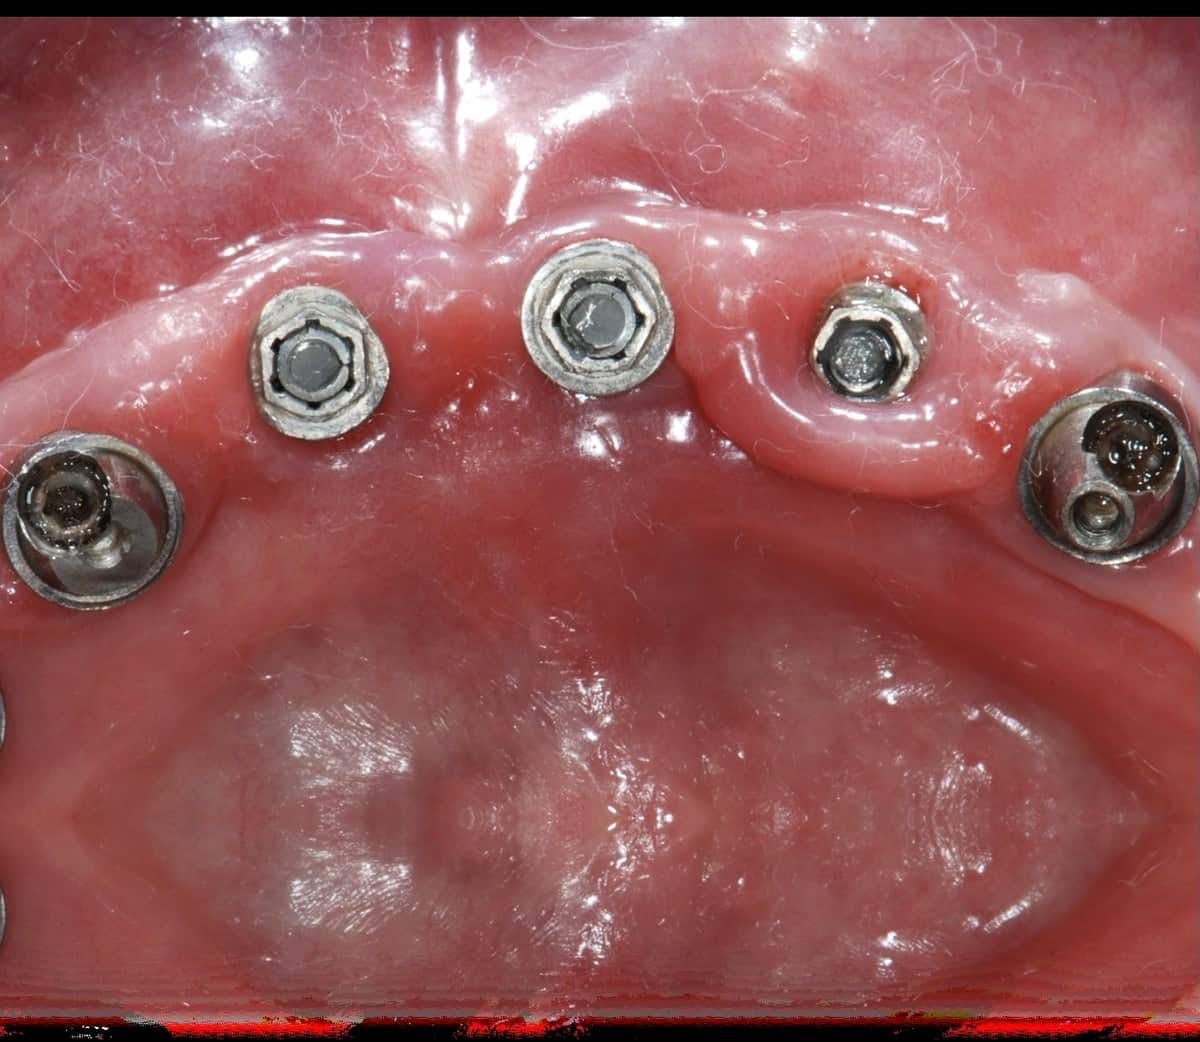
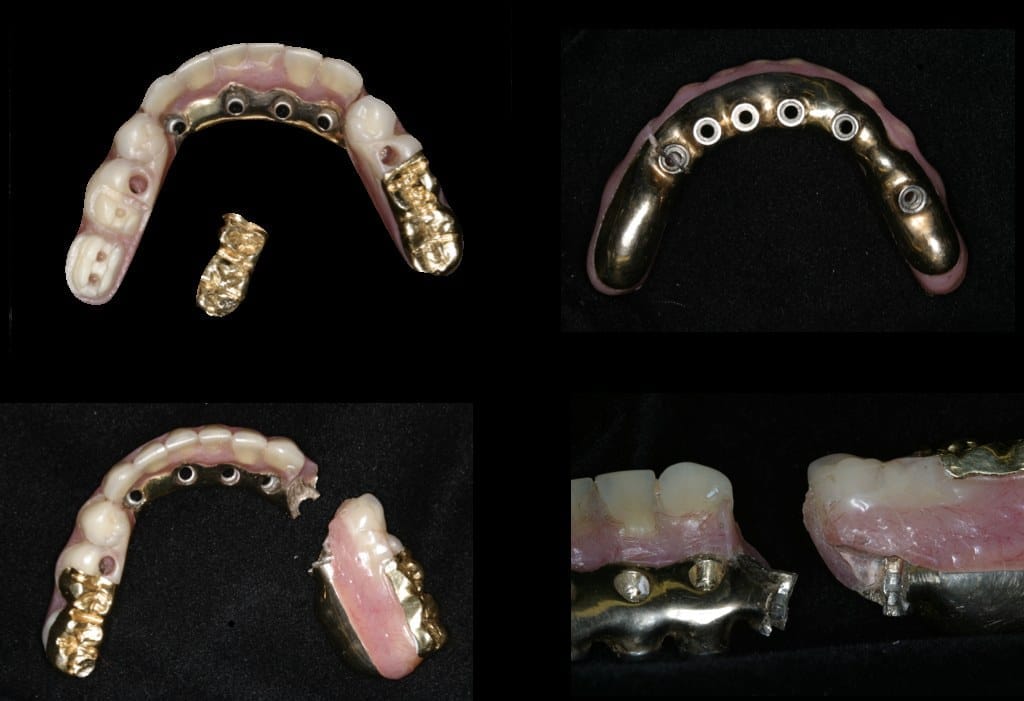
A patient came to Dr. Reshad after an all-on-4 restoration elsewhere left him in daily discomfort: his upper prosthesis was constantly loosening, his lower one gave off a persistent odor he couldn't get rid of no matter how carefully he cleaned it, and he'd bite his own cheek and tongue routinely. He'd even been given a removable partial denture to snap onto his "fixed" restoration — because he hadn't been given enough teeth to chew with in the first place. When the lower prosthesis was finally removed, two of his four implants had already failed. The underlying cause wasn't bad luck. It was a restoration shaped and positioned in a way that trapped plaque against the tissue from day one, on implants that had never been distributed to bear the load he was putting on them.
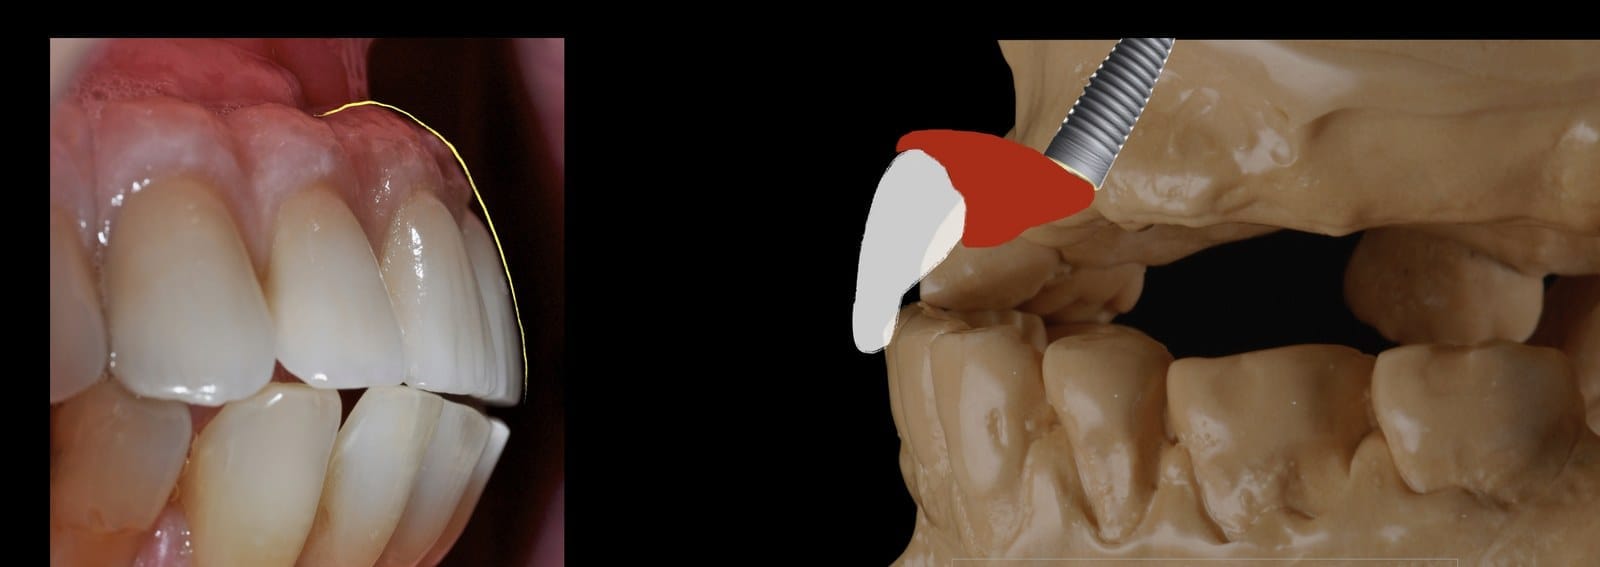
Where the food trap comes from — Seen from the side, the problem is the shape. When the implant goes in first and the teeth are fitted afterwards, the pink ceramic has to bulge outward to reach the tooth position — and the seam where that ceramic meets your own gum sits high, exposed and undercut. Food packs into that ledge after every meal, the lip catches on it, and no amount of brushing reaches underneath. Over time the irritation doesn't stay on the surface: it works down into the bone, which is exactly what had already happened by the time this patient reached Dr. Reshad.
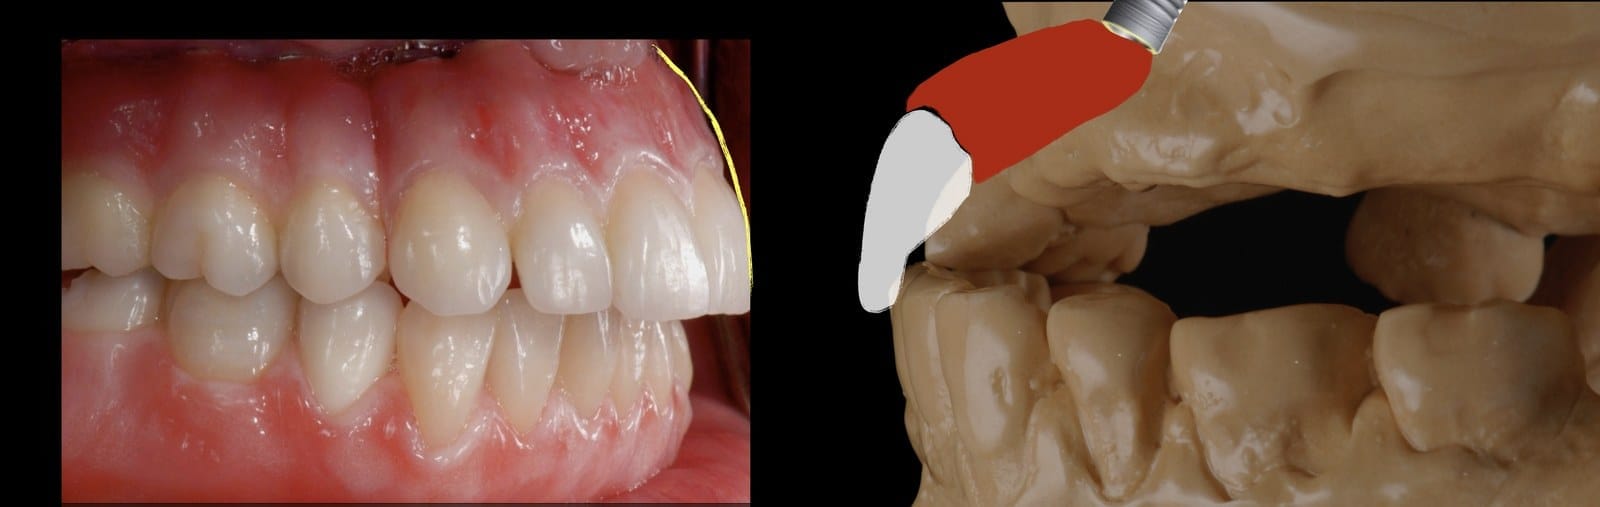
What proper planning and bone reduction buy you — Same principle, opposite result. Decide where the teeth need to be first, reduce the bone to make room for that, and the pink ceramic can sweep in one smooth, continuous line from the bone to the tooth. The seam moves up under the lip where it can't be seen or felt, there is no ledge for food to lodge in, the lip glides over it, and the whole surface can be cleaned in one pass. This is what a full-arch restoration should feel like from the inside — like your own gums, not a shelf.
A second case, referred to Dr. Reshad by a lab technician, was almost the mirror image: implants placed too far toward the palate, with so little lip support that the lab had to build a bulky shelf of pink material — a "ridge-lap" — just to fill the space in front of the implants and give the patient a normal-looking smile. It looked reasonable in a photograph. In the mouth, that ridge-lap was almost impossible to keep clean, and the case was failing on hygiene grounds within a couple of years.
Both patients had "had implants placed." Neither had had a plan. That's the difference this section is about.
Shape, Contour & Emergence
Where the tissue meets the teeth
Every full-arch restoration has to rise up out of the gum tissue somewhere. How it does that — the angle, the contour, the surface the tissue actually touches — determines whether you can keep it clean for the next 20 years, or whether it slowly, quietly causes problems underneath it that you can't see or reach.
Where the restoration meets the tissue — A well-planned emergence sits flush against healthy, unirritated gum — no redness, no swelling, no ledge for plaque to collect on.
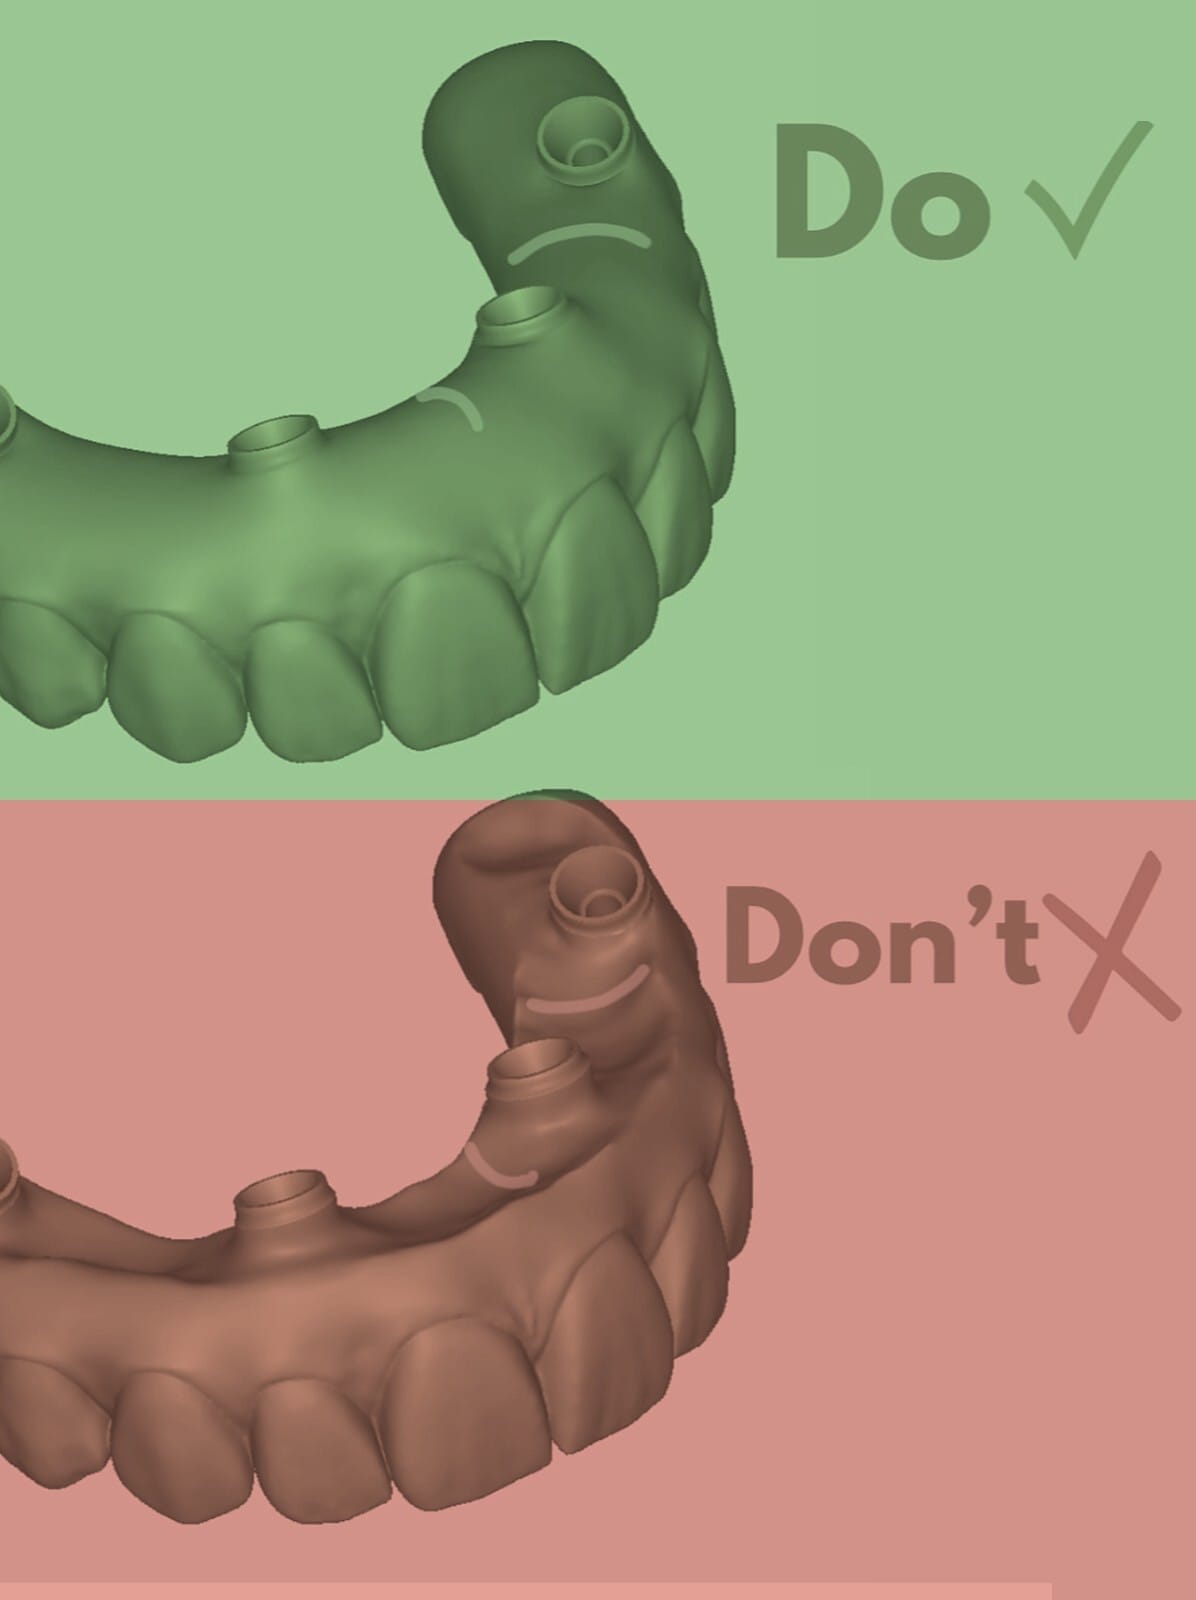
Green is what we build; red is what traps food — Seen from the palate: a smooth, convex shape versus a concave ledge.
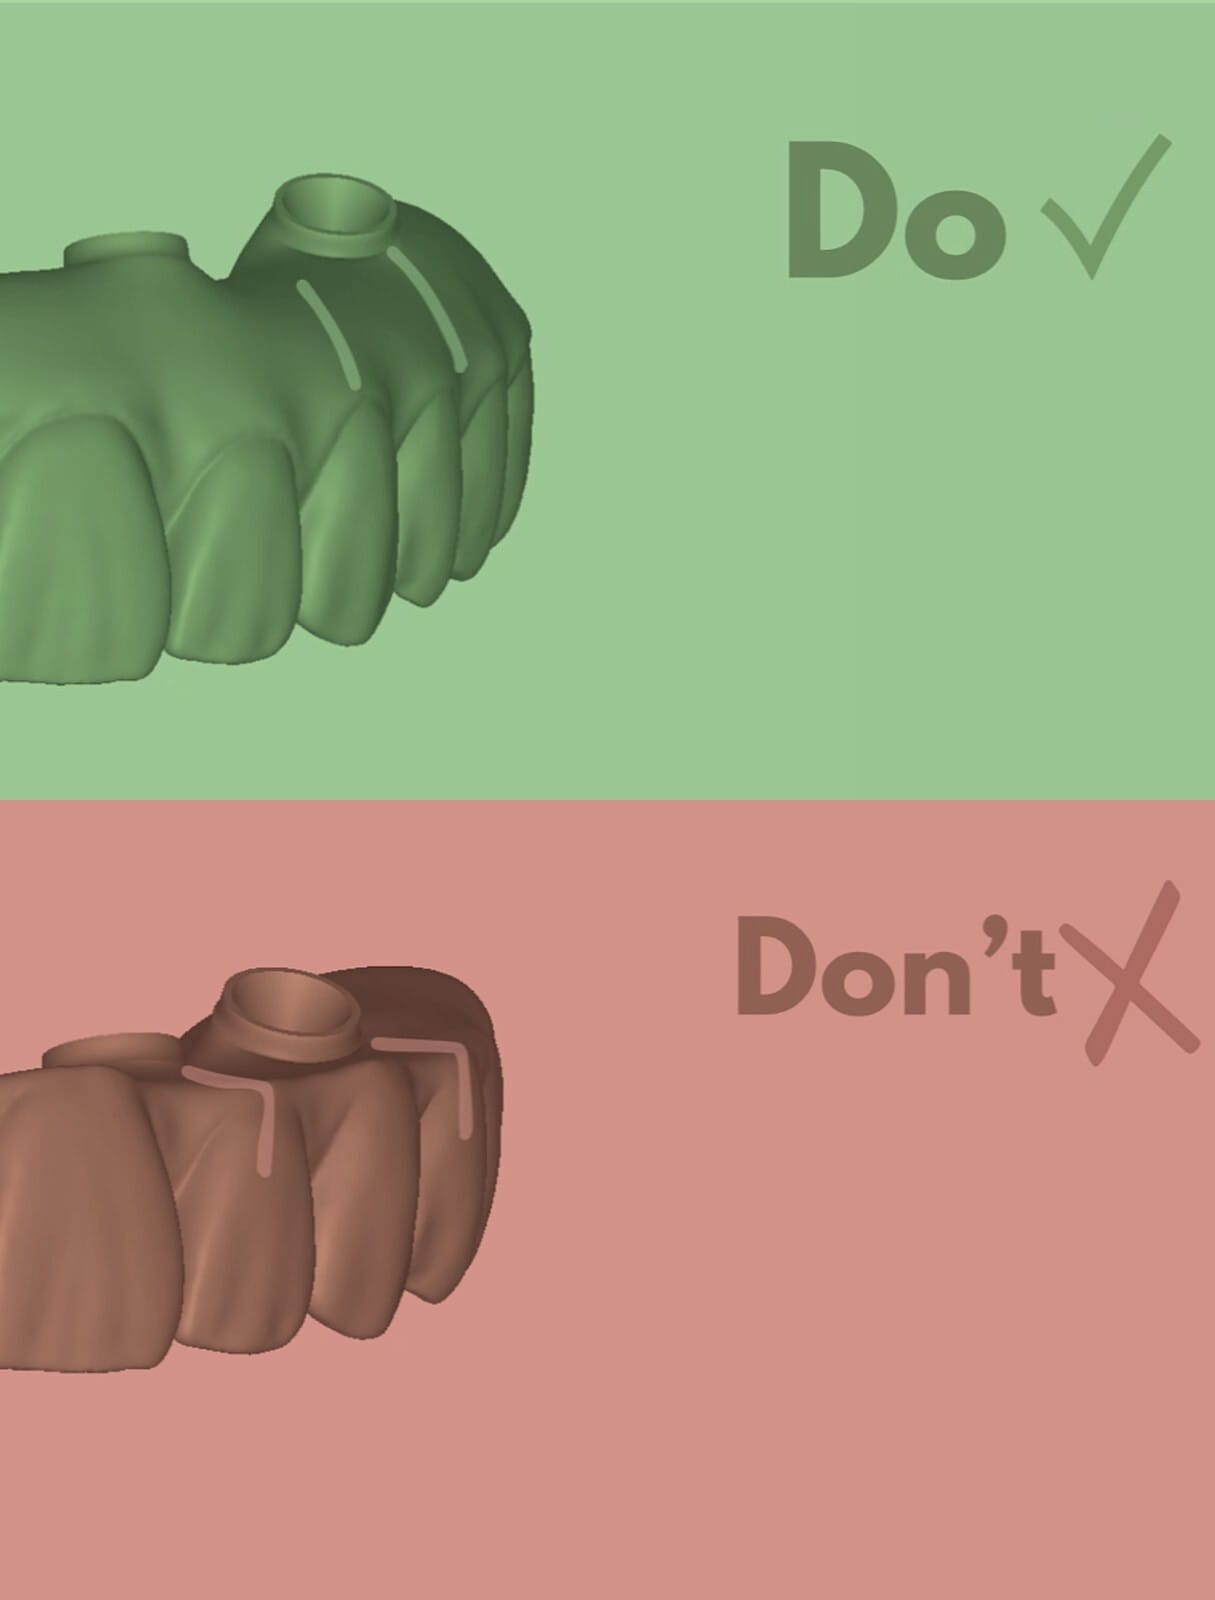
At the back implant — The same rule where it matters most — the last implant carries the most load and is the hardest to clean.
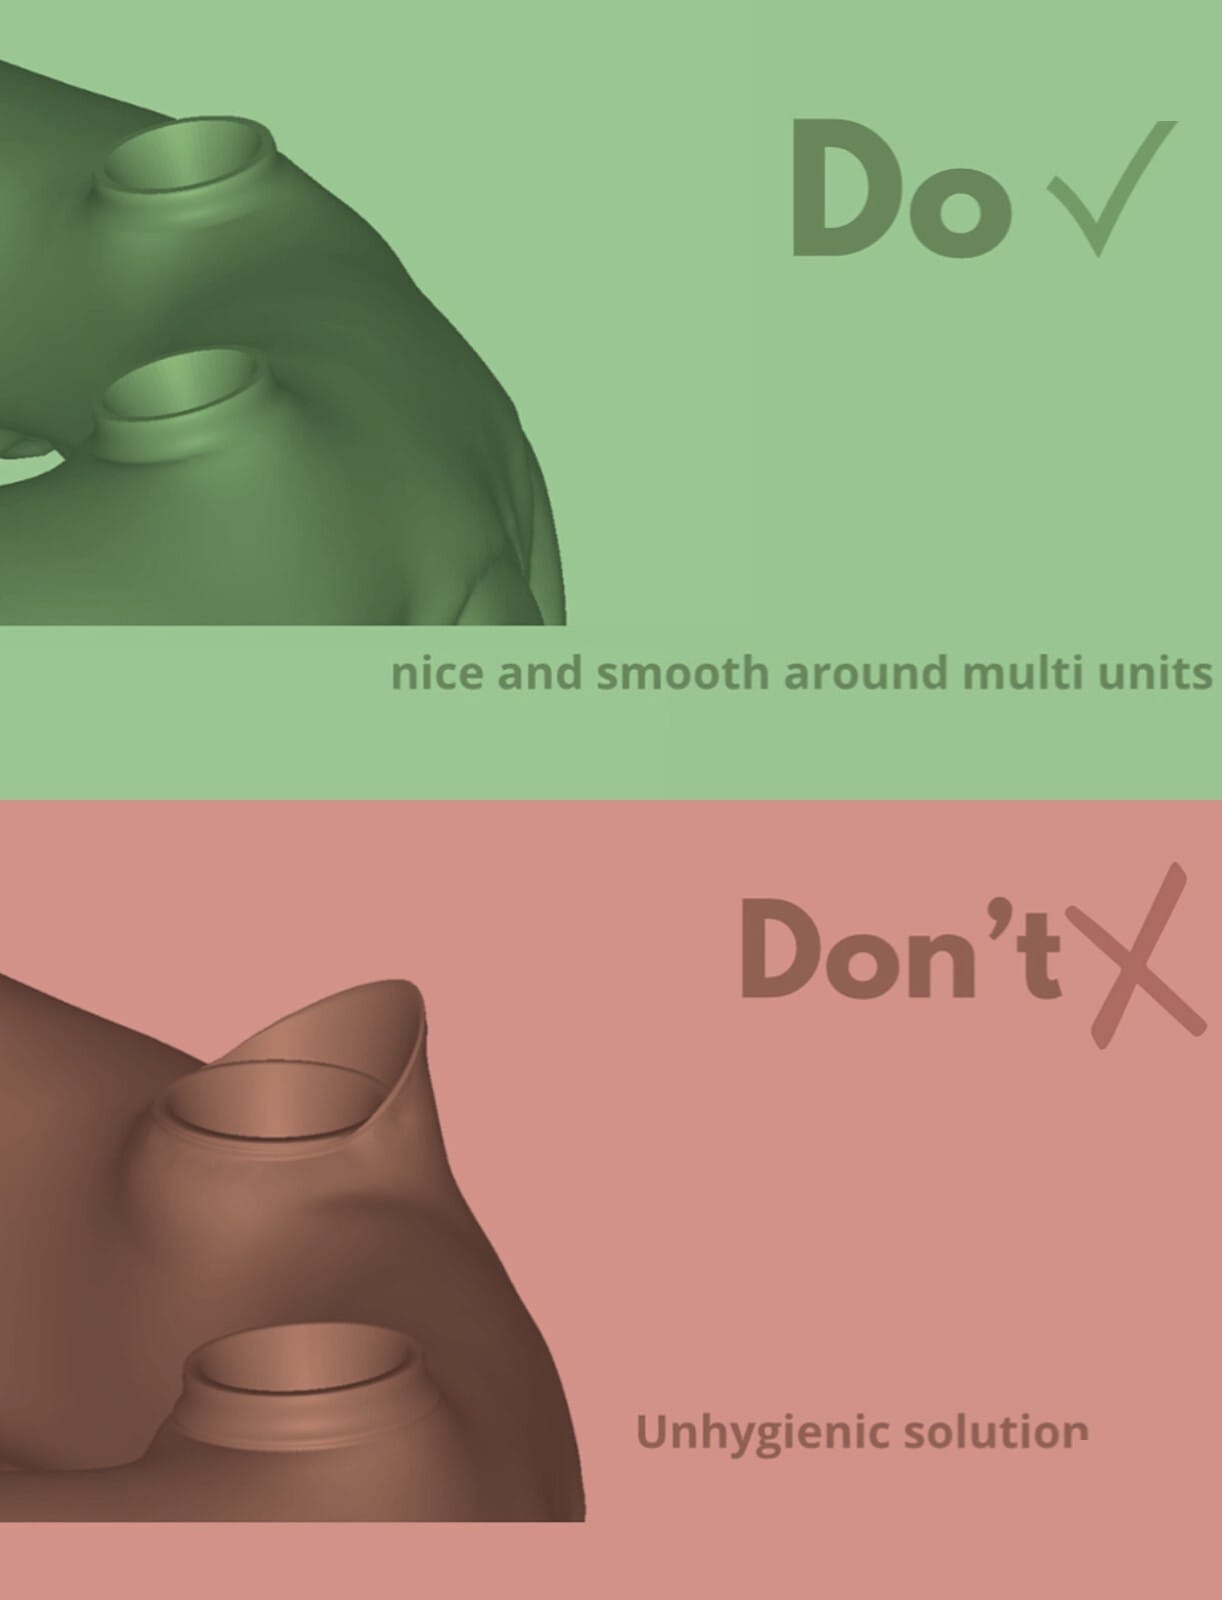
Smooth versus ridge-lap — A floss and a brush can follow the green shape in one pass. Nothing reaches under the red one.
Most dentists are taught to place the implant first, then figure out how to attach teeth to it. Dr. Reshad does the opposite: he starts from a wax try-in or denture setup that shows exactly where the teeth need to sit for you to speak, smile and chew properly. Only then does he work backward to decide how much bone needs to be reduced — often significantly more than people expect — so the final teeth emerge from the tissue at a shallow, cleansable angle instead of a steep, food-trapping one.
Convex, narrow & polished
- Sheds plaque instead of holding it
- Emergence angle of roughly 45° or less
- No ledge at the neck of the restoration for tissue or food to catch on
- Comfortable against the lip and tongue for the life of the restoration
Concave "ridge-lap"
- Traps plaque and food debris against the tissue
- Emergence steeper than 45°, sometimes near vertical
- Chronic irritation, odor and inflammation the patient can't brush away
- Frequently the real cause of a "failing" implant that was never actually the implant's fault
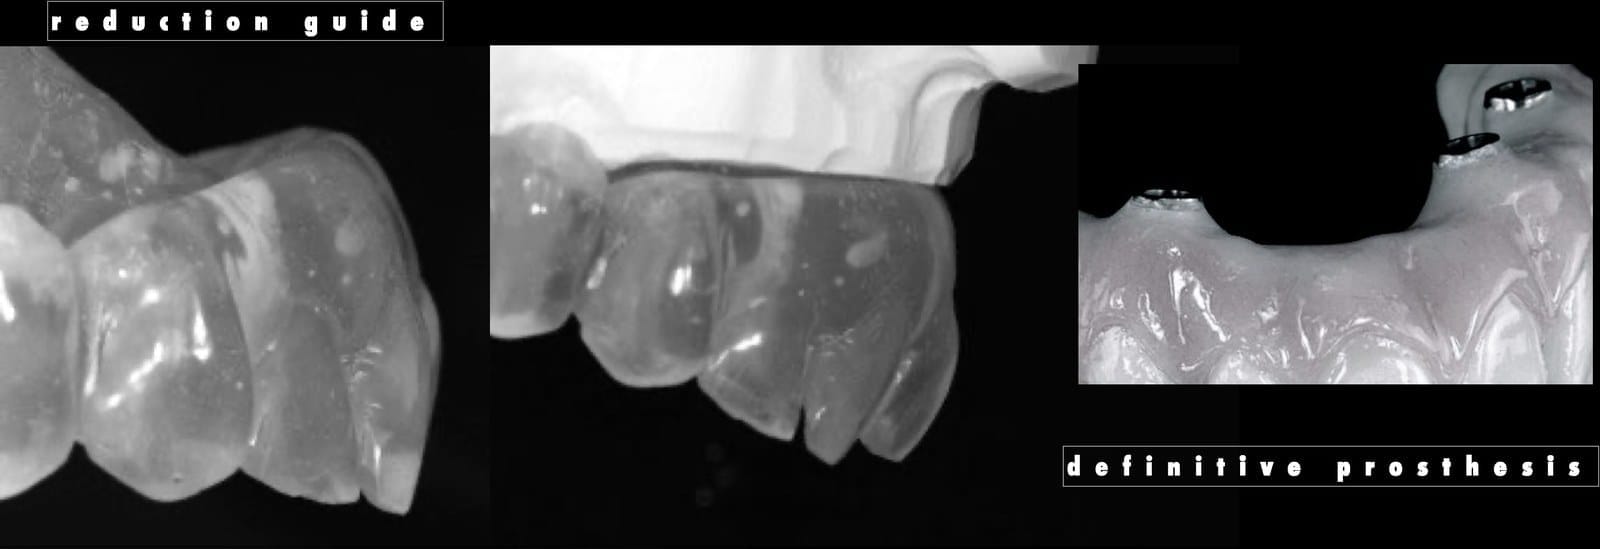
The plan becomes the guide, and the guide becomes the teeth — The clear reduction guide on the left is made directly from the planned tooth positions. It sits on the model and in the mouth and shows, to the millimetre, how much bone has to come away for the final teeth to emerge cleanly — nothing is judged by eye. The definitive restoration on the right is built to the same plan.
The clearest example Dr. Reshad can give is a patient who came in wearing a denture and wanted a fixed restoration. She had plenty of bone in her existing ridge, which meant the "obvious" plan — just place implants where the bone already was — would have worked from a surgical point of view. He didn't do that. Instead, the case started with a full denture setup to establish exactly where her teeth needed to be for the right lip support, speech and bite. Only once that was locked in was it calculated how much bone had to come down to let the final teeth emerge from a beautifully flat, hygienic ridge — using a surgical guide stabilized on her remaining posterior teeth for accuracy.
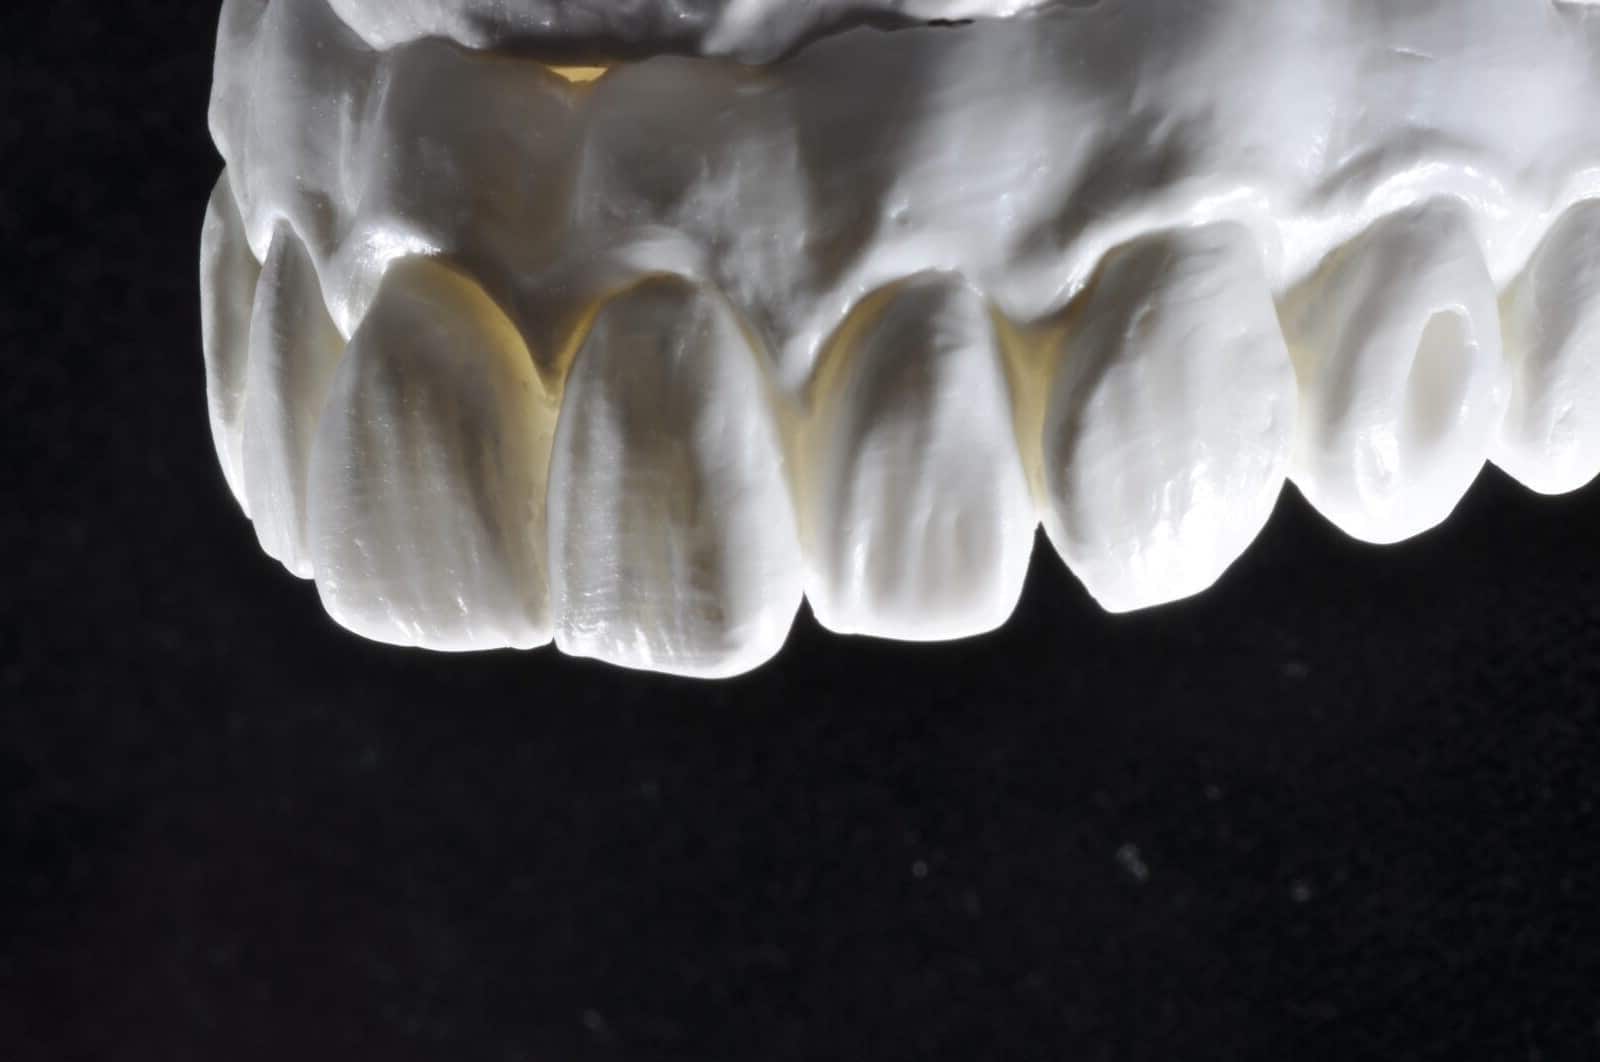
The payoff: a flat, hygienic surface — A narrow, convex tissue-facing surface with no ledge for plaque to catch on — achievable only because the bone reduction was planned around the teeth, not guessed at afterward.
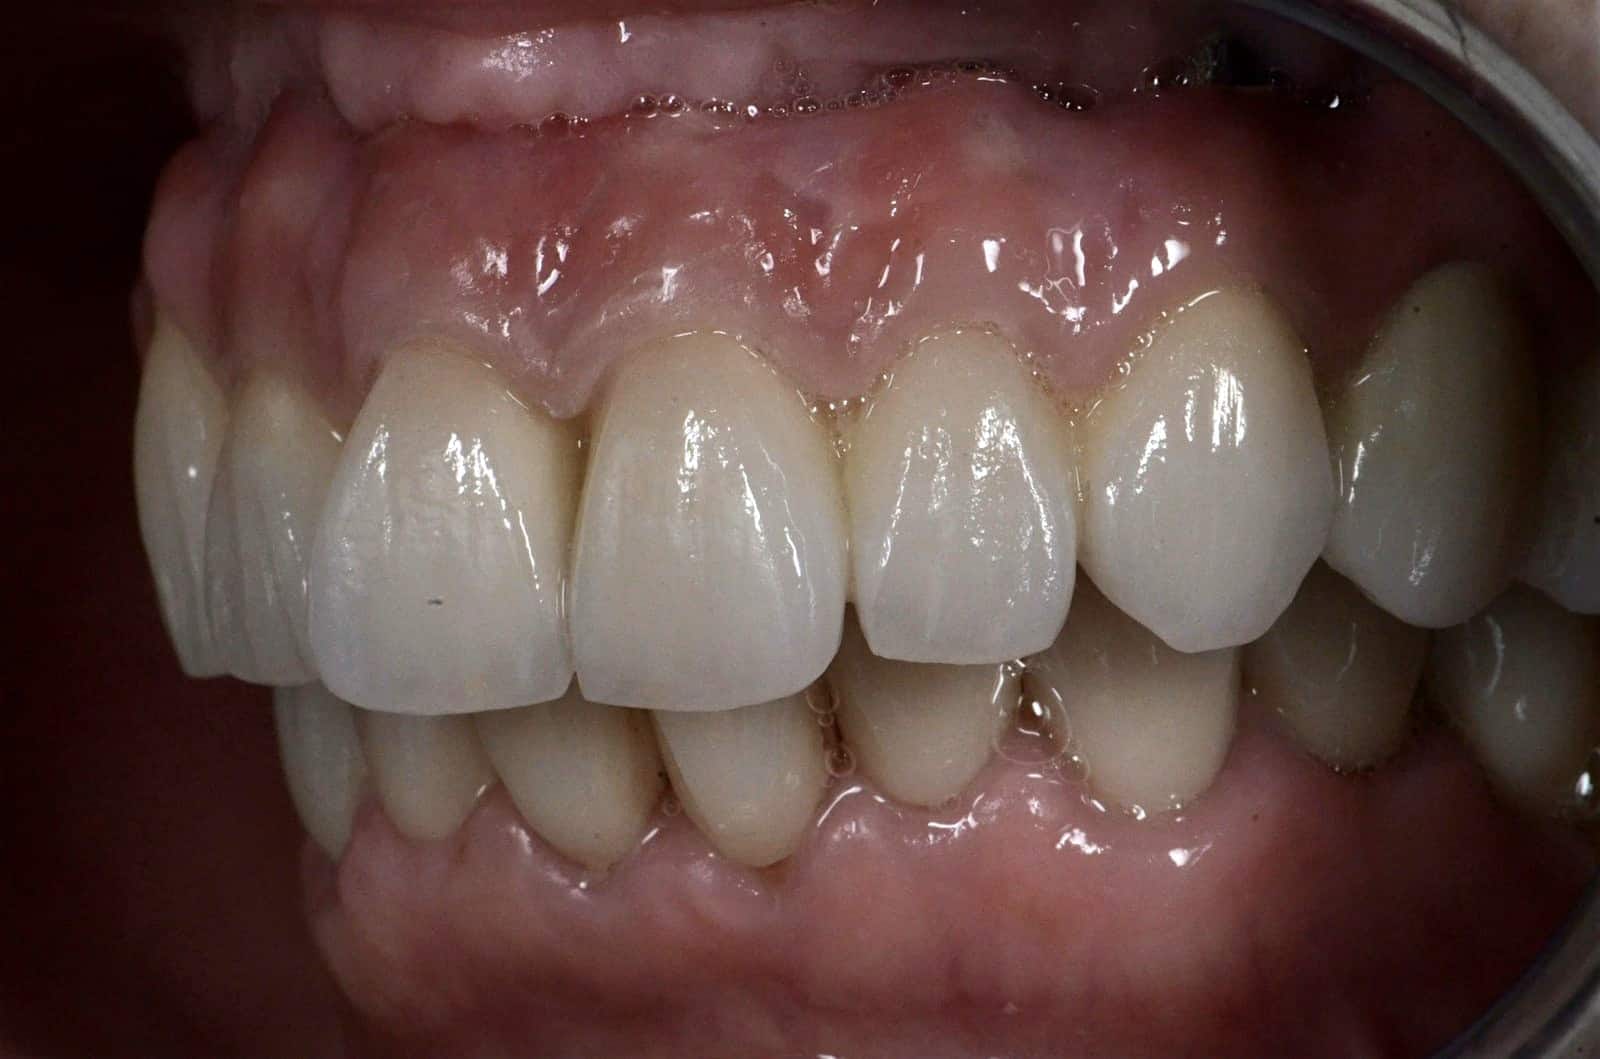
What that surface looks like in the mouth — Calm, pink, healthy tissue at the neck of every tooth — no redness, no ledge, nothing for food to lodge behind. This is the shape a patient can actually keep clean for decades.
That case needed a substantial amount of bone reduction — more than most clinicians are comfortable doing. Fourteen years later, her restoration still has the same flat, hygienic emergence it had on day one. Compare that to a patient who complains constantly of food trapped at the base of their teeth: almost always, that's a steep emergence angle, not a hygiene failure on the patient's part. The reduction itself is guided rather than estimated in the moment — a stabilized surgical guide translates the wax-up directly onto the bone, so the result is exact.
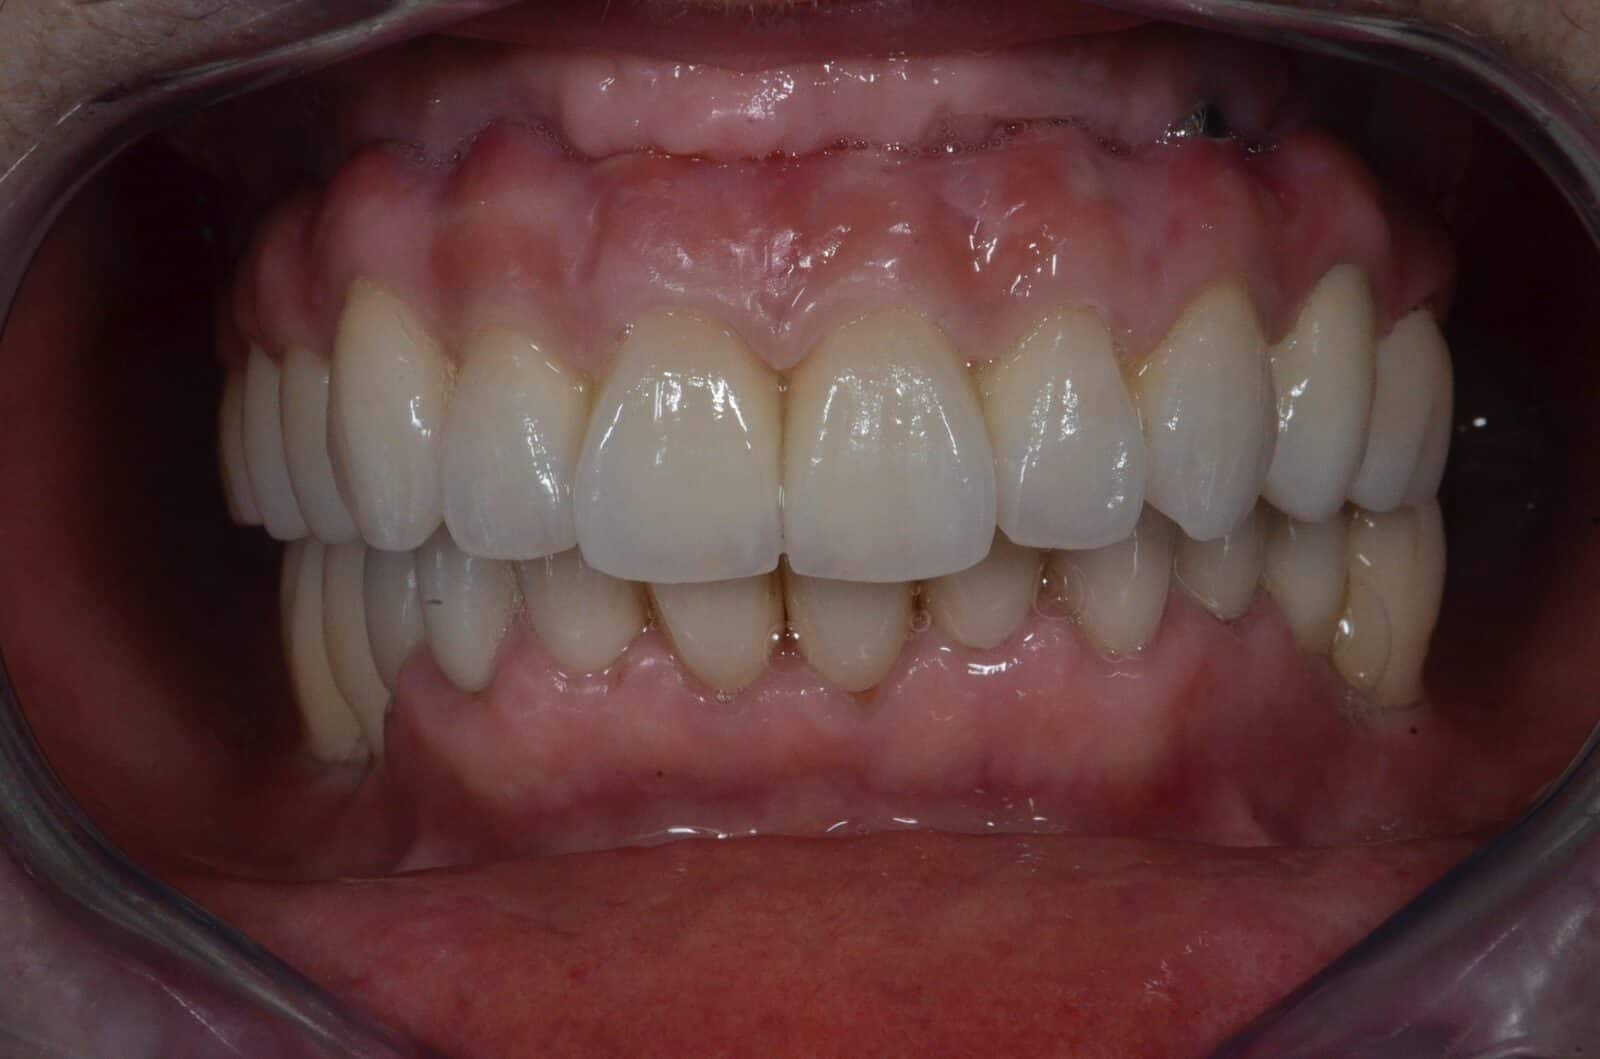
The finished result — Delivered restoration, built from the tooth position outward rather than the implant position outward.
Load & Cantilevers
The single biggest cause of failure
If shape and contour are about hygiene, this section is about survival. In three decades of full-arch dentistry, the cantilever — the unsupported extension of a bridge past its last implant — is the single biggest reason restorations fail. It is Dr. Reshad's biggest enemy in this kind of dentistry, and it deserves more attention than almost anything else in the planning process.
A classic all-on-4 or all-on-5 design places four or five implants between the nerves of the lower jaw, with the restoration cantilevering out past them on both sides to reach the back teeth. There is absolutely a group of patients who need this kind of fixed restoration — people whose gum and bone anatomy simply can't tolerate a removable denture, or people who have kept their own teeth into their 50s, 60s or 70s and would struggle badly adapting to a denture late in life. Giving that patient a fixed alternative is one of the most rewarding things Dr. Reshad does. But it only works long-term if the implant distribution underneath it is right.
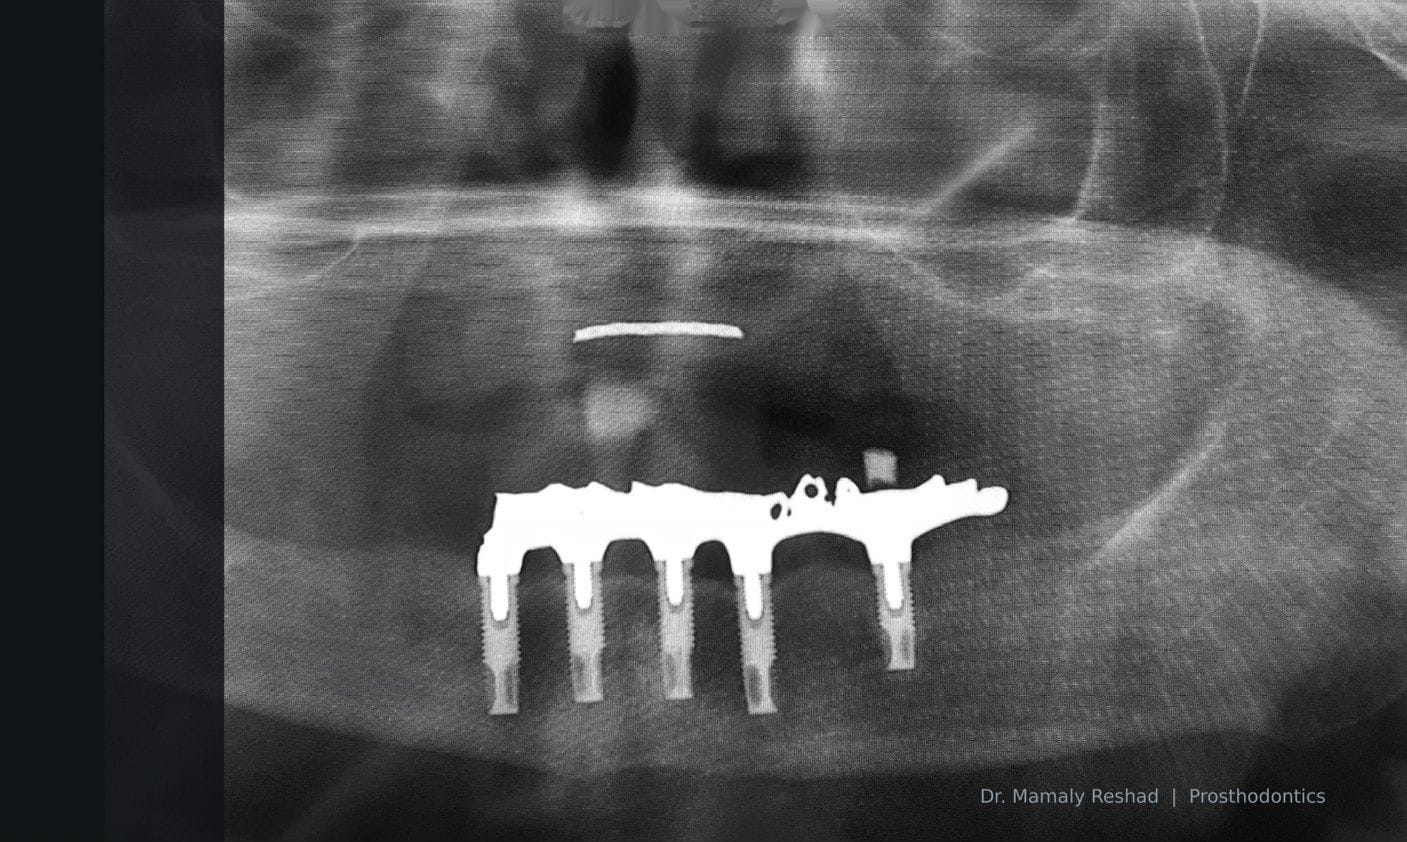
What a cantilever looks like on the film — The framework carries on well past the last implant on the right — every bite on that unsupported span turns into a bending load the implant underneath it has to absorb, cycle after cycle.
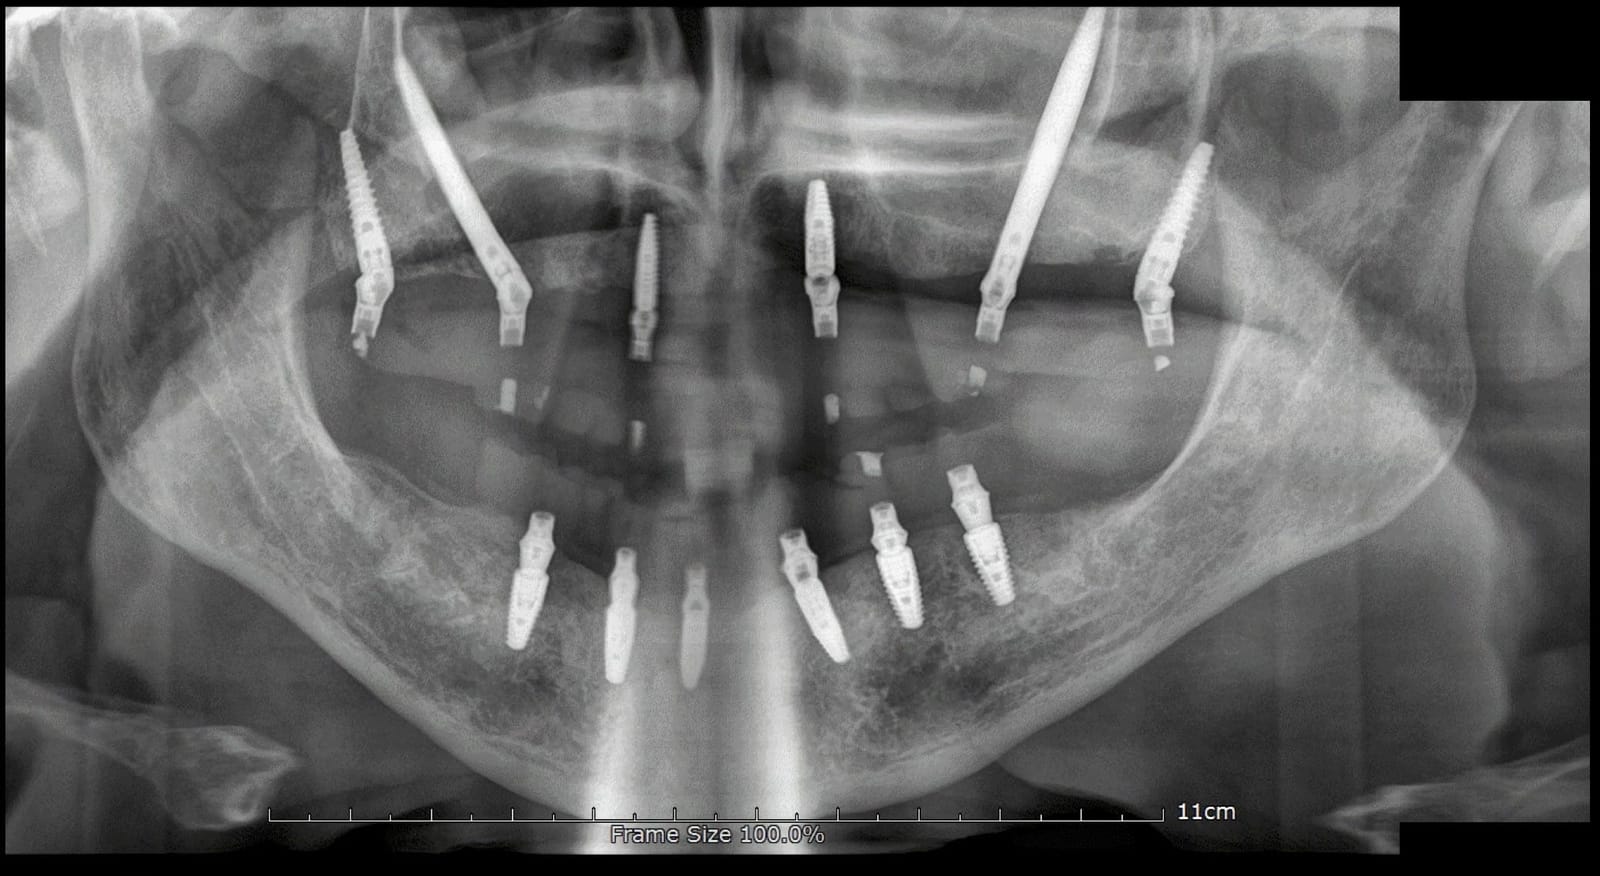
What good distribution looks like on film — Implants spread through a real curve in both arches rather than bunched in a line — the curvilinear arrangement above, as it actually looks on a panoramic film.
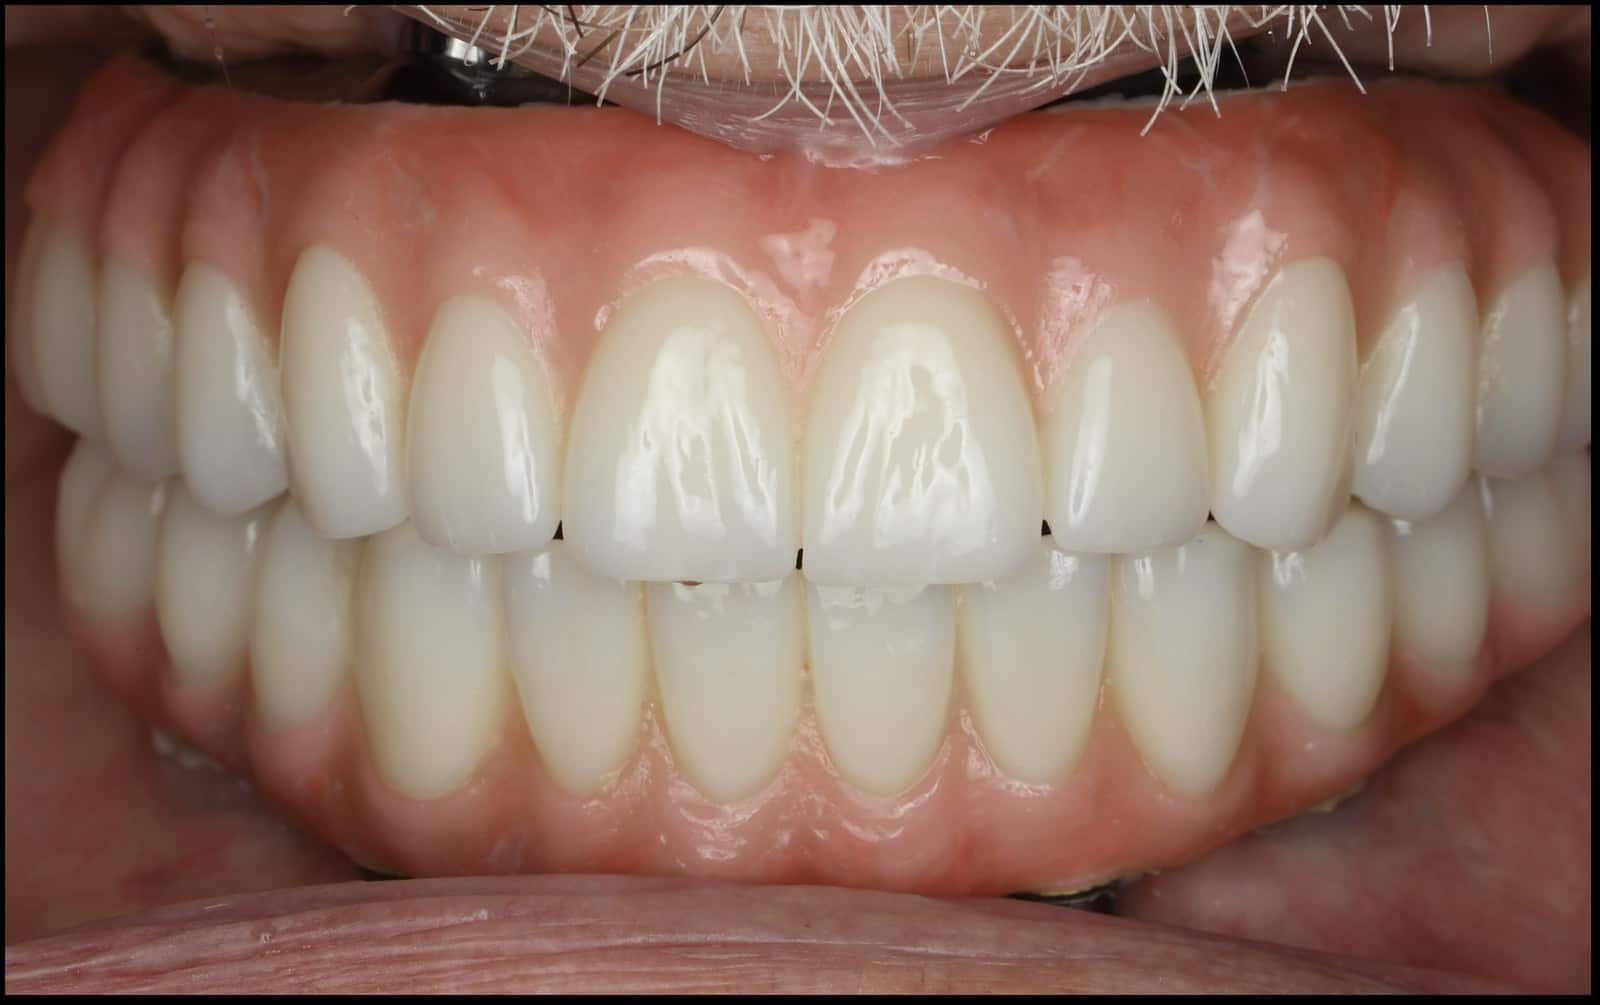
The result, in function — The same style of arch as delivered — a full, evenly supported row of teeth rather than a short span carried on a handful of implants at one end.
The other number that matters is the anterior-posterior (A-P) spread: draw a line through your two most distal implants, then measure the perpendicular distance forward to your most anterior implant. On average that's about a centimeter. The longer that spread, the further a cantilever can safely extend past it — this is the traditional teaching from the original Brånemark protocol, developed roughly fifty years ago and still the foundation of this math today.
Dr. Reshad has spent years repairing restorations built on a nearly straight line of implants with long cantilevers hanging off the back. One patient's case stands out: implants placed elsewhere, essentially no A-P spread, large bilateral cantilevers — and a restoration that kept coming loose, breaking abutments and shearing screws every few months. A single additional, well-placed posterior implant would very likely have prevented the whole pattern. He has built up what amounts to a library of these cases over the years: patients showing up late on a Friday afternoon or first thing Monday morning with a screw sheared off inside the implant, while he sweats over getting the broken piece out so they at least have teeth for the weekend.
The pattern is always the same: it isn't the number of implants that determines whether a restoration survives — it's where they're placed. Dr. Reshad has been asked to take over cases with the most linear implant arrangement he has ever seen, two massive bilateral cantilevers, metal-ceramic construction — and refused to deliver the case until the patient received an additional posterior implant first.
There's also an asymmetry worth knowing about: in the upper jaw, when things go wrong under cantilever load, it's usually the implants that fail. In the lower jaw, it's usually the restoration that fails first. That means the upper jaw generally needs even more conservative planning around cantilever length and implant distribution than the lower jaw does.
30%
Complication rate at 10 years for cantilevered full-arch restorations, across pooled studies.
Cumulative literature
5×
Higher failure rate when the patient is a bruxist (clenches or grinds).
Cumulative literature
41%
Failure rate at 7 years for zirconia full-arch restorations built with a cantilever.
Clinical follow-up data
What the published literature shows, in plain terms
Pooled results across peer-reviewed systematic reviews of cantilevered full-arch bridges
Mechanical complications
About 1 in 4 cantilevered restorations develop a complication — a fractured veneer, a loosened screw, a fractured abutment — within 5–10 years.
Survival gap
Cantilevered bridges run roughly 14 points behind non-cantilevered ones for trouble-free survival at 5 years.
Why it happens
A cantilever concentrates stress right where the bridge meets its last implant — that's the mechanical reason bone loss and hardware fatigue cluster there.
Bruxism
Clenching or grinding on top of a cantilever compounds the risk rather than simply adding to it — the two together call for an explicit plan, not the standard design.
With a cantilever in place, that 10-year failure curve arrives much sooner — often within five years. Dr. Reshad has personally replaced screws, abutments and fractured frameworks in patients who showed up, without fail, late on a Friday afternoon or first thing Monday morning.
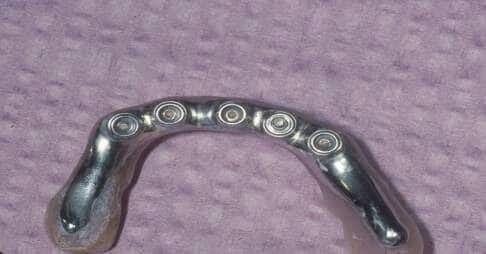
The prosthesis this came out of — A failed all-on-4 framework after removal — the restoration whose retaining screws are shown sheared on the right.
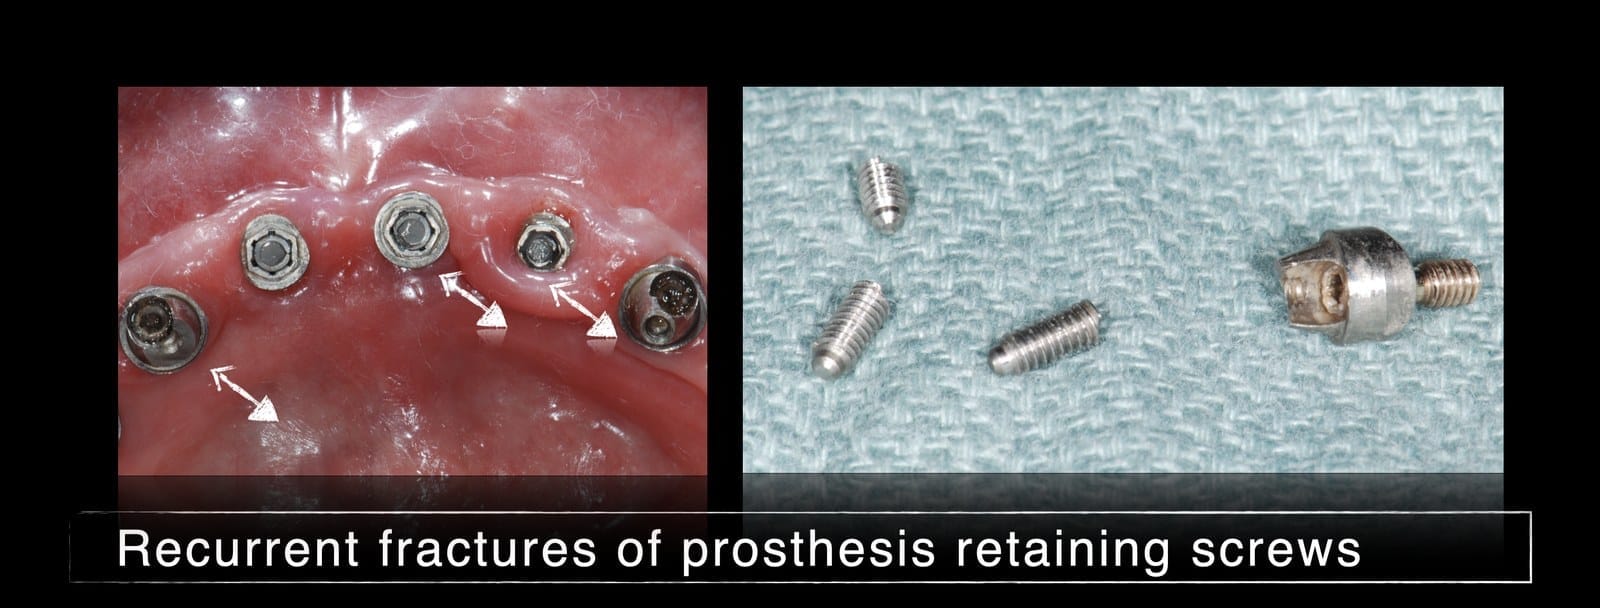
What a cantilever eventually does to hardware — Sheared retaining screws and a fractured abutment. The weakest link in the system always breaks first — screw, abutment, framework or implant.
Even a prosthesis made by a skilled lab, in gold or titanium, with proper support and design, will eventually fail if it's fighting a cantilever every time the patient bites down. Dr. Reshad has seen a whole library of beautifully fabricated restorations fail this way — not from poor workmanship, but from load magnification the cantilever created from day one.
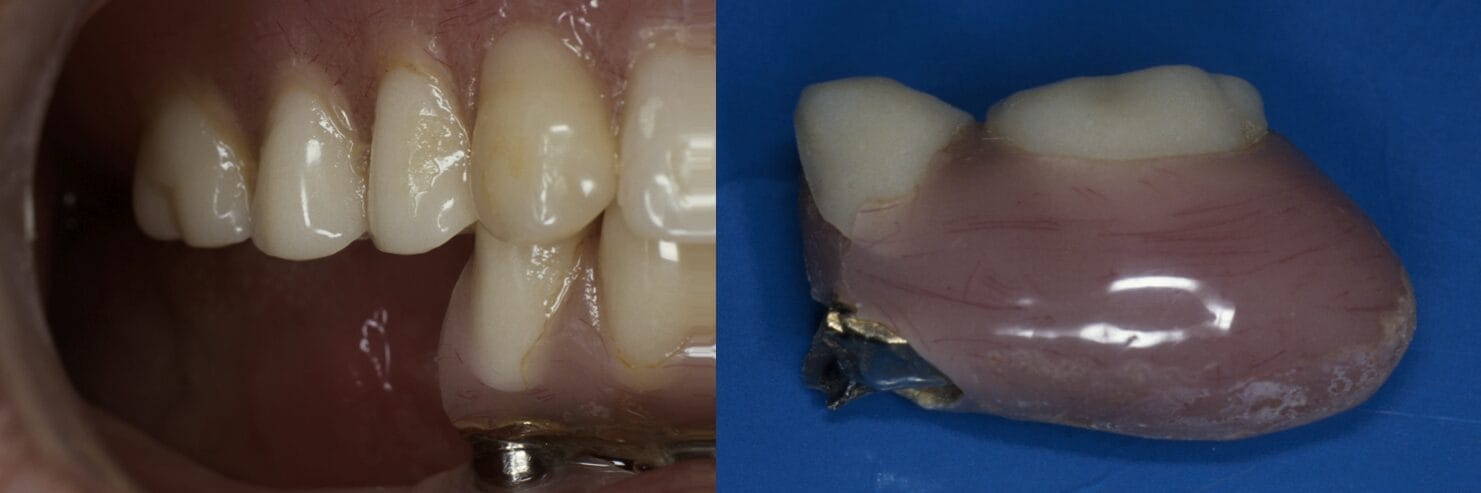
Fatigue is patient — A framework Dr. Reshad placed against a complete denture in 2003 — carefully designed, well within accepted limits at the time — fractured from metal fatigue by 2016, breaking exactly at the cantilevered implant. A cantilever doesn't just add load; it magnifies it, cycle after cycle, for years.
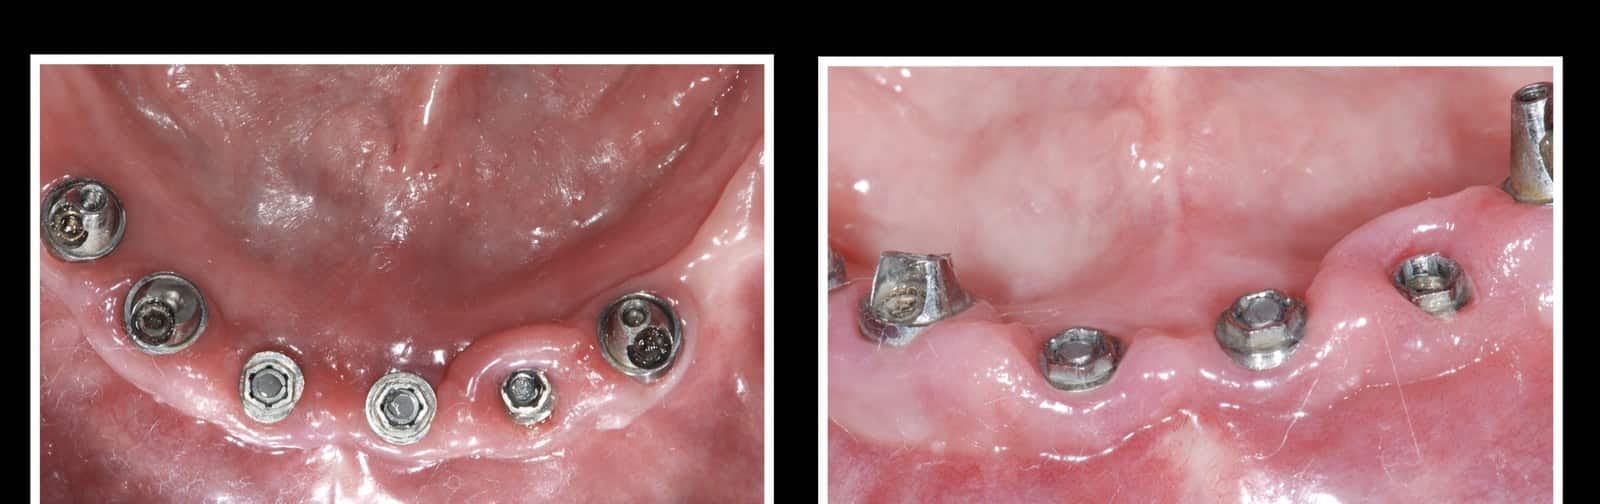
Every one of these is carrying its share of the bite — Each abutment in view is doing real mechanical work every time the patient chews. Distribute that load evenly and it's sustainable for decades; concentrate it on one end and something eventually gives.
Published guidance allows cantilevers up to 15 mm (the Shackleton rule). In Dr. Reshad's own practice, the maximum he will allow is one molar's width — about 10 mm — and he avoids a cantilever altogether whenever the case allows it.
There are better answers than a cantilever, and choosing the right one for your jaw is most of the art. Angling the back implants, using shorter ones, placing them where a routine plan wouldn't look — done well, these let the teeth reach further back with nothing left hanging unsupported. Dr. Reshad also checks the fit of every framework on a rigid test jig before it is ever finished, because a restoration that doesn't seat perfectly at the very back implant quietly behaves like a cantilever even when it was never designed as one. He is currently remaking an entire upper arch, done elsewhere, for exactly that reason. Catching it on the bench is far cheaper than discovering it in your mouth.
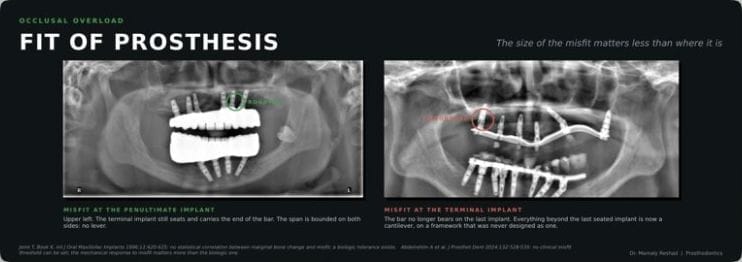
Where a poor fit sits matters more than how big it is — A small gap at a middle implant is held steady by the implants either side of it. The same gap at the very back implant leaves everything behind it hanging unsupported — a cantilever nobody planned for.
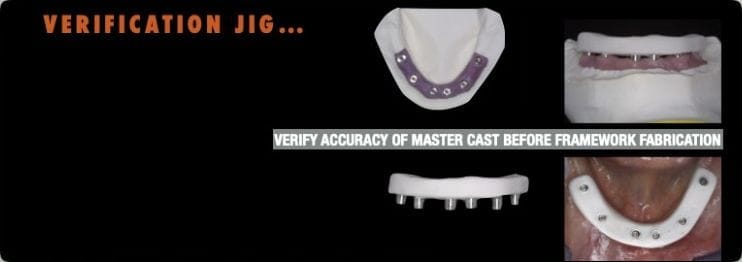
Caught on the bench, not in your mouth — A rigid jig verifies the accuracy of the master cast before the framework is ever fabricated — the only reliable way to know the fit is exact before committing to the final restoration.
This is also, honestly, the case for treatment by a specialist prosthodontist rather than a generalist doing occasional full-arch work: an inaccurate impression or scan doesn't announce itself. It shows up months or years later as the pattern above — a hidden cantilever, a chronically loosening screw, a framework that never quite seated right from day one. Verifying fit on the bench, before fabrication, is a habit built from having repaired enough of the alternative.
One more idea worth knowing: the shortened dental arch. Most patients function perfectly well with about ten teeth per arch rather than a full complement stretching to the last molar — most don't even notice. As we age, we simply need fewer teeth to chew comfortably, and a shorter, cantilever-free arch is very often the stronger long-term choice over a longer one that requires a cantilever to complete.
Restorative Space
Where sinuses, jaw anatomy & force compete
Most conversations about full-arch dentistry focus on the front of the mouth — how much room there is for teeth to look natural. That matters: a well-emerging restoration typically needs about 17 mm of anterior vertical restorative space for a patient with a normal (Class I) jaw relationship. For a patient whose lower jaw sits further back (a Class II relationship) and who needs an all-on-4 style restoration, Dr. Reshad plans for even more — often 19–20 mm — because without it, you end up with an uncleansable "red" zone under the prosthesis instead of a gentle, hygienic "green" one. That has to be decided early, long before surgery.
But the space that actually determines long-term survival is in the back of the mouth, where sinuses, jaw anatomy and biting force all compete for the same few millimeters. Muscle force at the second molar runs around 200 newtons — roughly four times what the front teeth absorb. Combine very little height for the back teeth, a sinus that has expanded down into the bone, and a cantilever acting as an unsupported lever, and you have a near-guarantee of eventual implant loss or prosthetic fracture. Dr. Reshad has measured case after failed case where that posterior restorative space came in under 15 mm.
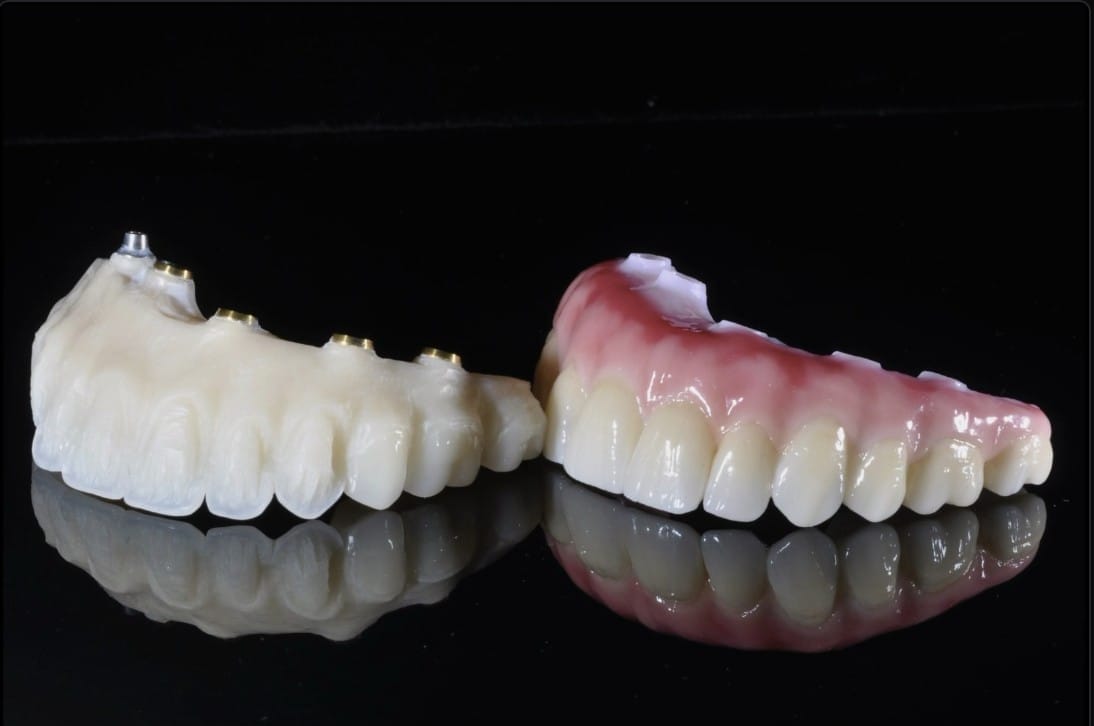
Limited posterior space, properly engineered — The milled framework (left) and the finished restoration built over it (right) — engineered to stay strong in a thin cross-section, exactly where space is tightest.
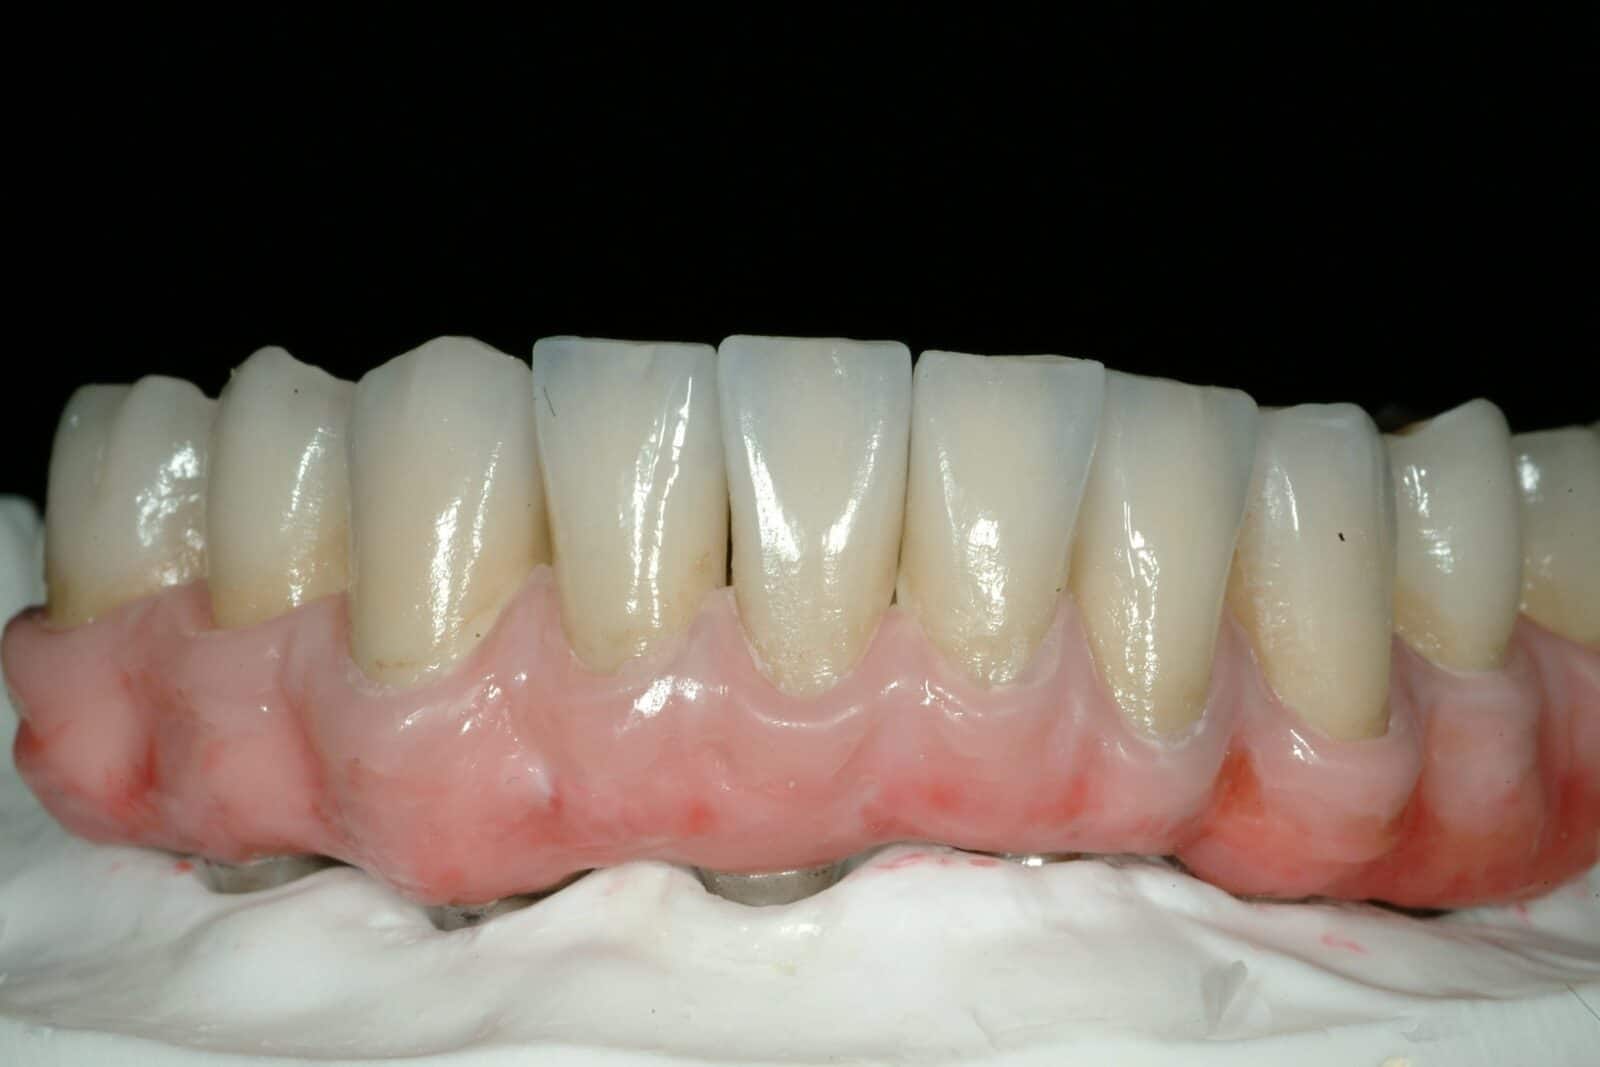
One-piece, screw-retained — Bone reduction with a stabilized guide, implants placed with a good A-P spread, then the bar milled and the ceramic layer cemented over it — one framework, delivered as a single screw-retained unit.
Across Dr. Reshad's own case data, cantilevers reliably fail at posterior restorative space under 15 mm, regardless of the material used. Above that threshold, the same designs hold up dramatically better, case after case.
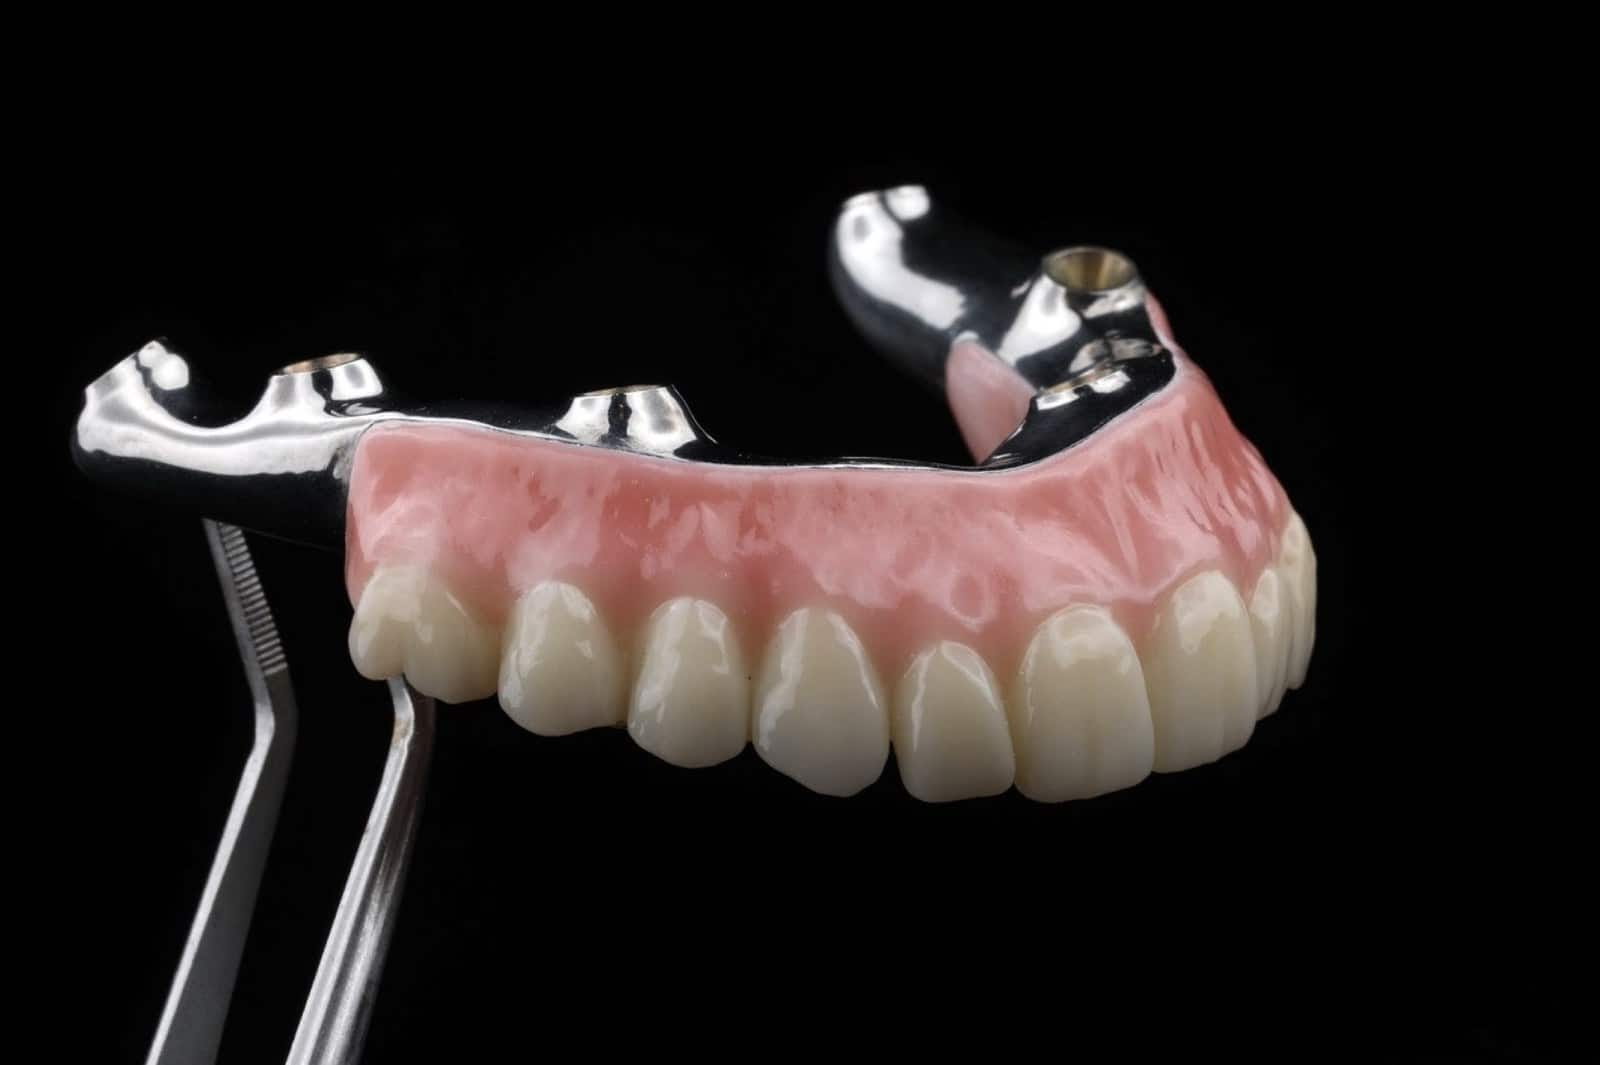
Strength where there's the least room for it — Look at the back of this arch: a slim, polished titanium bar runs through the whole restoration, hidden under the pink ceramic. That bar is what lets the back teeth stay strong when there is very little height to work with — a thin section of titanium can carry a load that would crack a thicker piece of ceramic on its own.
Dr. Reshad's answer for tight space at the back of the mouth is to build the restoration around a titanium bar, with the teeth and gum-coloured ceramic bonded over it, and deliver it as one piece that screws onto your implants. It stays strong even where it has to be thin, which is exactly the problem limited space creates. Getting there takes a specific sequence of planning, guided surgery and a trial restoration before the final one — each step is there to protect the one after it.
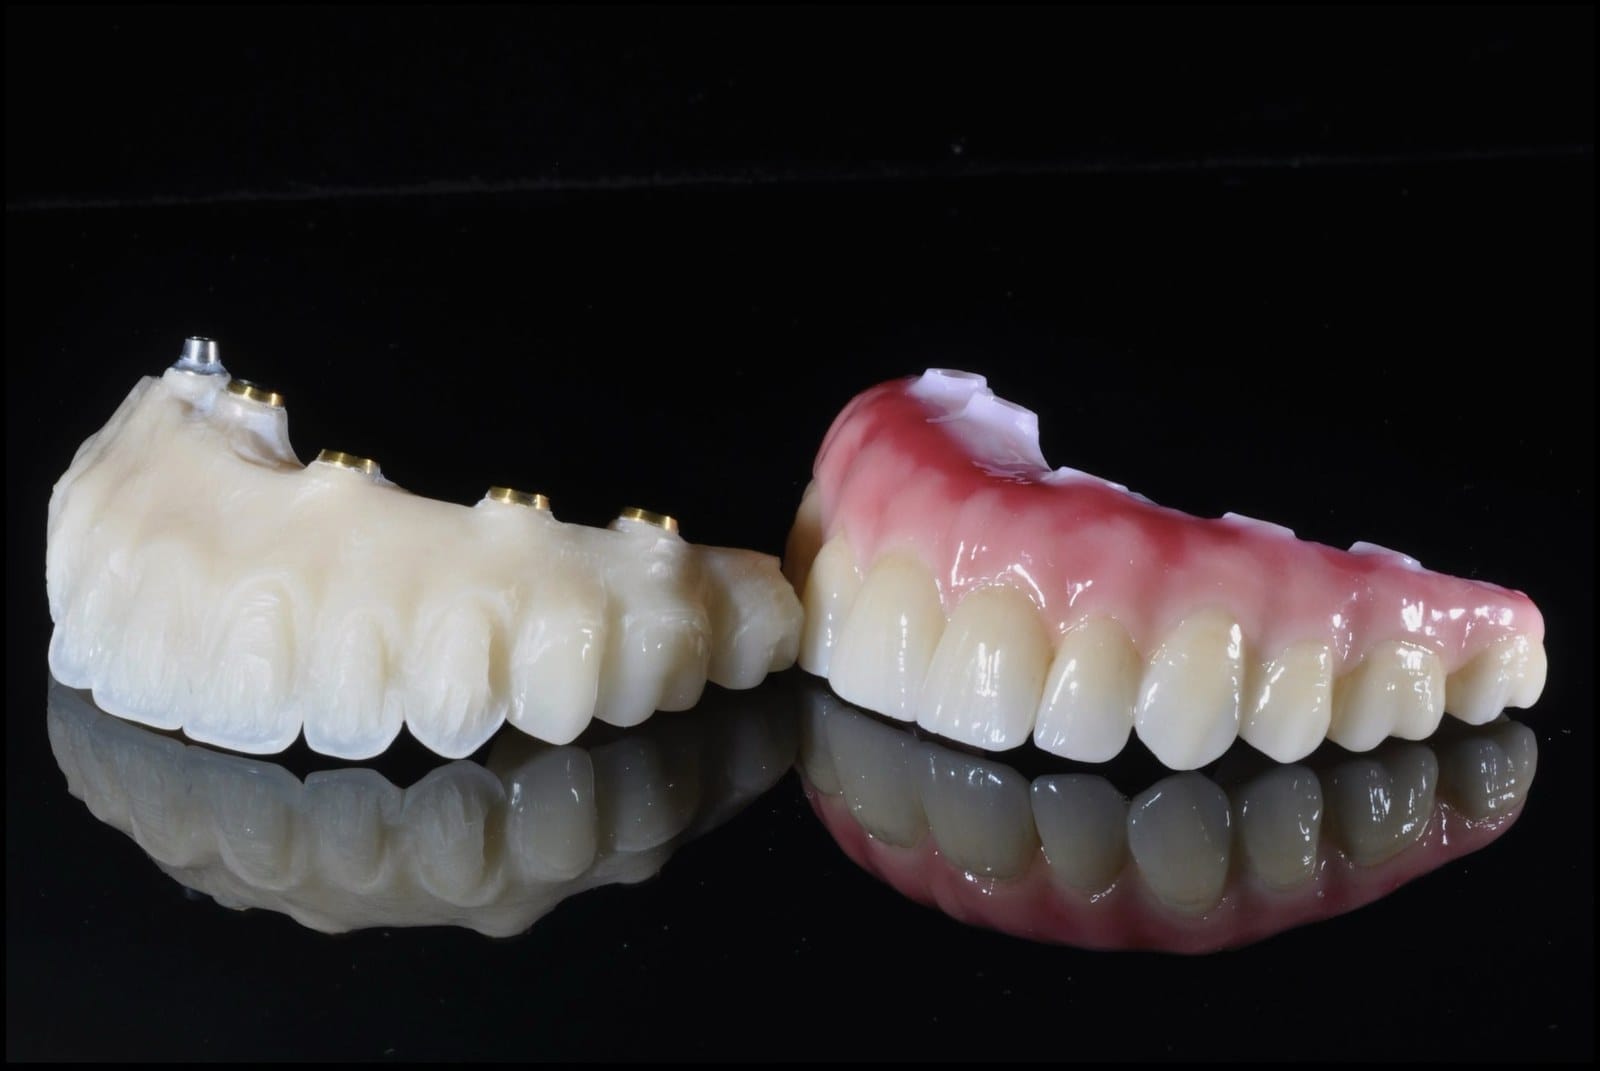
Two pieces, one restoration — The milled titanium bar (left) and the zirconia layer cemented over it (right) — built as separate pieces for accuracy, then delivered as a single screw-retained unit.
One case Dr. Reshad still thinks about had only 9 mm of posterior vertical restorative space, despite close to 17–20 mm anteriorly. Don't be deceived by generous space at the front of the mouth — he has planned cases with nearly 20 mm of anterior room and single-digit millimeters posteriorly, and the posterior number is always the one that decides whether the back of the restoration survives.
98% / 97%
Five-year survival for titanium-bar-and-zirconia restorations, mandible / maxilla.
Clinical follow-up data
95–96%
Survival for the same design at 10 years — still holding up when properly engineered.
Clinical follow-up data
15 mm
Dr. Reshad's working threshold for posterior restorative space before a cantilever becomes a real liability.
Case-based rule of thumb
By Dr. Reshad's own standard, a restoration with 95% survival at five years counts as a genuine success. This design holds up well even at the ten-year mark, which is exactly why he defaults to it whenever posterior space is the limiting factor.
Anterior–Posterior Spread
One implant, a decade of difference
This is the geometry behind the "load & cantilevers" principle, isolated on its own: how far the implants are spread from front to back determines how much leverage a cantilever can generate against them. A wider spread means dramatically less force reaching the implants and the framework for the exact same bite.
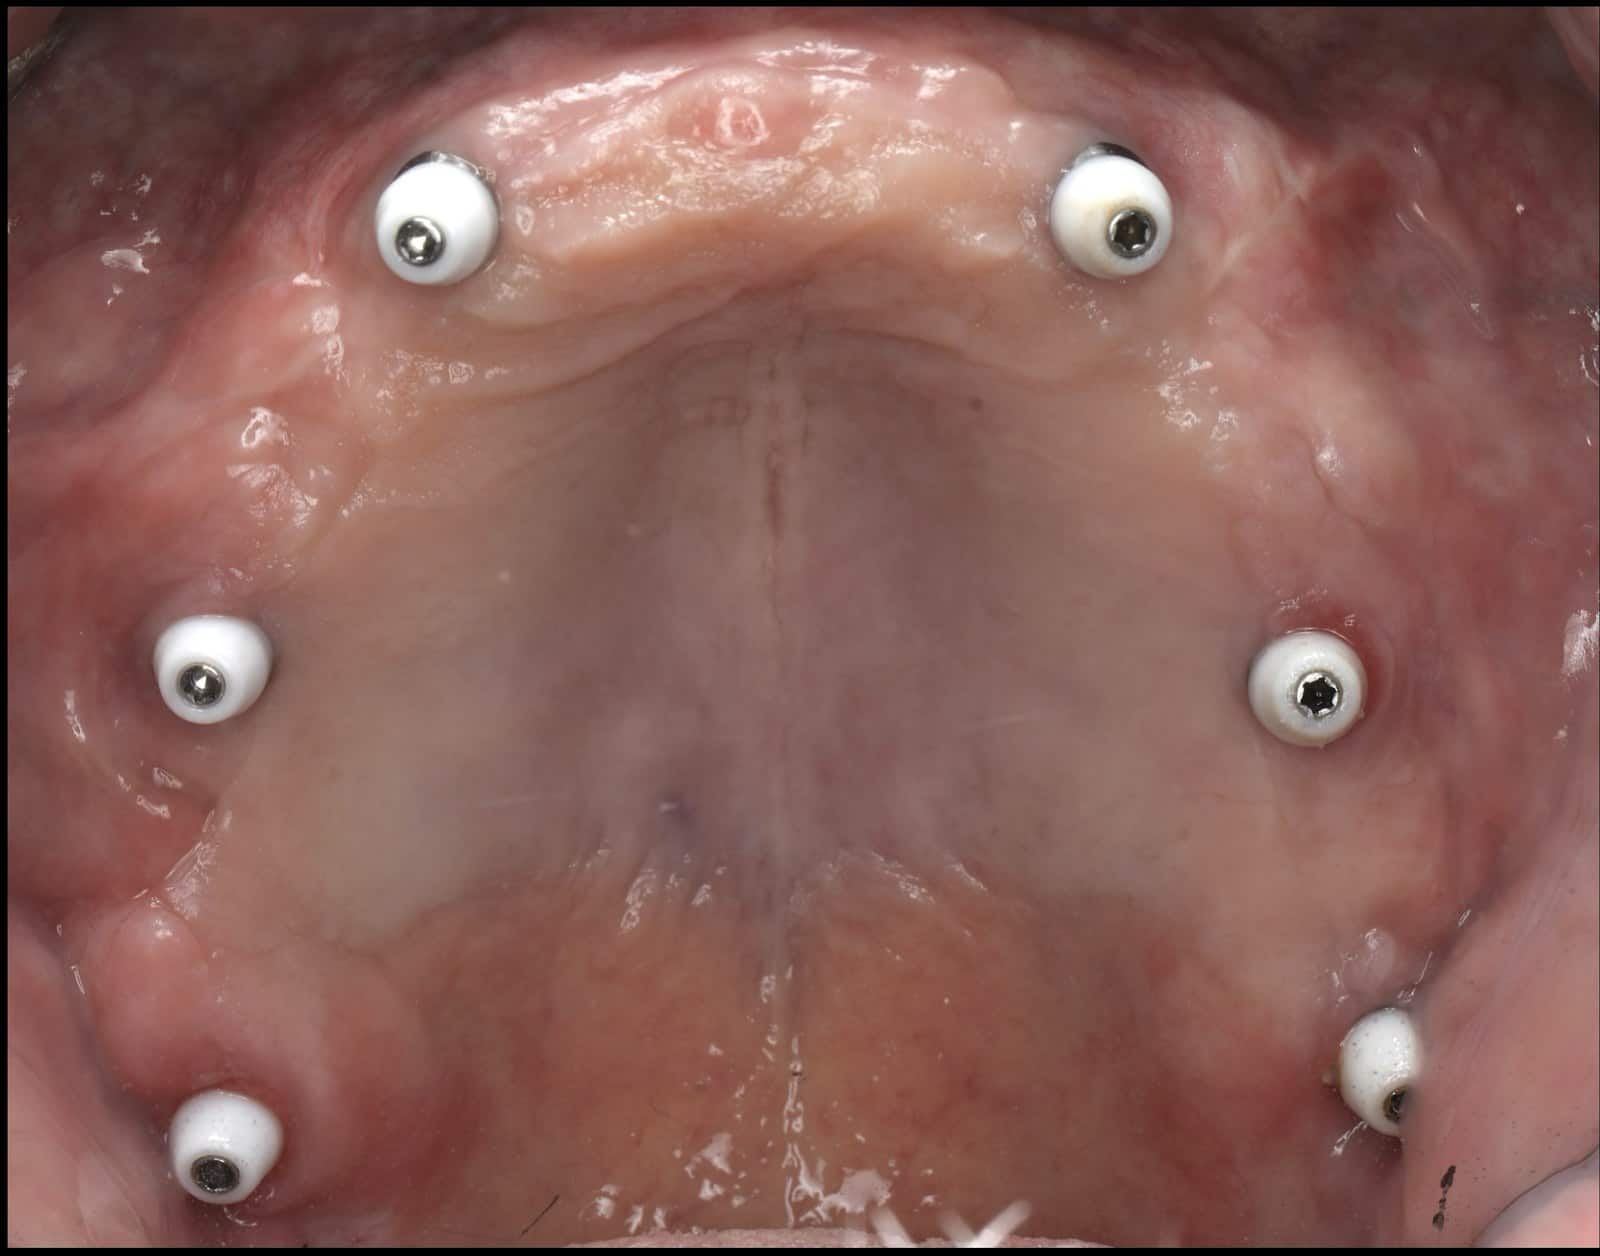
Distribution, seen from above — Six fixtures spread through a real curve rather than a straight line — the A-P spread and the curvilinear arrangement working together, exactly as planned before surgery.
The back of the jaw is where most implant plans give up. There's a nerve to avoid in the lower jaw, a sinus in the upper, and often less bone than anyone would like — so the standard answer is to stop short and let the bridge hang out over the gap. Dr. Reshad doesn't accept that as the default. Over thirty years he has built up a range of advanced techniques for getting reliable support into exactly those areas most plans avoid: different implant lengths and angles, different ways of using the bone that is there, and a planning process that finds the option a routine scan would miss. Which of them applies to you depends entirely on your anatomy — and that is a conversation for the consultation, with your scan on the screen in front of you.
What can be said here is why it matters. In Dr. Reshad's experience, getting support into the back of the arch instead of leaving it to hang can add a decade to the life of a restoration. It's a simple trade: a little more care in planning now, for a dramatically lower chance of a broken bridge ten years from now.
There's a second benefit that has nothing to do with strength. When the implant positions are planned this carefully, Dr. Reshad can usually give you a set of teeth on the same day as your surgery — a milled trial restoration, made in advance, that you can smile and speak with straight away. You leave with teeth, you get used to the shape and the bite before the final version is made, and the whole treatment takes far less time in the chair. It's one of the most underrated advantages of doing the planning properly from the start.
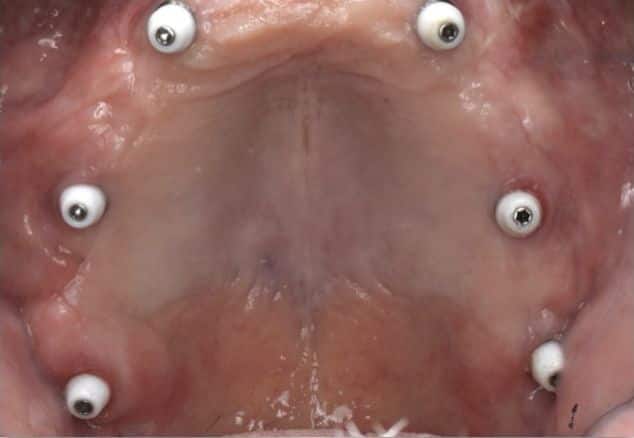
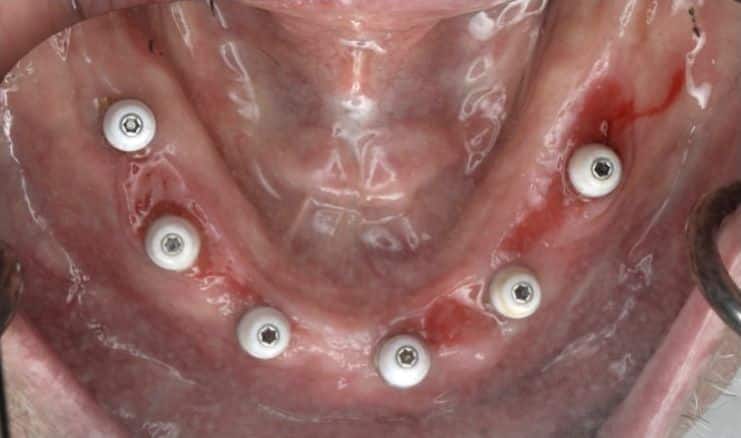
The finished result of planning this distribution before surgery — implants placed with enough spread front-to-back that the framework carries every bite directly, with nothing left hanging unsupported.
Anterior Occlusion (the Bite)
A shallow bite protects everything behind it
How your front teeth touch when you bite determines how much force reaches your back teeth — and therefore, once again, how much force reaches the implants holding everything together. Anterior guidance has to be shallow, and getting that wrong quietly overloads every implant behind it.
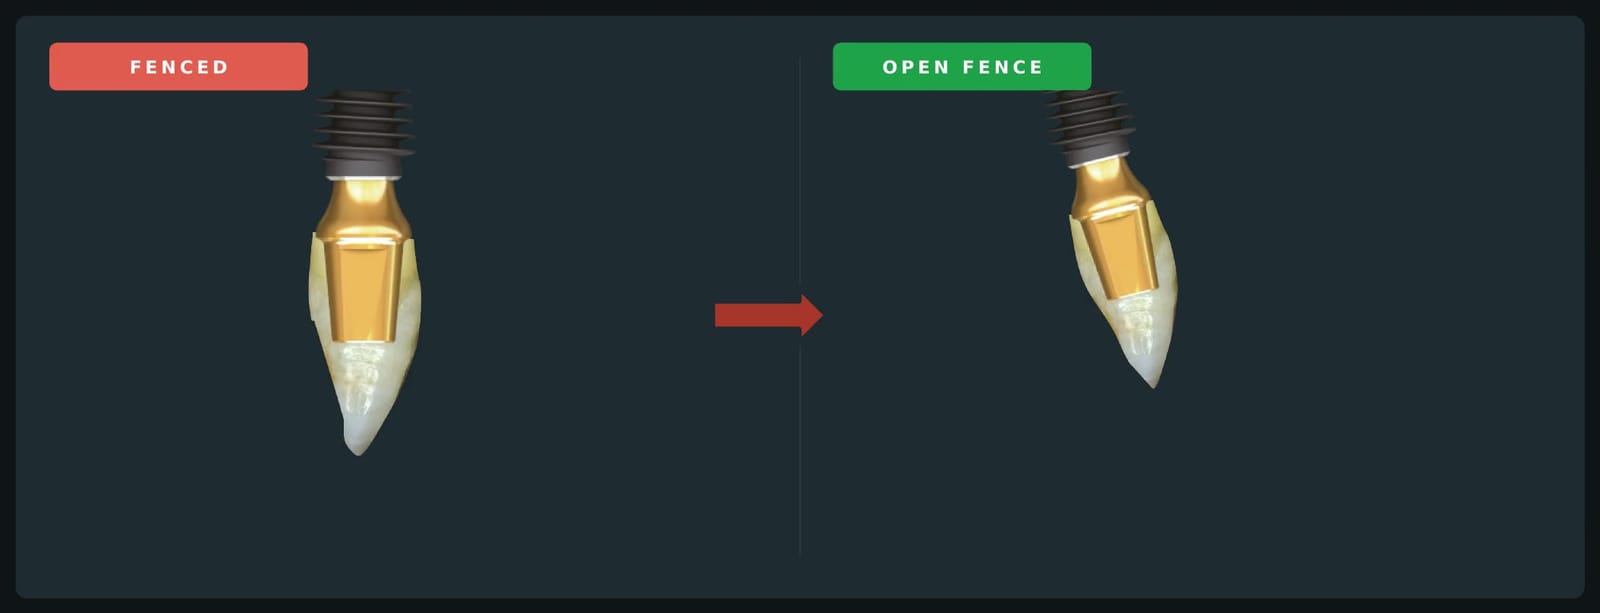
A "fenced" contact locks the implant crown tightly against the opposing tooth — every bite drives straight down the long axis with nowhere to go. Open the fence, and the same bite has room to glide clear instead of grinding home.
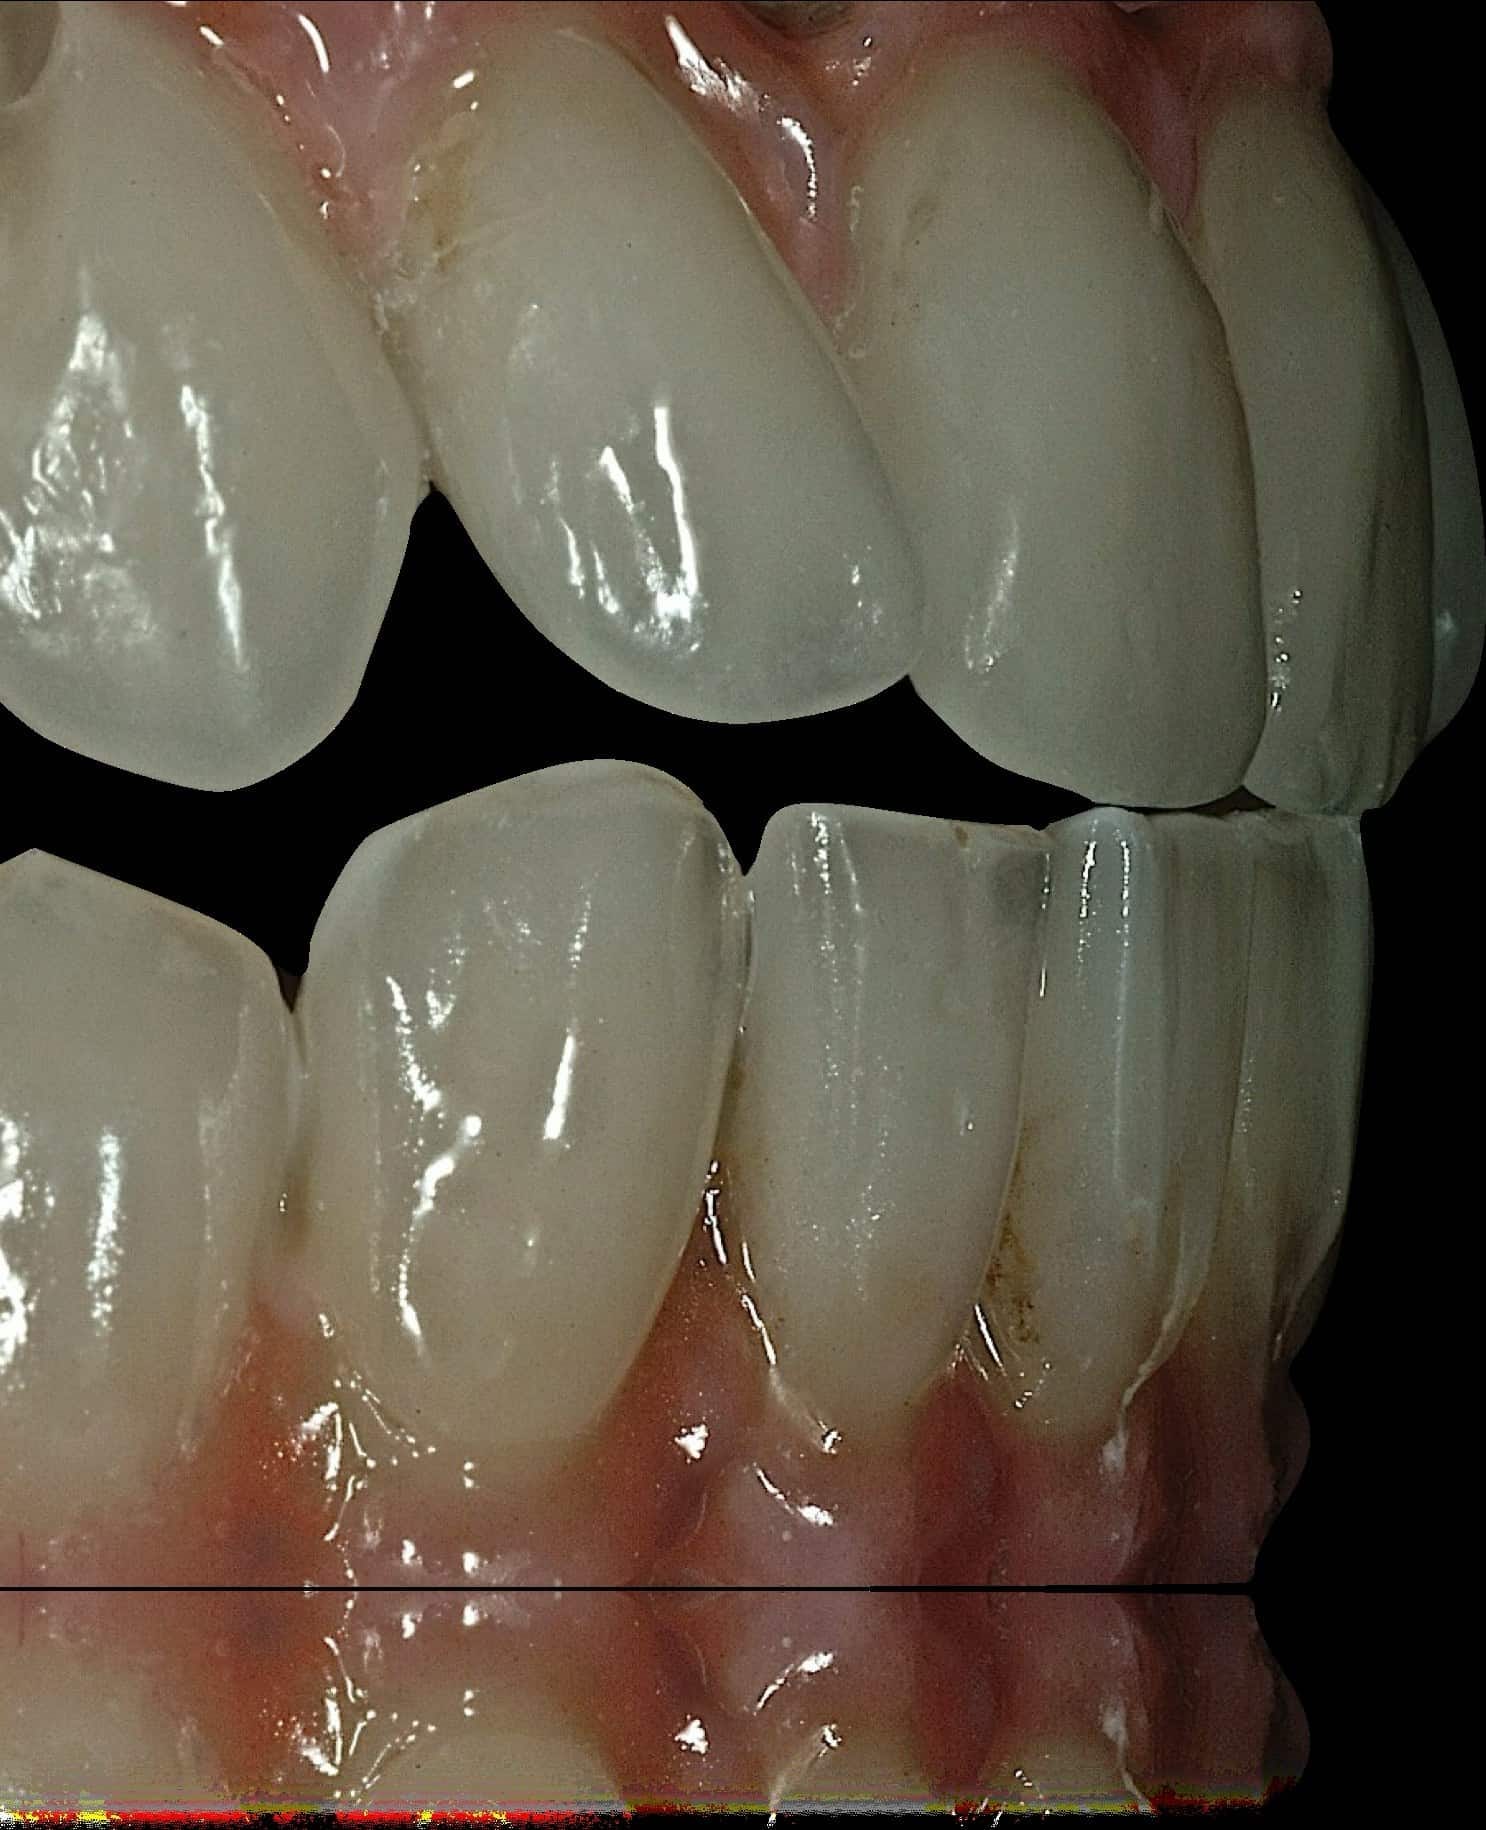
Edge to edge — The front teeth brought tip to tip — this is the path the lower jaw has to be able to travel freely, without catching.
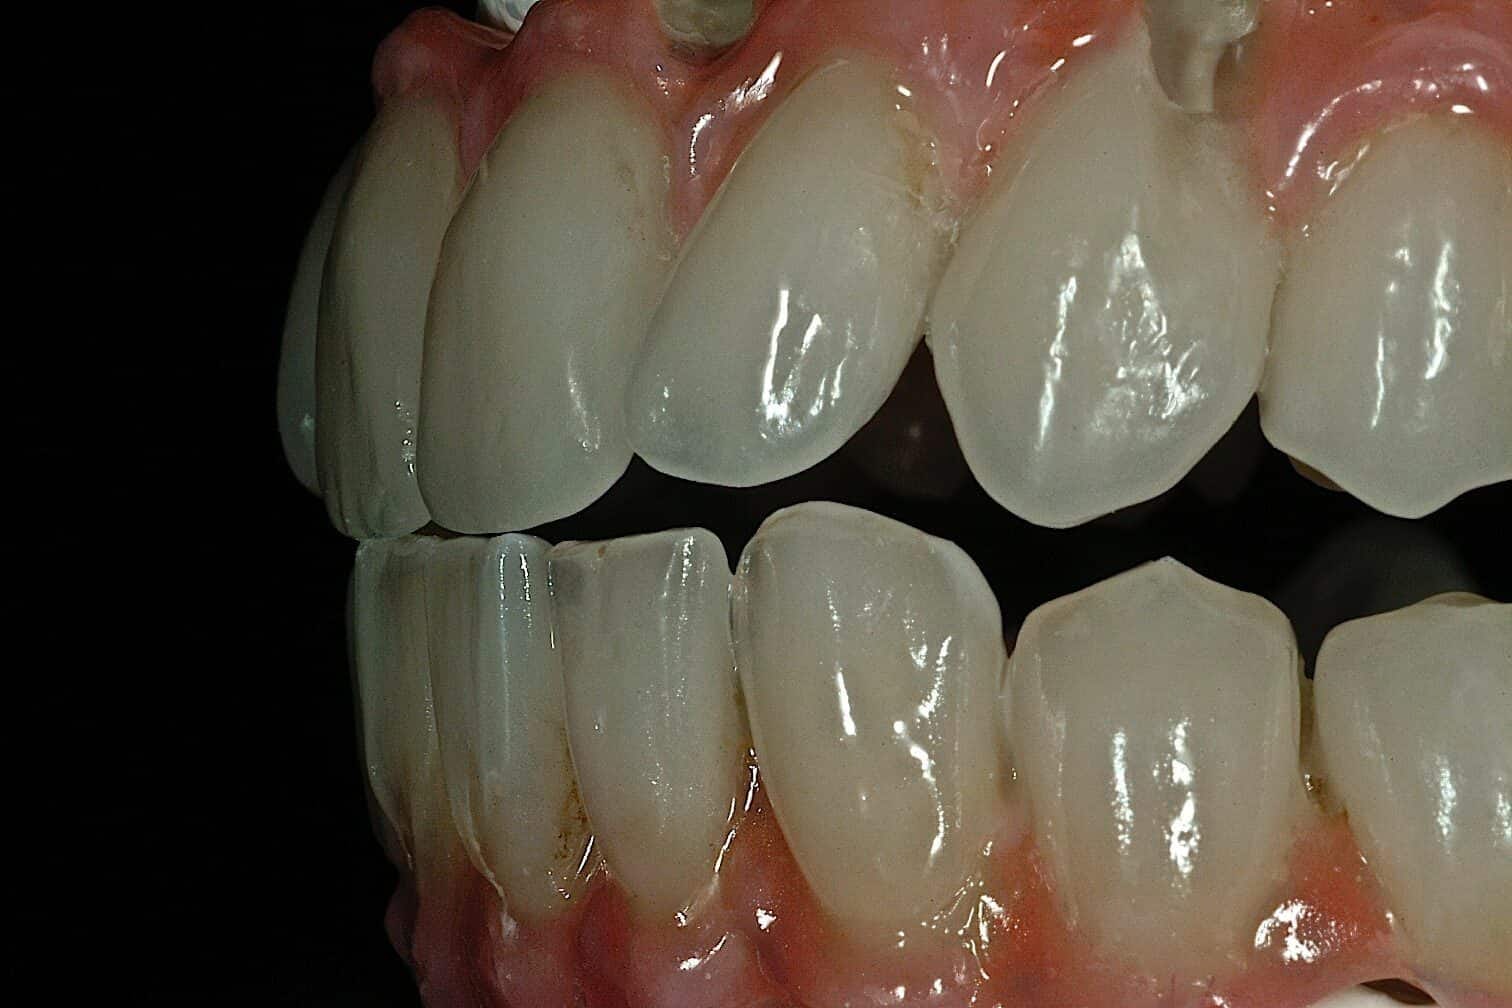
Closed, in the mouth — A shallow overlap — about a millimetre up and down, a millimetre front to back — measured and verified, not left to chance.
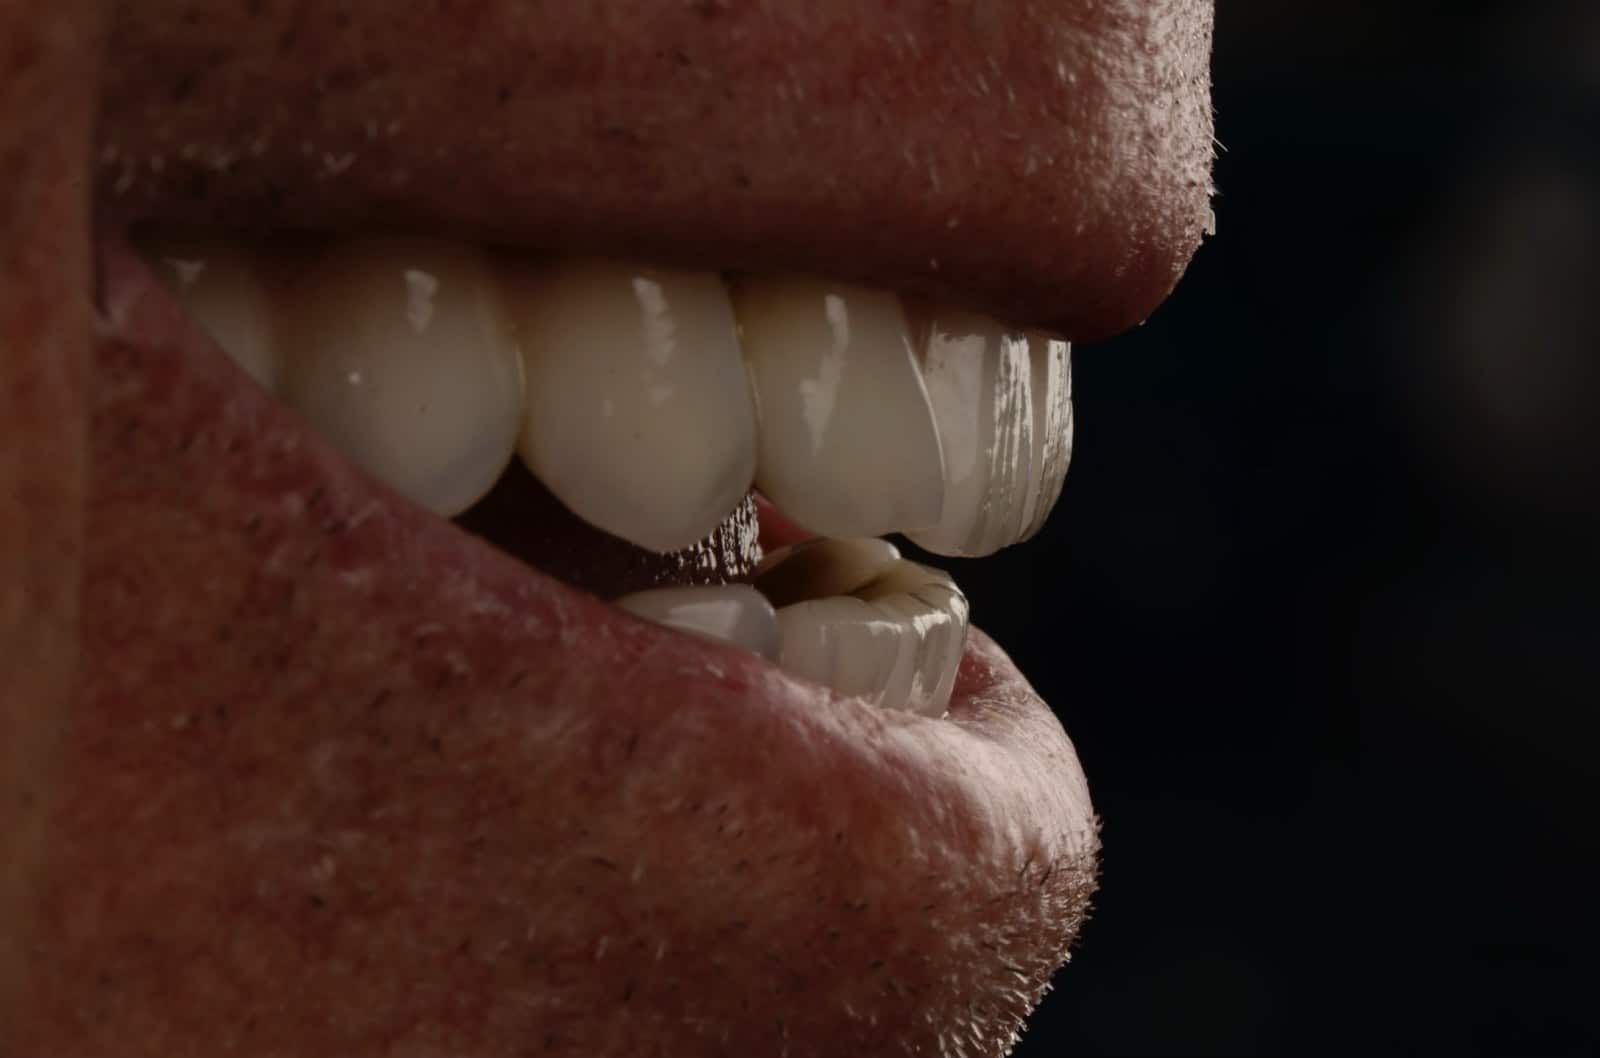
From the side — The upper teeth sit only slightly ahead of the lowers, so the jaw can slide forward and free itself on every bite instead of locking in.
Patients who need full-arch reconstruction almost always arrive with a collapsed bite — years of wear have closed the height of their bite (the "vertical dimension"), sometimes into what Dr. Reshad thinks of as a "straight jacket": the upper and lower teeth locked together with no easy way to slide past each other. Part of the treatment is reopening that dimension deliberately, to a specific target: about 1 mm of vertical and horizontal overlap on the front teeth, a shallow angle of escape, and no more than 3 mm of the lower front teeth visible with your lips at rest.
A steep, "locked-in" anterior bite is genuinely dangerous to the restoration behind it: it concentrates enormous force onto the back teeth every time you bite down, and full-arch restorations built with a deep bite and a cantilever don't fail gracefully — they fracture, with a 7-year failure rate as high as 41%. This is the kind of detail a patient never sees or feels in the chair, which is exactly why it has to be measured, planned and verified before a case is ever finished — not something checked once and assumed fine. Getting the bite right isn't a cosmetic afterthought; it's structural engineering for your own jaw, and it works hand-in-hand with everything already covered on cantilevers and load.
The Neutral Zone
The most overlooked principle in fixed dentistry
This last principle is borrowed from classical denture prosthodontics — first described by Dr. Wilfred Fish in the 1930s, and refined by prosthodontists since — and it's the one most overlooked in fixed implant dentistry today. The neutral zone is the narrow space in your mouth where the outward push of your tongue is exactly balanced by the inward pressure of your lips and cheeks.
In a denture, building outside that zone just means the denture comes loose — annoying, but self-correcting, because the denture simply won't seat. In a fixed full-arch restoration, the teeth can't move. So building outside the neutral zone means the restoration is permanently pushing against your lips and cheeks, hour after hour, for the rest of its life, with nowhere for that pressure to go.
Anatomically, this makes complete sense once you look at it: the corner of the mouth has no bony support at all. It's held together entirely by soft tissue and muscle — a knot of muscle at the corner of the mouth called the modiolus, and everything attached to it — which makes it, by a wide margin, the weakest and most easily irritated part of the entire system. It's also, unsurprisingly, exactly where these patients complain the most, and exactly the area conventional implant planning thinks about the least.
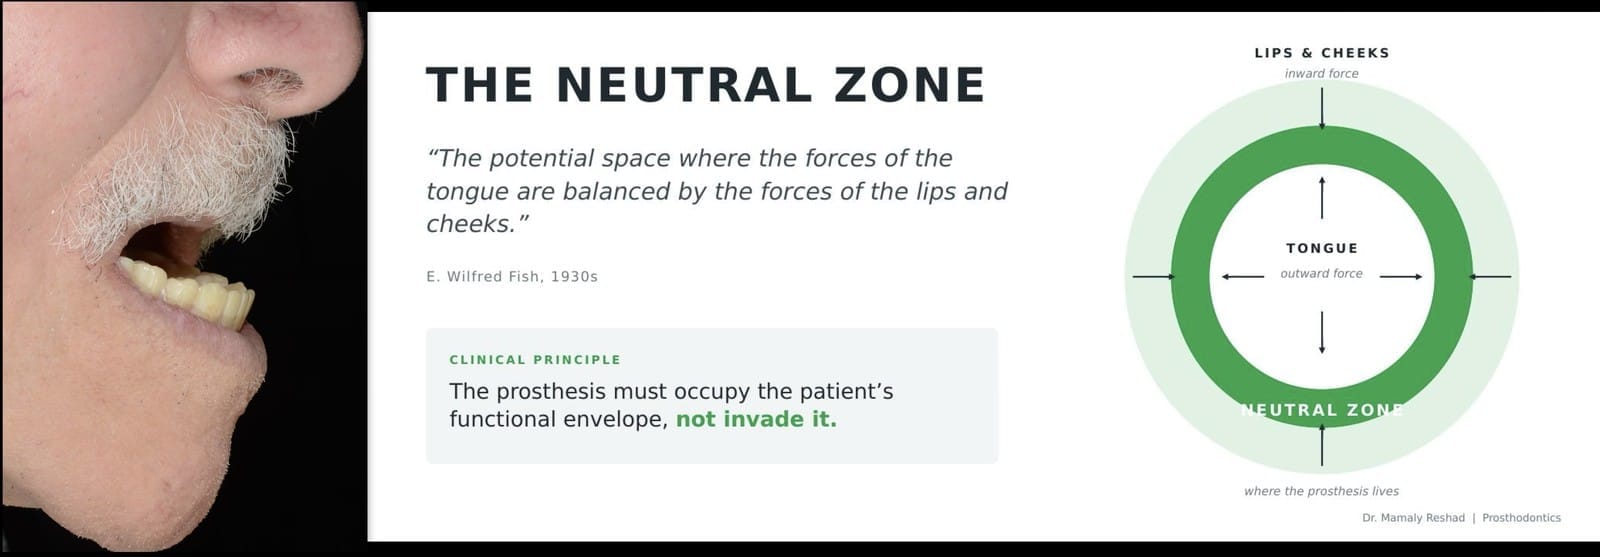
Where the balance actually sits — The neutral zone is the narrow corridor between the outward push of the tongue and the inward pressure of the lower lip — the restoration has to live inside it, not push past it.
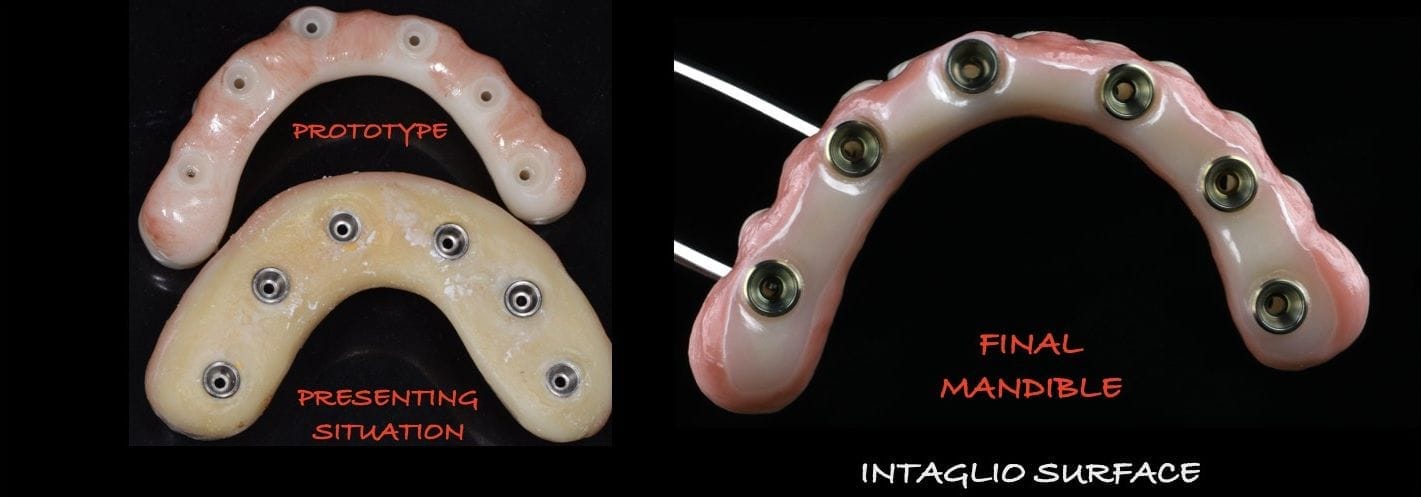
What he arrived with versus the final — The bulky restoration the patient came in with (left, lower) next to the prototype, and the final lower arch's narrow tissue-facing surface (right). That surface is what the lips and cheeks live against all day, and this reduction in bulk is what lets them close naturally.
Case 02 · Referred for revision — outside the neutral zone
This patient came to Dr. Reshad after a full-arch restoration elsewhere left him unable to close his mouth comfortably. His chief complaint was simple and constant: the restoration hurt his lips. He couldn't chew properly, and he couldn't fully close his lips around the prosthesis whether it was in or out of his mouth. His restoration was built far too thick from cheek-side to tongue-side, constantly pressing against his lips and cheeks. He was in daily discomfort from a problem that had nothing to do with the implants themselves and everything to do with where the teeth had been positioned relative to his own soft tissue.
The fix uses a technique with a very simple premise: a soft, room-temperature wax called Adaptol is built onto the anterior portion of the framework as a bite block, placed in the patient's mouth, and the patient is asked to talk, sip a cup of coffee, and move naturally. Their own lips and tongue sculpt the wax into exactly the shape and position their neutral zone allows — and that's precisely where the teeth are then set.
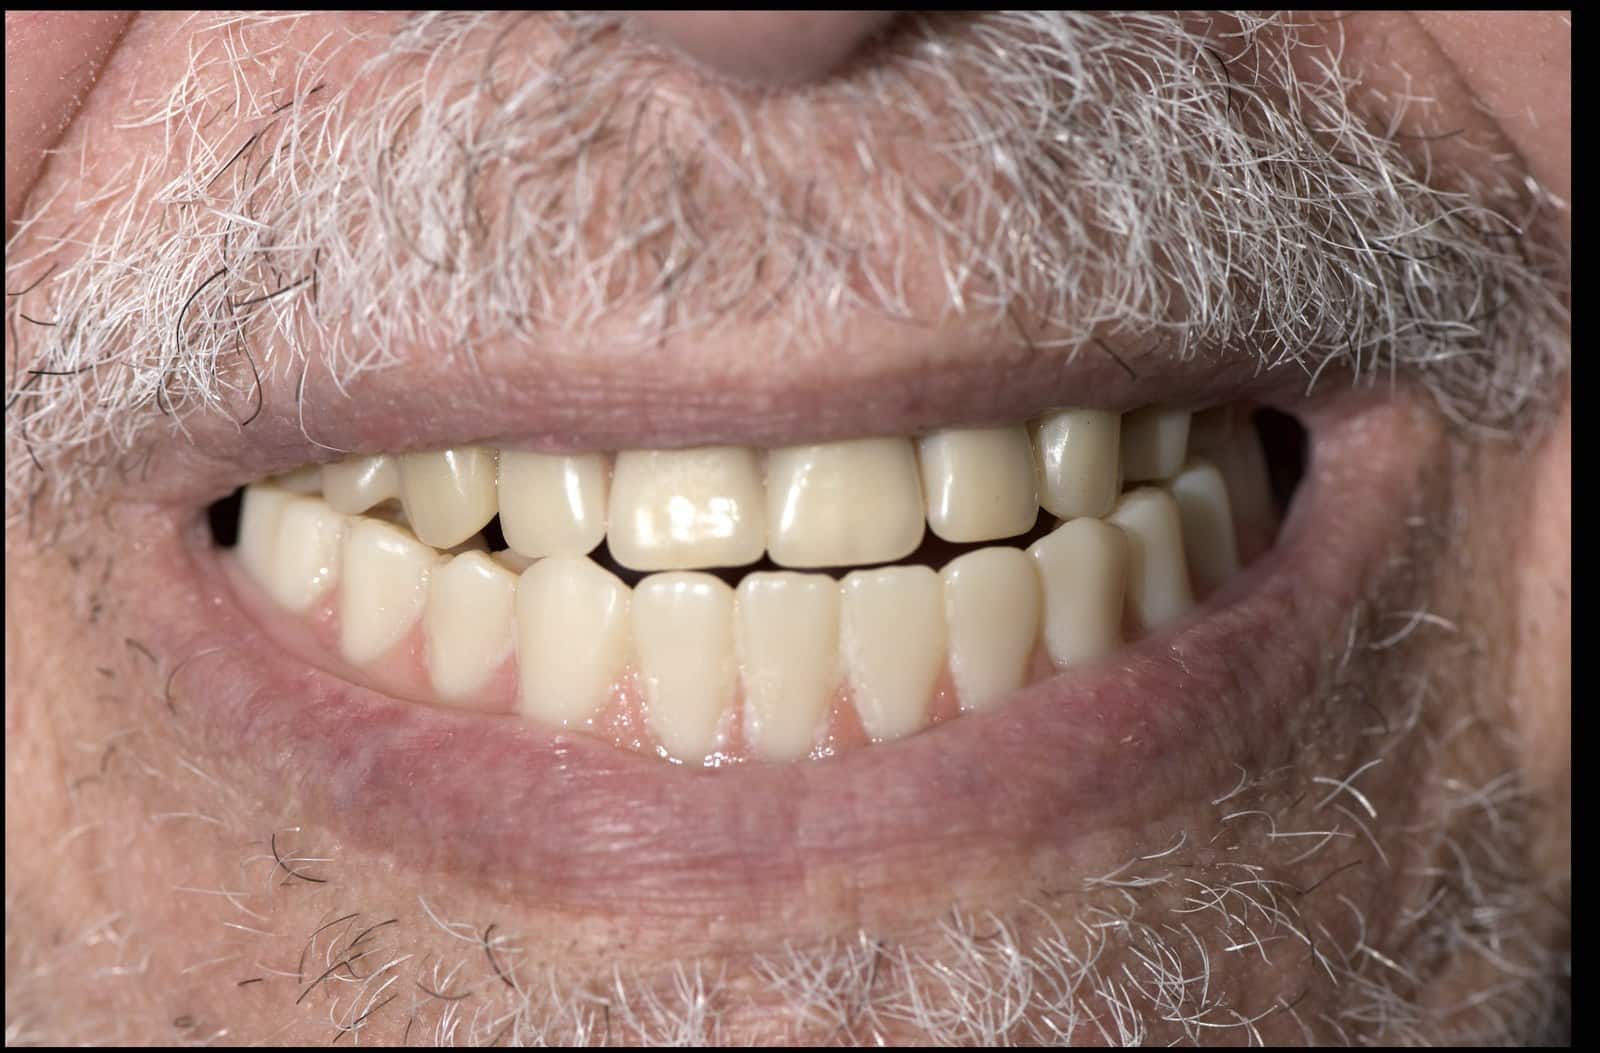
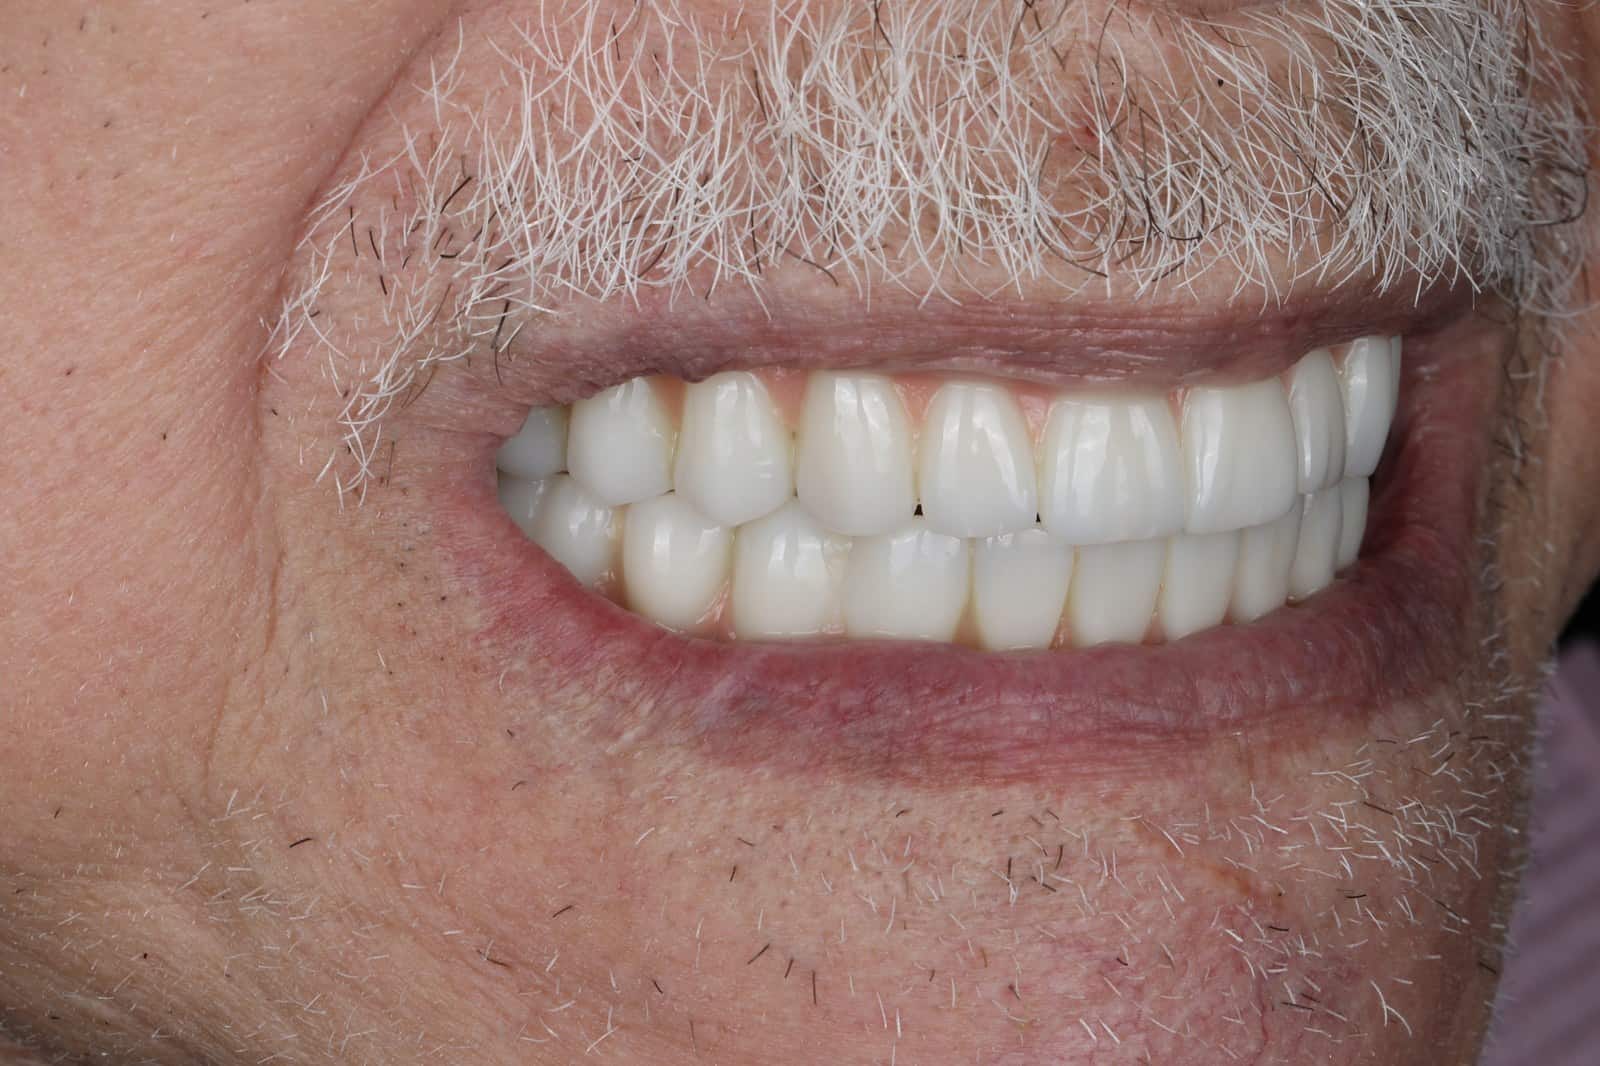
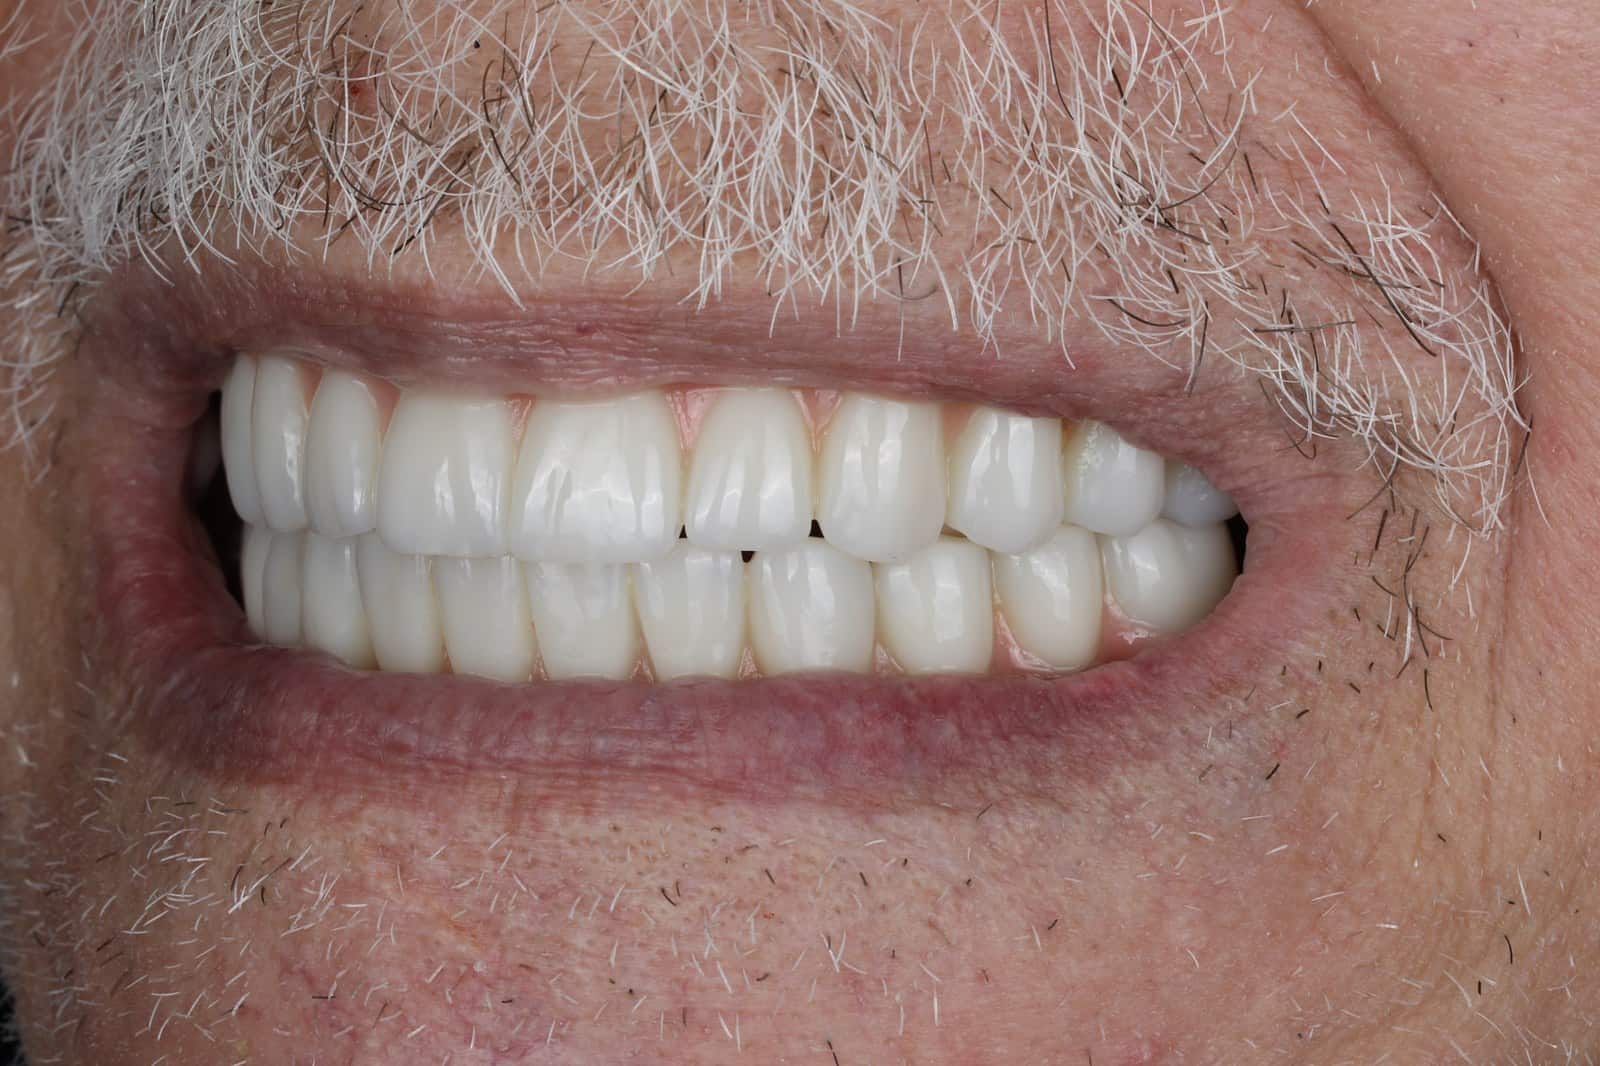
The original restoration (above) compared to the redesigned result from two angles, moved substantially inward — a visibly slimmer design, set further in toward the tongue — to sit within his neutral zone. He can now close his lips fully, speak clearly, and eat without the constant pressure that brought him to Dr. Reshad in the first place.
One detail from that case is worth mentioning honestly: in his lower jaw, Dr. Reshad had no control over how high up his existing implants had been placed by the original surgeon — a real compromise he had to plan around rather than starting from a blank slate. A screw-access hole would have come out through the biting edge of one front tooth as a result, which he corrected with an angled connector that redirects the screw channel out of sight. The case was still salvaged by properly applying the neutral zone concept, even working with implants he wouldn't have positioned that way himself — which tells you how much of the outcome the neutral zone decision controls, even when other parts of the case aren't ideal.
Full-mouth reconstruction done well isn't luck. It's six decisions, made in the right order, before surgery begins.
- 01
Shape & emergence — Plan the teeth first, reduce the bone to fit them, not the other way round.
- 02
Load & cantilevers — Distribute implants in a curve, and treat every cantilever as a liability to be minimized or eliminated.
- 03
Restorative space — Engineer for the tight posterior space, not just the generous anterior space.
- 04
A-P spread — A single extra implant, well placed, can add a decade to a restoration's life.
- 05
Anterior occlusion — A shallow bite protects everything behind it.
- 06
The neutral zone — Build within the space your own lips and tongue define, not around it.
Whether you're starting from scratch or living with a restoration that isn't working, here is what a first visit with Dr. Reshad actually involves — no surgery, no commitment, just a proper look.
1 · We look at all of it
A full examination, a 3D scan, photographs and a careful look at how you bite, speak and close your lips. If you already have implants or a restoration, we assess exactly what you have — what can be kept and what can't.
2 · We plan the teeth first
Before anyone talks about implants, we work out where your teeth need to be for you to look, speak and chew naturally. Everything else on this page follows from that one decision.
3 · You get a straight answer
A plan you can understand, the reasoning behind it, and an honest account of the options — including when a simpler, cantilever-free design will serve you better than a bigger one.

Case photographs are drawn from Dr. Reshad's own clinical archive and lecture materials, shared with patient permission for educational purposes. This section is educational and does not replace an in-person evaluation.
Revision Is Its Own Discipline
A first reconstruction is planned. A revision inherits whatever the first one left behind, and has to produce an excellent result from a compromised starting point.
Knowing how to build a framework that corrects for positions you did not choose, and then make teeth on top of it that nobody can read as a correction, is a specific body of knowledge. This one is in the literature.
Every case is planned around one person's anatomy. Individual results vary.
What FP-3 Means
FP-1, FP-2 and FP-3 are the three classes of fixed prosthesis. They are not grades of quality — one is not better than another. They describe how much of the tooth, and how much of the surrounding pink tissue, the new teeth are standing in for.
FP-1 replaces teeth and nothing else: the gum was never damaged, so none is rebuilt. FP-2 is where the gum has receded and a little prosthetic pink makes up the difference. FP-3 is the same problem further along — a lot of pink has gone, so the prosthesis carries a substantial amount of its own gingiva, and the teeth are set at their proper length against it rather than stretched to reach tissue that is no longer there.
Most full-arch reconstructions that follow years of tooth loss fall into this class. Which class a case belongs to is settled at the planning stage, before anything is placed, because it changes where the implants go.
Why an FP-3, and What It Replaces
There are many reasons we may decide on an FP-3. Dr. Reshad lectures extensively on it and has written in textbooks about the various reasons it is indicated.
This is a reconstruction where the patient is given a tooth made of pink or white ceramic, about eleven millimetres long, and above that a prosthetic gingiva that can extend three, four, five, six, seven, eight or nine millimetres. It can be a large procedure to replace structures that are missing. It is typically made of zirconia or ceramic, or a combination of both, and where the structures are big enough it carries a titanium framework supporting it.
These are patients who have had extensive loss and damage from previous situations, and for them the FP-3 is the way to replace it and avoid dentures.
As a prosthodontist, Dr. Reshad is the expert at rebuilding those structures in a patient's mouth, and at doing it so that all of it comes into play at once: speech, function, aesthetics, lip support, the neutral zone, comfort in speaking, eating and swallowing, the way the patient chews, the biomechanics, the emergence of the tissue, cleansability, and the long-term survival of the implants underneath. What results is something natural, that feels good, and that functions almost as well as natural teeth. That is the FP-3 design, for the more extensive losses of tooth structure.
Our Beverly Hills office at 414 N. Camden Dr., Suite 750 opens in January 2027. Until then, call (310) 444-5217 and we'll arrange your consultation.
The High Gummy Smile, and the Transitional Line Angle
There is one more group of patients who may require an FP-3: those with a high gummy smile. To hide the transitional line angle, Dr. Reshad uses specific techniques to build an FP-3 that moves that junction above the lip line, where it is not visible. These are the more advanced cases, and the point of diagnosing them properly at the first visit is to avoid the major unaesthetic problem — a visible junction between the patient's own gum and the prosthetic pink.
A transitional line angle is the line at the corner of a tooth where its surface turns and the light turns with it. A sharp, straight one is what reads as aesthetic, and as good restorative work. Set symmetrically and harmoniously across the arch, those line angles send the light back evenly and consistently from every angle — a natural, harmonious reflection, with no visual tension anywhere in the smile.
This is again part of being a prosthodontist, because a prosthodontist has been trained as a laboratory technician and can create these himself. If a line angle needs to be changed or moved, he can do it for you rather than sending the case back, which is what accelerates the work.
When the Implants Point the Wrong Way
A revision case can arrive with implants that are perfectly integrated and still cannot be restored, because of the angle they were placed at. Where the angulation is severe, the screw access emerges through the front of the teeth rather than behind them, and a conventional restoration is not available.
Removing well-integrated implants is surgery, and it costs bone. The alternative is to correct the problem above the bone: a primary framework that converts the trajectories the implants actually have into the trajectories the teeth need, with the restorations built on that.
This is the situation Dr. Reshad's published FP-3 framework technique was developed for. The original design dates back nearly twenty years; the current version is cast in cobalt chromium with ceramic layered on top, doing the same correction in materials that have moved on since.
Our Beverly Hills office at 414 N. Camden Dr., Suite 750 opens in January 2027. Until then, call (310) 444-5217 and we'll arrange your consultation.
How the Framework Is Made
The finished teeth are designed first, in a full-contour wax-up, so that the shape, length and position of every tooth is settled before any metal exists. Nothing about the framework is decided by where the implants happen to be.
That wax-up is then cut back in a controlled way, leaving the substructure that will carry the ceramic. What comes off is the space the ceramic will occupy; what stays is the framework that corrects the angulation and supports the load.
Ceramic is layered onto the framework, and the prosthetic gingiva is built and shaded against it. The result reads as teeth emerging from tissue, not as a correction — which is the whole point of doing it this way.
Why Revision Is Its Own Discipline
A first reconstruction is planned from a clean start. A revision inherits whatever the first attempt left behind — implant positions nobody would have chosen, bone that has already been lost, and a patient who has been through it once.
Producing an excellent result from that starting point is a different body of knowledge from producing one from scratch. It is the combination of surgical understanding, laboratory design and occlusion that defines prosthodontics as a specialty, and it is why revision work is referred to specialists rather than repeated.
Frequently Asked Questions
Most failures come from decisions made before surgery, not from the implants themselves: teeth fitted to wherever the implants went, leaving a pink-ceramic ledge that traps food and irritates the gum; long cantilevers past the last implant that load it on every bite; and restorations built too bulky for the lips and tongue. Planning the teeth first, then placing and distributing the implants to serve them, prevents most of it.
FP-3 is the class of fixed prosthesis that replaces the teeth and the missing gum tissue with them. Where a lot of gum has been lost, the prosthesis carries its own gingiva in ceramic, so the teeth can be made at their proper length instead of being stretched to reach tissue that is no longer there. It is a description of what has to be replaced, not a grade of quality.
Often, yes. An implant can be perfectly integrated and still be impossible to restore conventionally, because the screw access emerges through the front of the tooth. Rather than remove a well-integrated implant — which is surgery and costs bone — the angulation can be corrected above the bone with a primary framework that converts the trajectory the implant has into the one the tooth needs.
The current design is cast in cobalt chromium, with ceramic layered on top of it. Earlier versions of the same technique used the materials available at the time; the principle of correcting the angulation in the substructure has not changed.
The finished teeth are designed first as a full-contour wax-up, so their shape and position are settled before any metal exists. That wax-up is then cut back by a measured amount to create the framework underneath, leaving exactly the space the ceramic will occupy. Designing the outside first and working inwards is what keeps the finished teeth from being dictated by the implant positions.
The original design was created almost twenty years ago, for cases where no other answer was available, and it has been refined since. The materials have changed considerably; the correction it performs has not.
Yes. A first reconstruction is planned from a clean start, while a revision inherits implant positions, bone loss and compromises left by the previous attempt, and still has to produce an excellent result. Knowing how to build a framework that corrects for positions you did not choose is a specific body of knowledge.
Explore More Services
Medically reviewed by Dr. Mamaly Reshad, BDS (Lond), MSc (Lond), Cert Pros (USC), Prosthodontist — Last reviewed July 2026
Ready to Transform Your Smile?
Schedule a private consultation with Dr. Reshad to discuss your goals and explore your options.