Revision Case 1 · Revision Dentistry · All-on-X
Too Scared to Smile
She was too scared to smile. This is how we fixed it.
Her new implants looked fine at rest. The moment she smiled, they did not. This is the story of a failed upper restoration, the reason it failed, and the planning system Dr. Reshad developed so that the same mistake is never built into a smile again.
- Why it failed
- The Lip-Line Classification
- The rebuild, step by step
30+ years in full-arch & implant prosthodontics · USC faculty appointment · Author of a published classification of the edentulous maxilla
years of full-arch prosthodontics
faculty appointment
classification published in Fonseca's Oral and Maxillofacial Surgery
lecturer and published author
The patient who would not smile
“I am too scared and embarrassed to smile with my new implants.”
The patient's chief complaint
She had been told her new upper teeth were finished. With her lips relaxed, nobody would have disagreed.
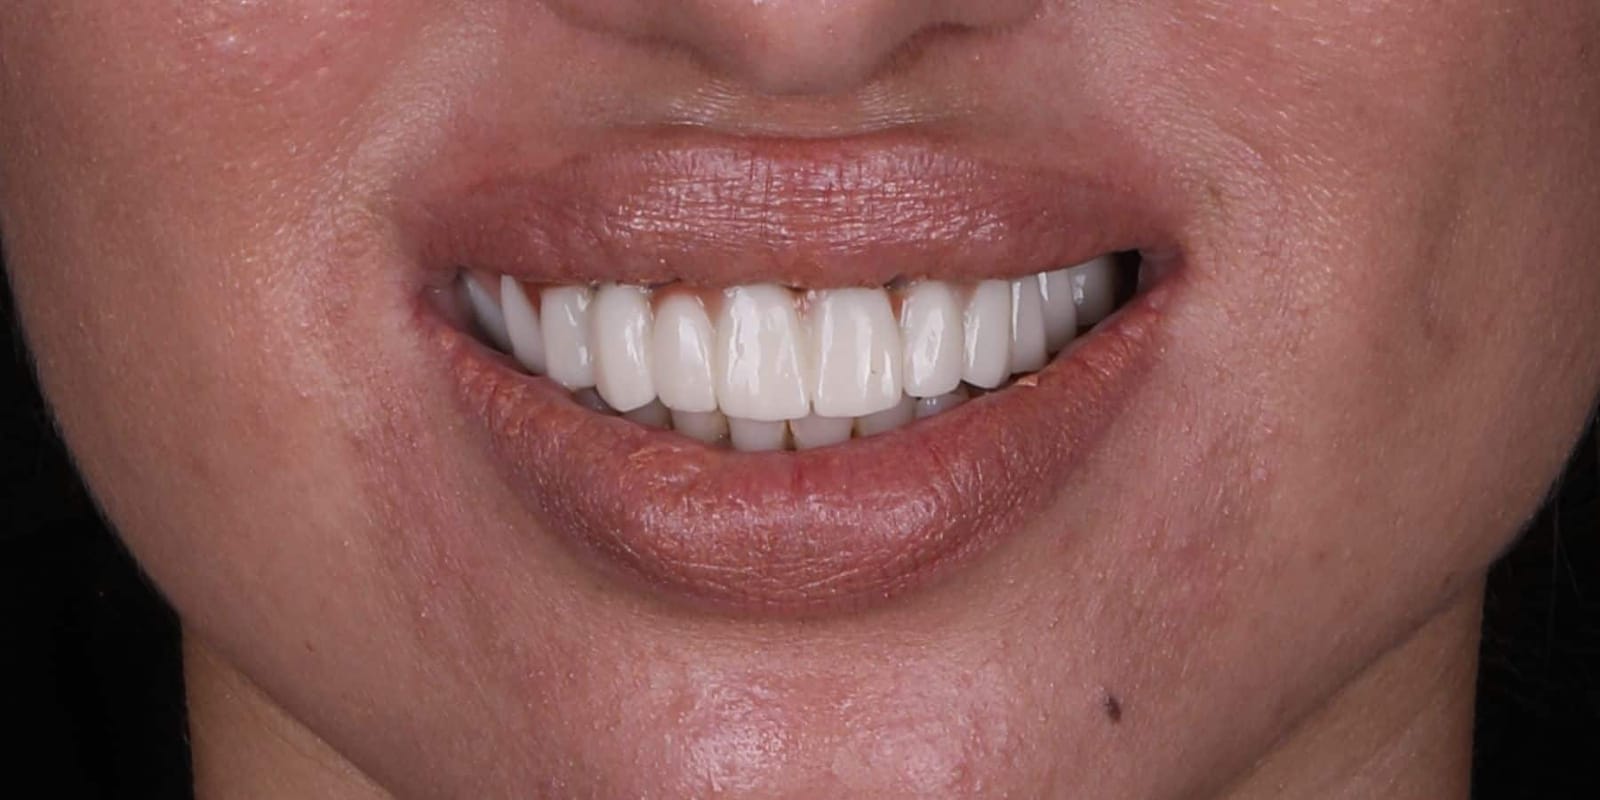 Lips in repose
Front
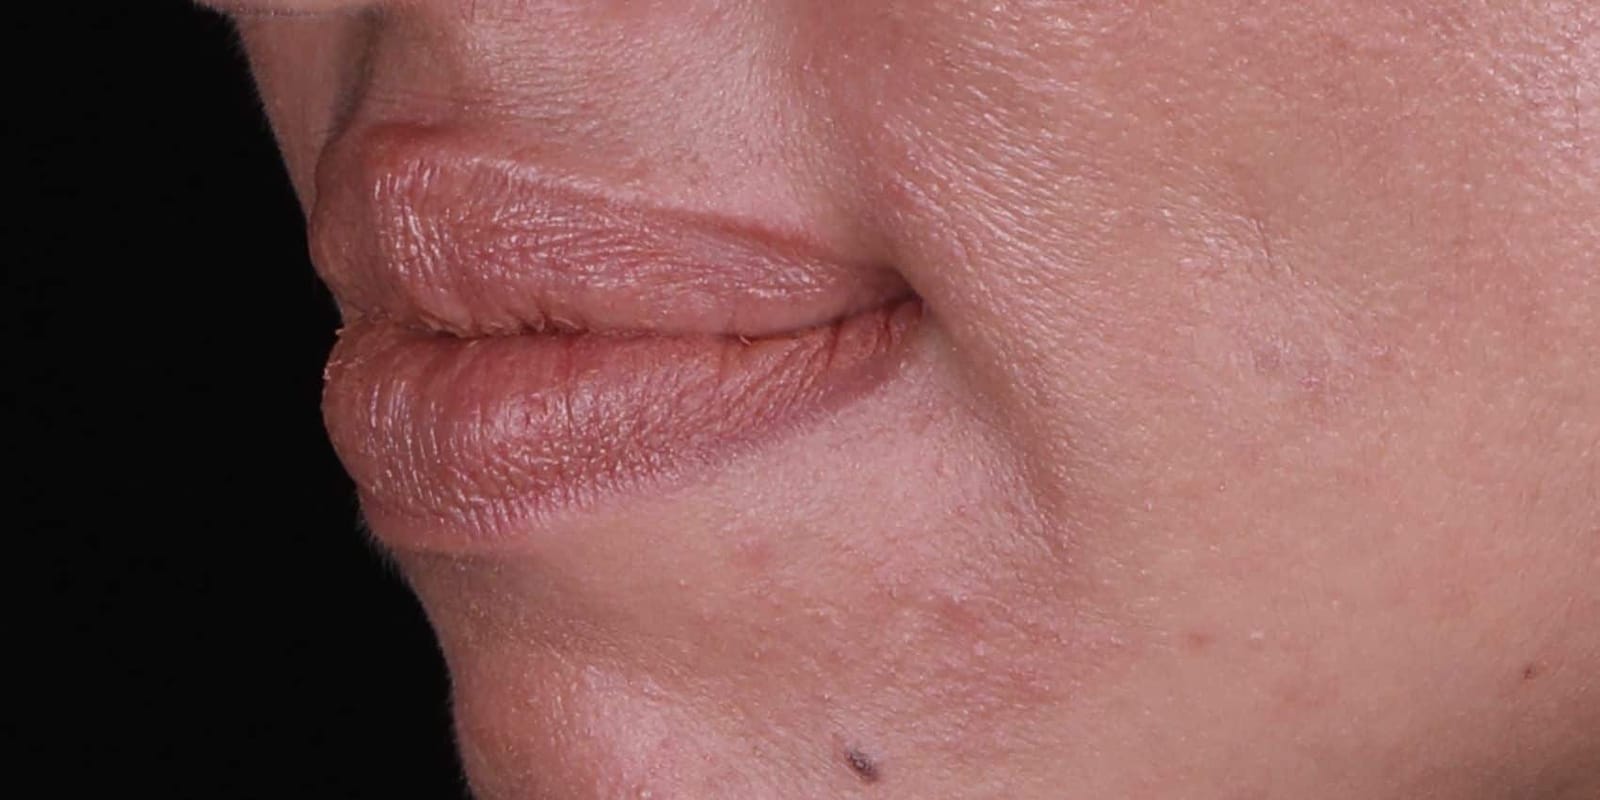 Lips in repose
Oblique
At rest, the lips cover the junction between the prosthesis and the patient's own tissue. The teeth are an acceptable shape and the profile is balanced. Nothing here explains why she had stopped smiling in photographs.
The explanation appears only when the lip moves.
Then she smiled
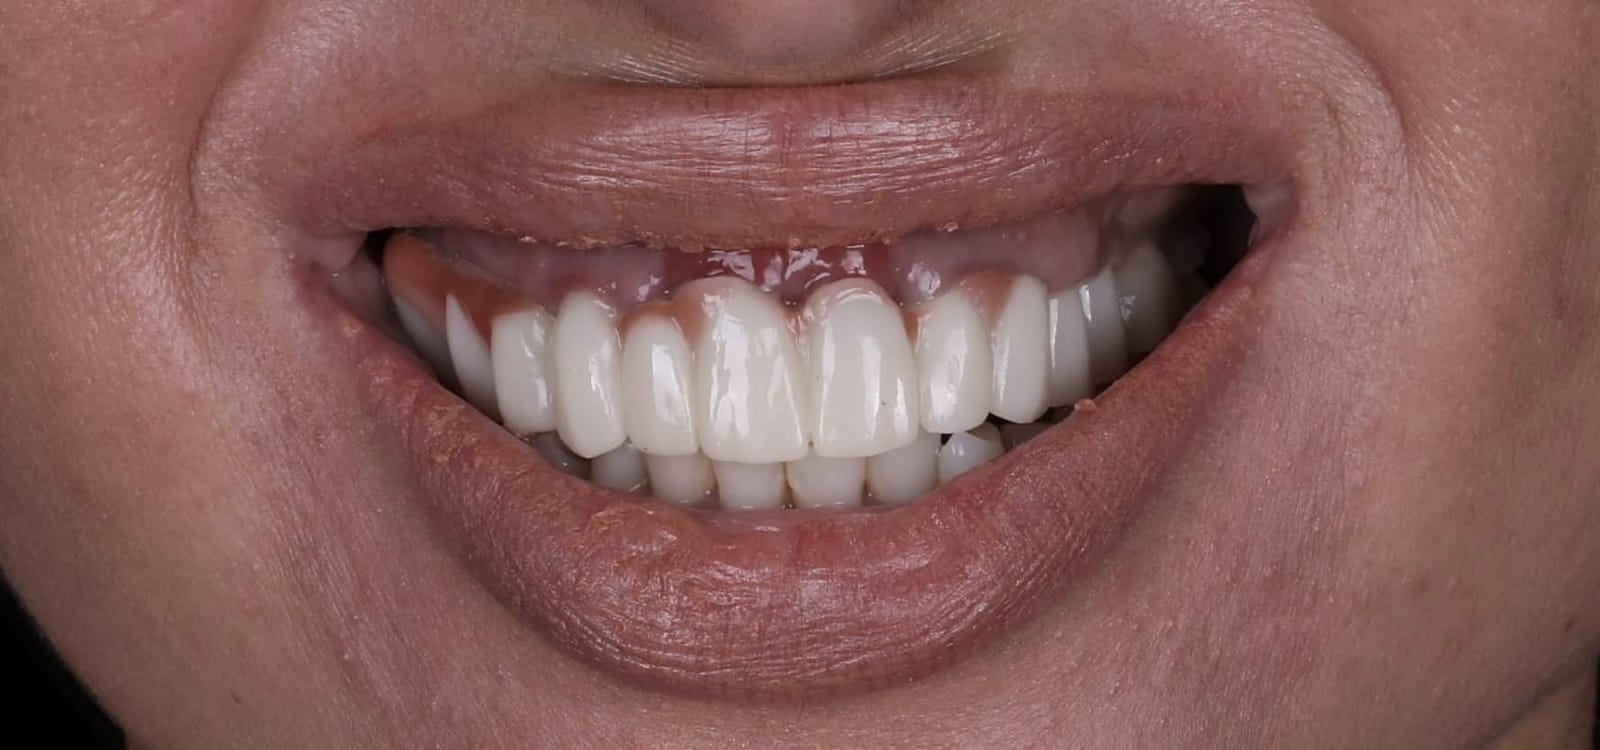 Maximum smile
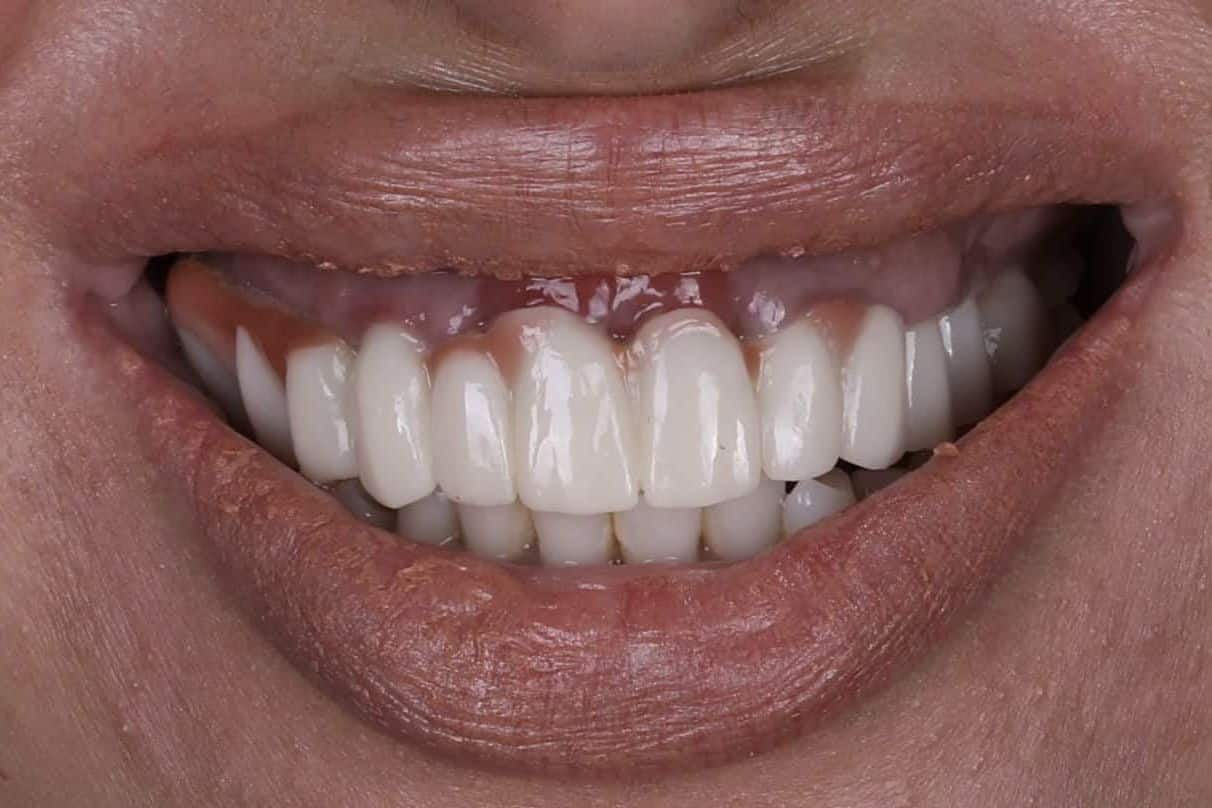
This is the photograph she was afraid of
At full smile the upper lip rises well above the line where the pink ceramic meets her own gingival tissue. Both are on show, with the join between them in plain view.
Upper lip length in this patient. Adult averages are roughly 18 to 22 mm (Fonseca, Oral and Maxillofacial Surgery).
A short lip lifts higher, and shows more
The transition line, where prosthetic pink meets natural gingival tissue, sits in view of the smile.
It can never be masked, only hidden
A high volume of filler in the upper lip, adding to the mobility and distorting the lip's natural movement.
Contributing factor
Upper lip length: this patient 14 mm, against a typical adult range of 18 to 22 mm.
Scale 0 to 25 mm. The shaded band marks 18 to 22 mm (Fonseca, Oral and Maxillofacial Surgery).
Three things were working against her at once: a very short upper lip, a lip with pathological levels of filler volume, and a restoration built without any reference to how far that lip actually travels. Each makes the lip move higher. Together they guaranteed the seam would show.
The restoration was designed for the lip at rest. Patients live in the lip at maximum smile.
Why existing classifications were not enough
Dentistry already has systems for describing the edentulous upper jaw. None of them looks at the one thing that decides whether a fixed restoration will be seen.
What the established systems describe
- Cawood and Howell classify the shape and resorption of the bone.
- Misch FP-1, FP-2, FP-3 classify the type of fixed prosthesis, from teeth only to teeth plus pink.
- Both are useful. Neither records how far this particular patient's lip rises when she smiles.
- Neither says where the join between pink ceramic and natural tissue must sit.
What the Lip-Line Classification adds
- The highest lip line at maximum smile and on the "E" sound, recorded on video.
- The transition line, the horizontal join between prosthetic pink and the patient's own gingival tissue.
- A rule: the transition line sits 2 to 3 mm above the highest lip line at maximum mobility.
- A diagnosis that tells you, before surgery, whether the plan will work.
Lip-Line Classification, Class I to V in rising difficulty
- Class I
- Finding: Teeth only. Ridge visible at smile. Prosthesis: FP-1. Outcome: Favorable
- Class II
- Finding: Teeth only. Ridge sits under the lip. Prosthesis: FP-2. Outcome: Favorable
- Class III
- Finding: Teeth and pink. Seam hidden under the lip. Prosthesis: FP-3. Outcome: Success. The target for every case.
- Class IV
- Finding: Teeth and pink. Seam visible in the smile. Prosthesis: FP-3. Outcome: Failure. Must be converted to Class III before surgery.
- Class V
- Finding: Lip unsupported. Prosthesis: Fixed is contraindicated. Outcome: Fixed-detachable prosthesis only.
Dr. Mamaly Reshad, building on the maxillary classification published in Fonseca, Oral and Maxillofacial Surgery, 3rd ed., 2017
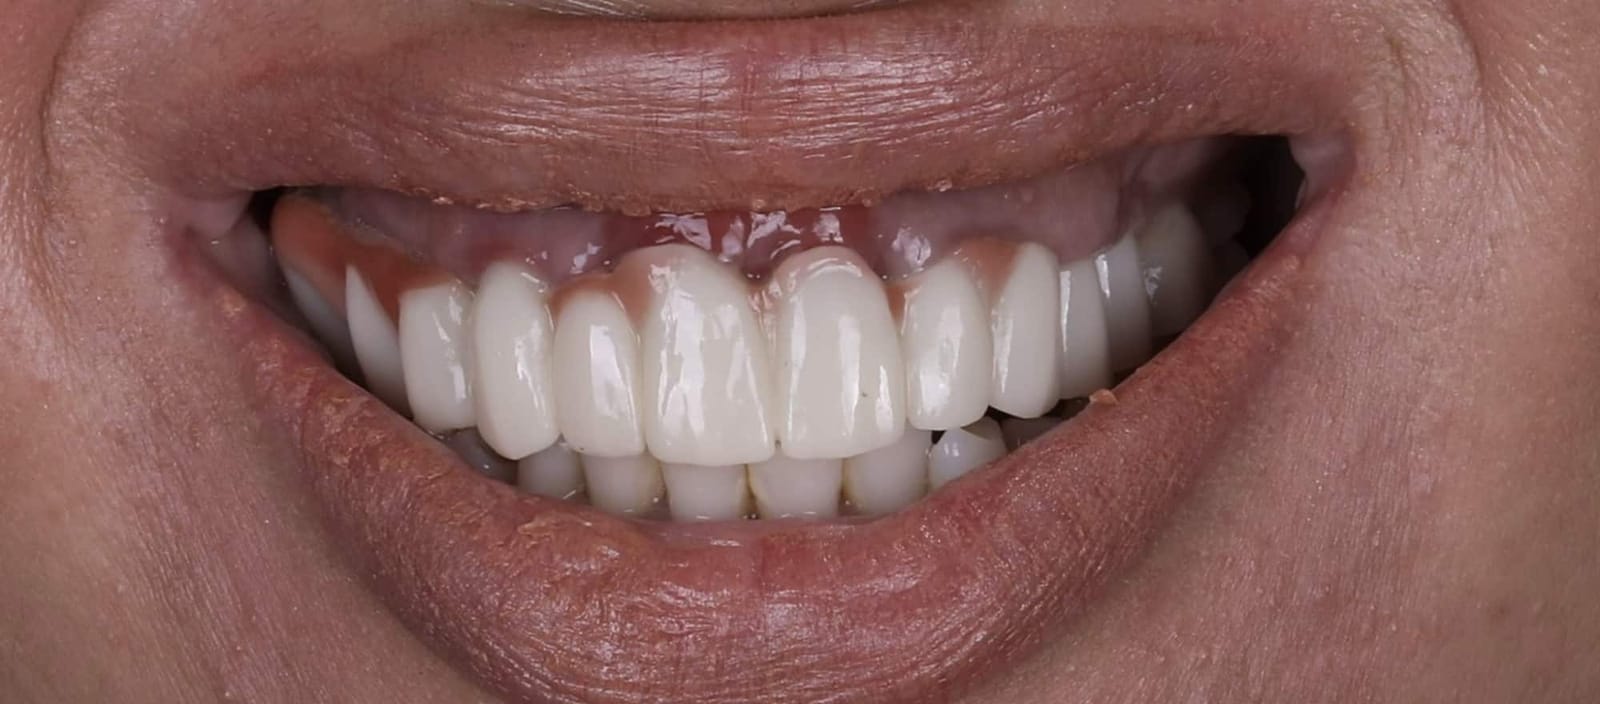 Patient's own gingival tissuePink ceramicVisible transition lineClass IV · seam visible
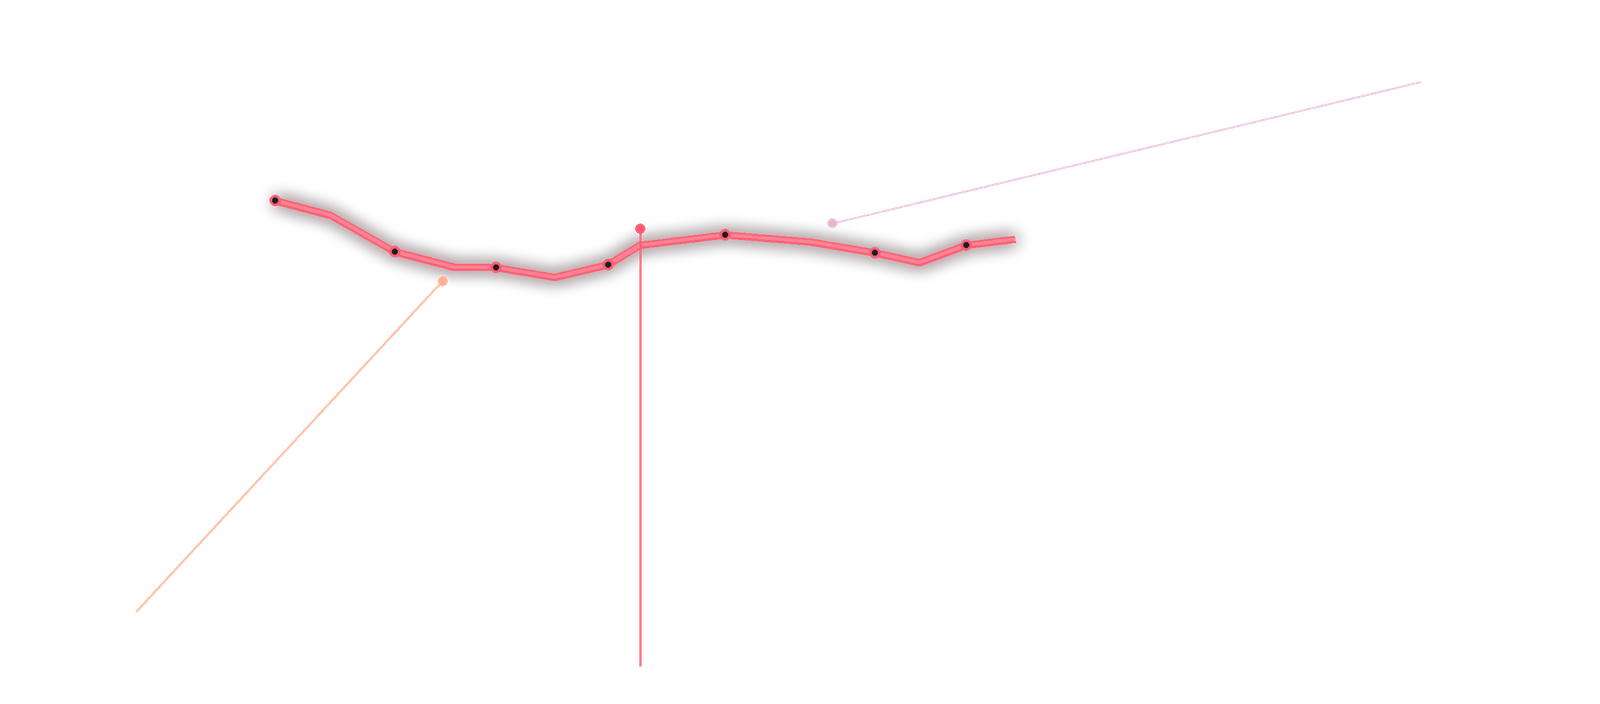
This patient was a Class IV
Pink ceramic and the patient's own gingival tissue meet in a line that sits at or below the lip line. Every smile exposes it. The fix is not cosmetic. It is a change of class.
Planning the correction on screen
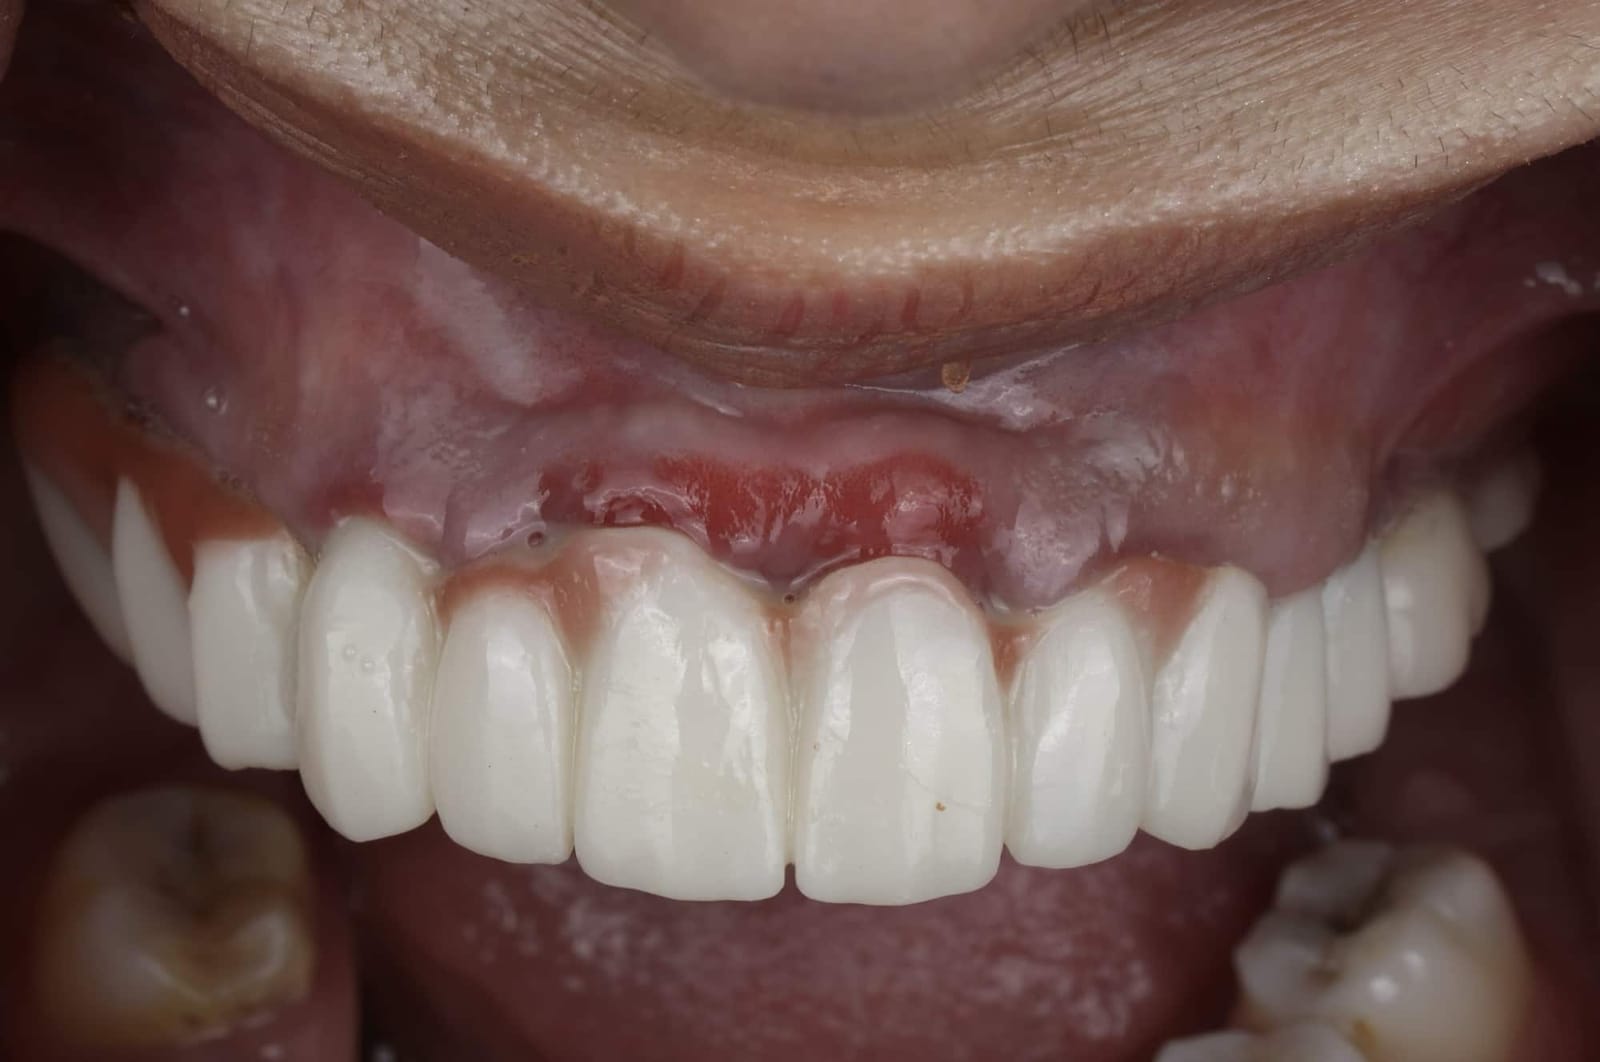 Retracted view
What the retracted view shows
With the lip held away, the join between pink ceramic and the patient's own gingival tissue is exposed. The tissue at the junction is inflamed.
Before a single instrument touched her, the problem was measured and the solution designed digitally.
The scan, the planned anatomy, and the difference between them
The original scan and the planned full anatomic design are overlaid, so the new tooth position, length and plane can be checked against the existing restoration. Slide the layers and the problem is obvious.
The aim was precise. Move the transition line apically so that it sits 2 to 3 mm above her highest smile line, converting a Class IV case into a Class III case. That requires removing bone, and it requires doing so with a guide rather than by eye.
Hiding the seam: a precision guide
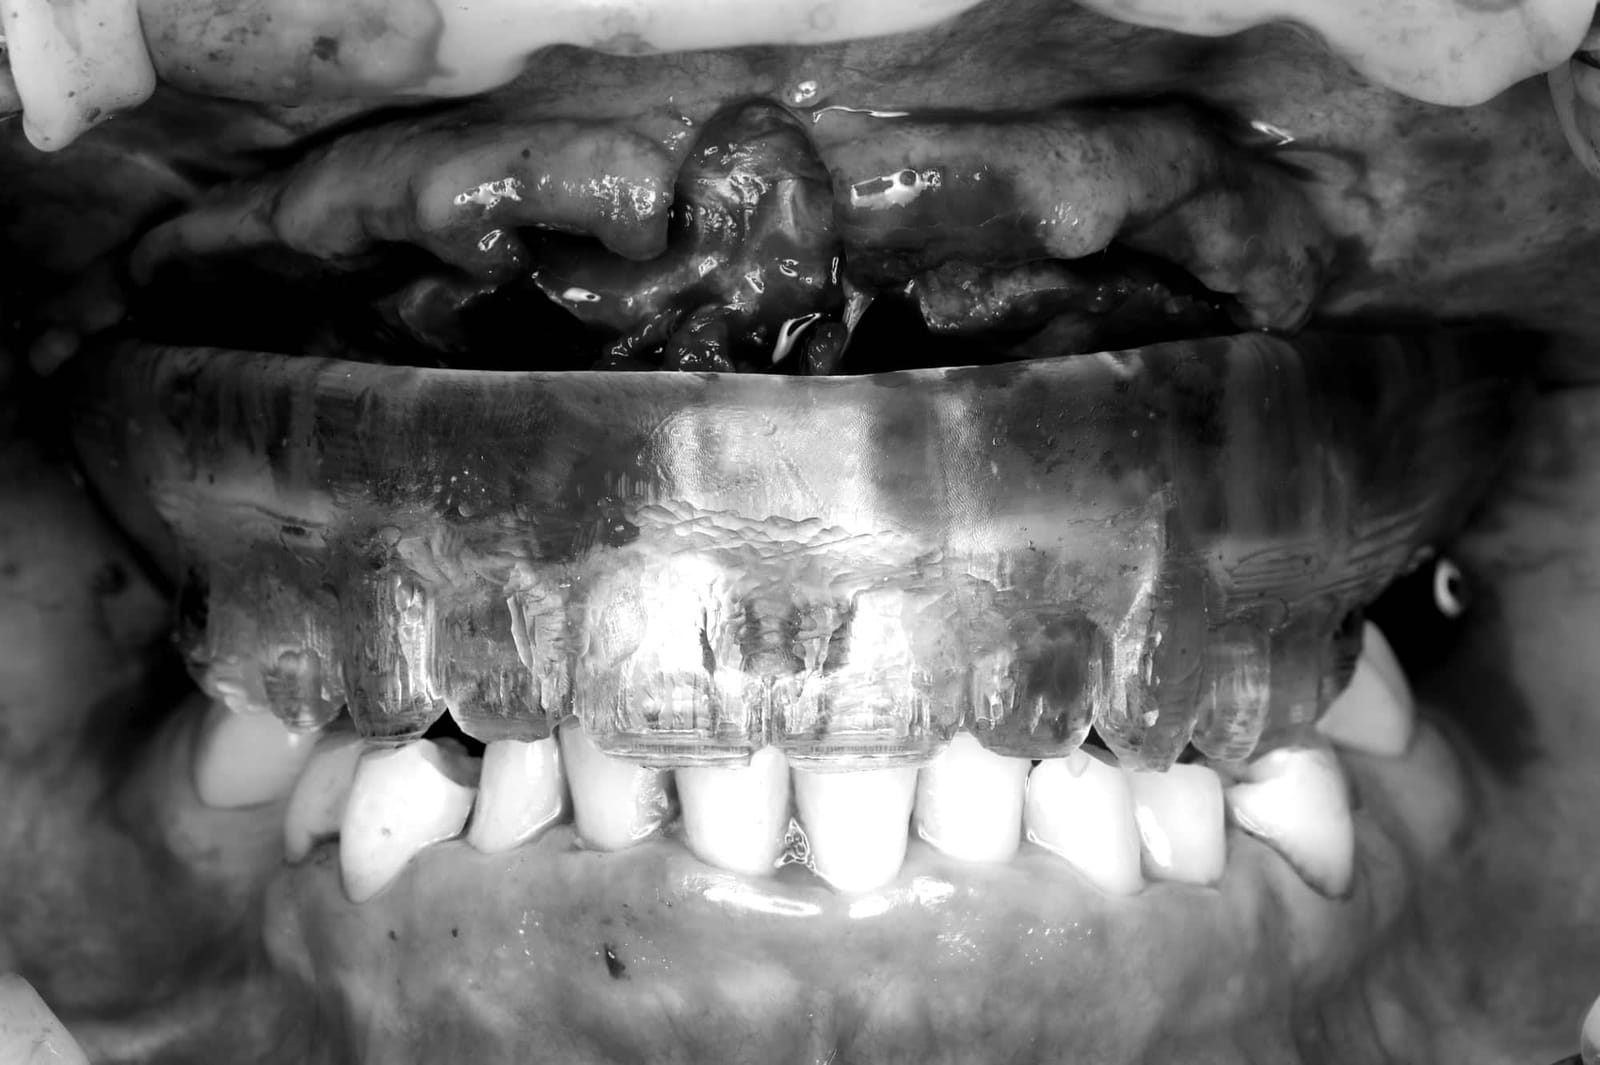 Planned seam: 3 mm above highest smile lineSurgical guideSurgical guide
A guide made for one purpose
The guide is stabilized on temporary implants. It tells the surgeon exactly how much bone to remove, so the seam lands where the plan says it must.
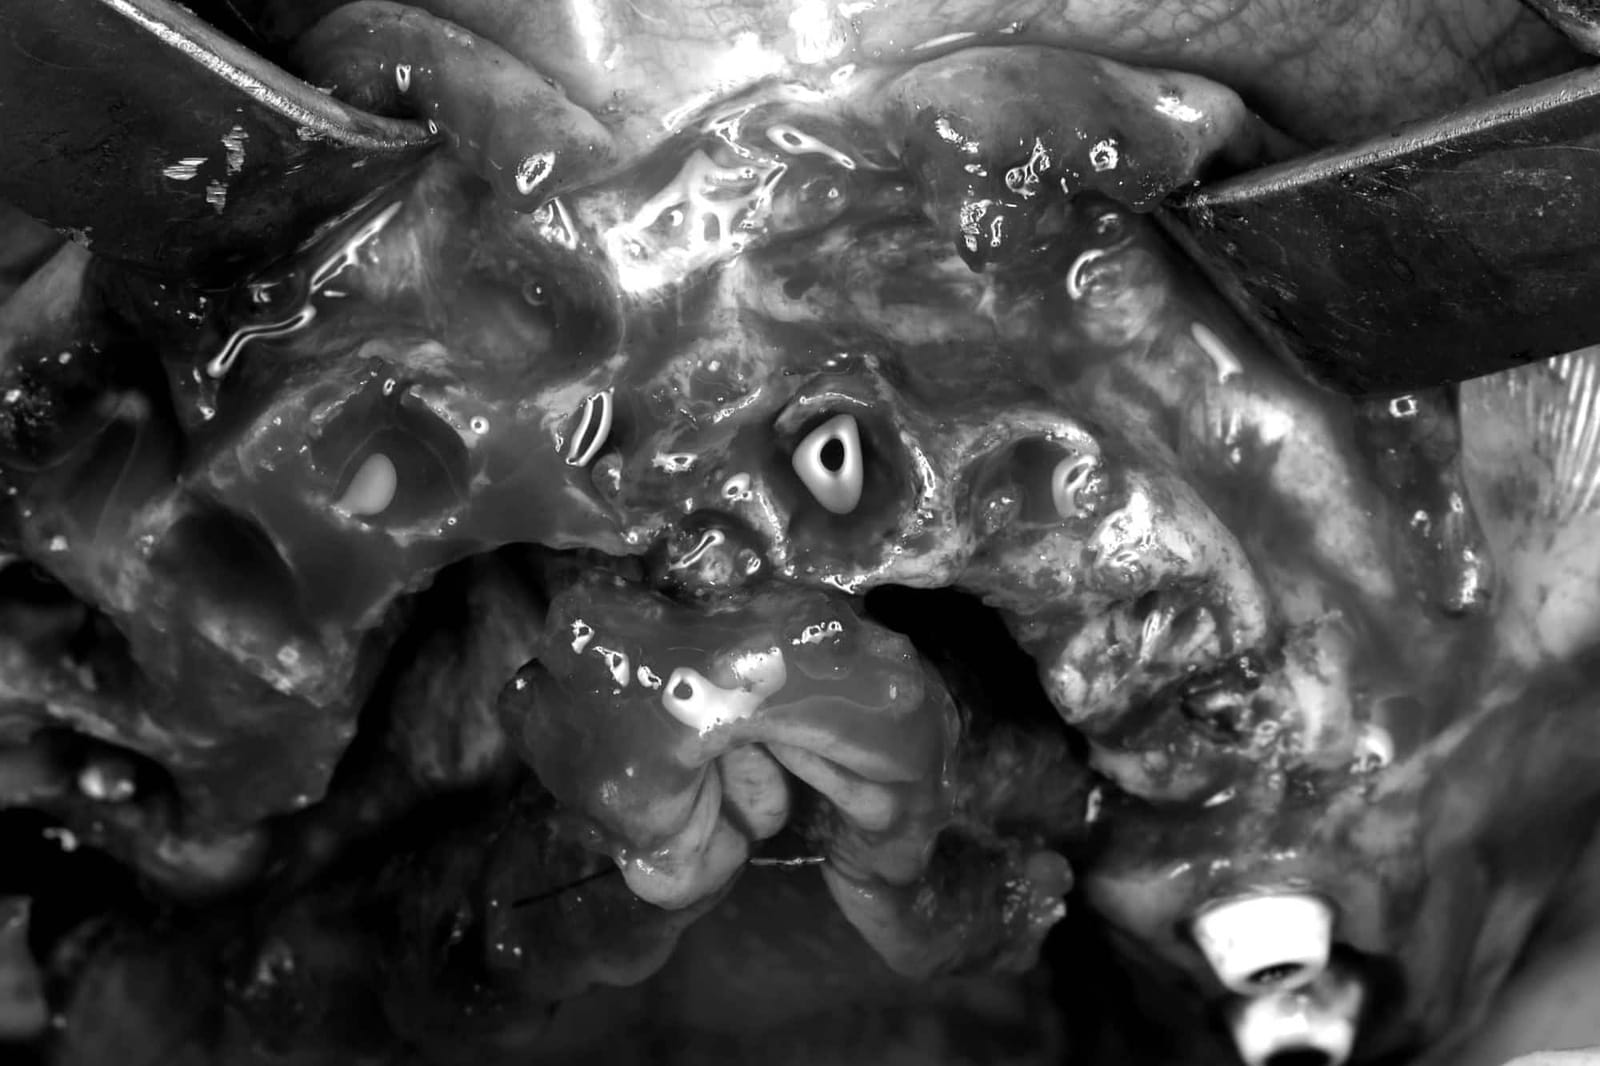 Ostectomy complete
A clean, flat foundation
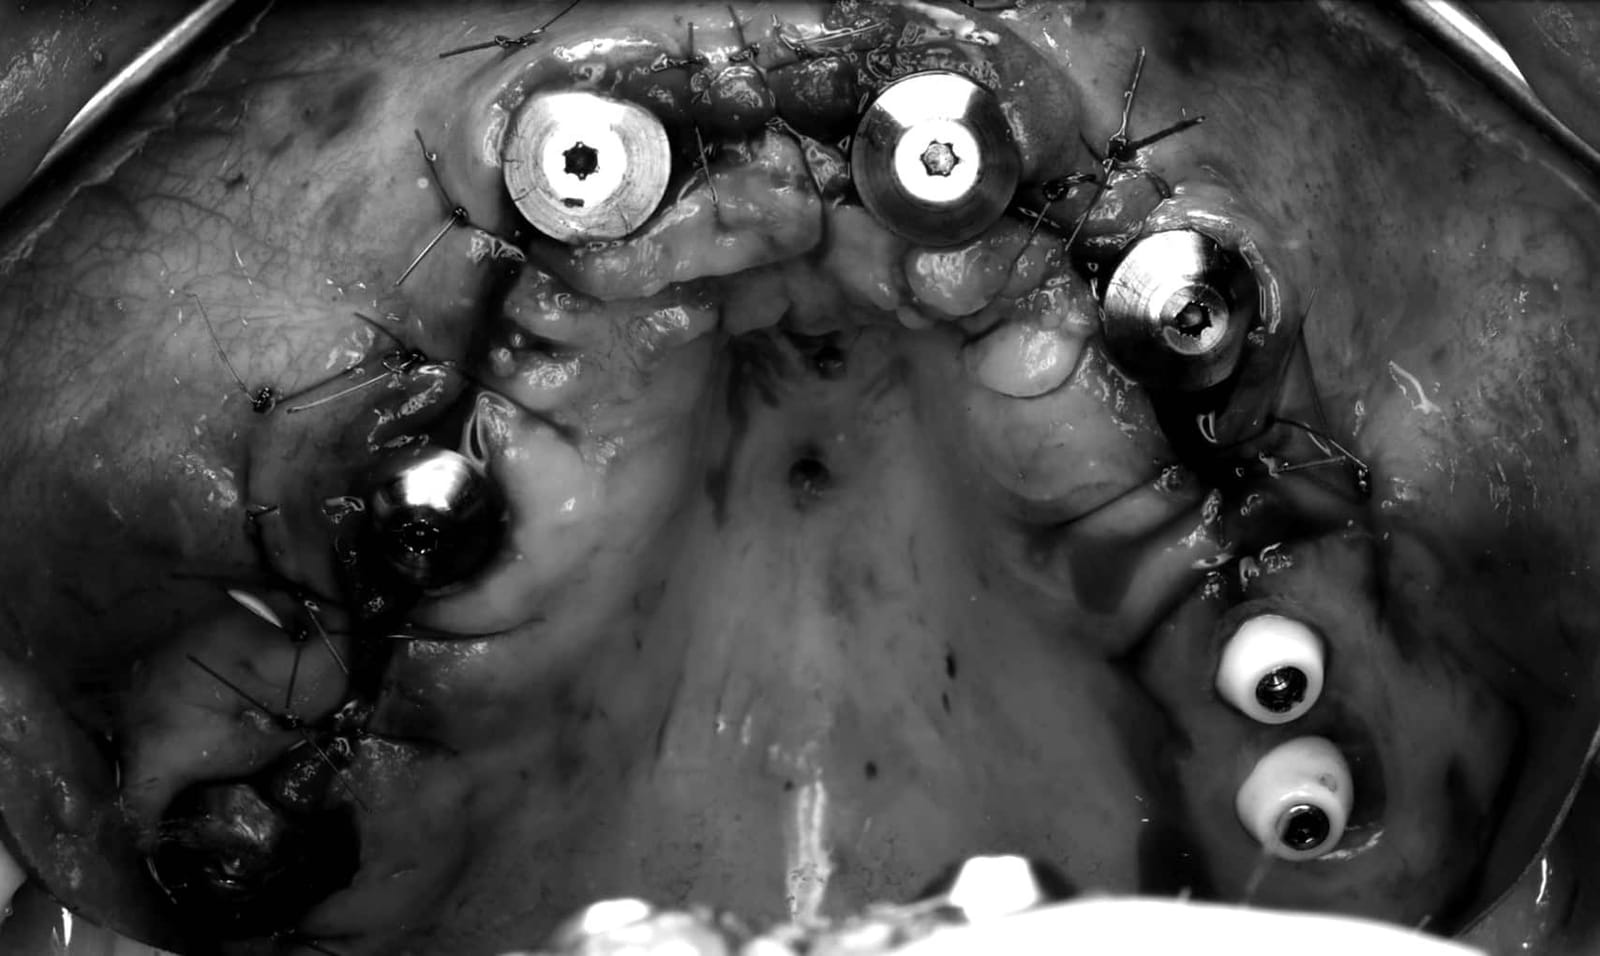
The bone has been reduced apically to a flat plane. Every infrabony defect and all infection have been removed, together with the failed implants. The new implants will sit deeper, so the join stays hidden under the lip.
- 01Ostectomy performedAlveolus reduced apically to a flat plane.
- 02Infrabony defects removedEvery defective infrabony defect eliminated.
- 03Infection eliminatedAll infected tissue removed.
- 04Infected implants removedFailed implants out and the sites cleaned.
Surgical images are shown in black and white. The clinical story is in the shape of the bone, not the blood.
Built to last
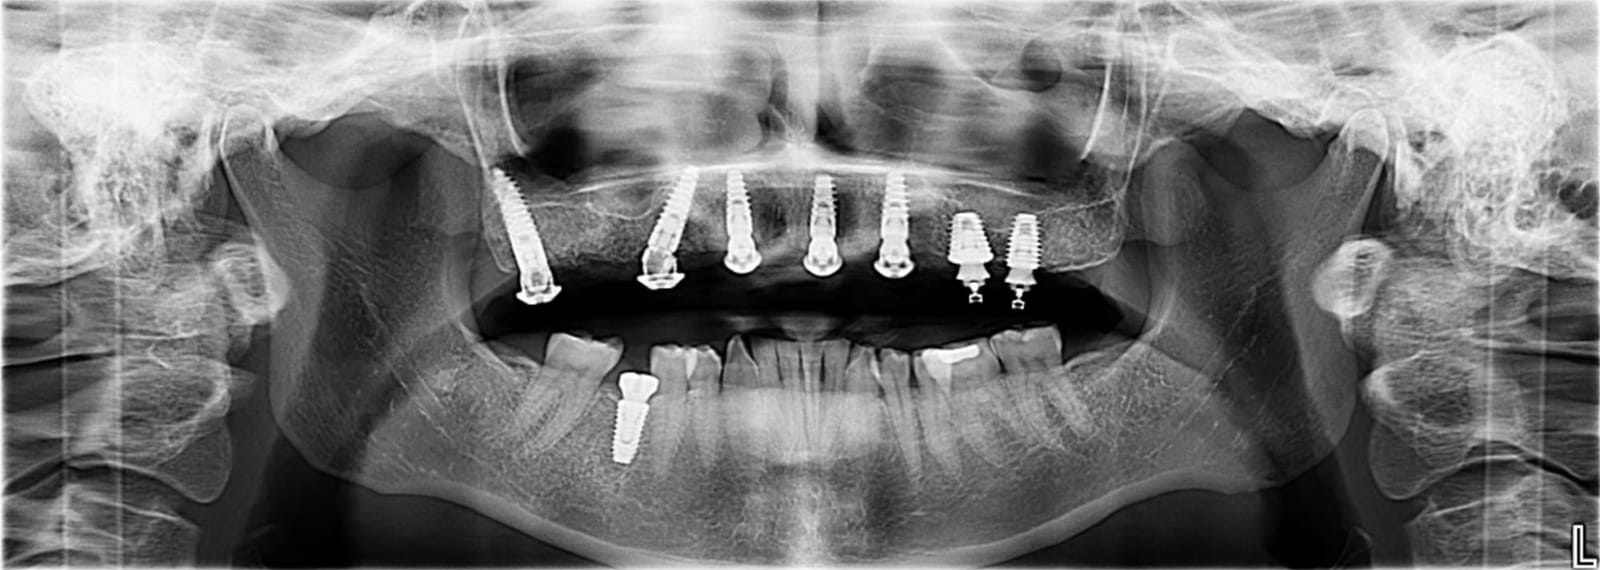 Foundation in place

On the radiograph
 Foundation in place
In the mouth
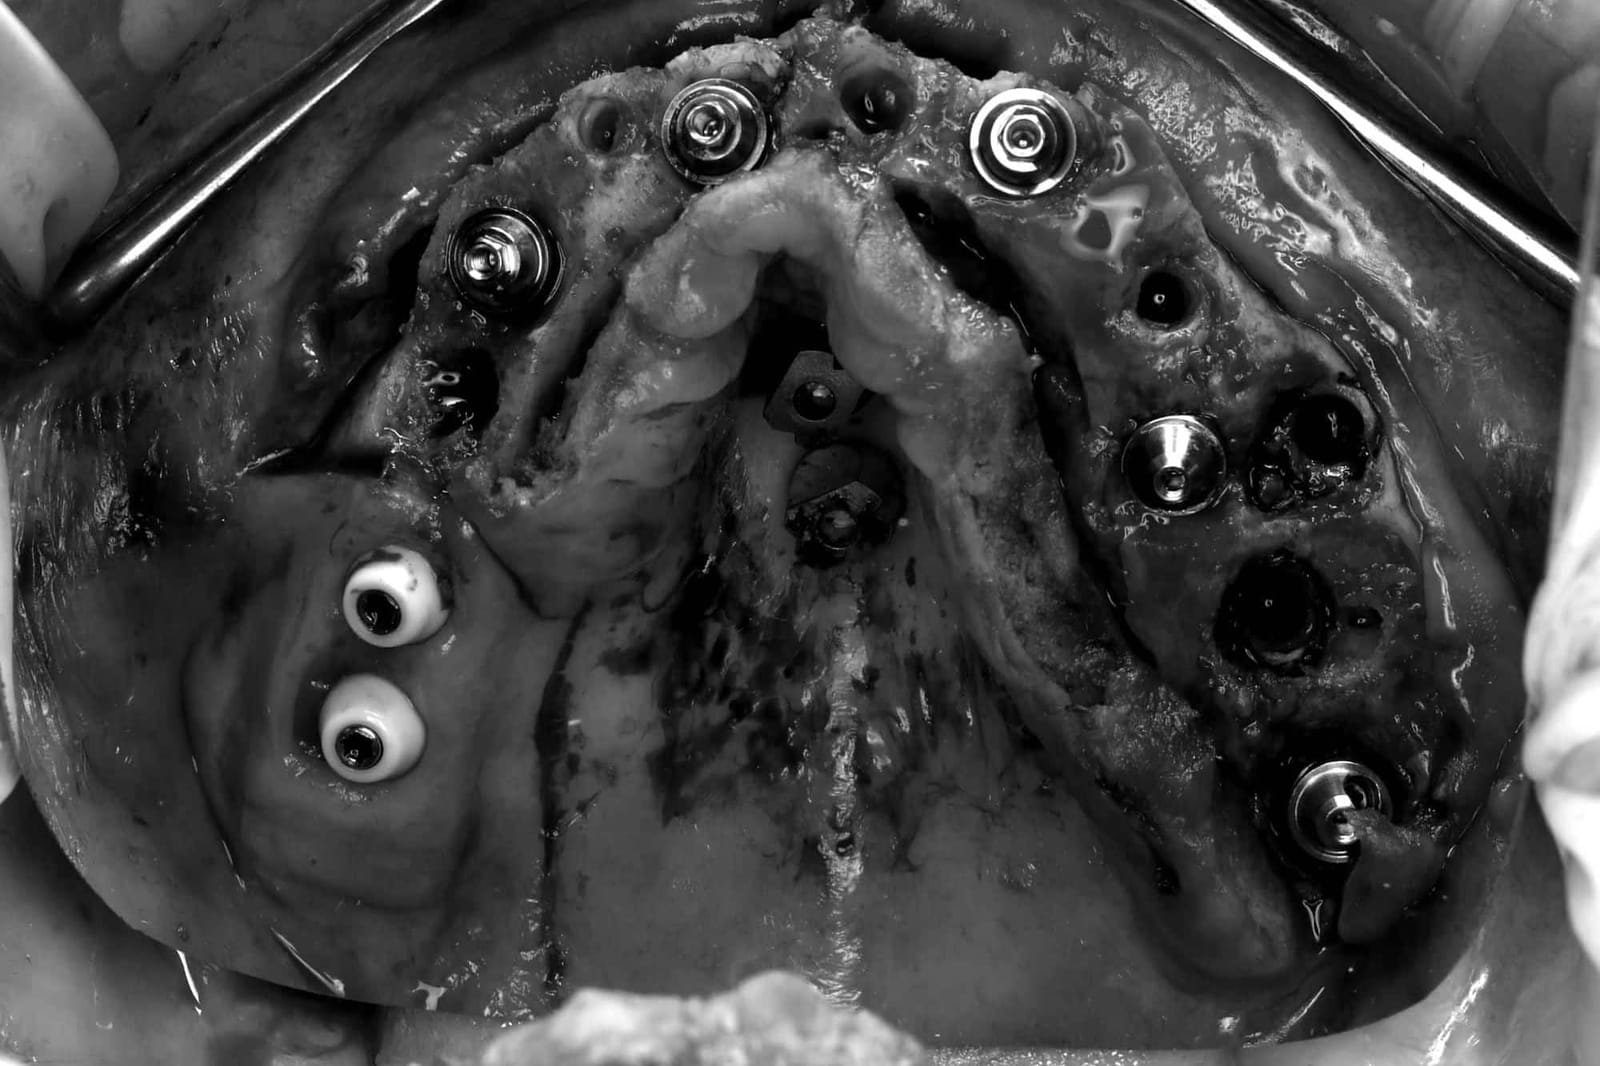 Implants placed
 across the whole arch
From the front of the jaw to the back, on both sides.
- Wide AP spread
- Implants spread from the anterior to the posterior maxilla widen the support polygon and keep distal cantilevers short. AP spread is one of several factors that set cantilever length.Walter L, Greenstein G. J Am Dent Assoc 2020;151(10):790-795.
- High insertion torque
- Primary stability sufficient for immediate loading of a fixed prosthesis. Consensus criteria: 30 Ncm or more and an implant stability quotient of 60 or more.ITI Consensus Conference 2013. Loading protocols for fixed prostheses in edentulous jaws.
- Good bone volume
- The ostectomy left a broad plane of sound bone, so every implant is fully encased. Consensus implant length: 10 mm or more.ITI Consensus Conference 2013, as above.
Every scan body, captured
A prosthesis built for the whole arch is only as accurate as the record it is built from.
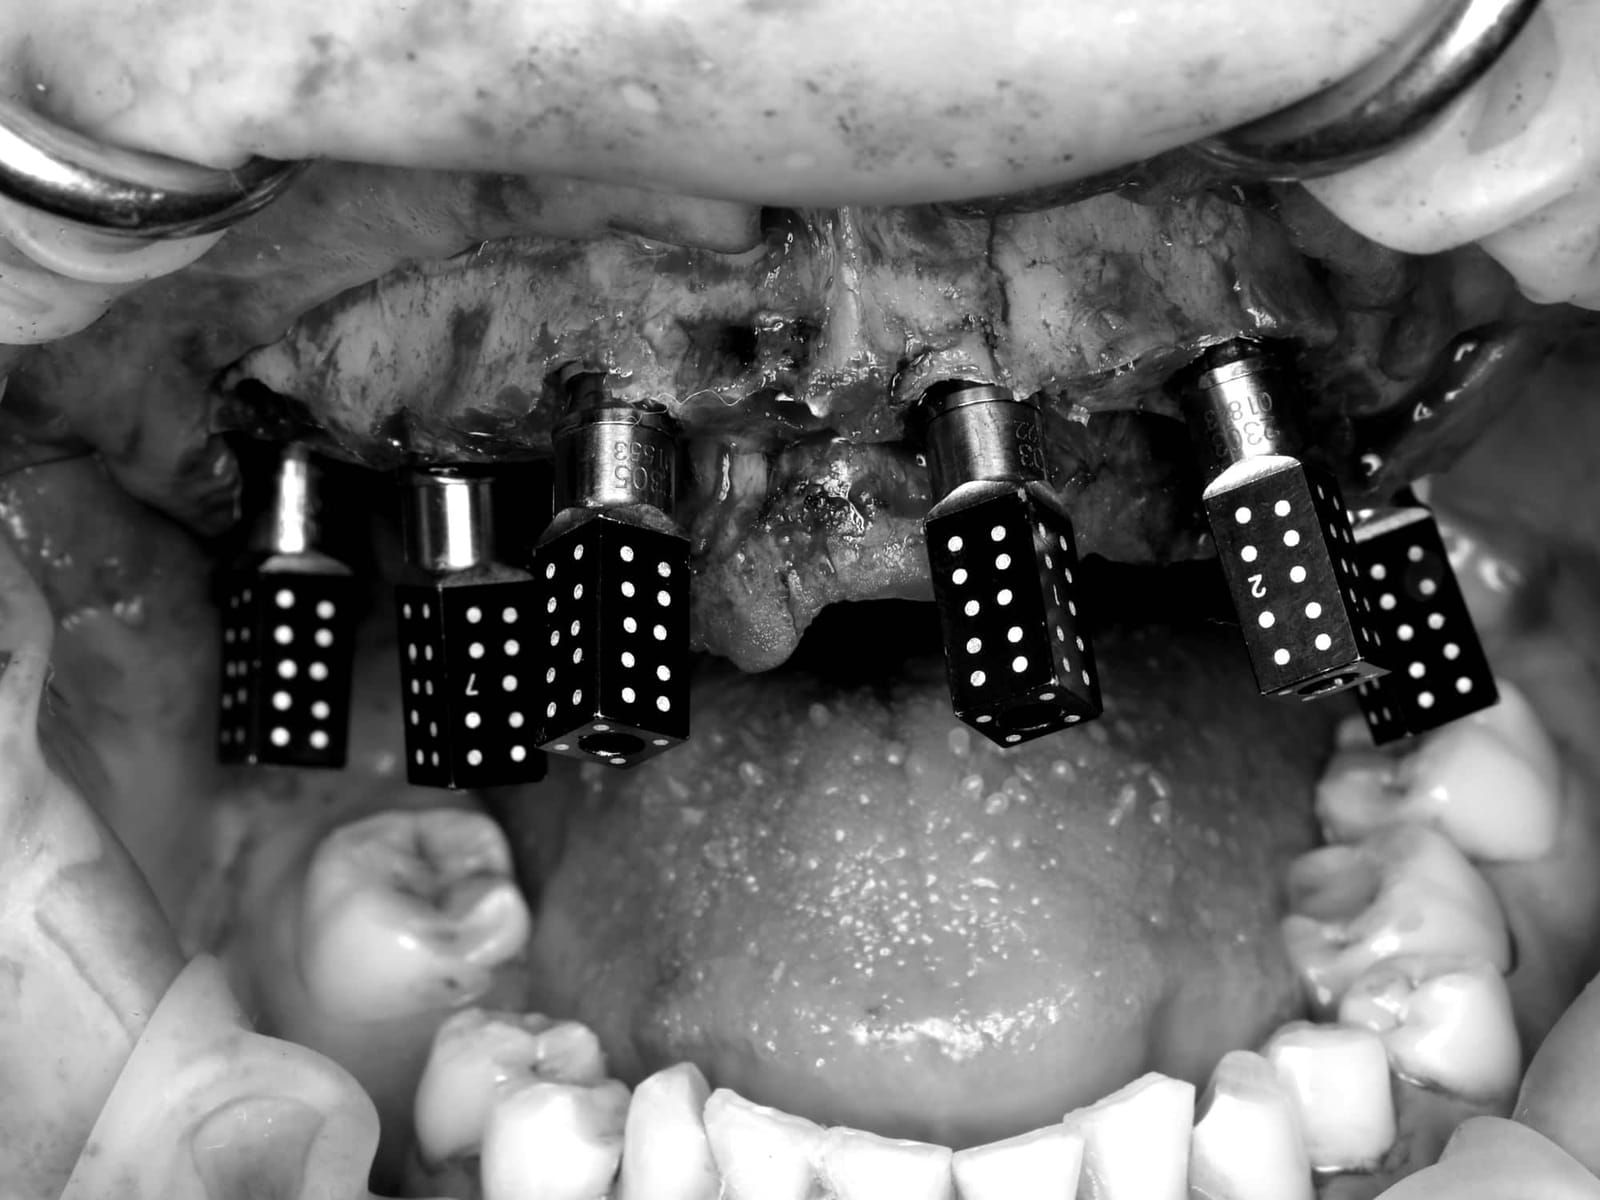 Scan bodies in place









Photogrammetry captures the position of every implant
Across a full arch, photogrammetry showed a trueness of about 20.5 µm, against 56 µm for an intraoral scanner alone (Prott et al., J Prosthet Dent 2025;134(3):782.e1-7). The clinical threshold cited in the literature is under 200 µm.
Trueness across a full arch: photogrammetry 20.5 µm, intraoral scan with a splinting device 30.9 µm, intraoral scan alone 56.0 µm. Shorter is more accurate.
Shorter is more accurate. Scale 0 to 80 µm. Prott et al., J Prosthet Dent 2025;134(3):782.e1-7. One study; results vary between systems and studies.
The scan after implant placement, protection caps in place
Merged with the pre-operative records, this digital model confirms the new implant positions against the plan before any tooth is made.
Checked before it is delivered
The final scan and design, before delivery of the definitive teeth
Screw channels, tooth form and relationship to the opposing arch are reviewed from every angle. Nothing is left to chance at the final appointment.
Before and after, on the radiograph
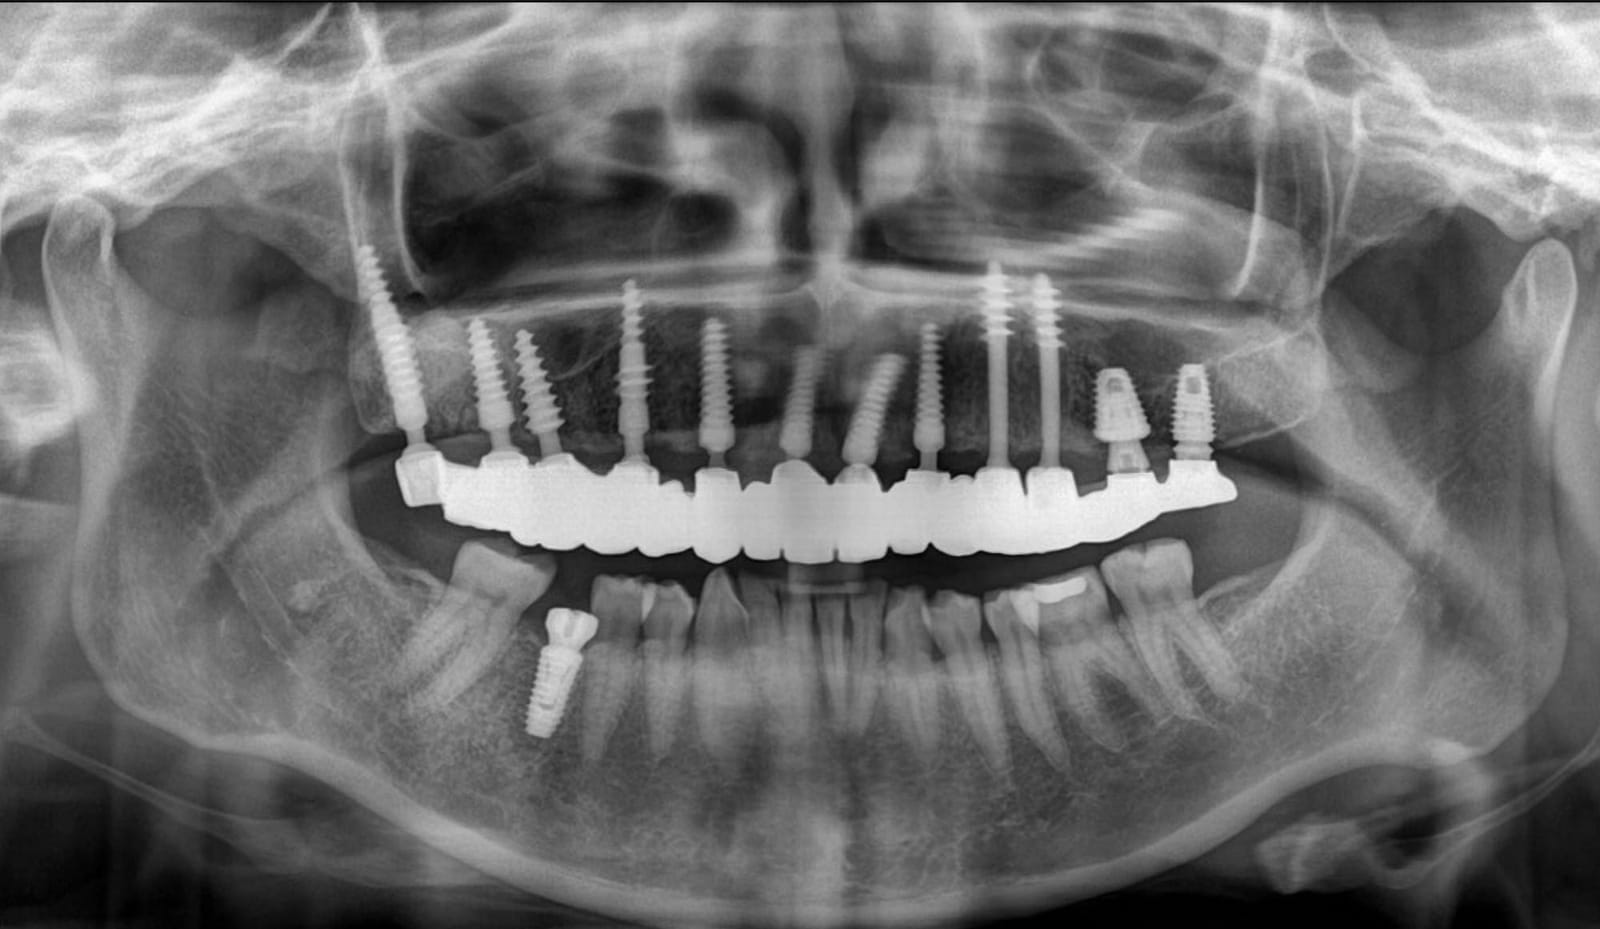
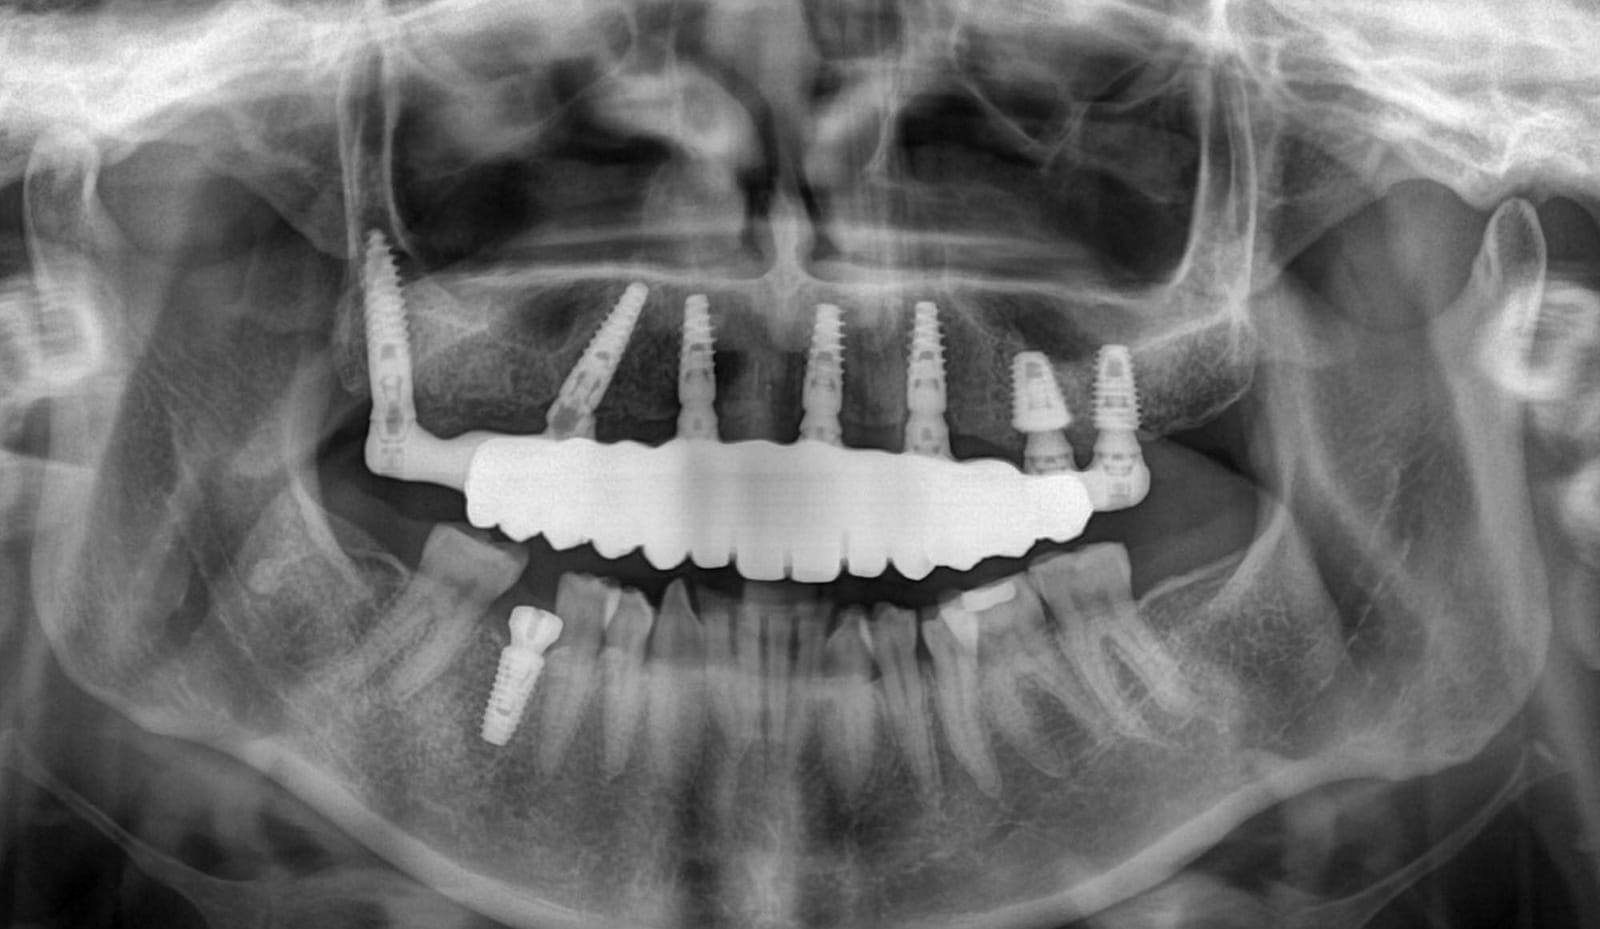
The difference is not only the teeth. The implants are redistributed across the arch and the framework is shaped to be cleanable and to carry load, which is what keeps a restoration working for decades.
Temporaries
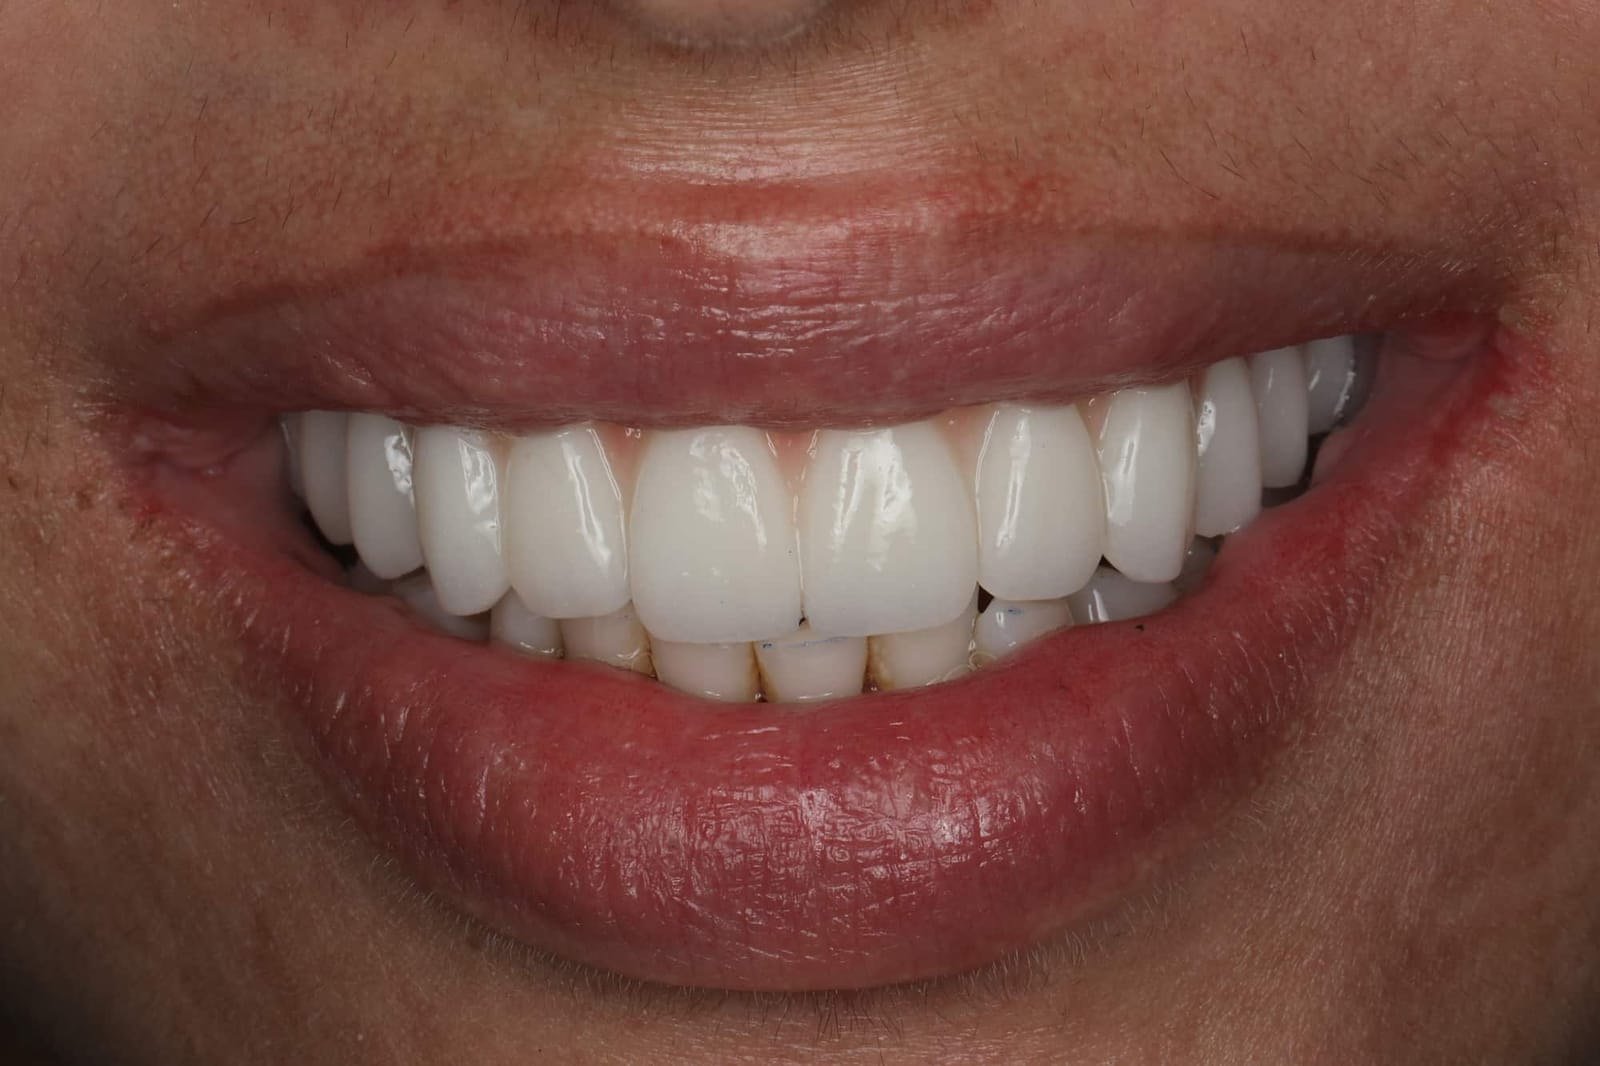
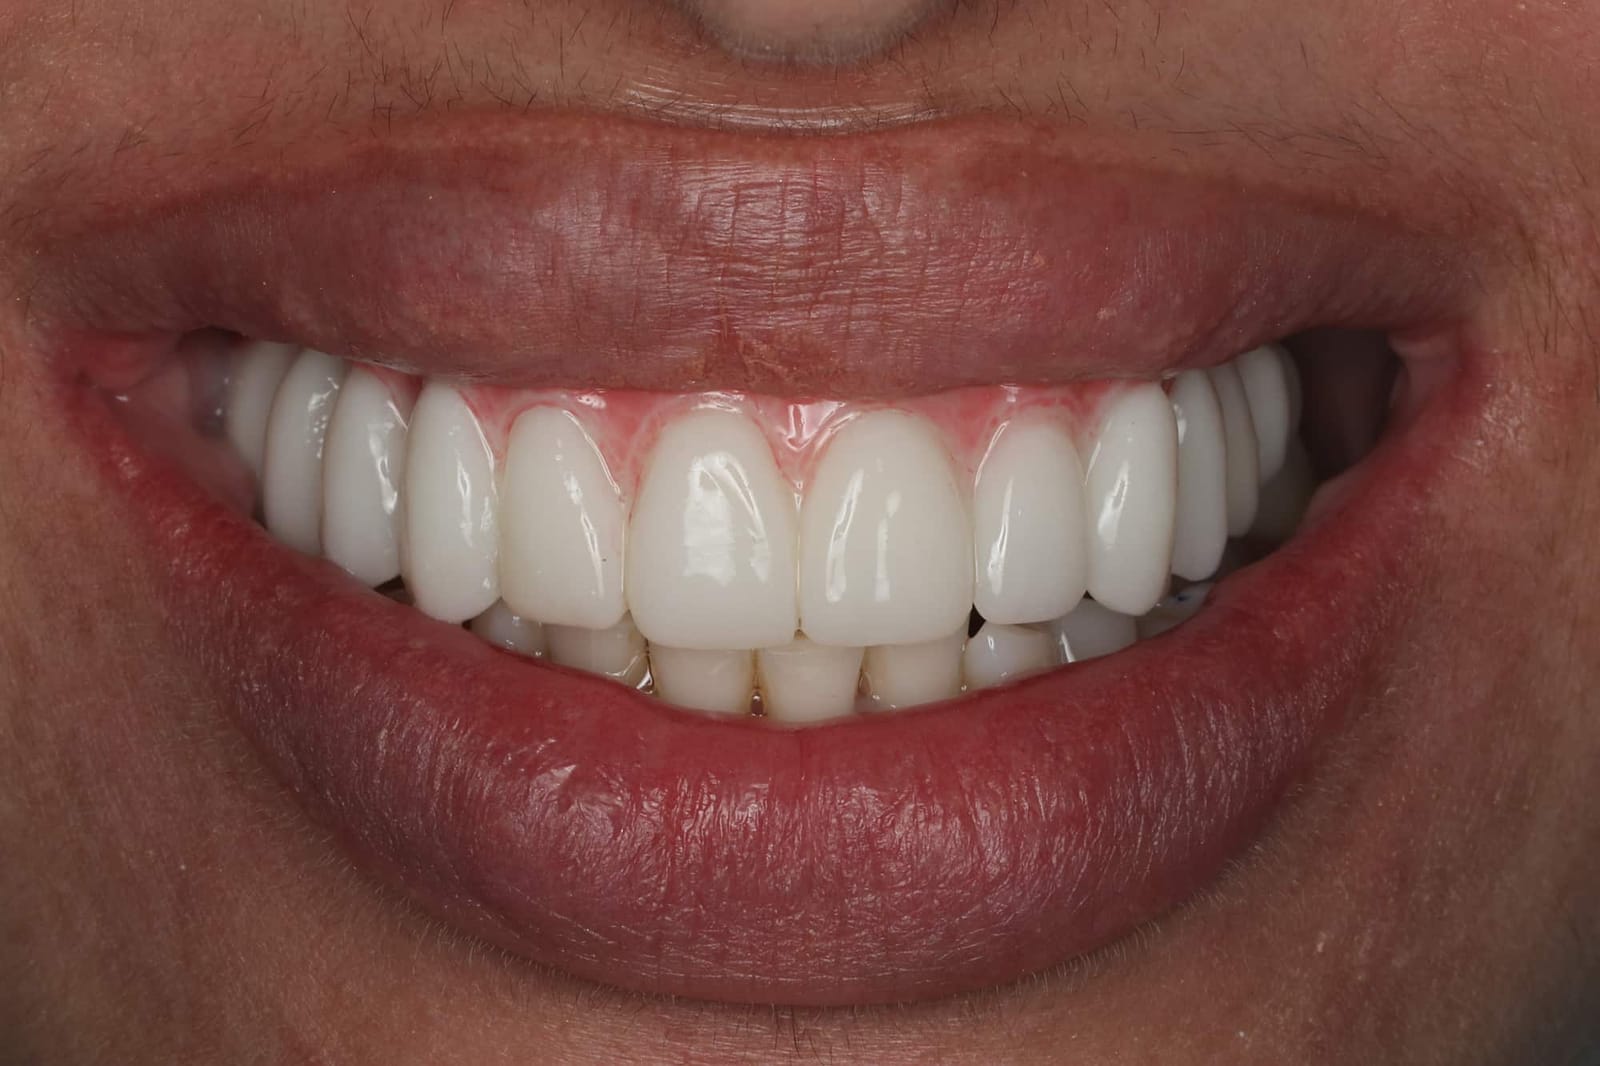
The finished teeth
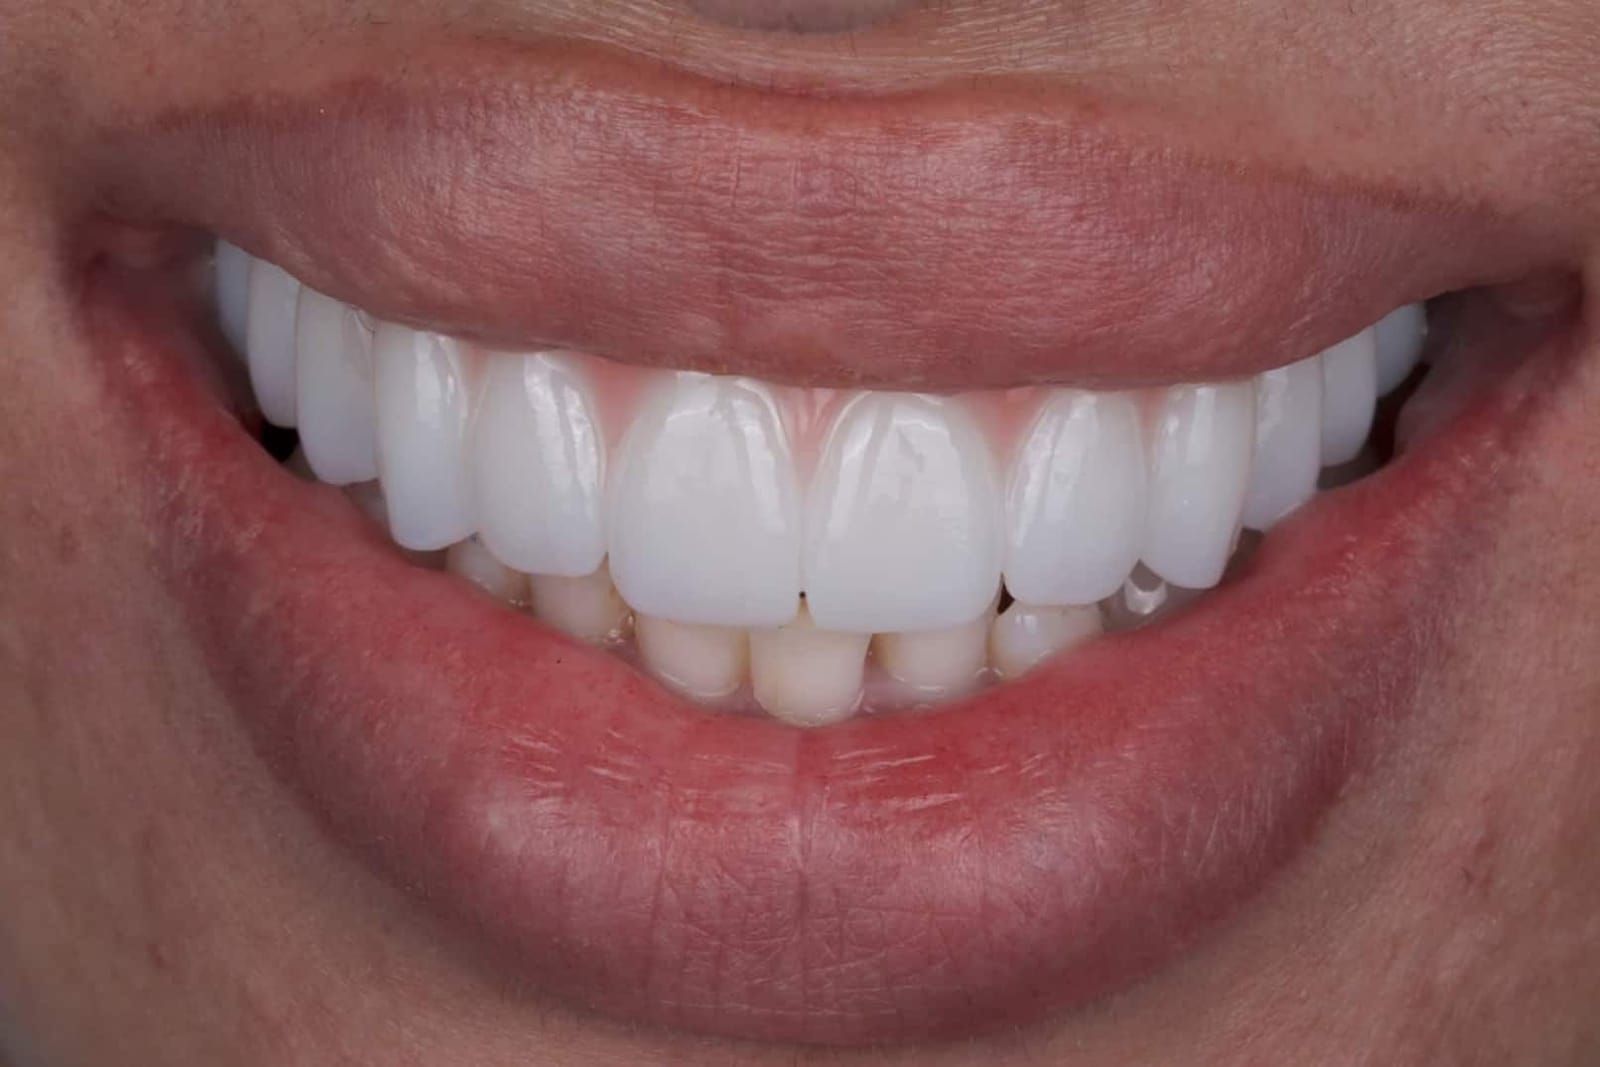
Made for this patient's lip, this patient's bite, and a smile she no longer has to hide.
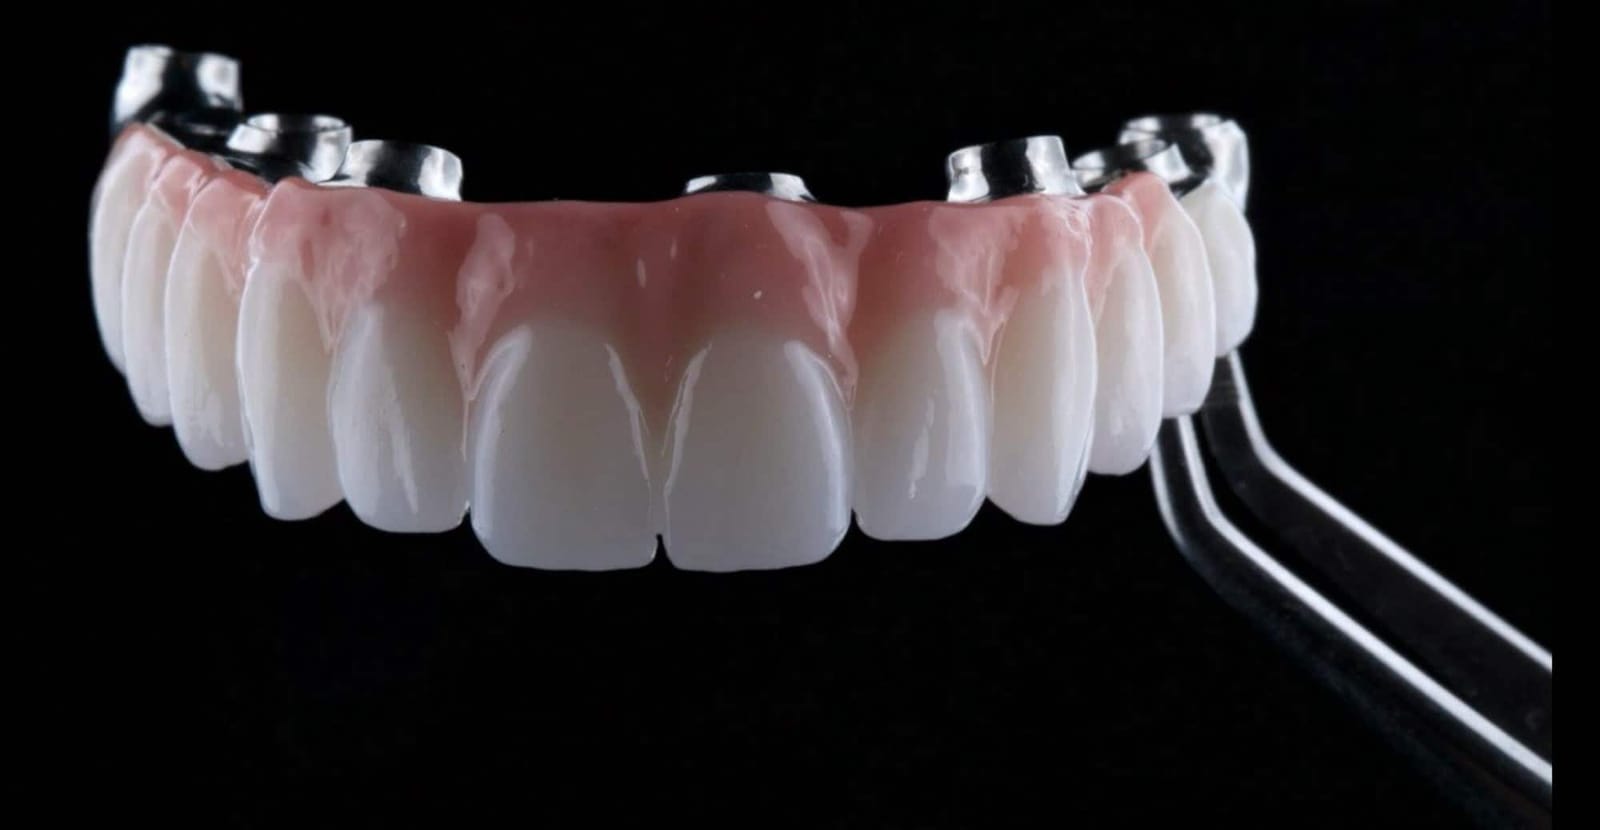
The prosthesis
Ceramic teeth and pink ceramic, shaped so the join sits where the lip will cover it.
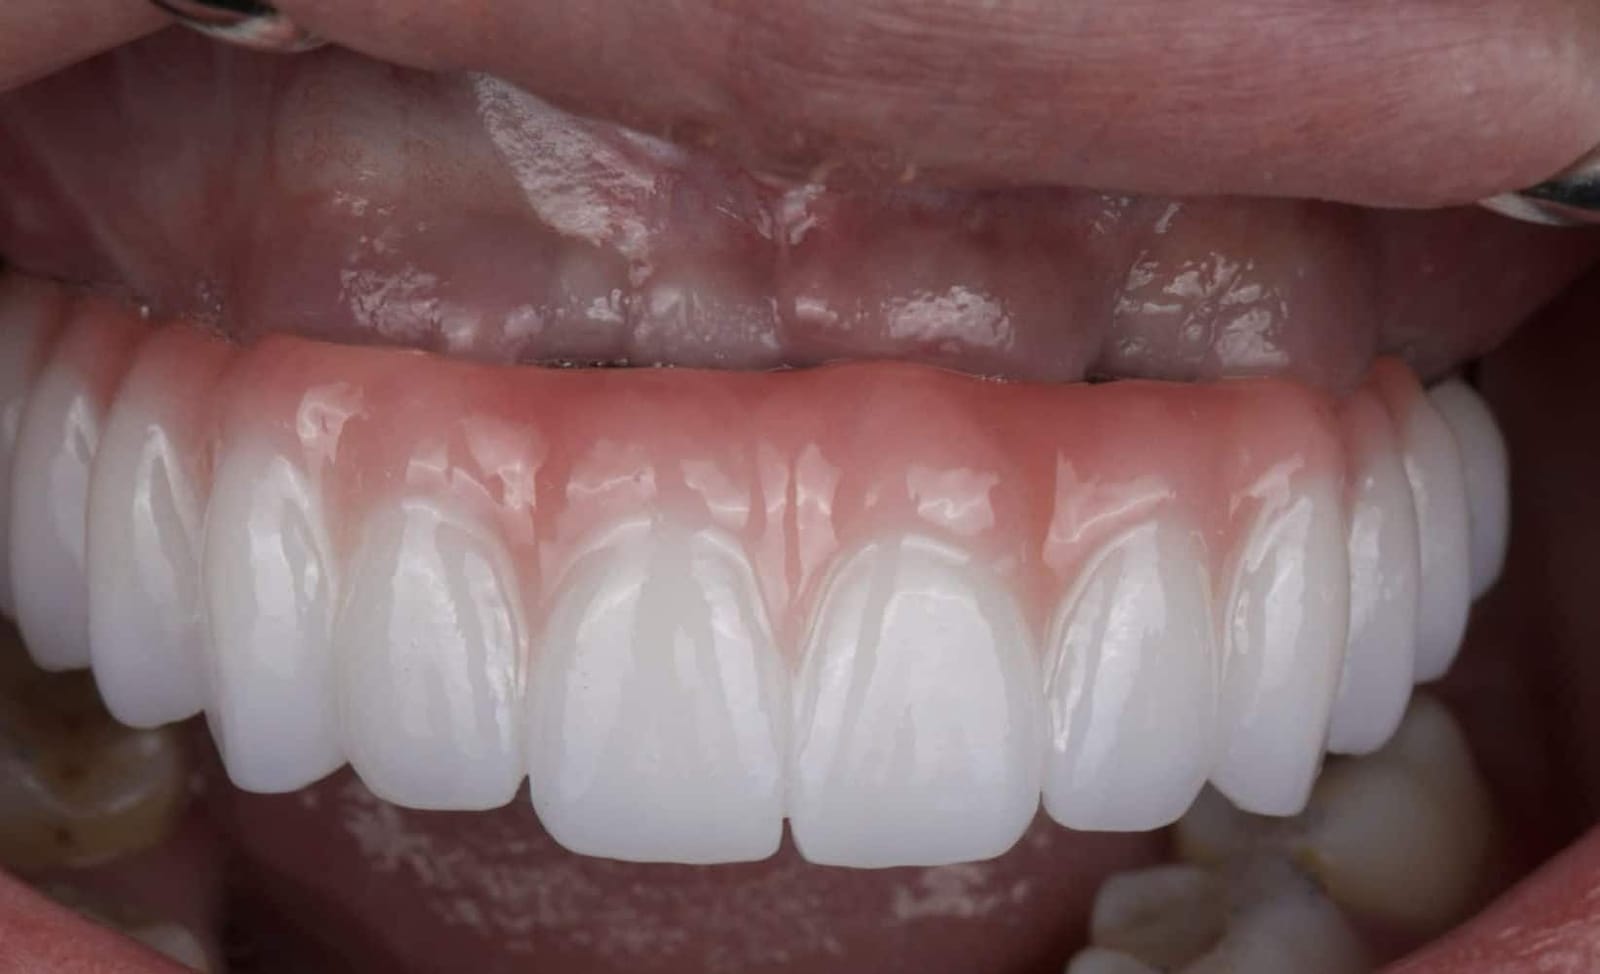
In the mouth, lip held away
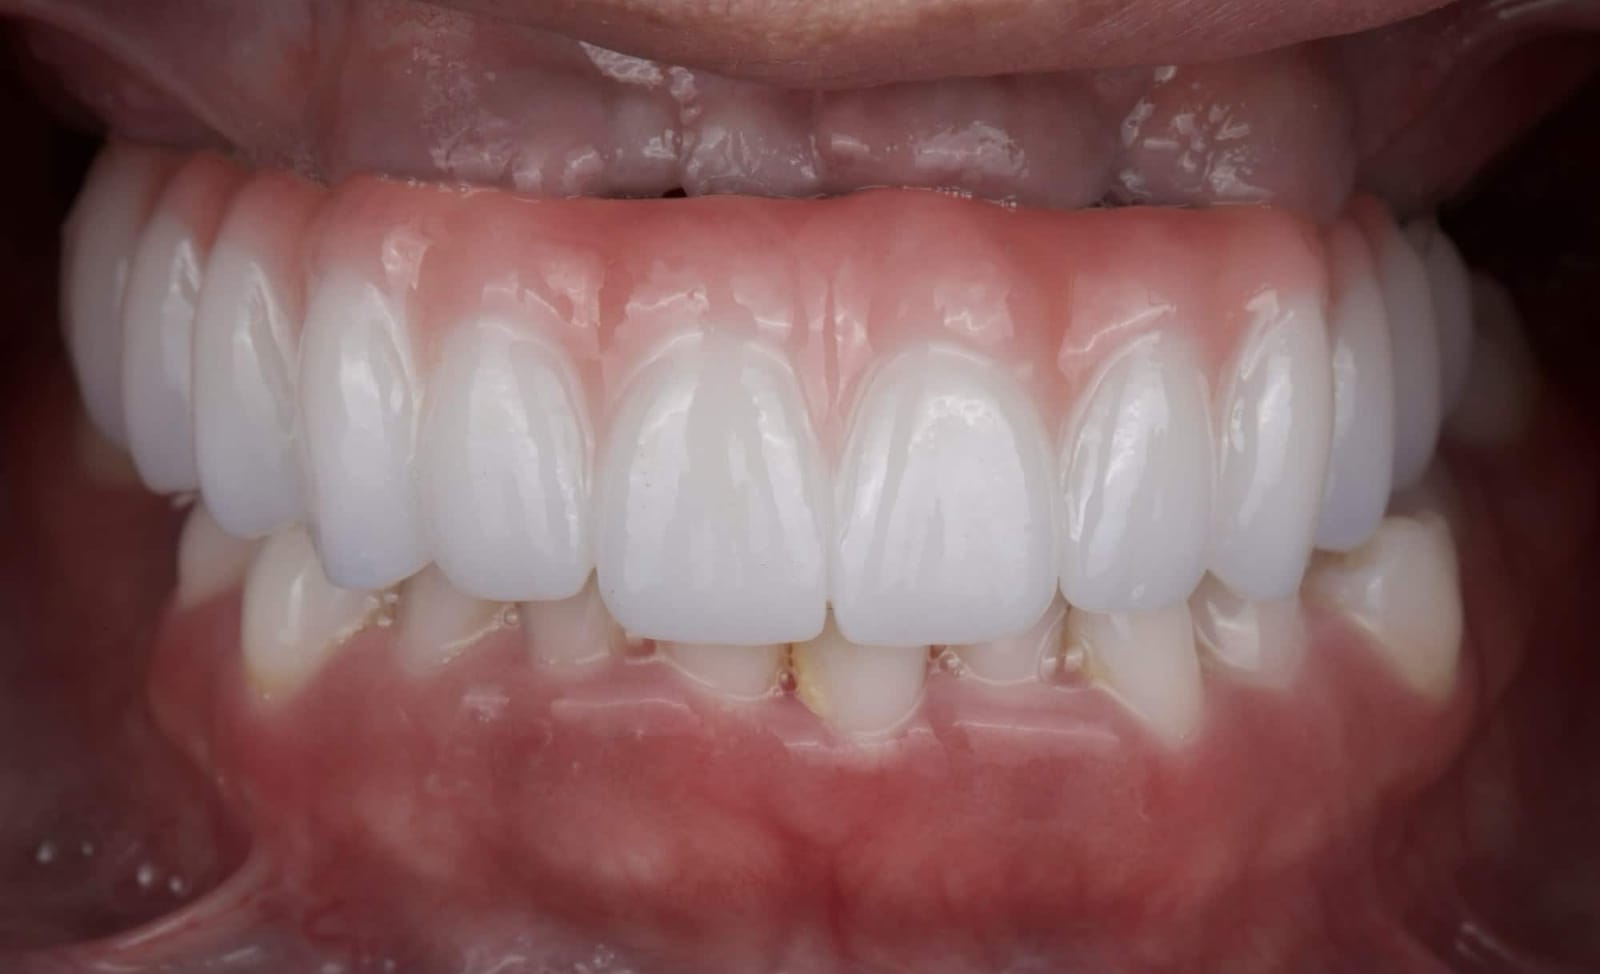
Teeth together
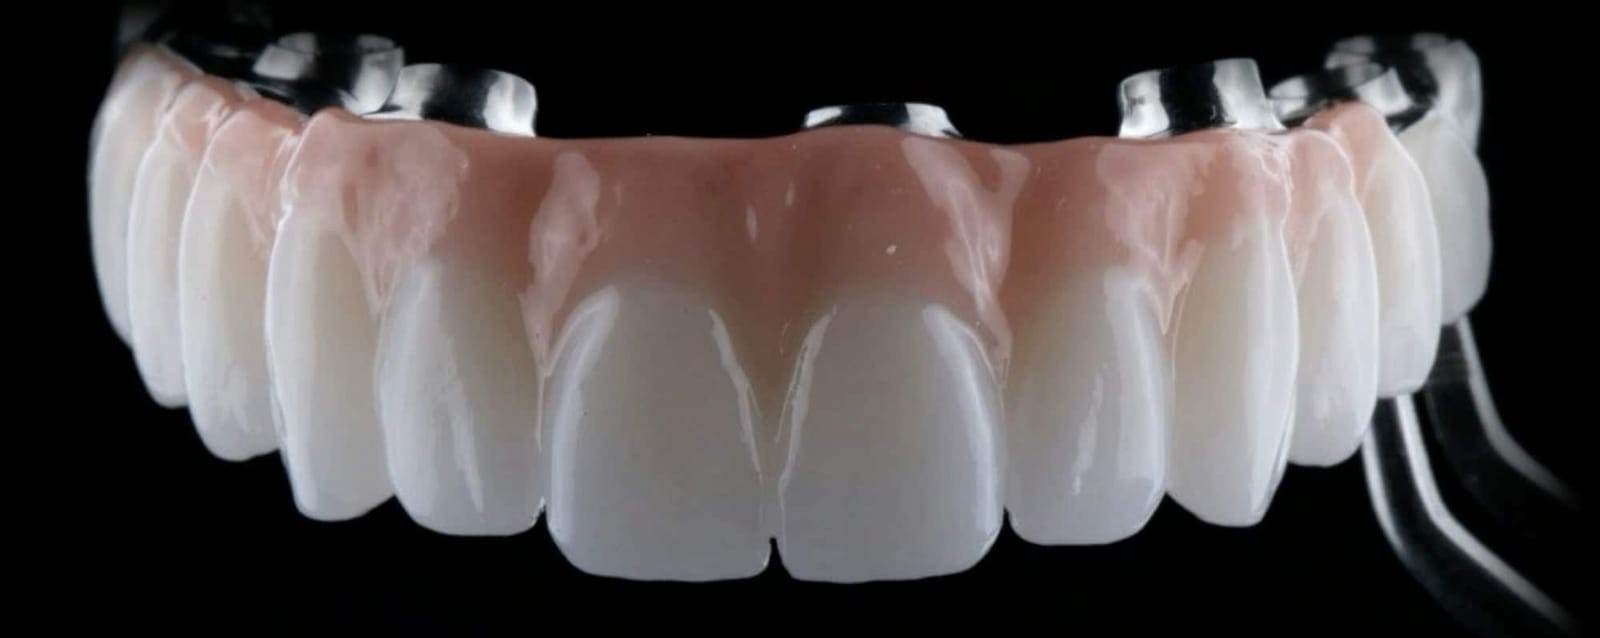
Detail
The transition from pink to tooth is smooth and cleanable, with no ledge for plaque.
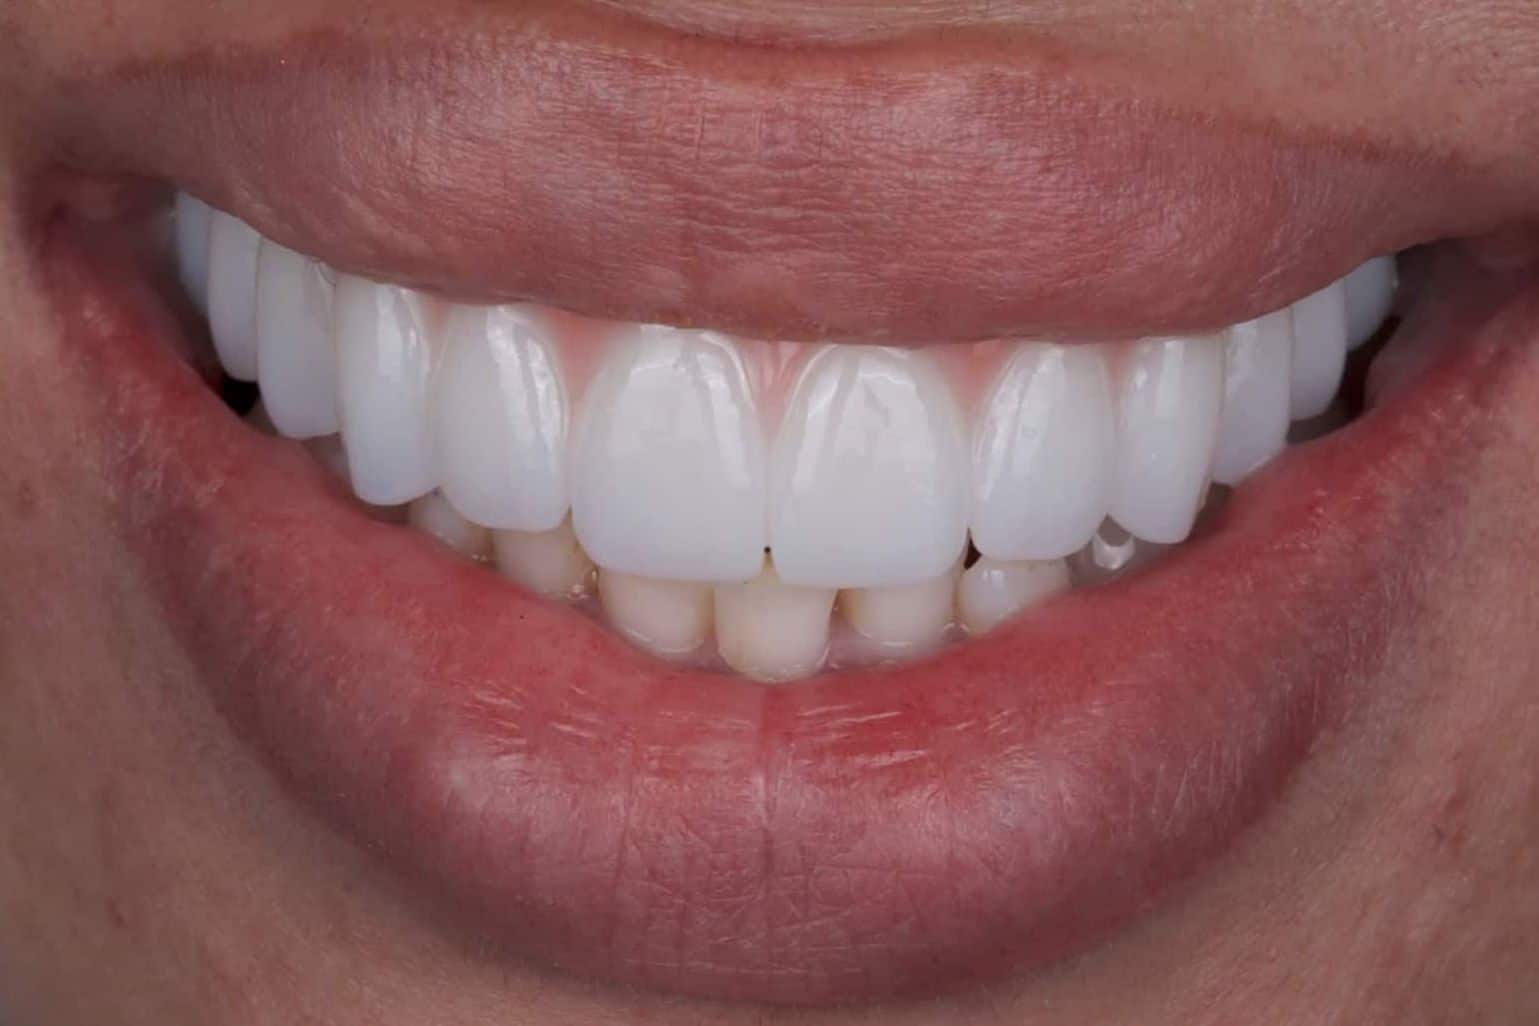
Now she smiles. Because the plan started with the lip.
From Class IV to Class III
The incisal edges are lined up and the teeth matched in size, so the only thing that changes is the one thing that mattered: where the seam sits.
Same patient. Same lip. A different plan.
The transition line now sits above her highest smile line. The pink is hidden, the teeth move with her lip, and the case has moved from a Class IV to a Class III.
- 01
Measure the lip: the highest lip line at maximum smile, on video.
- 02
Classify: Class I to V tells you before surgery whether the plan can succeed.
- 03
Convert if needed: a Class IV is converted to a Class III with a guided ostectomy.
- 04
Place and capture: well-distributed implants, recorded with photogrammetry.
- 05
Verify, then deliver: digital check of the final design before the definitive teeth.
If you are living with a restoration you are afraid to show
Here is what a first visit with Dr. Reshad involves. No surgery and no commitment, just a proper look.
- 1 · We look at all of it
- A full examination, a 3D scan, photographs, and a video of your lip in motion. We assess exactly what you have and what can be kept.
- 2 · We find the lip line
- We record where your lip travels at its highest. Everything about the design follows from that single measurement.
- 3 · You get a straight answer
- A plan you can understand, the reasoning behind it, and an honest account of the options.
Patient photographs and videos are cropped to protect identity and shared with patient permission for educational purposes. Surgical images are shown in black and white. Every case is planned around one person's anatomy and history; individual results vary. This page is educational and does not replace an in-person evaluation.
Before and after
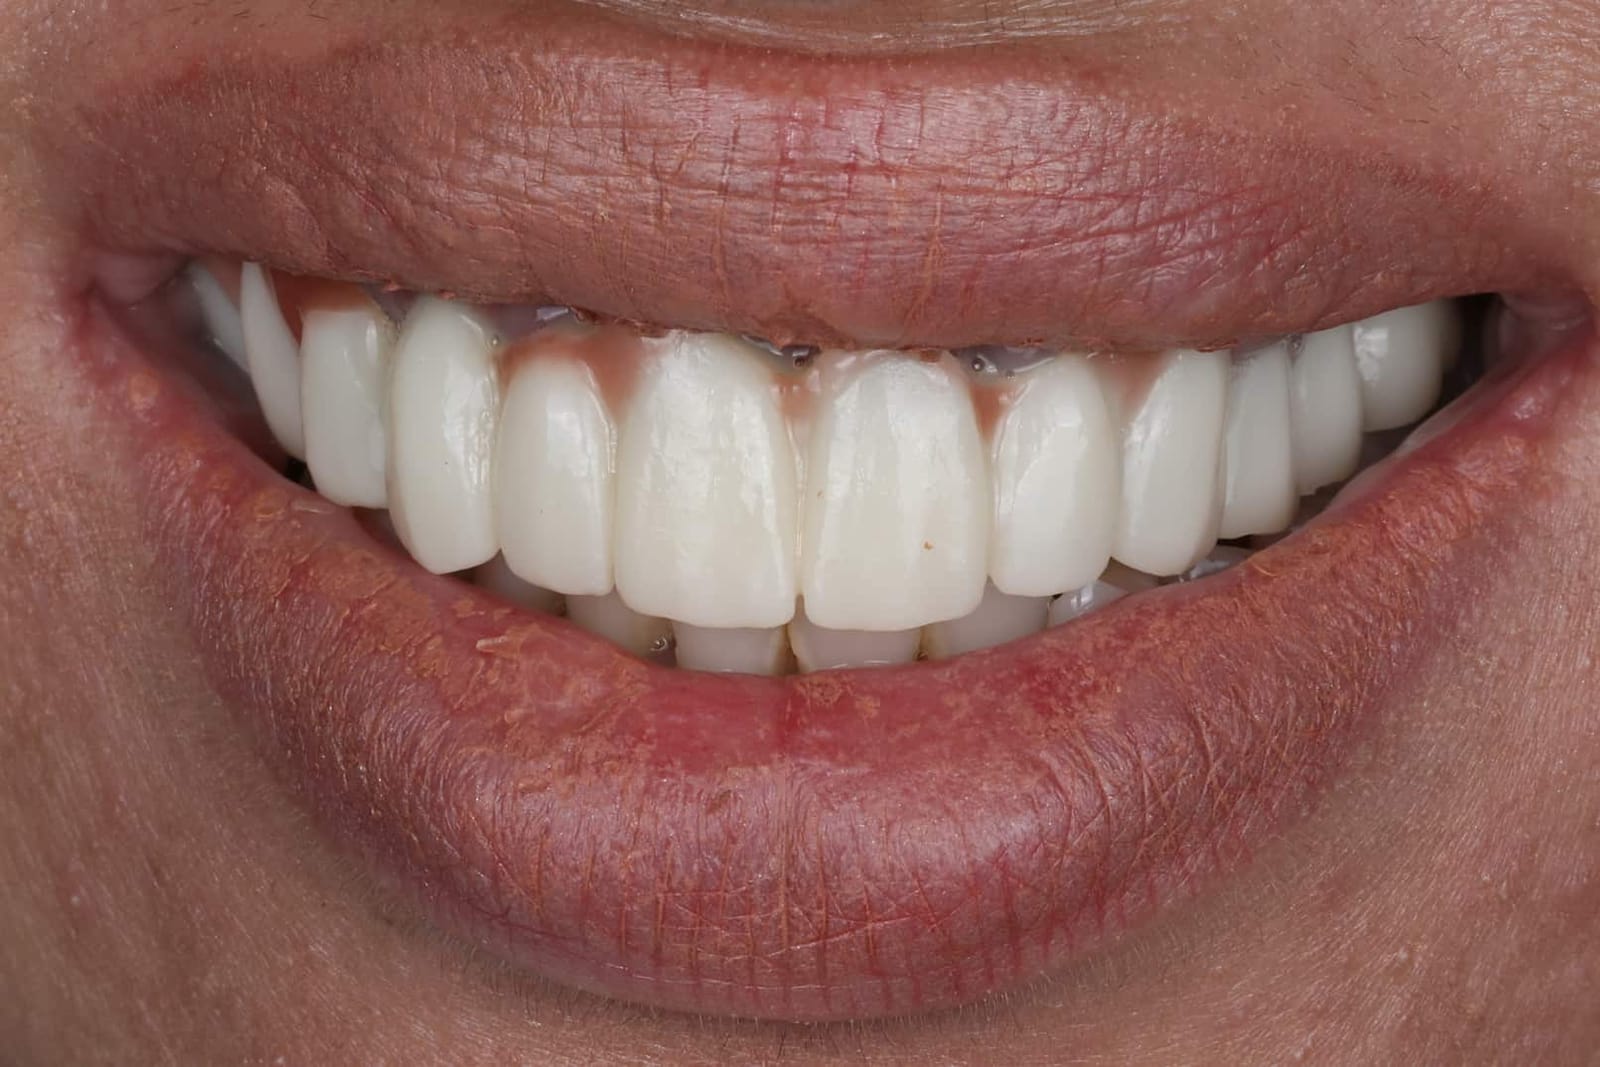
Every case is planned around one person's anatomy. Individual results vary, and what was right for this patient may not be right for you.